Sony EVI-D70P Operating Instructions Manual
Color video camera
Hide thumbs
Also See for EVI-D70P:
- Technical manual (60 pages) ,
- Product manual (25 pages) ,
- Dimensions (4 pages)
Table of Contents
Advertisement
Color Video
Camera
Žæˆµ•à–¾•' ______________________________
•i"ú–{Œê‚Í"ú–{•'"à•»•i‚Ì•à–¾‚Å‚·•B •j
Operating Instructions ___________________
‚¨"ƒ‚¢•ã‚°‚¢‚½‚¾‚«‚ ‚肪‚Æ‚¤‚²‚´‚¢‚Ü‚·•B
"d‹C•»•i‚Í•AˆÀ'S‚Ì‚½‚ß‚Ì'•ˆÓŽ–•€‚ðŽç‚ç‚È‚¢‚Æ•A
‰Î•Ð‚â•l•gŽ–ŒÌ‚ɂȂ邱‚Æ‚ª‚ ‚è‚Ü‚·•B
‚±‚̎戵•à–¾•'‚É‚Í•AŽ–ŒÌ‚ð–h‚®‚½‚ß‚Ì•d—v‚È'•ˆÓŽ–•€‚Æ•»•i‚Ì
Žæ‚舵‚¢‚©‚½‚ðŽ¦‚µ‚Ä‚ ‚è‚Ü‚·•B‚±‚̎戵•à–¾•'‚ð‚æ‚-‚¨"Ç‚Ý‚Ì
‚¤‚¦•A•»•i‚ðˆÀ'S‚É‚¨Žg‚¢‚-‚¾‚³‚¢•B‚¨"Ç‚Ý‚É‚È‚Á‚½‚ ‚Æ‚Í•A‚¢
‚Â‚Å‚àŒ©‚ç‚ê‚é‚Æ‚±‚ë‚É•K‚¸•ÛŠÇ‚µ‚Ä‚-‚¾‚³‚¢•B
EVI-D70
EVI-D70P
© 2003 Sony Corporation
•iƒˆ•[ƒ•ƒbƒpƒ‚ƒfƒ‹•^For European model only•j
3-813-895-02(1)
JP
GB
Advertisement
Table of Contents

Related Manuals for Sony EVI-D70P


Summary of Contents for Sony EVI-D70P
-
Page 1: Operating Instructions
3-813-895-02(1) Color Video Camera Žæˆµ•à–¾•‘ ______________________________ •i“ú–{Œê‚Í“ú–{•‘“à•»•i‚Ì•à–¾‚Å‚·•B •j Operating Instructions ___________________ ‚¨”ƒ‚¢•ã‚°‚¢‚½‚¾‚«‚ ‚肪‚Æ‚¤‚²‚´‚¢‚Ü‚·•B “d‹C•»•i‚Í•AˆÀ‘S‚Ì‚½‚ß‚Ì’•ˆÓŽ–•€‚ðŽç‚ç‚È‚¢‚Æ•A ‰Î•Ð‚â•l•gŽ–ŒÌ‚ɂȂ邱‚Æ‚ª‚ ‚è‚Ü‚·•B ‚±‚̎戵•à–¾•‘‚É‚Í•AŽ–ŒÌ‚ð–h‚®‚½‚ß‚Ì•d—v‚È’•ˆÓŽ–•€‚Æ•»•i‚Ì Žæ‚舵‚¢‚©‚½‚ðŽ¦‚µ‚Ä‚ ‚è‚Ü‚·•B‚±‚̎戵•à–¾•‘‚ð‚æ‚-‚¨“Ç‚Ý‚Ì ‚¤‚¦•A•»•i‚ðˆÀ‘S‚É‚¨Žg‚¢‚-‚¾‚³‚¢•B‚¨“Ç‚Ý‚É‚È‚Á‚½‚ ‚Æ‚Í•A‚¢ ‚Â‚Å‚àŒ©‚ç‚ê‚é‚Æ‚±‚ë‚É•K‚¸•ÛŠÇ‚µ‚Ä‚-‚¾‚³‚¢•B EVI-D70 EVI-D70P •iƒˆ•[ƒ•ƒbƒpƒ‚ƒfƒ‹•^For European model only•j © 2003 Sony Corporation... - Page 2 œ { Œ S ‰ –{‹@‚͈À‘S‚É•[•ª‚É”z—¶‚µ‚Ä•ÝŒv‚³‚ê‚Ä‚¢‚Ü x \ ƒ ¡ ‚·•B‚µ‚©‚µ•A“d‹C•»•i‚Í‚Ü‚¿‚ª‚Á‚½Žg‚¢‚©‚½ – ¯ ˝ A ‚ð‚·‚é‚Æ•A‰Î•Ð‚⊴“d‚È‚Ç‚É‚æ‚莀–S‚â‘傯 ⁄ ¨ \ ƒ ˜ ¢ • B \ ƒ ‚ª‚È‚Ç•l•gŽ–ŒÌ‚ɂ‚Ȃª‚邱‚Æ‚ª‚ ‚è•AŠëŒ¯ e › ˜ ' { ‚Å‚·•B ¶ ¤ ˙ › ‡ ¢ B Ž–ŒÌ‚ð–h‚®‚½‚ß‚ÉŽŸ‚Ì‚±‚Æ‚ð•K‚¸‚¨Žç‚è‚-‚¾...
- Page 3 –ÚŽŸ Œx•• ..........4 ’•ˆÓ ..........6 “d’r‚ɂ‚¢‚Ă̈À‘S•ã‚Ì‚²’•ˆÓ ..7 ŠT—v –{‹@‚Ì“Á’· ........8 •t‘®•i ..........8 Še•”‚Ì–¼•Ì ........10 –{ ‘Ì ........10 ƒŠƒ‚ƒRƒ“ ........11 Šî–{‘€•ì •€”õ‚·‚é ......... 13 •Ý’u‚·‚é ........13 “Vˆä‚É•Ý’u‚·‚é ......14 •Ú‘±‚·‚é ........17 “dŒ¹‚ð“ü‚ê‚é...
- Page 4 ‰º‹L‚Ì’•ˆÓ‚ðŽç‚ç‚È‚¢‚Æ•A ‰Î•Ð Š´“d Ž€–S ‘傯‚ª ‚â ‚È‚Ç‚É‚æ‚è ‚â ‚É‚Â‚È‚ª‚邱‚Æ‚ª‚ ‚è‚Ü‚·•B •sˆÀ’è‚È•ê•Š‚É•Ý’u‚µ‚È‚¢ •Ý’u‚Í•ê–å‚Ì•HŽ–‹ÆŽÒ‚Ɉ˗Š‚·‚é ŽŸ‚̂悤‚È•ê•Š‚É•Ý’u‚· •Ý’u‚ɂ‚¢‚Ä‚Í•A •K‚¸‚¨”ƒ ‚é‚Æ•A “|‚ꂽ‚è—Ž‚¿‚½‚肵 ‚¢•ã‚°“X‚Ü‚½‚ÍŠª––‚É‹L ‚Ä•A ‚¯‚ª‚ÌŒ´ˆö‚ƂȂ邱‚Æ •Ú‚µ‚Ä‚ ‚邨–â‚¢•‡‚킹 ‚ª‚ ‚è‚Ü‚·•B ‘‹Œû‚É‚²‘Š’k‚-‚¾‚³‚¢•B ¥ ‚®‚ç‚‚¢‚½‘ä‚Ì•ã “Vˆä‚È‚Ç‚Ö‚Ì•Ý’u‚Í•A –{‹@ ¥ ŒX‚¢‚½‚Æ‚±‚ë ‚ÆŽæ‚è•t‚¯‹à‹ï‚ðŠÜ‚Þ•d ¥ •U“®‚â•ÕŒ‚‚Ì‚©‚©‚é‚Æ —Ê‚É•[•ª‘Ï‚¦‚ç‚ê‚é‹-“x ‚±‚ë ‚ª‚ ‚邱‚Æ‚ð‚¨Šm‚©‚ß‚- ‚Ü‚½•A •Ý’u •E Žæ‚è•t‚¯•ê•Š ‚¾‚³‚¢•B•[•ª‚È‹-“x‚ª‚È‚¢...
- Page 5 •t‘®‚Ì“dŒ¹ƒR•[ƒh‚ðŽg‚¤ •t‘®‚Ì“dŒ¹ƒR•[ƒh‚ðŽg‚í‚È‚¢ ‚Æ•A ‰Î•Ð‚⊴“d‚ÌŒ´ˆö‚Æ‚È‚é ‚±‚Æ‚ª‚ ‚è‚Ü‚·•B “dŒ¹ƒR•[ƒh‚̃vƒ‰ƒO‚¨‚æ‚уRƒlƒN ƒ^•[‚Í“Ë‚«“–‚½‚é‚Ü‚Å•·‚µ•ž‚Þ ‚Ü‚Á‚·‚®‚É“Ë‚«“–‚½‚é‚Ü‚Å•· ‚µ•ž‚Ü‚È‚¢‚Æ•A‰Î•Ð‚⊴“d‚Ì Œ´ˆö‚Æ‚È‚è‚Ü‚·•B “dŒ¹ƒR•[ƒh‚𕕂‚¯‚È‚¢ “dŒ¹ƒR•[ƒh‚𕕂‚¯‚é‚Æ•A ‰Î •Ð‚⊴“d‚ÌŒ´ˆö‚ƂȂ邱‚Æ‚ª ‚ ‚è‚Ü‚·•B ¥ •Ý’uŽž‚É•A •»•i‚ƕǂ⃉ƒb ƒN•A ’I‚È‚Ç‚ÌŠÔ‚É•A ‚Í‚³‚Ý •ž‚Ü‚È‚¢•B ¥ “dŒ¹ƒR•[ƒh‚ð‰Á•H‚µ‚½‚è•A ••‚‚¯‚½‚肵‚È‚¢•B ¥ •d‚¢‚à‚Ì‚ð‚Ì‚¹‚½‚è•A ˆø‚Á ’£‚Á‚½‚肵‚È‚¢•B ¥ ”MŠí‹ï‚É‹ß•t‚¯‚½‚è•A ‰Á”M ‚µ‚½‚肵‚È‚¢•B ¥ “dŒ¹ƒR•[ƒh‚𔲂-‚Æ‚«‚Í•A •K‚¸ƒvƒ‰ƒO‚ð‚à‚Á‚Ä”²‚-•B –œˆê•A “dŒ¹ƒR•[ƒh‚ª••‚ñ‚¾‚ç•A ‚¨”ƒ‚¢•ã‚°“X‚Ü‚½‚̓\ƒj•[‚Ì...
- Page 6 ‰º‹L‚Ì’•ˆÓ‚ðŽç‚ç‚È‚¢‚Æ•A ‚¯‚ª ‘¹ŠQ ‚ð‚µ‚½‚èŽü•Ó‚Ì•¨•i‚É ‚ð—^‚¦‚邱‚Æ‚ª‚ ‚è‚Ü‚· ‚ʂꂽŽè‚Å“dŒ¹ƒvƒ‰ƒO‚ð‚³‚í‚ç‚È‚¢ ‚ʂꂽŽè‚Å“dŒ¹ƒAƒ_ƒv ƒ^•[‚È‚Ç‚Ì“dŒ¹ƒvƒ‰ƒO‚ð ”²‚«•·‚µ‚·‚é‚Æ•A Š´“d‚ÌŒ´ ˆö‚ƂȂ邱‚Æ‚ª‚ ‚è‚Ü‚·•B ’•ˆÓ...
- Page 7 d r ´ ¢ ˜ S ª † ‚±‚±‚Å‚Í•A–{‹@‚Å‚ÌŽg—p‚ª‰Â”\‚È’PŽO ” L ¨ Œ`Š£“d’r‚ɂ‚¢‚Ä‚Ì’•ˆÓŽ–•€‚ð‹L•Ú‚µ ¢ ˘ A j E › M E t R ‚Ä‚¢‚Ü‚·•B Œ Ł A S fl “ ¨ ˙ l g ¨ Ø – ˘ “ Ł • B Œ...
- Page 8 B T v { @` • t fi i ¥ L ł f 38 E X v i e w H A D « J fl ‰ A¨ ” t fi i “ Œ fi C C D p Ł A· x Be “ »...
- Page 9 ƒŠƒ‚ƒRƒ“•@•i1•j ƒlƒW 3 M 3 x 6@ i 6 j @i 1 j ƒV•[ƒŠƒ“ƒOƒuƒ‰ƒPƒbƒg•@•iA•j•@•i1•j ƒV•[ƒŠƒ“ƒOƒuƒ‰ƒPƒbƒg•@•iB•j•@•i1•j ƒ•ƒCƒ„•[ƒ••[ƒv•@•i1•j •t‘®•i...
- Page 10 ª ˚ Še•”‚Ì–¼•Ì 5 6 7 •i•@•j“à‚̃y•[ƒW‚É•à–¾‚ª‚ ‚è‚Ü‚·•B ‡ ˚ 9 q; qa qs qd e R ı f I M A G E F L I P X C b ‘ i 1 4 j fª ” ‰ ] s ¢ • B ˚ ˝ O F F ¯...
- Page 11 l V I S C A R S - 2 3 2 C O U T [ q i1 7 j m D C I N 1 2 V [ q i 1 7 j POWER CAMERA SELECT Œ ˚ FOCUS AUTO MANUAL...
- Page 12 c D A T A S C R E E N { ^ R dr Œ Ø D A T A S C R E E N { ^ • ˘ A Y [ fi ˘ } jA t H [ J X \ ƒ...
- Page 13 O r Ł t fl Ø ˝ ı • Ø O r Ł t fl l W ˝ AK i g p ˜ › ‡ ¢ B { ˝ ‰ ¨ ˘ – º u « • B I S O K i 4 4 .
- Page 14 V { ª ˚ u A z p ¥ •Ú’…•Ü•Aƒe•[ƒv‚È‚Ç‚ðŽg‚Á‚ă•ƒCƒh “ K v ¯ • B ƒRƒ“ƒo•[ƒWƒ‡ƒ“ƒŒƒ“ƒY‚Ì—Ž‰º–hŽ~•ˆ ’u‚ð•s‚Á‚Ä‚-‚¾‚³‚¢•B u ' ‰ “Vˆä‚É•Ý’u‚·‚é ƒJƒ•ƒ‰Œã–Ê‚ÌIMAGE FLIPƒXƒCƒb ƒ`‚ð ON ‚É‚·‚é•B •t‘®‚̃V•[ƒŠƒ“ƒOƒuƒ‰ƒPƒbƒg‚ƃ•ƒC ƒ„•[ƒ••[ƒv•AƒlƒW‚ðŽg‚Á‚Ä•AŠù‘¶‚Ì“V ‚²’•ˆÓ ˆä‚̃Wƒƒƒ“ƒNƒVƒ‡ƒ“ƒ{ƒbƒNƒX‚ȂǂɃJ ¥ “dŒ¹‚ð“ü‚ꂽŒã‚É IMAGE FLIP ƒ•ƒ‰‚ðŽæ‚è•t‚¯‚邱‚Æ‚ª‚Å‚«‚Ü‚·•B ƒXƒCƒbƒ`‚ð ON ‚É‚µ‚Ä‚à‰æ‘œ‚Í”½ •Ý’u‚·‚é•Û‚É‚Í•A•…•½‚È“Vˆä‚É•Ý’u‚µ “]‚µ‚Ü‚¹‚ñ•B‚à‚¤ˆê“x“dŒ¹‚ð“ü‚ê...
- Page 15 ƒV•[ƒŠƒ“ƒOƒuƒ‰ƒPƒbƒg•iB•j‚ð“V ƒV•[ƒŠƒ“ƒOƒuƒ‰ƒPƒbƒg•iA•j‚ð•t ˆä‚̃Wƒƒƒ“ƒNƒVƒ‡ƒ“ƒ{ƒbƒNƒX‚ÉŽæ ‘®‚̃lƒW•i 3M 3 x 6j 3 { ¯ J ‚è•t‚¯‚é•B Œ ˚ Ł t fl Ø B ƒWƒƒƒ“ƒNƒVƒ‡ƒ“ƒ{ƒbƒNƒX‚̃lƒWŒŠ‚É u P b g l W J { •‡‚Á‚½ƒlƒW•i•t‘®‚µ‚Ä‚¢‚Ü‚¹‚ñ•j‚ð „ ˜ Ł t fl • B ‚¨Žg‚¢‚-‚¾‚³‚¢•B C [ [ v ⁄ • ƒV•[ƒŠƒ“ƒOƒuƒ‰ƒPƒbƒg•iB•j‚ÌŒ`•ó...
- Page 16 ƒV•[ƒŠƒ“ƒOƒuƒ‰ƒPƒbƒg•iA•j‚Ì“Ë ƒJƒ•ƒ‰Œã–Ê‚Ì’[Žq‚ɃP•[ƒuƒ‹‚ð•Ú ‹N‚ðƒV•[ƒŠƒ“ƒOƒuƒ‰ƒPƒbƒg•iB•j ‘±‚·‚é•B ‚ÌŒŠ‚É•·‚µ•ž‚Ý•AƒV•[ƒŠƒ“ƒOƒuƒ‰ ƒPƒbƒg•iA•j‚ðŒã‚ë•ûŒü‚Ö‰Ÿ‚µ‚Ä ‰¼ŒÅ’è‚·‚é•B ƒV•[ƒŠƒ“ƒO ƒuƒ‰ƒPƒbƒg “Vˆä •iB•j † ƒV•[ƒŠƒ“ƒO ƒuƒ‰ƒPƒbƒg•iA•j •Ú‘±‚µ‚½ƒP•[ƒuƒ‹—Þ‚Í•Ú‘±•”‚É•‰‰× ‚ª‚©‚©‚ç‚È‚¢‚悤‚É•ˆ—•‚µ‚Ä‚-‚¾‚³ ‚¢•B ƒJƒ•ƒ‰‘O•”‚ð‰Ÿ‚µ•ã‚°‚È‚ª‚ç•A•t ƒJƒ•ƒ‰‚ÌŠO‚µ‚©‚½ ‘®‚̃lƒW•i 3M 3 x 6j 3 { ¯ •u•Ý’u‚Ì‚µ‚©‚½•v‚̎蕇‚U‚Å•AƒJ ' ¯ Ł • Ø B ƒ•ƒ‰‚ðŒÅ’肵‚½ƒlƒW 3 –{‚ð‚Í‚¸ ‚·•B ƒJƒ•ƒ‰‘S‘Ì‚ð“Vˆä‘¤‚Ö‰Ÿ‚µ•ã‚°‚È ‚ª‚ç•AƒJƒ•ƒ‰‚Ì‘O•û‚Ö“®‚©‚·•B ƒtƒbƒN‚ª‚Í‚¸‚ê•AƒJƒ•ƒ‰‚ª‚Í‚¸‚ê‚Ü...
- Page 17 ‚µ‚Ü‚·•B‹@Ší‚É‚æ‚Á‚Ä‚Í•A•ÏŠ·ƒP•[ƒu •Ú‘±‚·‚é ƒ‹‚È‚Ç‚ª•K—v‚Æ‚È‚è‚Ü‚·•B•Ú‘±‚·‚é‹@ •t‘®‚Ì AC ƒpƒ••[ƒAƒ_ƒvƒ^•[‚Æ“dŒ¹ Ší‚̎戵•à–¾•‘‚à‚ ‚킹‚Ä‚²——‚-‚¾‚³ ƒR•[ƒh‚ð‚‚Ȃ¬•A‰f‘œ“ü—Í’[Žq•t‚«‚Ì ‚¢•B ƒRƒ“ƒsƒ…•[ƒ^•[‚â AV ‹@Ší‚È‚Ç‚Ö•Ú‘± ƒrƒfƒI•Ú‘± ƒP•[ƒuƒ‹ •i•Ê”„‚è•j ‰f‘œ“ü—Í ’[Žq‚Ö VIDEO ’[Žq‚Ö S ‰f‘œƒP•[ƒuƒ‹ S ‰f‘œ“ü—Í •i•Ê”„‚è•j ’[Žq‚Ö S VIDEO ’[Žq‚Ö VISCA ƒP•[ƒuƒ‹ VISCA RS-232C RS-232C IN ’[Žq‚Ö ’[Žq‚Ö VISCA RS-232C ‘¼‚Ì EVI-D70 ‚Ì OUT ’[Žq‚Ö...
- Page 18 “dŒ¹‚ð“ü‚ê‚é ‚²’•ˆÓ ¥ ‰f‘œ“ü—Í’[Žq‚Ü‚½‚Í S ‰f‘œ“ü—Í’[Žq‚ª •t‘®‚Ì AC ƒpƒ••[ƒAƒ_ƒvƒ^•[•A“d •t‚¢‚Ä‚¢‚È‚¢ƒRƒ“ƒsƒ…•[ƒ^•[‚É‚Í•Ú Œ¹ƒR•[ƒh‚ðŽg‚Á‚Ä–{‘Ì‚ðƒRƒ“ƒZƒ“ ‘±‚Å‚«‚Ü‚¹‚ñ•BƒrƒfƒIƒLƒƒƒvƒ`ƒƒ•[ ƒg‚ɂ‚Ȃ®•B ƒ{•[ƒh‚âƒ\ƒtƒgƒEƒFƒA‚ð•Ê“r‚²—pˆÓ POWER ƒ‰ƒ“ƒv‚ª“_“”‚µ‚Ü‚·•B ‚¢‚½‚¾‚©‚È‚¢‚ÆŽg—p‚Å‚«‚È‚¢‹@Ží‚à –{‘Ì‚ðƒRƒ“ƒZƒ“ƒg‚ɂ‚Ȃ¢‚Å‚¢‚é‚Æ ‚ ‚è‚Ü‚·‚Ì‚Å‚²’•ˆÓ‚-‚¾‚³‚¢•B‚-‚í ‚«‚Í•AƒŠƒ‚ƒRƒ“‚Ì POWER ƒXƒCƒb ‚µ‚-‚Í•A‚¨ŽèŽ•‚¿‚̃Rƒ“ƒsƒ…•[ƒ^•[ ƒ`‚Å‚àƒJƒ•ƒ‰‚Ì“dŒ¹‚Ì“ü•^•Ø‚ª‚Å‚« ‚̃••[ƒJ•[‚â”Ì”„“X‚Ö‚¨‚½‚¸‚Ë‚-‚¾ ‚Ü‚·•B•iƒŠƒ‚ƒRƒ“‚Å“dŒ¹‚ð•Ø‚é‚Æ•A ‚³‚¢•B POWER ƒ‰ƒ“ƒv‚Í•Á‚¦•A ¥ ‚±‚Ì•»•i‚É‚Í•A•t‘®‚Ì AC ƒpƒ••[ƒAƒ_ STANDBY ƒ‰ƒ“ƒv‚ª“_“”‚µ‚Ü ƒvƒ^•[•i‹É•«“•ˆêŒ`ƒvƒ‰ƒO•EJEITA ‚·•B•j ‹KŠi•j‚ð‚²Žg—p‚-‚¾‚³‚¢•B•ã‹LˆÈŠO “dŒ¹‚ð“ü‚ê‚é‚ƃJƒ•ƒ‰‚ÍŽ©“®“I‚É•A ‚Ì...
- Page 19 PAN-TILT RESET ƒ { ƒ ^ ƒ “ ‚ ð ‰ Ÿ ‚ · ‚ © • A ƒpƒ“ • E ƒ`ƒ‹ƒg‚·‚é POWER ƒ X ƒ C ƒ b ƒ ` ‚ Å “ d Œ ¹ ‚ ð ˆ ê “ x OFF‚...
- Page 20 STANDBY ƒ‰ƒ“ƒv‚ª“_–Å‚µ‚½‚ç •¡•”‚̃Jƒ•ƒ‰‚ðƒŠƒ‚ƒRƒ“‚Å‘€•ì‚·‚é ‚Æ‚«‚Í ŠO—͂ŃJƒ•ƒ‰‚ª“®‚©‚³‚ꂽŽž‚â•A•¨‚â Žw‚È‚Ç‚Í‚³‚ñ‚¾•ê•‡‚È‚Ç•AƒJƒ•ƒ‰‚̃} ‘€•ì‚µ‚½‚¢ƒJƒ•ƒ‰‚Ì IR SELECT ƒCƒRƒ“‚ªƒJƒ•ƒ‰‚̃pƒ“•Eƒ`ƒ‹ƒgˆÊ’u‚ð ƒXƒCƒbƒ`•i–{‘ÌŒã–Ê•j‚ð 1•A2•A •³‚µ‚-‹L‰¯‚µ‚Ä‚¢‚È‚¢‚±‚Æ‚ª‚ ‚è‚Ü 3 ‚Ì‚Ç‚ê‚©‚É•‡‚킹‚é•B ‚·•B PAN-TILT RESET ƒ{ƒ^ƒ“‚ð‰Ÿ‚µ‚ăp 1 2 3 ƒ“•Eƒ`ƒ‹ƒgˆÊ’u‚ðƒŠƒZƒbƒg‚µ‚Ü‚·•B IR SELECT 1 ‚ŕݒ肵‚½”Ô•†‚Æ“¯‚¶”Ô•†‚Ì CAMERA SELECT ƒ{ƒ^ƒ“•iƒŠ ƒ‚ƒRƒ“•j‚ð‰Ÿ‚·•B ‚±‚ê‚Å•A“Á’è‚̃Jƒ•ƒ‰‚ðƒŠƒ‚ƒRƒ“‚©‚ç “_–Å ‘€•ì‚Å‚«‚é‚悤‚É‚È‚è‚Ü‚·•B ƒŠƒ‚ƒRƒ“‚©‚çƒJƒ•ƒ‰‚𑀕삷‚邽‚Ñ ‚É•A2 ‚ʼnŸ‚µ‚½ CAMERA SELECT ƒ{ ƒ^ƒ“‚ª“_“”‚µ‚Ü‚·•B POWER CAMERA SELECT...
- Page 21 ƒY•[ƒ€‚·‚é‚É‚Í ƒJƒ•ƒ‰‚𒲕߂·‚é ZOOM ƒ{ƒ^ƒ“‚ð‰Ÿ‚µ‚Ü‚·•B PAN-TILT ”íŽÊ‘Ì‚ª RESET NEAR •¬‚³‚-‚È ”íŽÊ‘Ì‚ª ZOOM SLOW FAST ‚ é ( • LŠ p• F ‘å‚«‚-‚È‚é MANUAL Wide) ( – ]‰ “• F BACK LIGHT Telephoto ) DIRECTION SET RM-EV100 ‚ä‚Á‚-‚è ZOOM ‚·‚΂â‚- AUTO ƒY•[ƒ€‚·‚é ƒY•[ƒ€‚·‚é...
- Page 22 ‹L‰¯‚³‚¹‚½•ó‘Ô‚É‚·‚é‚É‚Í ƒJƒ•ƒ‰‚Ì•ó‘Ô‚ð‹L‰¯ POSITION 1 •` 6 ƒ{ƒ^ƒ“‚Ì’†‚©‚ç 1 ‚³‚¹‚é •|ƒvƒŠƒZƒbƒg‹@”\ ‚‘I‚ñ‚ʼnŸ‚µ‚Ü‚·•B ƒJƒ•ƒ‰‚ÌŒü‚«‚â•AƒY•[ƒ€•Aƒsƒ“ƒg’² ‹L‰¯‚ð•Á‚·‚É‚Í •ß•A‹tŒõ•â•³‚Ì“ü•^•Ø‚È‚Ç‚ð 6 Ží—Þ‚Ü RESET ƒ{ƒ^ƒ“‚ð‰Ÿ‚µ‚È‚ª‚ç•A ‚Å‹L‰¯‚Å‚«‚Ü‚·•B POSITION 1 •` 6 ƒ{ƒ^ƒ“‚Ì’†‚©‚ç•Á‚µ ‚½‚¢ƒ{ƒ^ƒ“‚ð‘I‚ñ‚ʼnŸ‚µ‚Ü‚·•B DATA SCREEN BACK LIGHT POSITION1~6 RESET •Á‚µ‚½‚¢ ƒ{ƒ^ƒ“‚ð PRESET RESET PRESET ‰Ÿ‚· POSITION ‰Ÿ‚µ‚È‚ª‚ç ‚²’•ˆÓ ¥...
- Page 23 B » … g u ˛ { @« \ • Ø ‰ – æ ¨ ˘ « ˝ ˜ › ‡ ¢ B – ⁄ ¥ R s [ – “ ‡ ¢ ' m F • ˚ Ø ‡ ´ ¢ ˜ ^ [ –...
- Page 24 –{‘Ì‚Ì‚¨Žè“ü‚ê •Û•Ø‚ÆƒAƒtƒ^•[ƒT•[ ¥ ‰˜‚ꂪ‚Ђǂ¢‚Æ‚«‚Í•A•…‚Å‚¤‚·‚ß‚½ ƒrƒX‚ɂ‚¢‚Ä ’†•«•ô•Ü‚É•_‚ç‚©‚¢•z‚ð‚Ђ½‚µ•AŒÅ ‚-‚µ‚Ú‚Á‚Ä‚©‚牘‚ê‚ð•@‚«Žæ‚è•AŠ£ ‚¢‚½•z‚ÅŽd•ã‚°‚Ä‚-‚¾‚³‚¢•B ’²Žq‚ªˆ«‚¢‚Æ‚«‚Í‚Ü‚¸ƒ`ƒFƒbƒN‚ð ¥ ƒAƒ‹ƒR•[ƒ‹•AƒVƒ“ƒi•[•Aƒxƒ“ƒWƒ“‚È ‚±‚̎戵•à–¾•‘‚ð‚à‚¤ˆê“x‚²——‚É‚È‚Á ‚Ç‚ÍŽg‚í‚È‚¢‚Å‚-‚¾‚³‚¢•B•ÏŽ¿‚µ‚½ ‚Ä‚¨’²‚ׂ-‚¾‚³‚¢•B ‚è•A“h‘•‚ª‚Í‚°‚½‚è‚·‚邱‚Æ‚ª‚ ‚è ‚Ü‚·•B •Û•ØŠúŠÔ‚Æ•Û•Ø•ðŒ• ¥ ‰»Šw‚¼‚¤‚«‚ñ‚ð‚²Žg—p‚Ì•Û‚Í•A‚»‚Ì –{‹@‚Ì•Û•ØŠúŠÔ‚¨‚æ‚Ñ•Û•Ø•ðŒ•‚Í•A”Ì ’•ˆÓ•‘‚É•]‚Á‚Ä‚-‚¾‚³‚¢•B ”„’nˆæ•i•‘“à•AŠCŠO•j‚É‚æ‚Á‚ÄˆÙ‚È‚é ¥ ŽE’Ž•Ü‚̂悤‚ÈŠö”-•«‚Ì•¨‚ð‚©‚¯‚½ ‚±‚Æ‚ª‚ ‚è‚Ü‚·•B‚¨Žè•”‚Å‚·‚ª•A‚¨”ƒ ‚è•AƒSƒ€‚âƒrƒj•[ƒ‹•»•i‚É’·ŽžŠÔ•Ú ‚¢•ã‚°“X‚É‚¨–â‚¢•‡‚킹•A‚²Šm”F‚¢‚½ •G‚³‚¹‚é‚Æ•A•ÏŽ¿‚µ‚½‚è•A“h‘•‚ª‚Í ‚¾‚«‚Ü‚·‚悤‚¨Šè‚¢•\‚µ•ã‚°‚Ü‚·•B ‚°‚½‚è‚·‚邱‚Æ‚ª‚ ‚è‚Ü‚·•B ƒŠƒ‚ƒRƒ“‚Ì“d’rŒðŠ· ƒŠƒ‚ƒRƒ“‚Å‘€•ì‚Å‚«‚é‹——£‚ª’Z‚-‚È‚Á ‚Ä‚«‚½‚ç•A’P 3 Œ`Š£“d’r•i2 ŒÂ•j‚ðŒð Š·‚µ‚Ä‚-‚¾‚³‚¢•B –{‹@‚Ì•«”\‚ð•ÛŽ•‚·‚邽‚ß‚É...
- Page 25 ‚ » ‚ Ì ‘ ¼ Žd—l “ ü — Í “ d ˆ ³ DC 12 V • i D C 10 . 8 • ` 13 V • j • Á ” ï “ d — ¬ 1. 0 A •...
- Page 26 •¡–@•} •³–Ê •ã–Ê 170•‹ 170•‹ ‘¤–Ê ’ê–Ê 24.5 ƒ³5, •[‚³ 5 90•‹ 30•‹ BOTTOM ƒXƒCƒbƒ` ŽO‹rƒlƒWŒŠ 1/4-20UNC, •[‚³ 6.5 ’PˆÊ : ‚•‚• Žd—l...
- Page 27 ƒV•[ƒŠƒ“ƒOƒuƒ‰ƒPƒbƒg•t‚«•¡–@•} •³–Ê ‘¤–Ê ƒV•[ƒŠƒ“ƒOƒuƒ‰ƒPƒbƒg•iB) 60•‹ Žæ•tŒŠ ƒ³88.9 •i’²•®”͈͕F•} 30•‹•j •iŒŠ•• 4.5 mm•j•i•~ 2•j Œã‘¤ Žæ•tŒŠ ƒ³107.3 •iŒŠ•• 4.5 mm•j•i•~ 2•j Žæ•tŒŠ ƒ³4.5 mm•i•~ 4•j 45•‹ 45•‹ Žæ•tŒŠ ƒ³83.5 •iŒŠ•• 4.5 mm•j•i•~ 2•j ‘O‘¤ Žæ•tŒŠ ƒ³121.2 83.5 •iŒŠ•• 4.5 mm•j•i•~ 4•j ’PˆÊ...
- Page 28 ƒ•ƒCƒ„•[•iAW G No.28 •` 18•j ‚ð•Ú‘±‚µ‚½‚¢ŒŠ‚É•·‚µ•ž‚Ý•A“ü‚ê ‚½ŒŠ‚ɑΉž‚·‚éƒlƒW‚ðƒ}ƒCƒiƒXƒh VISCA RS-422 ’[Žq‚̃sƒ“”z—ñ ƒ‰ƒCƒo•[‚ŌŒ肷‚é•B 1 2 3 4 5 6 7 8 9 ƒ•ƒCƒ„•[ VISCA RS-422 ƒ}ƒCƒiƒXƒhƒ‰ƒCƒo•[ VISCA RS-422 ƒRƒlƒNƒ^•[ƒvƒ‰ ƒO‚ðƒJƒ•ƒ‰Œã–Ê‚Ì VISCA RS- 422 ’[Žq‚Ö•·‚µ•ž‚Þ•B VISCA RS-422 ƒRƒlƒNƒ^•[ƒvƒ‰ƒO ‚ÌŽg‚¢‚©‚½ –{‘̂̃ŠƒAƒpƒlƒ‹‚©‚ç•AVISCA RS-422 ƒRƒlƒNƒ^•[ƒvƒ‰ƒO‚Ì—¼ ’[‚ðŽ•‚¿•A•}‚̂悤‚Ɉø‚«”²‚-•B ‚²’•ˆÓ...
- Page 31 Owner’s Record If a fault should occur during operation of the unit, operate the disconnect device to The model number and the serial number are switch the power supply off, or disconnect located on the bottom exterior. the power cord. Record these numbers in the spaces provided below.
- Page 32 If you have any questions about this product, you may call: Sony’s Business Information Center (BIC) at 1-800-686-SONY (7669) or Write to: Sony Customer Information Services Center 6900-29 Daniels Parkway, PMB 330 Fort Myers, Florida 33912 Declaration of Conformity Trade Name: SONY Model No.:...
-
Page 33: Table Of Contents
Table of Contents Overview Features ..........34 Supplied Accessories .......34 Locations of Controls .......36 Main Unit ........36 Remote Commander ....37 Basic Operations Preparations ........39 Installation ........39 Installing the unit on the ceiling .40 Connections ........43 Turning on the Power ....44 Pan/Tilt Operation ......45 Adjusting the Camera .......47 Having the Camera Memorize the Setting —... -
Page 34: Overview
Overview Features Supplied Accessories • An EXview HAD CCD provides 380,000 (EVI-D70)/410,000 (EVI-D70P) effective When you unpack, check that all the picture elements (pixels) enabling high- supplied accessories are included. resolution imaging with this camera. Camera (1) • The use of VISCA commands allows you to control the camera from a computer. - Page 35 Screw 3M 3×6 (6) European model Operating Instructions (1) Remote commander (1) Ceiling bracket (A) (1) Ceiling bracket (B) (1) Wire rope (1) Supplied Accessories...
-
Page 36: Locations Of Controls
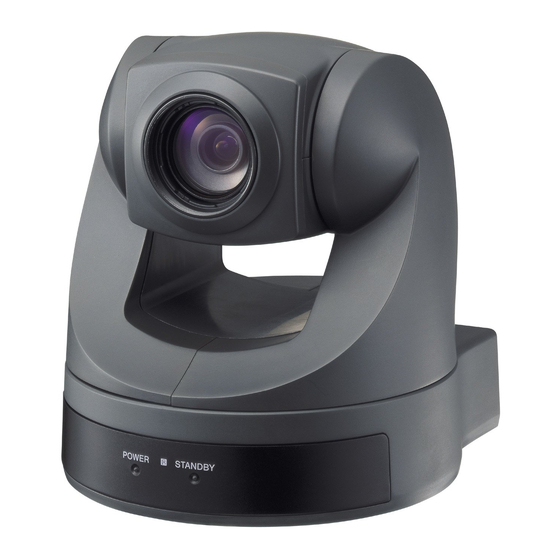
Rear Locations of 5 6 7 Controls For details, see the pages indicated in parenthesis. Main Unit Front 9 q; qa qs qd 5 Sensor for the Remote Commander 6 IMAGE FLIP switch (40) Flips the image upside down. Normally set this to OFF when you use the camera. -
Page 37: Remote Commander
Remote Commander Bottom POWER CAMERA SELECT FOCUS AUTO MANUAL NEAR DATA SCREEN BACK LIGHT PRESET RESET POSITION PAN-TILT HOME PAN-TILT RESET ZOOM SLOW FAST qf Tripod screw hole (39) DIRECTION SET RM-EV100 qg BOTTOM switch Used to switch between RS-232C and RS-422, to switch between D30 and D31 modes, to make the IR OUT output setting, or switch between speeds of... - Page 38 5 L/R DIRECTION SET button (45) Installing batteries 6 POWER switch (44) 7 BACK LIGHT button (47) 8 POSITION buttons (48) Numeric buttons (Button 1 also works as the STD button. Button 2 also works as the REV button.) (45) PRESET button R6 (size AA) ×...
-
Page 39: Basic Operations
Basic Operations To attach the camera to a tripod Preparations Use a tripod with screws meeting either of the following specifications. Installation length Be sure to place the main unit on a flat surface. ISO standard: length 4.5 mm ±0.2 mm If you must place the camera on an inclined ASA standard: length 0.197 inches surface, make sure the incline is less than... -
Page 40: Installing The Unit On The Ceiling
Installation Installing the unit on the ceiling Set the IMAGE FLIP switch on the rear panel to ON. Using the ceiling bracket, retaining wire, and retaining screws supplied, you can Notes utilize existing junction boxes, etc., to attach the camera to the ceiling. •... - Page 41 Attach the ceiling bracket (B) to the Attach the ceiling bracket (A) to the junction box on the ceiling. bottom of the camera using the 3 × screws ( 6) supplied. Align the holes in the bracket with those in the junction box, and use appropriate Align the screw holes on the bottom of screws (not supplied).
- Page 42 Insert the protrusions raised on the Connect the cables to the connectors ceiling bracket (A) into the spaces on the rear of the camera. prepared in the ceiling bracket (B), and temporarily attach them by pushing the ceiling bracket (A) to the Ceiling rear.
-
Page 43: Connections
video input. Some connections may require Connections extra cables. Refer to the instruction manual of the equipment to be connected. Connect your Color Video Camera to a computer, TV or VCR equipped with a Video cable (not supplied) to Video input to VIDEO S-Video cable... -
Page 44: Turning On The Power
Notes Turning on the Power • You cannot connect your Color Video Camera to a computer that is not equipped Connect the main unit to an AC outlet with either video input or an S-Video input using the supplied AC power adaptor connector. -
Page 45: Pan/Tilt Operation
When the camera is facing in the Pan/Tilt Operation wrong direction The camera is preset to face toward the right whenever the arrow ( ) button is pressed. You might wish to face the camera toward the opposite direction from that of the button CAMERA SELECT you pressed. - Page 46 If the STANDBY lamp flashes Operating more than one camera with the Remote Commander When the camera is moved or turned by hand or by external shock, the Set the IR SELECT switch (at the rear microcomputer inside the camera may not of the main unit) of the camera(s) be able to memorize the pan/tilt position which you intend to operate to 1, 2 or...
-
Page 47: Adjusting The Camera
Zooming Adjusting the Press either of the four ZOOM buttons. Camera Subject Subject appears PAN-TILT appears RESET farther closer. ZOOM SLOW FAST away. (Telepho NEAR (Wide angle) MANUAL DIRECTION SET BACK LIGHT RM-EV100 Zooms in Zooms in or out from or out from ZOOM AUTO... -
Page 48: Having The Camera Memorize The Setting - Presetting Feature
Recalling the memorized setting Having the Camera Press any of the POSITION buttons Memorize the Setting 1 – 6 on which your settings have been saved. — Presetting feature Canceling the preset memory While holding down the RESET button, Up to six combinations of settings (position, press the POSITION button on which the zooming, focusing and back lighting) can be settings are to be canceled. -
Page 49: General
General Troubleshooting Precautions After operating the unit with an AC power Symptom Remedy adaptor, disconnect the AC power adaptor The picture does • Make sure the from the wall outlet if the set is not to be not appear on the connections are made used for an extended period of time. - Page 50 Cleaning the main unit • When the body of the camera is dirty, clean it with a soft cloth that is soaked with a diluted neutral detergent and tightly wrung. Then finish with a dry cloth. • Do not use any type of solvents, which may damage the finish.
-
Page 51: Specifications
Control signal format Specifications 9600 bps/38400 bps Data: 8 bit Stop bit: 1 Power connector System JEITA type4 Video signal EVI-D70: NTSC Color, JEITA General standards Input voltage EVI-D70P: PAL Color, CCIR DC 12 V (DC 10.8 to 13 V) standards Current consumption Picture element... -
Page 52: Dimensions
Dimensions Front 170° 170° 132 (5 Side Bottom 24.5 ( 90° ), depth 5 ( 30° Bottom switch Tripod screw hole 1/4-20 UNC, depth 6.5 66 (2 144 (5 7.4 ( Unit: mm (inch) Specifications... - Page 53 Dimensions with ceiling bracket Front Side 141 (5 144 (5 132 (5 7.4 ( 66 (2 Ceiling bracket (B) 60° Adjustable limit: ±30° Retainer opening 88.9 (3 Rear Width 4.5 ( ) (×2) Retainer opening 107.3 (4 Width 4.5 ( ) (×2) Retainer opening 4.5 (...
-
Page 54: Using The Visca Rs-422 Connector
Insert a wire (AW G Nos. 28 to 18) Using the VISCA RS-422 into the desired wire opening on the connector pin assignments plug, and tighten the screw for that wire using a flat-head screwdriver. The VISCA RS-422 connector pin Wire assignments 1 2 3 4 5... - Page 56 ‚±‚Ì•à–¾•‘‚Í 100% ŒÃŽ†•Ä•¶Ž†‚ðŽg—p‚µ‚Ä‚¢‚Ü‚·•B Printed on 100% recycled paper. Printed in Japan...