Table of Contents
Advertisement
Quick Links
Contents
1. Introduction ・・・・・・・・・・・・・・・・・・・・・・・ P.1
2. Precautions ・・・・・・・・・・・・・・・・・・・・・・・ P.1
3. Specifications ・・・・・・・・・・・・・・・・・・・・・・ P.4
4. Before Use ・・・・・・・・・・・・・・・・・・・・・・・・・ P.5
5. Names and Functions of Parts ・・・・・・・・ P.7
6. Correct Use of the FAP-1001 ・・・・・・・・・ P.9
7. How to Operate the FAP-1001 ・・・・・・・ P.11
8. How to Remove and Attach Parts ・・・・ P.13
9. Cleaning and maintenance ・・・・・・・・・・ P.16
10. Fixing Prong ・・・・・・・・・・・・・・・・・・・・・・・ P.18
11. Push Plate ・・・・・・・・・・・・・・・・・・・・・・・・・ P.21
12. Peeler Blade ・・・・・・・・・・・・・・・・・・・・・・・ P.22
13. Using Specified Settings・・・・・・・・・・・・・ P.24
●Thank you very much for purchasing the FAP-1001 Fruit Peeler.
●To ensure safe and correct operation of this unit, please read and understand the contents of
this manual before use.
●After reading this manual, keep it in a safe and accessible place for other users of the FAP-
1001.
●In order to improve the performance of this product, the specifications of the product may be
modified without prior notification.
High-speed
Electric Peeler
FAP-1001
Peel-A-Ton XL
Fast, clean removal of peels
Operation Manual
Vegetables ・・・・・・・・・・・・・・・・・・・・・・・・ P.32
15. Troubleshooting ・・・・・・・・・・・・・・・・・・・・ P.40
16. In Conclusion ・・・・・・・・・・・・・・・・・・・・・・ P.43
Remarks
Advertisement
Table of Contents

Related Manuals for Astra FAP-1001


Summary of Contents for Astra FAP-1001
-
Page 1: Table Of Contents
High-speed Electric Peeler FAP-1001 Peel-A-Ton XL Fast, clean removal of peels Operation Manual Contents 1. Introduction ・・・・・・・・・・・・・・・・・・・・・・・ P.1 14. Settings for Various Fruits and 2. Precautions ・・・・・・・・・・・・・・・・・・・・・・・ P.1 Vegetables ・・・・・・・・・・・・・・・・・・・・・・・・ P.32 3. Specifications ・・・・・・・・・・・・・・・・・・・・・・ P.4 15. Troubleshooting ・・・・・・・・・・・・・・・・・・・・ P.40 4. Before Use ・・・・・・・・・・・・・・・・・・・・・・・・・ P.5 16. -
Page 2: Introduction
1. Introduction ● This appliance is specifically designed to peel round and oval fruits and vegetables. ● Improper use of the unit may result in a breakdown or an accident. ● Before using the unit, read this manual carefully, and pay careful attention to inspection and maintenance and also safety. - Page 3 Warning! 6) Do not allow children near this unit. Do not allow children to operate this unit. An accident may result. 7) Do not disassemble or attempt to repair or modify this unit. Failure to do so may result in an accident or injury. 8) If you detect anything unusual in the operation of the unit, do not continue to use it.
- Page 4 Warning! 14) Use adequate caution when attaching and operating the peeler blade. Never touch the peeling blade while the unit is operating. Always turn the switch to “OFF” before handling the peeling blade. Failure to do so may result in serious injury.
-
Page 5: Specifications
Caution! 6) Upon taking delivery of the unit, check to see that no damage has occurred, and no parts (screws, nuts, etc.) have come loose or separated in transit. Failure to do so may result in injury or damage to the unit. 7) When storing or operating the unit, observe the following precautions. -
Page 6: Before Use
4. Before Use 1) Check the enclosed parts. ● To obtain replacement parts, contact your retailer or ASTRA. (1) Main Unit Name of part Check No. Name of part Check Power connection x 1 Spring holder clip x 1 (CP–S) Fixing prong x 9 (HP–M3 x 3, HP–MB x 3, HP–MO x 3) - Page 7 (3) Place the main unit on the installation base and fasten Connection stay Main-body connection Use the supplied wrench 7 mm [(1) - ⑫ ] to remove Place the main unit on the installation base and fas- the connection stay [(2) - ② ]. ten by placing the stays on the connecting parts on the front, rear and bottom surfaces of the main unit.
-
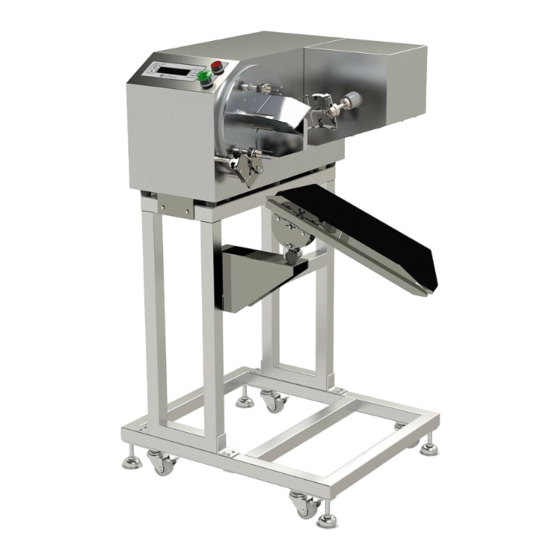
Page 8: Names And Functions Of Parts
5. Names and Functions of Parts 1) Control Panel Name of part Function Reference page The operation of the Start/Stop button differs according to the following Reference pages: conditions. 10~13, 24~27 Pressing and holding down the button will power up the unit, and initiate the “reset”... - Page 9 2) Mechanical parts 4. (Peeling position) 4. (Input position) 4. (Discharge position) Name of part Function Reference page Replaceable parts. Select the spring according to the item to Reference pages: 9, 13, 14, Peeler blade be peeled. 22, 23, 25, 29, 30 The arm is shown above in the “start”...
-
Page 10: Correct Use Of The Fap-1001
6. Correct Use of the FAP-1001 1) Pre-operation preparation ● In order to prevent a possible electric shock please connect a ground fault interrupter to this unit. ● Install the unit in a well-lit area free of clutter or obstacles. ●... - Page 11 ● Be sure that the arm is in the correct starting position. If the arm is not in the correct starting po- sition, the peeler will not start when the “Start” button is pressed. Always start the peeler with the arm in the correct starting position.
-
Page 12: How To Operate The Fap-1001
1) Turn the power switch “On.” Reference pages: 24, 36) ● “Astra FAP-1001” will be displayed on the operation screen, followed by the Settings Menu. At the same time, if the arm is not at the home position in the origin confirmation operation, the arm returns to the home position, and the ejector operates after the turntable rotates one segment. - Page 13 1. Pierce the item to be peeled with the fixing prong at the at the insertion position. Base of prong Drive axle Fixing Prong Item to peel Start button 2. The standby state is set. Push in until a clicking sound is made. The start button functions.
-
Page 14: How To Remove And Attach Parts
8. How to Remove and Attach Parts 1) The Arm ● The Arm holds the peeling blade. It can be removed and fully immersed for washing. When re- moving the arm it is recommended that the fixing prong also be removed. The peeler blades are extremely sharp. - Page 15 2) The Spring ● To replace the spring, it is best to remove the arm first. Arm holder Spring holder Spring holder Plate spring (clip) Clip First, pull the clip to remove it. Then Use a Phillips screwdriver to remove the spring holder can be removed.
- Page 16 4) Fixing prong ● You can remove the prong and immerse it for washing. ● The prong is fixed to the drive shaft axle with a clip. Remove the clip, then remove the prong. ● If the clip (with fixing prong) is left attached for an extended period, it may become stuck due to fruit juice residue, etc.
-
Page 17: Cleaning And Maintenance
9. Cleaning and Maintenance When inspecting or cleaning the unit, always switch the power “Off” and unplug the power cord from the wall outlet. Warning! Failure to do this may result in injury. 1) When using the unit be sure to carry out do the following on a daily basis. 1. - Page 18 4) Inspect regularly • The unit should be inspected regularly to ensure that screws and other items have not loosened, and that no cracks or fractures are visible. 5) Regularly food-machine grease (at least once /day). ● If neglected, it will cause malfunction and the life of the parts etc.
-
Page 19: Fixing Prong
10. Fixing Prong 1) Types of fi xing prongs ● Prong lengths are classifi ed as XS, S, M and L. The type of prong can be identifi ed by the color of the prong base. ● Prongs come in four different shapes. ●... - Page 20 Size (color coded) X S (White) S (White) M (Black) L (Blue) Prong length 25 mm 30 mm 40 mm 50 mm Flat Prong XS Flat Prong S Flat Prong M Flat Prong L Part Name Part No. HP-XSB HP-SB HP-MB HP-LB Flat Prongs...
- Page 21 2) How to select the fixing prong: Length of the prong (size) Select a prong that is over half the vertical height of the item to be peeled. However, if the item has a firm core, a shorter prong may be used, and will be easier to insert and remove. On the other hand, if the item is soft, and the volume of peeling is large, it is better to use a thicker prong.
-
Page 22: Push Plate
11. Push Plate ● Select the size of the push plate to be attached to the ejector according to the fi xing prong to be mounted. Push plate Fixing prong can be used Citrus Prong M Peach Prong L HP-MO HP-LP Other than fi xing prongs corresponding to push plates "large"... -
Page 23: Peeler Blade
12. Peeler Blade 1. Types of peeler blades ● The peeling thickness is divided into thin peel, normal peel, thick peel, and very thick peel. The yield is determined by adjusting the blade and the peeling thickness. ● Blade types are categorized as follows: fl at and comb. The selection depends on the type of item to be peeled. - Page 24 2) Yield effects of different peeling blades vs. peel thickness adjustments. Adjusting for thicker (deeper) peeling Thick Adjusting the unit to take a thicker peel increases the number of overlapping passes of the blade, thereby increasing the amount of peel removed. The peeler Flesh blade passes over the fruit more slowly, leaving less peel.
-
Page 25: Using Specified Settings
13. Using Specified Settings 1) [Item?] (Item selection) ● After powering up the unit, the first task is to select the item to be peeled. The available items are displayed in sequence on the Menu using the [ ] and [ ] buttons. - Page 26 2) Confi rming Correct Use of Attachments ● [Item?] By making a selection using (Item Selection) and pressing the "Start" button, a screen for confi rming installation of each of the parts according to the item selected next is displayed. (Dis- played in the sequence Peeler Blade and Fixing Prong.) Confi rm that the correct part is attached by pressing the Start button.
- Page 27 3) Resetting the Menu ● The counter displayed during peeling operations can be reset. In addition, the Specific Settings in each menu and the Standby adjustments can be reset to the original defaults. The available items are displayed in sequence on the Menu using the [ ] and [ ] buttons.
- Page 28 4) Using Specified Settings ● The standard item peeling range, direction, throw and finish settings can be modified manually, as needed. 1. Scroll the menu to display the item whose Item? settings you wish to modify. ( See page 24) 1 Apple, Asian Pear 2.
- Page 29 5) [1 Peeling Range] ● The peeling area can be set manually. ● The starting point is 0°, and the top point is 180°. 1. Left side (■ grey highlight): 0°~ 80° 2. Right side (■ light grey highlight): 100°~180° 80°...
- Page 30 6) [2 Peeling Direction] ● Set the direction of movement of the Peeler Blade arm to suit the type and ripeness of the item to be peeled. 1. Peeling left to right This is the default setting for hard items. When an item is soft, there is a chance that it will slip off the fi xing prongs.
- Page 31 7) [3 Peel Throw] ● Make the desired setting based on the type, size and skin thickness of the item to be peeled. 1. Peeling small items On small items there is less force to “throw” (eject) the peeling, so set the Peel Throw setting to “Yes.”...
- Page 32 8) [4 Peeling Finish] ● Choose a setting based on the type and size of the item to be peeled. Peel Finish is a function of the Peeling Range and Peeling Direction. It can be set to change the arm speed (from the default in Standby mode.) Peeling range 45°...
-
Page 33: Settings For Various Fruits And Vegetables
14. Settings for Various Fruits and Vegetables ● The settings below are only suggested guidelines. Settings may require adjustment based on the variety of item, place of origin, harvest time and ripeness. Moreover, an item may not be peeled depending on the condition. 1) Apples, Asian Pears Article Recommended Settings &... - Page 34 3) Oranges, small pomelos Article Recommended Settings & Procedures Explanation Fixing Prong HP-MO Optimal F-3, F-4 For removing the outer skin (flavedo) Peeler blade S-1, S-2 To remove the inner skin (albedo) Push plate Large It is exclusive. For removing the inner skin (albedo) Skin Thickness Adjust according to the thickness of the inner skin (albedo) Spin Speed...
- Page 35 How to Peel Citrus Well ● Preparation 1) Cut off the top portion at a position where the fruit can be clearly seen. Slece off Fruit flesh is not visible. Fruit flesh (cross-section of orange Make a vertical score (cut) to reduce segments) is sufficiently visible fouling of the blade during peeling.
- Page 36 4) Grapefruit, Hassaku oranges Article Recommended Settings & Procedures Explanation Fixing Prong HP-MO Optimal Peeler blade For removing the inner skin (albedo) Push plate Large It is exclusive. Skin Thickness Adjust according to the thickness of the inner skin (albedo) Spin Speed Adjust according to the softness of the fruit.
- Page 37 6) Persimmons and Turnips Article Recommended Settings & Procedures Explanation Fixing Prong HP-M3 Optimal Peeler blade Optimal Push plate Medium It is exclusive. Skin Thickness For larger items use lower values Spin Speed Peeling range Angle 20° – 180° Optimal L to R 0°...
- Page 38 8) Onions Article Recommended Settings & Procedures Explanation Fixing Prong HP-M3 Optimal Peeler blade S-2, S-3 Optimal Push plate Medium It is exclusive. Skin Thickness Adjust according to the softness of the fruit. Spin Speed Peeling range Angle 10° - 170° Optimal L to R 0°...
- Page 39 10) Lemons and Limes ● Since it is not included in the options, please register the detailed setting with the items 10) to 12). Article Recommended Settings & Procedures Explanation HP-SB, HP-MB Do this if the fruit is soft. Fixing Prong HP-M2, HP-M3 When the fruit is firm F-3, F-4...
- Page 40 11) Tomatoes ● Since it is not included in the options, please register the detailed setting with the items 10) to 12). Article Recommended Settings & Procedures Explanation Fixing Prong HP-SB, HP-MB Flat prongs are recommended to protect soft flesh. Peeler blade S-3, S-4 Optimal...
-
Page 41: Troubleshooting
15. Troubleshooting • If you notice something amiss while operating the unit, please refer to the following: Stage Issues, symptoms Additional info Likely Cause Solution Has the power cord become unplugged from the wall out- Check the power cord. let? No power No reaction at all It is conceivable that an inter-... - Page 42 Stage Issues, symptoms Additional info Likely Cause Solution Return the arm to the start- “Arm misaligned – realign” Peeling action does The Arm is not in the correct ing position, and press is displayed. not start. start position. “Start.” Making the peeling adjust- The skin peels off The peeling thickness setting ment thicker will prevent...
- Page 43 MEMO...
-
Page 44: In Conclusion
16. In Conclusion • This completes the basic user instructions for the FAP-1001. • If you have further questions, or issues with the unit, please contact Astra for additional consulta- tion. Warranty 1) The warranty period for this unit is one year from delivery, or 1000 hours of use.
Need help?
Do you have a question about the FAP-1001 and is the answer not in the manual?
Questions and answers