Table of Contents
Advertisement
Quick Links
Advertisement
Table of Contents

Related Manuals for Mach Sedan 5000-4CH

Summary of Contents for Mach Sedan 5000-4CH
-
Page 2: Table Of Contents
Manual L I S T List ------------------------------------------------------------------------------------------------------------------------------------------------------- Before Use -------------------------------------------------------------------------------------------------------------------------------------------- When Installs Caution Standard Package ---------------------------------------------------------------------------------------------------------------------------------- Product Overview ---------------------------------------------------------------------------------------------------------------------------------- Live Screen ------------------------------------------------------------------------------------------------------------------------------------------- Menu ---------------------------------------------------------------------------------------------------------------------------------------------------- PC Viewer --------------------------------------------------------------------------------------------------------------------------------------------- Appendix #1 Firmware Update ----------------------------------------------------------------------------------------------------------------- Appendix #2 HDMI Monitor Output ----------------------------------------------------------------------------------------------------------- Appendix #3 CVBS Monitor / Navigation Output ---------------------------------------------------------------------------------------- Appendix #4 Left/Right/Rear Trigger --------------------------------------------------------------------------------------------------------- Appendix #5 Select Monitor / Navigation for Trigger Function --------------------------------------------------------------------- Appendix #6 Driver State Monitoring System ---------------------------------------------------------------------------------------------... -
Page 3: Before Use
Manual Before Use • Thank you for choosing our Mach Truck Dash Cam Series. • Please carefully read this manual and use this dash cam with safety. • This manual is subject to change without any notice. • Some functions or features are subject to change with prior notice for product improvement. -
Page 4: When Installs
Manual When Installs • Do not remodel or cut the power cable. Use the power cable supplying by MBIZONE. • Check the dash cam operation before and after installing camera, memory and monitors to the vehicle. • Check the proper location and attach the dash cam. •... -
Page 5: Caution
Manual Caution • Do not manipulate the dash cam during driving. It may cause the accident. • Do not leave the dash cam at very high or low temperature in long term. It may cause malfunction or failure. • The operating temperature range is -10C to 60C. Use the dash cam in the temperature range. . •... -
Page 6: Standard Package
Manual Standard Package 1. MACH TRUCK 5000 Standard Package ① Mach Truck 5000 ② External HD IR Camera(550HDIR) + 5m cable ③ External HD IR Camera(550HDIR) + 5m cable ④ External HD IR Camera(550HDIR) + 20m cable ⑤ Hardwiring power cable ⑥... - Page 7 Manual 3. Optional ① 10m External HD camera cable ② 20m External HD camera cable ③ 2m CVBS Video cable ④ 1.5m Micro HDMI to HDMI cable ⑤ 3m Trigger cable (Left, Right, Rear Trigger cable) ⑥ DSM(Driver State Monitoring) device ⑦...
-
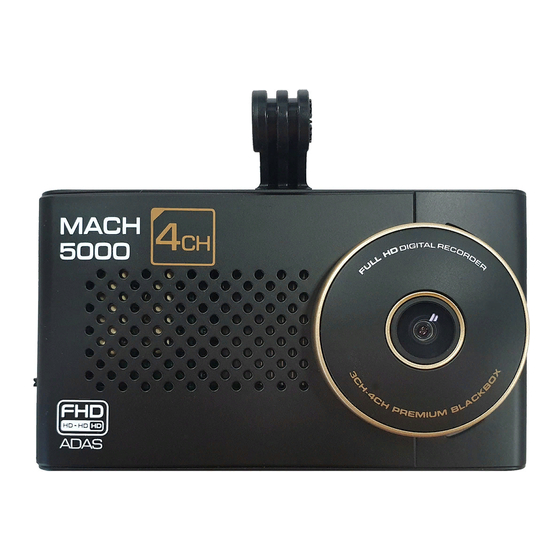
Page 8: Product Overview
Manual Product Overview 1. Front Mount Connector : Connect your bracket came with the dash cam. Speaker Hole : Sound alerts and voice guide Front camera lens : Shoot the forward footage Security LED : Display the recording status. 2. Rear Touch Screen : Touch the LCD to move the various function MIC Hole : Record the voice. - Page 9 Manual 3. Top and Bottom DC-IN port : Connect the DC power(12~24V) cable GPS Port : Connect GPS antenna. 10) SIG Port : Connect trigger cable. (The function with Mini D-Tacho using the port is disabled for further developing.) 11) CAM 1 Port : Connect camera. (Recommended to mount on right side.) 12) CAM 2 Port : Connect camera.
- Page 10 Manual 4. Left and Right 19) Micro SD card Slot : Insert Micro SD card. 20) Screw Hole for SD card cover : Insert a screw. (The special screw and the screw driver are optional.) 21) Power switch : Turn on or off the power. Page | 9 April 2020...
-
Page 11: Live Screen
Manual Live Screen 1. LIVE SCREEN FRONT CAM3 CAM1 CAM2 Switch Display mode : By touching LCD, the display mode switches in the following order ; 4-way spilt screen(Front/Cam1/Cam2/Cam3) ▶ 2 cameras vertical split screen(Front/Cam3) ▶ 2 cameras vertical split screen(Cam2/Cam1) ▶ Full screen of front camera ▶ Full screen of Cam3 ▶ Full screen of Cam2 ▶... - Page 12 Manual 2. ICONS FOR RECORD STATUS Icon Description Use Driver Status Monitoring System. Do not use Driver Status Monitoring System. Do not use any function in the signal port. Use Mini Digital Tach-graph. (Currently disabled.) Use Trigger function(Left/Right/Rear). Record to the HDD/SSD. (Currently disabled.) Record to the Micro SD Card.
-
Page 13: Menu
Manual Menu 1 . A U D I O S E T T I N G ( 1 ) A L A R M - Turn on or off the alarm sound when the event modes(Normal Event, Parking Motion, Parking Event, Manual Rec, DSM Event) are activated. - Page 14 Manual 2 . P L A Y B A C K ( 1 ) N O R M A L - The videos are recorded in 1 minute segments during driving. - The video is stored in the Normal folder. ( 2 ) N O R M A L E V E N T - When the impact to the vehicle is detected, a video is recorded for 20 seconds.
- Page 15 Manual ( 5 ) M A N U A L R E C . - When user touches the manual recording button on the LCD, a video is recorded for 20 seconds. - The video is recorded from 5 seconds before touching to 15 seconds after touching. - The video is stored in the Manual REC.
- Page 16 Manual ( 8 ) P L A Y B A C K - Touch on top left, the each cameras’ video recorded at the same time is played. - Touch on top right to move back to the file list. - Touch to play previous video, stop the video or play next video.
- Page 17 Manual 3 . R E C O R D I N G C O N F I G U R A T I O N ( 1 ) R E C O R D I N G M O D E - Turn on or off to activate or deactivate the each recording modes.
- Page 18 Manual ( 2 ) R E C O R D I N G C H A N N E L S E L E C T I O N - Select the channel number to record. - Set to record the video from front camera only. - Set to record the videos from front camera and the camera connected to CAM1 port.
- Page 19 Manual ( 3 ) M E M O R Y A L L O C A T I O N - Select memory allocation rate. - Allocation rate is measured in the amount of memory allocated per each recording mode.. - “Normal”...
- Page 20 Manual ( 4 ) M E M O R Y S E L E C T I O N (The function with External Hard Drive is disabled and it will be activated in the future.) - Select memory type to store the videos. - Choose to store the videos to Micro SD card.
- Page 21 Manual ( 5 ) C A M E R A M I R R O I N G - Turn on or off to rotate the image horizontally. The same is applicable for both live view and recording. ▶ Default : OFF ▶...
- Page 22 Manual 4 . R E C O R D I N G Q U A L I T Y ( 1 ) R E S O L U T I O N - Select the camera resolution for front camera and side(rear) camera(s). - For front camera, choose the Full HD(1920 x 1080p) or HD(1280 x 720p).
- Page 23 Manual ( 2 ) F R A M E S - Choose the FPS(Frame rate Per Second) for all cameras. ▶ Default : 25FPS ▶ Option : 10FPS, 15FPS, 20FPS, 25FPS, 27FPS and 30FPS [Caution] All the data stored on the memory will be erased after setting change by formatting the memory. ( 3 ) B I T R A T E S - Select the video recording bitrate for all cameras.
- Page 24 Manual 5 . S C R E E N S A V E R - Select the screen display mode after 1 minute from live view screen. - Set to display current time and date on the LCD screen. - Set to turn off the LCD screen.
- Page 25 Manual 6 . S A F E D R I V I N G D E V I C E ( 1 ) A D A S (The ADAS function is disabled and it will be activated in the future.) - ADAS is safety camera alert system.
- Page 26 Manual ( 2 ) S I G N A L P O R T S E L E C T I O N (The function with Mini D-Tacho is disabled and it will be activated in the future.) - The signal port is used for trigger function or operating Mini D-Tacho. - Select not to use the signal port.
- Page 27 Manual ( 3 ) P R I O R I T Y S P E E D S E L E C T I O N (The function with Mini D-Tacho is disabled and it will be activated in the future.) - Select the vehicle speed from D-Tacho or GPS when connecting D-Tacho.
- Page 28 Manual 7 . S E C U R I T Y - Set to use password for the security of this dash cam. - If set the password, this dash cam permits to move the menu after authorizing by password. - The password allows only 4 numbers for example “1111”...
- Page 29 Manual 8 . S Y S T E M ( 1 ) T I E M & D A T E - Set current time and date. - The time and date will be synchronized when external GPS antenna is connected. ( 2 ) L A N G U A G E - Choose any language.
- Page 30 Manual ( 3 ) S E N S I T I V I T Y / C U T - O F F - Set G-sensor(shock) sensitivity for normal and parking modes from level 1 to level 10. ▶ Default : Level 5 ▶...
- Page 31 Manual ( 4 ) S E C U R I T Y L E D - Turn on or off the security LED on front of body and status LED on rear of body. - Turn on or off the LEDs during normal mode. ▶...
- Page 32 Manual ( 6 ) M E M O R Y F O R M A T - Memory formatting is to erase the videos recorded to the memory. - The data or videos may have errors if turns off the dash cam or detaches the memory before completing formatting. - Store any important data or videos separately before formatting.
- Page 33 Manual ( 8 ) S Y S T E M I N F O R M A T I O N - The model name, firmware information, G-sensor level and GPS are displayed. Page | 32 April 2020...
-
Page 34: Pc Viewer
PC Viewer This PC viewer is an application for viewing movies, GPS data and G-Sensor data recorded by Mach Truck 3800 and Mach Truck 5000. With this viewer, you can play your videos on the main screen while watching your vehicle’s speed, position, G-Sensor Data on graphs and maps. - Page 35 Manual ( 2 ) F I L E O P E N - Click the open icon. - Select “MBIZONE” drive and click “OK” button. ( 3 ) P L A Y V I D E O F I L E - Select any file from the list to load entire video play list in the memory card.
- Page 36 Manual ( 4 ) V I E W S C R E E N - Select a certain screen in 4-spilit screen to enlarge full screen. ( 5 ) D O W N L O A D V I D E O ①...
- Page 37 Manual ( 6 ) F U L L S C R E E N - Click the Full Screen button to see the video by maximum screen. ( 7 ) M A P - Select a certain video file. - Check the location of the recorded video. - It is enabled only if video is captured while connected to GPS antenna.
-
Page 38: Appendix #1 Firmware Update
Manual A P P E N D I X # 1 [ F I R M W A R E U P D A T E ] 1. Power off the dash cam and separate memory from dash cam. 2. Insert the memory to PC. 3. -
Page 39: Appendix #2 Hdmi Monitor Output
Manual A P P E N D I X # 2 [ H D M I M O N I T O R O U T P U T ] This function is to view the live images from the dash cam with live HDMI monitor output. ▶... -
Page 40: Appendix #3 Cvbs Monitor / Navigation Output
Manual A P P E N D I X # 3 [ C V B S M O N I T O R / N A V I G A T I O N O U T P U T ] This function is to view the live images from the dash cam with live CVBS or Navigation monitor output. -
Page 41: Appendix #4 Left/Right/Rear Trigger
Manual A P P E N D I X # 4 [ L E F T / R I G H T / R E A R T R I G G E R ] This function is to view the live images of left, right or rear camera will automatically switch over the full screen when left or right ▶... -
Page 42: Appendix #5 Select Monitor / Navigation For Trigger Function
Manual A P P E N D I X # 5 [ S E L E C T M O N I T O R / N A V I G A T I O N F O R T R I G G E R F U N C T I O N ] This function is to use your navigation with trigger function. -
Page 43: Appendix #6 Driver State Monitoring System
Manual A P P E N D I X # 6 [ D R I V E R S T A T E M O N I T O R I N G S Y S T E M ] This function is to connect the dash cam with separate DSM device. -
Page 44: Appendix #7 Recording File Folder
Manual A P P E N D I X # 7 [ R E C O R D I N G F I L E F O L D ] In order to play the video, please connect Micro SD Card to your PC and find “MBIZONE” directory. ▶... -
Page 45: Appendix #8 Recording Time
Manual A P P E N D I X # 8 [ R E C O R D I N G T I M E ] The micro SD card 64GB is in the standard package. ▶ Please select memory capacity and settings for the purpose of use. ▶... -
Page 46: Appendix #9 Specification
Manual A P P E N D I X # 9 [ S P E C I F I C A T I O N ] ■ MACH TRUCK 5000 4CH(MT-5000 4CH) Item Specifications Number of Channel 4 Channels Image Sensor Sony Starvis, 2.0Mega Pixels(Side 1.3Mega Pixels)
Need help?
Do you have a question about the Sedan 5000-4CH and is the answer not in the manual?
Questions and answers