Table of Contents
Advertisement
Quick Links
OPERATOR'S MANUAL
SELF-LOADING GRITTER
SAHARA 100
SAHARA 140
SAHARA 200
SAHARA 240
Serial number
Translation of the original operator's manual
SaMASZ Sp. z o.o.
Poland, 16-060 Zabłudów, ul. Trawiasta 1
– English –
Established – 1984
NIP PL-966-159-29-76
tel. (+48) (85) 664 70 31
fax (+48) (85) 664 70 41
e-mail: samasz@samasz.pl
www.samasz.pl
IN907EN001
2015.01.26
EDITION NO.1.
Advertisement
Table of Contents

Related Manuals for SaMASZ SAHARA 140


Summary of Contents for SaMASZ SAHARA 140
- Page 1 SaMASZ Sp. z o.o. Poland, 16-060 Zabłudów, ul. Trawiasta 1 Established – 1984 NIP PL-966-159-29-76 tel. (+48) (85) 664 70 31 fax (+48) (85) 664 70 41 e-mail: samasz@samasz.pl www.samasz.pl OPERATOR'S MANUAL SELF-LOADING GRITTER SAHARA 100 SAHARA 140 SAHARA 200...
- Page 2 This operator's manual is indispensable part of any self-loading gritter and is to familiarize future user with principles of proper operation and use of the machine as well as with risks these encompass. Prior to commissioning content of the hereby manual and safety advices should be learned thoroughly.
-
Page 3: Table Of Contents
Self-loading gritter Operator's manual Sahara Table of contents Page 1. IDENTIFYING THE MACHINE ..................... 2 2. SAFETY CONDITIONS ......................3 2.1. Safety principles ............................ 3 2.2. Safety decals ............................4 2.3. Risks and prohibitions ........................... 5 3. DESIGNATION AND CONSTRUCTION ................6 4. -
Page 4: Identifying The Machine
Self-loading gritter Operator's manual Sahara 1. IDENTIFYING THE MACHINE Each gritter can be identified owing to data plate, which is placed firmly onto linkage body as shown below Fig. 1. Fig. 1. Data plate and its placement Data plate includes: - name and adress of the manufacturer, - model year, - CE marking means, that the produce... -
Page 5: Safety Conditions
Self-loading gritter Operator's manual Sahara 2. SAFETY CONDITIONS NOTE! Sahara gritter can only be operated by personnel who learned content of this manual. Each gritter operator should be fully aware of potential risks resulting from its operation and should know how these are avoided. 2.1. -
Page 6: Safety Decals
Self-loading gritter Operator's manual Sahara 2.2. Safety decals NOTE! Always comply with safety decals describing risks, and warning signs placed on the machine. NOTE! All warning decals (labels) should be clean and legible. Lost or damaged decals (labels) must be replaced with new ones. ... -
Page 7: Risks And Prohibitions
Sahara self-loading gritter 2.3. Risks and prohibitions NOTE! Despite the fact, that SaMASZ company – the manufacturer of self-loading gritter takes responsibility for the gritter design and manufacturing, in order to eliminate risk, certain elements of residual risk when operating the gritter are unavoidable. -
Page 8: Designation And Construction
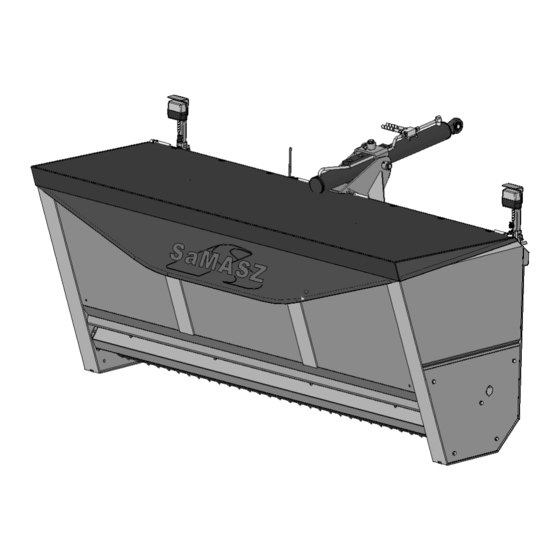
Besides, it may also be useful in spreading aggregate (grit) at construction and repairs of roads as well as liming lawns and pitches. Well-proven design and quality materials ensure high reliability and durability of SaMASZ machines. Gritter generally comprises load container (K) lowered with use of hydraulic cylinder (H), crushing and dosing assembly and flaps;... -
Page 9: Equipment And Spare Parts
Spare parts should be ordered according to spare part catalogue by giving full name of the part as well as its catalogue no. NOTE! Use only genuine SaMASZ fittings and spare parts. Spare parts of unknown origin or new made feature lower strength and have unfavorable influence on machine’s performance and overall safety. -
Page 10: Controlling Gritter
Self-loading gritter Operator's manual Sahara Fig. 7. Mounting of Sahara gritter on 3-point linkage Cat. II. A – Electric lighting connector, B – Hydraulic engine connectors, C – 3-point linkage pins Cat. II, D – Lowering cylinder hydraulic connectors, E – Cylinder height adjustment, F – Lowering cylinder In order to mount the gritter, drive perpendicularly to its hitch, so that lower links of 3-point linkage are locked in gritter's linkage holders. -
Page 11: Transport And Standstill Position Of Gritter
Self-loading gritter Operator's manual Sahara NOTE! During the process of self-loading (when pushing dropped hopper into a pile of loose aggregate), tractor's hydraulics MUST be set to float (neutral) position or tilting cylinder's control lever MUST be pushed and hold. This procedure will prevent the cylinder or the machine from damage. - Page 12 Self-loading gritter Operator's manual Sahara Sahara gritters have been designed as precise sand, salt, grit, or lime spreaders. Owing to vertical spreading system they cause no damages to cars and pose no danger to passers-by. In case of spreading salt these gritters pose no danger to greenery. Gritters feature possibility of quick self- loading owing to hopper back tilting system which allows them to operate without any additional equipment or personnel.
-
Page 13: Operating Service
Self-loading gritter Operator's manual Sahara Upon loading the gritter and setting it in proper operating position (Fig. 11). In order to turn dosing on start hydraulic engine with handle for hydraulics section to which it has been connected. Gritter is also equipped with double spreading rate adjustment. With use of knob for adjustment of rotation of hydraulic engine which drives crushing shaft and dosing shaft and through pressing of rear flap to dosing shaft with use of the handle. -
Page 14: Maintenance And Storing
Self-loading gritter Operator's manual Sahara 7. MAINTENANCE AND STORING If gritter is idle for more than two weeks, the following maintenance works should always be performed: clean and wash gritter thoroughly, if need be perform any repair, adjustment, replacement of sealing or hose, ... -
Page 15: Technical Characteristics
Self-loading gritter Operator's manual Sahara Fig. 12. Location of centre of gravity Tab. 3. Location of centre of gravity Model Dimension [mm] SAHARA 140 SAHARA 200 SAHARA 240 1110 1320 9. TECHNICAL CHARACTERISTICS General characteristics of Sahara self-loading gritter Tab. 4. Model: Sahara Sahara 140... -
Page 16: Repair And Withdrawal From Use
Self-loading gritter Operator's manual Sahara 10. REPAIR AND WITHDRAWAL FROM USE NOTE! When mounting and dismounting, please remember about personal protection as well as environmental protection means. NOTE! When unhitching the machine pay particular attention to additional threat such as crush or cut. Special protective equipment must be used: gloves, protective clothing, glasses etc. -
Page 17: Warranty
3. Faults or damages should be submitted personally, by letter or by telephone. Repairs shall be carried out within 14 days. Any repair which is subject to warranty should be carried out by an authorized SaMASZ dealer. 4. Warranty claims regarding the product replacement or repayment are considered within 14 days by the manufacturer. -
Page 18: Warranty Repairs Record
Self-loading gritter Operator's manual Sahara 6. The costs of technical assessment are borne by the Purchaser - if the manufacturer determines that the product being subject to claim is defect free and what is confirmed by the following expertise. 7. Parts of gritter which are not covered by this warranty as a result of normal wearing during intensive use: a) rubber of both rear and front flap, b) connecting fittings,... -
Page 19: List Of Parts
Self-loading gritter Operator's manual Sahara 12. LIST OF PARTS List of parts can be found in parts catalogue, which is an integral part of self-loading gritter equipment, just as this operator’s manual. - 17 -...
Need help?
Do you have a question about the SAHARA 140 and is the answer not in the manual?
Questions and answers