Table of Contents
Advertisement
Quick Links
Advertisement
Table of Contents

Related Manuals for DFC T730

Summary of Contents for DFC T730
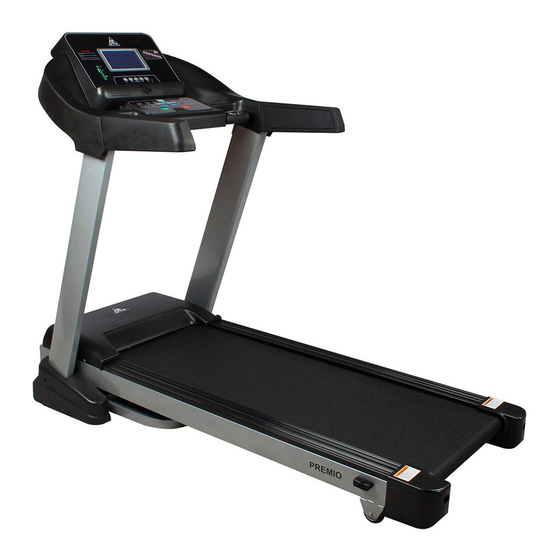
- Page 1 Электрическая Модель: DFC Premio Артикул: T730...
-
Page 2: Safety Precautions
Safety Precautions Please keep this manual for future reference. 1. Before commencing assembly and use of your new Treadmill, carefully read the instruction manual to understand the information provided. The correct installation, maintenance and use of your Treadmill is important to ensure you get the safest and most effective fitness workout. -
Page 3: Directions For Use
Directions for Use In order to avoid an accident, please ensure you have the treadmill safety key securely attached to your clothing. In the event, that you accidently trip or slip whilst walking or running on the treadmill, removing the safety key from the console will ensure the power is paused to the motor bringing the belt to a stop. - Page 4 Assembly Instructions We recommend 2 people assist in assembling this unit. Place all parts of the Treadmill in a cleared area and remove the packing materials. Do not dispose of the packing materials until assembly is completed. Before you start installation inspect and prepare all parts and screws featured in this manual.
- Page 5 Step 1 Installing the upright frame Upright and secure the upright frame into the stabilizer with Hex Bolt M8x50mm teeth 12mm (S2) and Hex Bolt M8x16mm(S3) back sides. Important : While assembly, it need two person work together. One people hold the computer and another one tighten the bolts with the Allen Wrench (S1) provided.
-
Page 6: Emergency Stop
Step 3 Installing the Covers Secure the cover (S8) to the upright frame with one Hex Bolt (S4) both sides, tighten the bolts with Multi Hex Tool with Philips Screwdriver (S5) provided. EMERGENCY STOP SAFETY KEY Before beginning a workout session ensure that the Safety Tether Key is properly placed onto the Computer Console and the Safety Clip is securely attached to an article of your clothing. -
Page 7: Display Functions
Display Functions TIME No Set Target Time - TIME will count up from 00:00 to maximum 99:00 with each increments is one minute. Using Set Target Time - TIME will count down from Preset Value . Each preset Increment is one minute between 5:00 to 99:00 minutes. SPEED Display current training speed from 1.0 to a maximum of 20.0 km/h. -
Page 8: Function Buttons
Function Buttons 1. MODE: To confirm all settings and to enter exercise modes. 2. Speed +: To select training mode and adjust the function value up. 3. Speed -: To select training mode and adjust the function value down. 4. START/STOP: To start or stop your workout. POWER ON: Plug the main power cord in a grounded wall outlet, please make sure the power matched. -
Page 9: Moving And Storage Instructions
Moving & Storage Instructions Folding away your Treadmill A.)Turn off the treadmill, switch off at the main power switch and pull out the plug. B.) Lift the treadmill deck up towards the main console. You should feel the treadmill gas spring system engage. C.) To lower the treadmill deck, press the gas spring system in with your foot to disengage the lock. -
Page 10: Warm-Up Exercise
Warm-Up Exercise Warm up exercise is important in preparing the muscles for activity whilst minimising the risk of injury. You may choose to warm up with a light/brisk walking pace for 5-10 minutes before stopping and performing some simple stretches. (As shown in the pictures below) 1. -
Page 11: Maintenance Instructions
Maintenance Instructions WARNING: Before cleaning or carrying out any maintenance on your treadmill, ensure the power is turned off and the power cord removed from the plug socket. At least once a year, the motor cover on your treadmill should be removed and any dust or debris vacuumed up to maintain the smooth operation of the motor and drive system.
Need help?
Do you have a question about the T730 and is the answer not in the manual?
Questions and answers