
Related Manuals for Solido 80

Summary of Contents for Solido 80
- Page 1 Montageanleitung solido 80 Holz mit Antrieb solido ECO für ein- und zweiflügelige Anlagen solido 80 timber with drive solido ECO for single and double leaf doors DS020642/06.2017...
-
Page 2: Table Of Contents
Solido 80 timber Page 7 bis 80 kg Flügelgewicht up to 80 kg leaf weight Technische Hinweise Technical notes Einbauzeichnungen Antrieb solido ECO Seite 8 Mounting drawings drive solido EC Page 8 Montageanleitung Solido ECO Seite 11 Installation instructions Solido ECO Seite 11 Benötigtes Werkzeug... -
Page 3: Lieferumfang
Solido 80 Holz/Solido 80 timber Lieferumfang/Sope of delivery Abb. 1 einflügelig/ fig. 1 single leaf 1. Laufschiene 6. Zahnriemenverbinder 1. Track 6. Toothed belt connector 2. Stopper 7. elektrischer Antrieb 2. End Stop 7. elektrical drive 3. Umlenkrolle 8. Zahnriemen 3. - Page 4 Solido 80 Holz/Solido 80 timber Montageschritte, ein- und zweiflügelig/Mounting steps, single and double leaf Laufschiene entsprechend der vorliegenden Befesti- Abb. 3 gung montieren. Die entsprechenden Einbauschnitte fig. 3 finden Sie auf Seite 7. Mount the track as it is appropriate for the used mounting parts.
-
Page 5: Montageschritte Ein- Und Zweiflügelig
Solido 80 Holz/Solido 80 timber Montageschritte, ein- und zweiflügelig/Mounting steps, single and double leaf Schiebetür in die Tragschrauben der Rollapparate Abb. 7 einhängen, Höhe (s. Seite 7) einstellen und Konter- fig. 7 mutter anziehen. Hang sliding door into the holding screws of the trolley hangers, height (see page 7), set and tighten counter screw. - Page 6 Solido 80 Holz/Solido 80 timber Montageschritte, ein- und zweiflügelig/Mounting steps, single and double leaf Zahnriemen um Antriebsritzel und Umlenkrolle Abb. 10 führen und mit Vorspannung in die andere Aus fig. 10 nehmung der Befestigungsplatte einsetzen und mit der Platte klemmen.
- Page 7 Flügelgewicht/up to 80 kg leaf weight Abb. 13 Abb. 14 fig. 14 fig. 13 Abb. 13: Solido 80 Holz mit Antrieb solido ECO, Abb. 14: Solido 80 Holz mit Antrieb solido ECO, einflügelig bis 80 kg, elektrisch zweiflügelig bis 70 kg, elektrisch Fig. 13: Solido 80 timber with drive solido ECO, Abb.
- Page 8 Solido 80 Holz/Solido 80 timber Antrieb solido ECO/electrical drive solido ECO Einbauzeichnung Antrieb solido ECO/Mounting drawing drive solido ECO solido 80 Abb. 15 82,8 45,5 ~110 82,8 fig. 15 33,5 195,5 49,5 DS020642/06.2017...
- Page 9 Montageanleitung Installation instructions Solido ECO Schiebetürantrieb Solido ECO sliding door drive DS020642/06.2017...
- Page 10 • TÜV-geprüft nach DIN EN 18650-2 Low-Energy • Wenn kein Serientaster eingebaut wird benötigt man einen Einstellhilfetaster 1. Properties of the Solido ECO • power supply 230V (approx. 2.5 m cable) • suitable for continuous mains operation 230V • housing (approx. 50 x 50 x 158 mm) with motor and integrated control •...
-
Page 11: Scope Of Supply
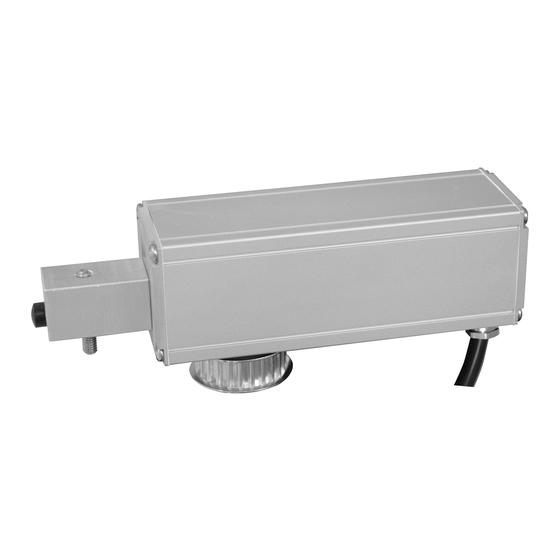
Solido ECO Allgemeine Informationen/General information Lieferumfang/ Scope of supply Abb. 1 fig. 1 1. Zahnritzel, 24 Zähne 1. pinion, 24-tooth 2. LED 2. LED 3. Verschlusskappe „Lernfahrt“ 3. cap "teach-in operation" 4. Verschlusskappe „Programmierung“ 4. cap "programming" 5. fünfadriges Anschlusskabel 5. - Page 12 Solido ECO Allgemeine Informationen & Inbetriebnahme/General Information & Set-up Anschluss/Connection Der Motor verfügt über ein 5-poliges 2,5 m langes, nummeriertes, halogenfreies Anschlusskabel: /10VA Revision: 1.4 Seiten 1/1 The motor has a 5-pole 2.5 m long, numbered, halogen-free connection cable: green/yellow = protective : 30.11.2011...
- Page 13 Antriebsritzel in die Normalstellung zurückgeschoben werden. Important: • At the bottom of the Solido ECO there are two caps (see p. 13, fig. 1) • Open the cap "programming" (fig. 1, item 4) and push the subjacent switch in the direction of the connection cable.
- Page 14 Solido ECO Allgemeine Informationen & Inbetriebnahme/General Information & Set-up Einstellungsebenen/Adjustment planes Der Solido ECO verfügt über 4 Einstellungsebenen. The Solido ECO has 4 adjustment planes. Ebene 1: Einstellung von: Plane 1: Setting of: 1. Laufrichtung 1. direction of travel 2. Dauer- oder Impulsbetrieb 2.
- Page 15 Solido ECO Allgemeine Informationen & Inbetriebnahme/General Information & Set-up Zur Einstellung der Betriebsart gehen Sie wie folgt vor/ For setting the mode of operation proceed as follows • Drücken und halten Sie die Auf- und Zu -Taste Ihres nicht verriegelten Serien - oder Einstellhilfetasters zeitgleich für ca.
- Page 16 Solido ECO Allgemeine Informationen & Inbetriebnahme/General Information & Set-up 3.2.2 Automatischer Zulauf/Automatic closing Bei aktiviertem automatischem Zulauf fährt die Tür, nach Erreichen der Endlage in Auf-Richtung, nach eingestellter Offenhaltezeit (Ebene 3 Punkt 3.3.2 ) automatisch zu. When the automatic closing mode is activated (plane 3 item 3.3.2), the door closes automatically, after reaching the end position of the opening movement, after the pre-set hold-open time.
- Page 17 Solido ECO Allgemeine Informationen & Inbetriebnahme/General Information & Set-up • Press and hold the open and close button of your non-interlocked two-circuit breaker or adjustment aid button simultaneously for approx. 3 seconds until you hear a short blip and the LED is lit once.
- Page 18 Solido ECO Allgemeine Informationen & Inbetriebnahme/General Information & Set-up • Release both buttons briefly. • Press and hold the open and close button simultaneously again for approx. 3 seconds until you hear three short blips and the LED is lit three times.
- Page 19 Solido ECO Allgemeine Informationen & Inbetriebnahme/General Information & Set-up • Release both buttons briefly. • Press and hold the open and close button simultaneously again for approx. 3 seconds until you hear two short blips. and the LED is lit twice.
- Page 20 Aufleuchten der LED bestätigen die korrekte Programmierung. Taste loslassen. • Interrupt the power supply to the Solido ECO for approx. 10 seconds. • As soon as the power supply is restored, press and hold the PROG button on the transmitter to be taught in within 60 seconds from a distance of approx.
- Page 21 Solido ECO Allgemeine Informationen & Inbetriebnahme/General Information & Set-up Hinweis/Note: Es kann lediglich ein Funkhand- oder Wandsender als Mastersender eingelernt werden. Only one wireless hand-held transmitter or wall-mounted transmitter can be taught in as master transmitter. 4.1 Einlernen eines zusätzlichen...
- Page 22 Solido ECO Allgemeine Informationen & Inbetriebnahme/General Information & Set-up • Press the PROG button of your master transmitter; a short blip and the LED lighting up acknowledge that you are in the programming mode. Release button. • Press the CLOSE button on the master transmitter within approx. 2 seconds. The motor is in the deletion mode.
- Page 23 Solido ECO Allgemeine Informationen & Inbetriebnahme/General Information & Set-up Die Gewährleistungszeit für den Motor beträgt 2 Jahre ab Verkaufsdatum. Die Gewährleistung schließt Fehler oder Mängel aus, welche zurückzuführen sind auf: The warranty period for the motor is 2 years from date of sale.
- Page 24 Solido ECO Allgemeine Informationen & Inbetriebnahme/General Information & Set-up 8. Allgemeines zur bestimmungsgemäßen Verwendung und Sicherheitshinweise 8. General information for the intended use and safety instructions Eine Fernsteuerung von Geräten oder Anlagen mit erhöhtem Unfallrisiko ist gesetzlich verboten. Die Anwendung in sicherheitskritischen und gesundheitsgefährdenden Bereichen ist nicht gestattet.
- Page 25 Solido ECO Allgemeine Informationen & Inbetriebnahme/General Information & Set-up 10. Wichtige Sicherheitshinweise für die Montage und Inbetriebnahme 10. Important safety instructions for mounting and set-up • Die Steuerungen sind ausschließlich für den Betrieb von Schiebetüren bestimmt. • Werden Schiebetür-Antriebe installiert, muss die Zuleitung bei AP-Installation im Freien sowie bei UP-Installation durch ein Schutzrohr oder einen Kabelkanal geschützt werden.
- Page 26 Solido ECO Allgemeine Informationen & Inbetriebnahme/General Information & Set-up Übersicht Programmierung/Overview programming Ebene/Plane 1: Plane 1: 1. Laufrichtung 1. Laufrichtung 2 x Auf-Taste = Änderung der Laufrichtung 2 x Auf-Taste = Änderung der Laufrichtung 1 x Auf-Taste = Rückkehr zur Werkseinstellung 1 x Auf-Taste = Rückkehr zur Werkseinstellung...
- Page 27 Solido ECO Allgemeine Informationen & Inbetriebnahme/General Information & Set-up A1 Geschwindigkeiten und Rampenlängen/speeds and ramp lengths Gewicht der Schiebetür in kg max. Geschwindigkeit in cm/s Länge der Rampen Weight of sliding door in kg max. speed in cm/s lengths of the ramps...
- Page 30 Schachermayer - Großhandelsgesellschaft m.b.H. Schachermayerstraße 2 A - 4020 Linz Tel.: + 43 (0) 732 - 6599 - 0 Fax: + 43 (0) 732 - 6599 - 1360 www.schachermayer.at Die technischen Angaben entsprechen dem neusten The technical specifications are up-to-date. We reserve Stand.
Need help?
Do you have a question about the 80 and is the answer not in the manual?
Questions and answers