Advertisement
Advertisement
Table of Contents

Related Manuals for Best Tugs ROMEO R8

Summarization of Contents
Introduction
Contact Information
Contact Best Tugs for assistance via phone at 800-914-2003.
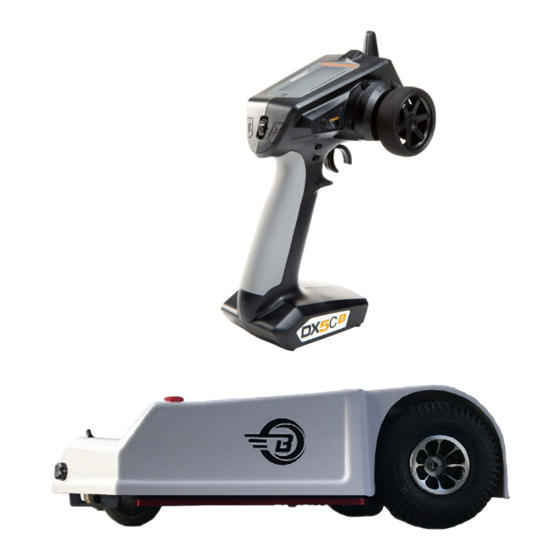
What's in the Crate?
External Charger
The external charger included in the crate for powering the tug.
Remote Control
The remote control unit provided with the tug for operation.
Romeo Tug
The main unit of the Romeo tug itself, shown as part of the crate contents.
Uncrating Instructions
Tools Needed
Lists the required tools: Phillips Head Screwdriver and 7/16 Socket.
Step-by-Step Uncrating
Detailed instructions for safely removing the tug from its shipping crate.
Uncrating Instructions (Continued)
E-Stop and Master Switch Check
Ensuring E-Stop switches are out and the master switch is on for operation.
Attaching Tug to Aircraft
Connecting the tug to the aircraft after completing uncrating and safety checks.
Powering On Sequence
Important note on powering the controller first and the tug last.
Remote Control
Control Trim Functions
Adjusting throttle and steering trims to correct tug behavior.
Rotation and Locking Mechanisms
Operating the Lazy Susan rotation lock and the loading hook.
Indicator Functions
Understanding visual indicators for loading hook and rotation lock.
Power and Light Controls
Turning the controller on/off and operating the light function.
Throttle Operation and Warning
Using the throttle for speed control and understanding throttle reversal warnings.
Using Your Tug
Power On Sequence
Correct procedure for powering on the remote and the tug.
Maneuvering Practice
Familiarizing with tug movements and practicing without an aircraft.
Directional Relativity
Understanding that directions are relative to the tug, not the remote.
Shutdown Procedure
Procedure for shutting down the tug and controller.
Safety Warning
Crucial safety warning about potential damage from improper use.
First Use - Easy Load/Lazy Susan
Initial setup for easy load or Lazy Susan configuration.
Lazy Susan/EZ Load Operation
Cage Adjustment
Adjusting the tug's cage diameter and width for proper fit.
Lazy Susan Locking
Locking the Lazy Susan for EZ Load operation and engaging the mechanism.
Loading Procedure
Steps for loading an aircraft onto the tug with the ramp down.
Unloading Procedure
Steps for unloading an aircraft from the tug.
Advanced Unloading Maneuver
An advanced technique for unloading using the rocker switch and throttle.
Moving Your Plane
Initial Practice
Recommends practicing without an aircraft to learn controls.
Plane Movement Familiarization
Understanding the tug's stopping distance and 'coast' feature.
Pre-flight Checks
Checking surroundings, path, and aircraft wheel security before moving.
Storage
Storage Environment
Storing the tug in a dry, safe area away from elements.
Extended Storage
Advice for storing the tug plugged in for battery maintenance.
Maintenance
Lazy Susan Bolt Tightening
Annual tightening of the Lazy Susan central bolt to prevent bearing failure.
Lazy Susan Mechanism Cleaning
Cleaning the Lazy Susan locking mechanism opening and reconnecting wires.
Charging the Tug
Procedure for charging the tug's battery using the included charger.
Battery Care
Recommended Charging Levels
Suggests charging when battery falls below 70% for optimal life.
Battery Discharge Rate
Explains the non-linear discharge rate and how it fluctuates.
Battery Lifespan and Damage
Discusses factors that damage lead-acid batteries and their limited warranty.
Smart Charger Functionality
Details on how smart chargers work and their protection features.
Diagnosing Battery Condition
Steps to diagnose battery condition using a charger and meter.
Battery Specifications
Technical specifications for the 12 Volt 18 Ah Sealed AGM Battery.
Critical Cautions
Soft Stop Feature
Warning about the tug's soft stop feature and the need for practice.
Emergency Stop (E-Stop)
Explanation of the E-Stop function and its potential to damage equipment.
Aircraft Chocking
Reminder to chock aircraft mains to prevent unintended movement.
Operator Surroundings Awareness
Emphasizes awareness of surroundings to prevent serious injury or death.
Braking System Limitations
Notes that tugs rely solely on motor/transmission for braking.
Tug Parameter Exceedance
Warning about exceeding tug parameters causing power train failure.
Rough Surfaces and Tire Pressure
Impact of rough surfaces and tire pressure on tug performance and gear wear.
Critical Cautions (Continued)
Overloading and Heat Buildup
Explains how overloading and slopes cause heat buildup, damaging the motor.
Intermittent Use Design
Tugs are designed for intermittent use; long distances require slower speeds.
Load & Duty Cycle Tables
Tables showing load and duty cycle ratings for R5, R8, and R12 tugs.
Optional Accessories
LED Flood Lamp
A high-intensity LED light for loading assistance.
Compressor
A tankless air pump for inflating aircraft tires.
Tundra Package
Features for better operation on grass fields.
Standard Ramp (R12)
Default tire ramp for tires up to 7.5 inches wide.
Double Wide Ramp (R12)
Extra-wide ramp for tires up to 14 inches wide.
Easy Load 18" or 22"
Accessory that captures and locks the tire in a cradle.
Lazy Susan 16" or 18" (R12)
Accessory that captures and rotates the tire in a cradle.
Under Glow Lights
LED accent lights for aesthetic enhancement.
Support Contact
Contact information for the BEST TUGS support team.
Customization, Tips, and Tricks
Tire Cradle Configuration
Adjusting the tire cradle for maximum tire diameter and width.
Cradle Adjustment and Tightening
Adjusting side plates and tightening bolts for proper tire cradling.
Parameter Exceedance Issues
Situations where exceeding parameters affects locking mechanisms.
Powering On/Off Sequence Reminder
Key reminders for turning the controller and tug on and off.
Warranty
Battery Warranty Exclusion
Explicit statement that batteries are not covered under warranty.
Standard One-Year Warranty
Details of the one-year warranty on parts, excluding labor and shipping.
Warranty Inclusions and Exclusions
Conditions that void the warranty, such as misuse or unauthorized modifications.
Need help?
Do you have a question about the ROMEO R8 and is the answer not in the manual?
Questions and answers