
Related Manuals for Hyrel Engine

Summarization of Contents
How to Use This Manual
Understanding Highlighted Information
Explains the use of NOTE, WARNING, and CAUTION formatting conventions in the manual.
Manual Sections Overview
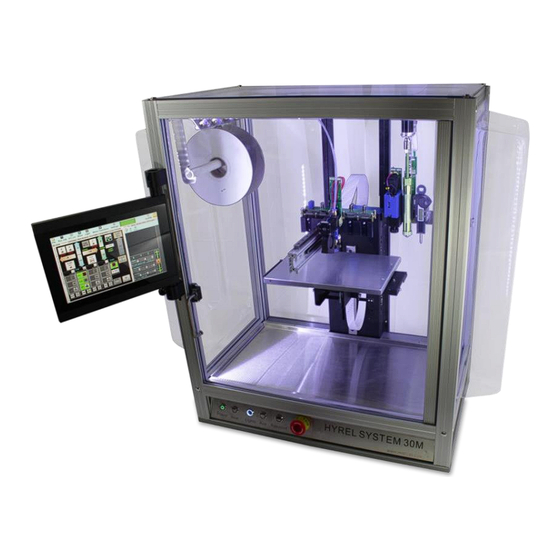
Overview of Printer Features and Supplies
Provides a quick reference for the printer's layout, components, and supplies.
Printer Setup and Installation Guide
Guides initial printer installation and setup, including unpacking, power, software, and network.
Printer Operation Procedures
Develops understanding of the printer via UI, material loading/unloading, and part removal.
Printer Maintenance Schedule
Lists tasks for keeping the printer performing optimally, including 'As Needed' and hour-based tasks.
Printer Troubleshooting Steps
Procedures for diagnosing and correcting problems, including a checklist and fault codes.
HYREL Machine Overview
HYREL 3D Printing System Components
Lists the six primary components of the HYREL 3D Printing System, including Machine, Extruders, Accessories, Tool Kit, Build Platform, and Software.
Available HYREL Extruder Types
Describes the two types of HYREL Extruders available: Mk1 and EMO-25.
Physical Setup: Yoke and Touchscreen
Yoke Component Identification
Shows the yoke component, which holds heads and accessories, on both printer models.
Touchscreen Control Interface
Highlights the touchscreen controls on both printer models.
Physical Setup: Tool Tree and Filament Spool
Tool Tree Slot Configuration
Illustrates the tool tree component, noting its slot capacity for System 30M and Engine.
Filament Spool Holder Location
Shows the filament spool holder on both System 30M and Engine models.
Physical Setup: PC Control and Power Supply
Connecting Your HYREL for PC Control
Details how to connect and control the HYREL printer from a separate PC using USB.
Power Supply Unit Identification
Shows the power supply unit, identifying it as an ATX Form Factor 500W.
Power Supply Voltage Settings and Cord Connection
Setting the Power Supply Voltage (115V/230V)
Explains how to set the power supply voltage (115V/230V) and includes a CAUTION about incorrect settings.
Connecting and Turning On the Power Cord
Illustrates the steps for plugging in the power cord and turning on the power supply.
Physical Setup: Power Button and REPETREL Introduction
Power Button Locations
Shows the power buttons for both System 30M and Engine models.
REPETREL Software Overview and Benefits
Introduces REPETREL as the control software suite, detailing its advantages over other software.
Walkthrough of REPETREL Software
REPETREL Interface: 3D View and Basic Controls
Explains the 3D View tab, control buttons, and the log filters within the REPETREL software.
Walkthrough of REPETREL Software
REPETREL: Moving Axes and Unlocking Motors
Guides on moving X and Y axes, unlocking motors, and the auto-lock feature in REPETREL.
REPETREL: Understanding the 3D View Tab
Describes the functionality of the "3D View" tab, providing a graphical simulation of user parts.
Walkthrough of REPETREL Software
REPETREL 3D View: Control Buttons and Log Filters Explained
Details the control buttons (Rotate, Pan, Zoom) and log filters (Commands, Infos, Warnings, Errors) in the 3D View tab.
Walkthrough of REPETREL Software
REPETREL Control Tab: Manual Movement and Parking
Explains the "Control" tab for manual movement, calibration, and the "HOME ALL" and "Park" buttons.
Walkthrough of REPETREL Software
REPETREL Control Tab: Z-Height Adjustment (Part 1)
Details setting Z-height using buttons like 10mm, 1mm, 0.1mm, and 0.02mm increments.
Walkthrough of REPETREL Software
REPETREL Control Tab: Z-Height Adjustment (Part 2)
Continues Z-height settings, explaining "Enable Big Z Move" and how it affects 10mm moves.
First Print: Tramming Your System
Printer Preparation: Install the Digi-tram
Guides on installing the Digi-tram tool as the first step in tramming the printer.
First Print: Tramming Your System
Tramming: Secure the Extruder with Thumbscrew
Instructs to tighten the thumbscrew to lock the extruder into place after installing the Digi-tram.
Tramming: Place the Removable Build Platform
Guides on placing the removable build platform, noting the set screw and not covering it.
First Print: Tramming Your System
Tramming: Secure Build Platform with Painter's Tape
Details using painter's tape to hold the build platform and following the edge for best results.
Tramming: Home and Park Axes for Digi-tram Positioning
Instructs to home the printer and then park the axes, placing the Digi-tram over the build platform center.
First Print: Tramming Your System
Tramming: Setting the Digi-tram Zero Point
Guides on setting the Digi-tram's zero point after positioning it on the build platform.
First Print: Tramming Your System
Tramming: Unlock Build Platform Lock Screws
Instructs to use a 2.5mm Allen wrench to unlock four lock screws under the build platform.
Tramming: Unlock Printer Motors
Guides on unlocking the motors using the REPETREL software's manual control interface.
First Print: Tramming Your System
Tramming: Position Digi-tram Pin in First Corner
Details positioning the Digi-tram pin in the first corner of the build platform for tramming.
Tramming: Adjust Set Screw with Screwdriver
Guides on adjusting the set screw with a screwdriver to achieve +/- 0.01 tolerance.
First Print: Tramming Your System
Tramming: Position Digi-tram Pin in Next Corner
Instructs to position the Digi-tram pin in the next corner and adjust the set screw for tolerance.
Tramming: Re-adjust Set Screw for Tolerance
Guides on adjusting the set screw to maintain +/- 0.01 tolerance across corners.
First Print: Tramming Your System
Tramming: Lock Build Platform Lock Screws
Instructs to use a 2.5mm Allen wrench to lock the build platform lock screws.
Tramming: Remove the Digi-tram Tool
Guides on unlocking the yoke thumbscrew and removing the Digi-tram after tramming.
First Print: Using Plasticine Filament
G-Code Conversion: Load .stl File
Guides on loading an .stl file into the software to convert it into G-Code.
First Print: Using Plasticine Filament
G-Code Conversion: Scale, Rotate, and Translate Model
Explains how to scale, rotate, and translate the .stl model in Imperial or Metric units.
First Print: Using Plasticine Filament
G-Code Conversion: Orient Model for Flat Printing
Details rotating the model to lay flat on the build surface using specific software controls.
First Print: Using Plasticine Filament
G-Code Conversion: Center Model Using Bulls-eye
Guides on centering the model using the "Bulls-eye" feature for optimal placement on the build surface.
First Print: Using Plasticine Filament
Plasticine Print: Check EMO Nozzle Diameter
Instructs to check the EMO nozzle diameter size, noting the use of the 2mm nozzle.
Plasticine Print: Select Slic3r Recipes
Guides on selecting Slic3r recipes, including nozzle size and filament settings for Plasticine.
First Print: Using Plasticine Filament
Plasticine Print: Slice .stl File to G-Code
Explains the slicing process to convert the .stl file into G-Code, noting it can be long.
Plasticine Print: G-Code Ready for Printing
Indicates that the G-Code editor tab opens automatically when slicing is complete.
First Print: Using ABS Filament
MK1 Installation: Physical Extruder Head Setup
Guides on physically installing the extruder head, connecting the extruder connector to the head connector.
First Print: Using ABS Filament
MK1 Installation: Secure Extruder Head Connection
Details ensuring the connector is seated properly and tightening the thumbscrew to lock the extruder.
MK1 Installation: REPETREL Interface View (Part 1)
Shows the REPETREL interface after installing the extruder head, before preparing the extruder.
First Print: Using ABS Filament
MK1 Installation: REPETREL Interface View (Part 2)
Continues showing the REPETREL interface after extruder installation, leading into priming.
MK1 Priming: Extrude Small Amount of Material
Guides on priming the extruder head by extruding a small amount of material.
First Print: Using ABS Filament
ABS Print Prep: Set Extruder Head Height
Details setting the extruder head height using a piece of paper and Z-Height calibration.
ABS Print Prep: Prepare Build Surface with Plasticine
Instructs to rub Plasticine on the build surface to aid adhesion for printed parts.
First Print: Printing with ABS
ABS Printing: Start the Job with 'Run Job'
Guides on starting the print job by pressing the "Run Job" button and identifying key controls.
ABS Printing: Adjust Layer Height During Print
Advises close attention to first layers and adjusting height during printing for optimal results.
First Print: Printing with ABS
ABS Printing: Allow Print to Complete
Instructs to let the print job complete without interruption.
ABS Printing: Remove Finished Print
Guides on safely removing the finished print from the build surface.
First Print: ABS Filament Installation
MK1 Installation: Locate Components
Guides on locating the necessary components for MK1 extruder installation.
MK1 Installation: Align and Slide Extruder Gibs
Details aligning and sliding the gibs of the MK1 extruder into the yoke gib slot.
First Print: ABS Filament Installation
MK1 Installation: Check Connection and Lock Extruder
Instructs to check the extruder connection and secure it by locking the MK1 extruder onto the yoke.
MK1 Installation: REPETREL Interface View (Part 1)
Shows the REPETREL interface after MK1 installation, before the next steps.
First Print: ABS Filament Installation
MK1 Installation: REPETREL Interface View (Part 2)
Continues showing the REPETREL interface relevant to MK1 installation and filament loading.
MK1 Filament Handling: Heat Up Extruder
Guides on heating the MK1 extruder to its material service temperature for filament handling.
MK1 Filament Handling: Heat Up and Unload
Heat Up MK1 Extruder for Filament Handling
Reinforces heating the extruder and notes the time it may take for material to extrude.
Unload Filament: Release Guide Tube
Details releasing the guide tube by pressing a blue tab and pulling up to unload filament.
MK1 Filament Handling: Unloading and Inspection
Unload Filament Using Rocker Switch
Instructs to use the rocker switch to unload filament from the MK1 extruder.
Inspect Unloaded Filament for Reloading
Guides on inspecting the unloaded filament for notches and trimming if reloading.
MK1 Filament Handling: Loading Filament
Load Filament into MK1 Extruder
Details loading trimmed filament into the MK1 extruder, aligning it with motor teeth.
MK1 Filament Handling: Loading and Securing
Load Filament Using Rocker Switch
Guides on using the rocker switch to load filament into the MK1 extruder.
Secure Filament Guide Tube
Instructs to lock the filament guide tube after loading filament.
ABS Printing: Purge and Prepare Extruder
Purge Old Material from MK1 Extruder
Guides on running the extruder motor at service temperature to purge older material.
Stop Extrusion After Consistent Flow
Instructs to stop the motor after extruding 8-10 inches of filament for consistent flow.
ABS Printing: Set Z-Height for Nozzle
Remove Filament Dribble from Nozzle
Guides on removing filament dribble from the MK1 extruder nozzle using a wire brush or tweezers.
Center Extruder Using Home and Park Commands
Instructs to press Home then Park to center the MK1 extruder over the print area.
ABS Printing: Set Z-Height and Prepare Bed
Set Z-Height Using Paper and Calibration
Details setting the Z-Height by bringing the build surface to the nozzle with paper.
Bed Preparation: Home, Unlock Motors, and Heat Bed
Guides on preparing the bed by homing, unlocking motors, and activating the heated bed.
ABS Printing: Prepare Build Surface
Apply AquaNet Spray to Build Surface
Instructs to spray the bed with AquaNet, shielding linear slide bearings.
Allow Build Surface Patches to Dry
Advises allowing the sprayed patches on the glass bed to dry without touching them.
ABS Printing: Load G-Code File
Open .gcode File from Menu
Guides on opening a G-code file from the software's File menu.
Browse and Select .gcode File
Details browsing for and selecting the appropriate .gcode file to load.
Print Vase: Printing Process
Start Print Job with 'Run Job' Button
Guides on starting the print job by pressing the "Run Job" button and identifying key controls.
Adjust Layer Height During ABS Printing
Advises close attention to first layers and adjusting height during printing for optimal results.
Print Vase: Finishing the Print
Remove Finished Vase Print from Build Surface
Guides on safely removing the finished print from the build surface.
Need help?
Do you have a question about the Engine and is the answer not in the manual?
Questions and answers