Table of Contents
Advertisement
Advertisement
Table of Contents

Related Manuals for Sunforest H-100F


Summary of Contents for Sunforest H-100F
- Page 1 Portable Non-destructive Fruit Quality Meter H-100 series User’s manual Ver. 1.2.1 Before using the product, make sure to read the user’s manual correctly. After reading the manual, make sure to place it where the user can easily find it. Product warranty is included in...
-
Page 2: Precautions For Safety
Precautions for safety To safely and correctly use the product as well as prevent accidents and risks, the user must take the following precautions for safety. Caution Physical injury or damage on product may occur when the user doesn’t comply with the directions. 1. -
Page 3: Table Of Contents
Contents Precautions for safety ------------------------------------------------------------ 2 Contents --------------------------------------------------------------------------- 3 Description of H-100F ------------------------------------------------------------ 4 Description of H-100C ------------------------------------------------------------ 5 Name and function : Buttons ---------------------------------------------------- 6 Name and function : LCD display ----------------------------------------------- 7 Display for Brix, DM, G.I and Browning level----------------------------------- 8 Name and function : Accessories ---------------------------------------------- 9-10 How to use the instrument Battery charging -------------------------------------------------------------- 11... -
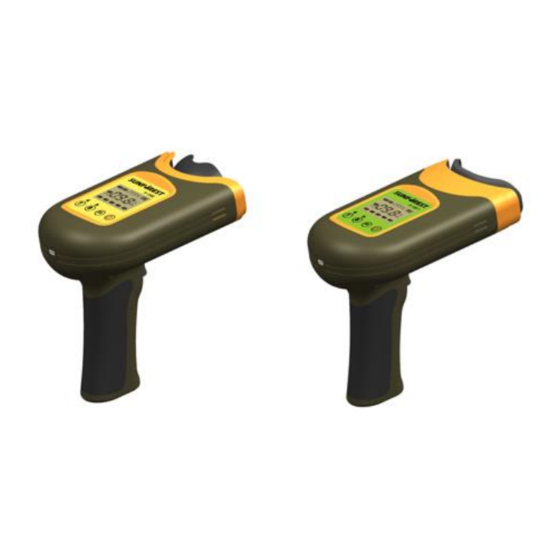
Page 4: Description Of H-100F
Description of H-100F - 4 -... -
Page 5: Description Of H-100C
Description of H-100C - 5 -... -
Page 6: Name And Function : Buttons
Name and function : Buttons ■ Description on navigation menu buttons To be used to adjust calibration value (to be decreased by -0.1 scale) To be used to adjust calibration value (to be increased by +0.1 scale) Also used to activate Bluetooth interface with smartphone app. (Smartphone gets download of data from the instrument by Bluetooth interface) This key is also used to display Dry Matter ad Chlorophyll where applicable. -
Page 7: Name And Function : Lcd Display
Name and function : LCD display ■ Description on LCD display LCD display may be hardly seen under direct sunlight. Use it with sunlight protection. To save battery consumption, LCD display and power of the instrument are automatically turned off when the instrument is not used for a set period of time. Measurement data to be displayed on LCD are Brix and temperature. -
Page 8: Name And Function : Accessories
indicates the selection of calibration model (Only the selected model is to be displayed on the screen) indicates the measured value of Brix (or Dry Matter and Chlorophyll to be optionally displayed, as the case may be). Name and function : Accessories ■... - Page 9 impurities. Power charger ■ 1. To charge the battery of the instrument. 2. Rated power input: AC 90~264V, 57-63Hz. Rated power output: DC12V 1.5A Keep the charger free from moist or heat. If the charger is not in use for a long time, pull the power plug out.
-
Page 10: How To Use The Instrument Battery Charging
How to use the instrument Battery charging ■ 1. Fully charge the battery when the image blinks on the LCD, or when storing the instrument for a long time without use, or when the instrument initially used for the first time. -
Page 11: Instrument Turn On And Off
even when the charging time exceeds extraordinary over time. 7. It is recommended to place the instrument on the desktop stand during battery charging. Scan continued Using a charger other than provided genuine charger may diminish battery life or cause electrical damage to the instrument. -
Page 12: How To Setup The Measuring Condition
2. Before conducting initialization, firmly close the head-cover to the optical sensor part. When closing the head-cover, be sure to get the upper and lower parts correctly placed. 3. During initialization, make sure that the head cover to the measure part doesn't move. 4. - Page 13 2. Correction of measurement deviation (offset adjustment) With this function, user can adjust deviation between the value measured by the instrument(nondestructive method) and the reference value obtained from squeezed juice. In the measurement mode, press longer than 1 second, then will appear and blinks.
-
Page 14: Smartphone Interface Via Bluetooth
The instrument can save up to 1,000 readings (0~999). In the setup mode, press shortly then stock number will blink (for example ). Then, select the preferred stock number by pressing For the number selected, the measured value will be displayed. Press shortly to return to the home menu. -
Page 15: Zero Set Process By White Teflon Built In The Head Cover
■ Zero set process by White Teflon built in the head-cover 1. To measure the internal quality of the fruit, the reference material (White Teflon) must be scanned first (zero set process). 2. When the power turns on, the instrument automatically scans the reference material (White Teflon) during its initialization procedure. -
Page 16: Cleaning
6. When a browning detected, in case of apple and pear application, a couple of beep sound occurs and displays “ “ on the LCD screen. ■ Cleaning - 16 -... -
Page 17: Pc Interface
1. The optical part of the instrument must be kept clean using the cotton swab or smooth cloth included in the cleaning kit provided in the product package. 2. To clean the instrument body and LCD display, wipe softly with a smooth cloth. 3. -
Page 18: Diagnosis Of The Instrument And Troubleshooting
■ Diagnosis of the instrument and Troubleshooting The following is a brief description on how to diagnose and deal with various abnormal situations that may occur while using the instrument. To resolve abnormalities swiftly, please read and check the followings before making malfunctioning reports to the A/S center or visiting service representative. -
Page 19: Technical Support
Error code “ ” appears, when the head-cover of measuring part is opened or when When initializing / when the reference material(white Teflon) inside the cover is severely damaged. Make sure to measuring reference value check the condition of the cover and see if it is properly closed to the instrument, and restart booting (initialization).. -
Page 20: Principle Of Measuring The Sugar Contents Of Fruit
As shown on the below drawing, SUNFOREST H-100 series has large area of incident light covering half or one - 20 -... - Page 21 Therefore, measuring juice using a refractometer, extracted from the same size and area measured by the SUNFOREST H-100 series instrument, shall provide more accurate comparison of sugar contents value.
- Page 22 Though SUNFOREST H-100 has built in auto-correction function for temperature compensation, the measured value may has still a deviation due to different environment temperature and time of cultivation. Therefore, it would be better to have a deviation correction for calibration model before using the instrument at a new environment.
-
Page 23: Specification Of Product
Specification of product ■ Specifications item Descriptions Remarks Nondestructive portable sugar contents Name of product measuring instrument H-100F (apple, pear, peach, and orange) model H-100F / H-100C H-100C (mandarin, kiwifruit) Method of measurement Semi-transmittance diffused reflection light Spectral analysis of Near-Infrared Brix (mandatory) Measuring items Dry Matter, Chlorophyll (optionally supported) - Page 24 SUNFOREST CO., Ltd. #507 Incheon IT Tower, 229 Gyeongin-ro, Nam-gu, Incheon 22106 Korea Tel. 0082-32-719-7031 / Fax. 0082-32-719-7032 Email : sales@sunforest.kr - 24 -...
Need help?
Do you have a question about the H-100F and is the answer not in the manual?
Questions and answers