
Related Manuals for Chatillon DFX2-100


Summarization of Contents
Safety Icons
Warning
Warns of situations leading to personal injury or death. Do not proceed until understood.
Dangerous Voltage
Warns of uninsulated dangerous voltage within the product. Never open enclosures unless authorized.
Caution
Warns of situations that may lead to equipment malfunction or damage. Do not proceed until understood.
Note
Indicates additional or supplementary information about actions, activities, or concepts.
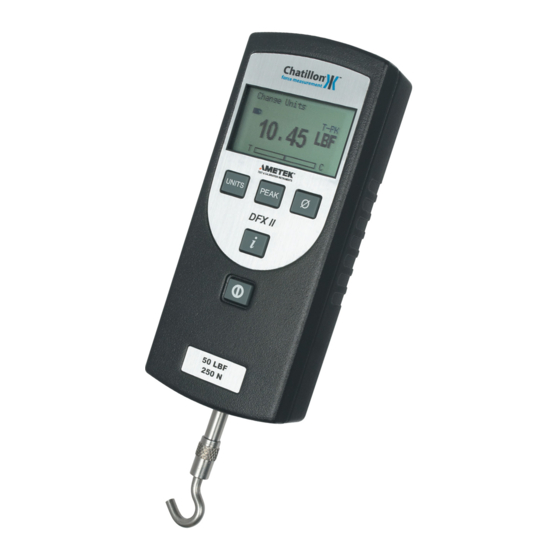
Keypad Functions
On/Off Key
Turns the gauge on or off.
UNITS Key
Selects and displays results in different measurement units.
PEAK Key
Selects measurement modes, changing between Normal and Peak.
ZERO Key
Zeros the measurement or tares up to 10% of capacity.
INFO Key
Views gauge information and selects operating options.
INFO Key Functions
View Capacity
Displays the gauge's capacity and resolution.
View Firmware
Displays the gauge's firmware version and revision details.
View Overloads
Shows the overload history, including tension and compression counts.
Battery Life Information
Battery Life Display
Shows the estimated battery life in hours and current voltage.
Using the Battery Charger
Charging Procedure
Step-by-step guide to connect and charge the DFX II force gauge.
Auto Shutdown Feature
Enabling Auto Shutdown
Procedure to enable the auto shutdown feature by accessing settings.
Selecting Measurement Units
Changing Units
Steps to cycle through available units like ozf, gf, lbf, kgf, or N.
Units Lock Feature
Enabling Units Lock
Steps to enable the Units Lock feature via the INFO key sequence.
Selecting Display Language
Changing Display Language
Step-by-step process to select English, Spanish, French, Portuguese, Chinese, or German.
Peak Filter Functionality
Enabling Peak Filter
Procedure to enable or disable the Peak Filter via the INFO key sequence.
Calibration Procedure Overview
Calibration Setup
Guidance on using a hanger fixture for compression calibration to prevent side loading.
Calibration Steps
Select Calibration Units
Choosing the correct units for calibration based on the weights used.
Accessing Calibration Mode
Procedure to enter calibration mode via the ON and PEAK/UNITS keys.
Select Gauge Model
Choosing the correct gauge model from the list for calibration.
Calibration Verification
Zero Verification
Removing weights to check zero readings after calibration.
Full Scale Calibration
Adding weights to match the gauge's full scale capacity for calibration.
Compression Verification
Verifying the accuracy of the compression calibration at zero and full scale.
Calibration Completion
Tension Verification
Verifying the accuracy of the tension calibration at zero and full scale.
Saving Calibration
Procedure to save the new calibration settings using the INFO key.
Performing Tensile Tests
Normal Mode Tensile Test
Conducting a tensile test to view real-time load without peak capture.
Peak Mode Tensile Test (T-PK)
Conducting a tensile test to capture and display the maximum load achieved.
Performing Compression Tests
Normal Mode Compression Test
Conducting a compression test to view real-time load without peak capture.
Peak Mode Compression Test (C-PK)
Conducting a compression test to capture and display the maximum load achieved.
Technical Specifications
Performance Specifications
Details accuracy, sampling rate, data capture, display, and power specifications.
Environmental Specifications
Covers storage/operating temperatures, humidity, and loadcell deflection.
Need help?
Do you have a question about the DFX2-100 and is the answer not in the manual?
Questions and answers