
Related Manuals for Coastal Saunas Newport


Summary of Contents for Coastal Saunas Newport
- Page 1 COASTAL SAUNAS 2018 Pro Series Installation/User’s Manual Coastal Saunas/Infrared Innovations LLC 2683 Via De La Valle G110 Del Mar, CA 92014 1-800-327-5122 www.CoastalSaunas.com COPYRIGHT 2018 COASTAL SAUNAS INC. ALL RIGHTS RESERVED...
- Page 2 Table of Contents INSTALLATION Page(s) Electrical Requirements Unpacking Your Sauna General Assembly Guidelines Malibu/Delmar/Sauna Jump Assembly Instructions 5 - 9 Newport Assembly Instructions 10 - 14 Hollywood Assembly Instructions 15 – 19 HOW TO USE Pages(s) Control Panel Instructions 20 - 22 Frequently Asked Questions 23 - 24 Disclaimer Warranty and Return Policy Information 26 - 28 Safety Certifications...
-
Page 3: Electrical Requirements
Electrical Requirements Malibu: 110-120volts/15amp dedicated circuit/outlet NEMA 5-15R (required) NEMA 5-15P (included) 8 Heaters 1600-watts Delmar, Newport, Sauna Jump: 110-120volts/20amp dedicated circuit/outlet NEMA 5-20R (required) NEMA 5-20P (included) 9 Heaters 2150-watts Hollywood: 220-240volts/20amp dedicated circuit/outlet NEMA 6-20R (required) NEMA 6-20P (included) 15 Heaters 2850-watts Note: The electric power cord extends out from the center of the roof cap. The cord is approximately 9 feet long. It is recommended that the location of the outlet you are installing is accessible without moving the sauna. Dedicated circuit requires that no other appliance should share the outlet/circuit with the sauna. Failure to comply with this requirement may cause electrical interruption and diminished sauna performance. It is recommended that a qualified, licensed electrician install your dedicated electrical wiring for proper sauna function and to avoid any potential electrical hazards. -
Page 4: Unpacking Your Sauna
Unpacking Your Sauna Identify the three boxes (A/B/C) that arrived in your shipment. Place boxes in an open area. All three boxes are labeled with the contents inside. It is recommended that a minimum of two people be present for unpacking and assembly. Lay boxes flat on the ground with lettering facing up. Make sure the area is clear of debris. Open the boxes from smallest to largest to make for light, fast work. PRO TIP: Take extra caution to make sure the Glass Door does not swing out during handling of the front wall. Many customers prefer to unbox the sauna outside and then bring the wall in as needed. General Assembly Guidelines TOOLS NEEDED #2 Phillips Head Screwdriver (or Phillips drill driver - set on lowest setting) Small Step Ladder MOVING THE SAUNA AFTER ASSEMBLY If the sauna needs to be moved after assembly, perhaps into an alcove or confined space, Coastal Saunas strongly recommends the use of furniture sliders. These can be found at a local hardware store such as Lowe’s or Home Depot. Place the furniture sliders under the feet of the sauna, or the perimeter corners of the Base Platform of the sauna, prior to beginning assembly. Important note: When moving the assembled sauna: 1. Do not push on the cabin walls as this can cause damage to the sauna cabin. 2. Always push on the base platform to move the sauna. 3. After sauna has been moved to desired location, the sliders can be left in place to ease any future movement needed. GENERAL All panels are labeled with white stickers. These can be left on the panels after assembly. That way if the sauna is ever broken down for movement there is no confusion come re-assembly. - Page 5 Malibu/Sauna Jump/Delmar Step One: Open Box C (Floor Panel/Roof Panel/Bench Panel and Seat/Accessories Box). Lay the floor panel at the desired location. The floor heater is towards the front of the sauna. Insert furniture sliders if desired (If you are installing the Sauna Jump you will use your rebounding base). Do not walk or stand on any area of the floor panel except the floor heater panel! Step Two: Open Box A (Front Wall Panel/Back Wall Panel). Install the Back Panel first by sliding the panel into the metal brackets located on the Floor Panel. Next install the Front Panel by the same method used for the Back Panel. Remove the plastic wrap from the Front Panel being careful that the glass door does not swing open. One person should hold the Front and Back Panels in vertical position until side panel has been mounted and attached. PRO TIP: Use caution when sliding the walls into the floor brackets that the brackets are between each other and not on top of each other. If the brackets get flattened, use a flat heat screwdriver to open them up and reinstall.
- Page 6 Step Three: Open Box B (Right Panel/Left Panel). The direction of the panel (Right vs. Left) is determined by standing in front of the sauna. Install the Right and Left Panels by lining up the panels to the Front and Back Panels. Using the Installation Bolts provided in the accessories box, hand tighten the Installation Bolts through the holes in the side panels to the Front and Back Panels. A final tightening of the Bolts will be performed with a screwdriver after the sauna is completely assembled. *Do not over tighten installation bolts. It will cause damage to the sauna cabin* Step Four: From Box C, install the Bench Support Panel by lining up the magnets on the ends of the Bench Support Panel with the magnets located on the wall of the Left and Right Wall Panels. Make all four electrical connections using the four-outlet receptacle on the Back-Wall Panel. ...
- Page 7 Step Five: From Box C, install the Bench Seat by guiding it between the Right and Left Wall Panels. There are two small oval wooden braces found in the Accessories Box that may be screwed into the Back-Wall Panel to prevent the bench from sliding upward when the user sits on the front of the Bench Seat. The wooden brace can be screwed into the Back Panel directly above the Bench Seat. Step Six: From Box C, install the Roof Panel. Feed all the electrical wiring where emitting from the top of the Front and Back Wall Panels through the corresponding holes in the Roof Panel. Slide the Roof Panel over the top of the sauna and secure it into position. *Make sure wires do not get pinched between the walls and the Roof Panel* Step Seven: Once the Roof Panel is securely in place, use a step ladder to view the inside of the Roof Panel to make the proper electrical connections. There are three ribbon cable connections: a two pin (temp sensor), a three pin (chromo therapy light) and an eight pin (power) that come from the Control Panel area through the Roof Panel along with one 120 volt, Three prong electrical cord connection. There are three additional 120 volt, three prong electrical cord connections to be made: One in the front right side of the sauna, and two in the back. ...
- Page 8 Step Eight: Install the top dust cover. Feed the main power cord through the hole in the dust cover. It is optional to secure the dust cover with the screws provided. Step Nine: Return to the Installation Bolts on the Left and Right Wall Panels. Using a screwdriver tighten the bolts as necessary. Again, do not over tighten as this can cause damage to the sauna cabin. Step Ten: Install the Door Handle keeping the shining side out. Step Eleven: Install the optional accessories: cup holder(s), Magazine Rack and Towel Holder. These items may be installed in any location desired, or not at all. ...
- Page 9 Step Twelve: Install the Ionizer (this step is optional if you have the Cedar Wood option, as Cedar is naturally anti-bacterial). When you look inside your sauna, you will see a black wire hanging down from the top left side of the ceiling. Screw the Ionizer vertically below the wire, as seen in the picture below. Note that the disk on the back of the Ionizer can stay in the “on” position. Refer to “how-to-use” instructions on page 21 for operation. Step Thirteen: Perform an Operational Check. Proceed to Page 19 of this manual for instructions on how to perform an operational check. Step Fourteen: Slide the sauna into the desired location (if applicable).
-
Page 10: Newport Assembly Instructions
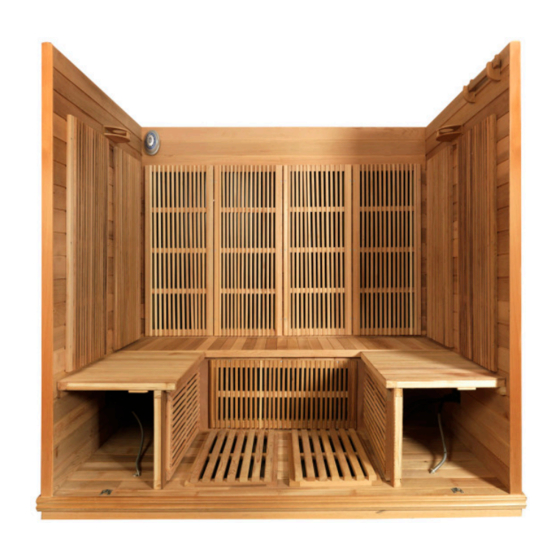
Newport Assembly Instructions Step One: Open Box C (Floor Panel/Roof Panel/Bench Panel and Seat/Accessories Box). Lay the Floor Panel at the desired location. The floor heater is towards the front of the sauna. Insert furniture sliders if desired. Do not walk or stand on any area of the floor panel except the floor heater panel! Step Two: Open Box A (Door Panel/Right Front Panel/Left Front Panel). The direction of the panel (Right vs. Left) is determined by standing in front of the sauna. Install the Front Door Panel first by sliding the Panel onto the metal brackets located on the Floor Panel. Next, install the Left Front Panel by raising it above the Door Panel and guiding it down into the metal brackets located on the edge of the wall. Install the Right Front Panel by the same method. Remove the plastic wrap from the Door Panel being careful that the glass door does not swing open. One person should hold the Door Panel and Right Front Panel in vertical position until the Right Back Panel has been mounted and attached. PRO TIP: Use caution when sliding the walls into the floor brackets that the brackets are between each other and not on top of each other. If the brackets get flattened, use a flat heat screwdriver to open them up. - Page 11 Step Three: Open Box B (Right Back Panel/Left Back Panel). Install Right Back Panel by sliding the Panel onto the metal brackets located on the Floor Panel. After lining up the Right Back Panel to the Right Front Panel, thread the Installation Bolts provided in the accessories box through the holes in panels and hand tighten them. Set the Left Back Panel onto the Floor Panel (Note: there are no metal brackets on the left side of the Floor Panel). After lining up the Left Back Panel with the Right Back Panel and the Left Front Panel, thread the Installation Bolts provided through the holes in the panels and hand tighten them. A final tightening of the Bolts will be performed later with a screwdriver after the sauna is completely assembled. *Do not over tighten installation bolts. It will cause damage to the sauna cabin* Step Four: From Box C, install the two Bench Support Panels by lining up the bench support panels and interior wall magnets. Behind the right Bench Support Panel, connect the two 120 volt electrical cords. Make all four 120 volt, three prong electrical connections using the four-outlet receptacle located on the Left Wall Panel. ...
- Page 12 Step Five: From Box C, install the Bench Seats by guiding them into place. There are two small oval wooden braces found in the Accessories Box that may be screwed into the Back-Wall Panels to prevent the bench from sliding upward when the user sits on the front of the Bench Seats. The wooden brace can be screwed into the Left and Right Wall Panels directly above the Bench Seats. Step Six: From Box C, install the Roof Panel. Feed all the electrical wiring where emitting from the top of the Front and Back Wall Panels through the corresponding holes in the Roof Panel. Slide the Roof Panel over the top of the sauna and secure it into position. *Make sure wires do not get pinched between the walls and the Roof Panel* Step Seven: Once the Roof Panel is securely in place, use a step ladder to view the inside of the Roof Panel to make the proper electrical connections. There are three ribbon cable connections: a two pin (temp sensor), a three pin (chromo therapy light) and an eight pin (power) that come from the Control Panel area through the Roof Panel along with one 120 volt, three prong electrical cord connection. There are three additional 120 volt, three prong electrical cord connections to be made: One in the front right side of the sauna, and two in the back.
- Page 13 Step Eight: Return to the Installation Bolts on the Left and Right Wall Panels. Using a screwdriver tighten the bolts as necessary. Again, do not over tighten as this can cause damage to the sauna cabin. Step Nine: Install the top dust cover. Feed the main power cord through the hole in the dust cover. It is optional to secure the dust cover with the screws provided. Step Ten : Install the Door Handle keeping the shiny side out. Step Eleven: Install the optional accessories: cup holder(s), Magazine Rack and Towel Holder. These items may be installed in any location desired, or not at all. ...
- Page 14 Step Twelve: Perform an Operational Check. Proceed to Page 21 of this manual for instructions on how to perform an operational check. Step Thirteen: Install the Ionizer (this step is optional if you have the Cedar Wood option, as Cedar is naturally anti-bacterial). When you look inside your sauna, you will see a black wire hanging down from the top left side of the ceiling. Screw the Ionizer vertically below the wire, as seen in the picture below. Note that the disk on the back of the Ionizer can stay in the “on” position. Refer to “how-to-use” instructions on page 21 for operation. Step Fourteen: Slide the sauna into the desired location (if applicable).
-
Page 15: Hollywood Assembly Instructions
Hollywood Assembly Instructions Step One: Open Box C (Floor Panel/Roof Panel/Bench Panel and Seat/Accessories Box). Lay the Floor Panel at the desired location. The floor heater is towards the front of the sauna. Insert furniture sliders if desired. Note: Do not walk or stand on any area of the floor panel except the floor heater panel! Step Two: Open Box A (Front Panel/Back Panel). Install the Back Panel first by sliding the panel into the metal brackets located on the Floor Panel. Next install the Front Panel by the same method used for the Back Panel. Remove the plastic wrap from the Front Panel being careful that the glass door does not swing open. One person should hold the Front and Back Panels in vertical position until the side panel has been mounted and attached. PRO TIP: Use caution when sliding the walls into the floor brackets that the brackets are between each other and not on top of each other. If the brackets get flattened, use a flat heat screwdriver to open them up ... - Page 16 Step Three: Open Box B (Right Panel/Left Panel). The direction of the panel (Right vs. Left) is determined by standing in front of the sauna. Install the Left Panel by lining up the panel to the Front and Back Panels. Using the Installation Bolts provided in the accessories box, thread the Bolts through the holes in the Left Panel to the Front and Back Panels. Finger tighten the bolts. The Right Panel will be installed later. A final tightening of the Bolts will be performed with a screwdriver after the sauna is completely assembled. *Do not over tighten installation bolts. It will cause damage to the sauna cabin* Step Four: From Box C, install the Bench Support Panels by lining up the magnets on the ends of the Bench Support Panels with the magnets located on the walls. This step must be completed prior to the installation of the Right Panel. Make the left side electrical connections using the four-outlet receptacle on the Left Panel. Also connect the bench heater panel to the cord found in the middle of the Back Panel. The right side electrical connections will be completed after Step Six. ...
- Page 17 Step Five: From Box C, install the Bench Seats by guiding them under the heater panels. There are two small oval wooden braces found in the Accessories Box that may be screwed into the Back and Side Wall Panels to prevent the bench from sliding upward when the user sits on the front of the Bench Seat. The right side can be completed during Step Six. Step Six: From Box B, install the Right Panel by lining up the panel to the Front and Back Panels. Using the Installation Bolts provided in the accessories box, thread the Bolts through the holes in the Right Panel to the Front and Back Panels. Finger tighten the bolts. A final tightening of the Bolts will be performed with a screwdriver after the sauna is completely assembled. *Do not over tighten installation bolts. It will cause damage to the sauna cabin* Next, enter the sauna and make the final electrical connections to the right side using the four-outlet receptacle on the Right Panel. Finally, install the Right Bench. Step Seven: From Box C, install the Roof Panel. Feed all the electrical wiring where emitting from the top of the Front and Back Wall Panels through the corresponding holes in the Roof Panel. Slide the Roof Panel over the top of the sauna and secure it into position. *Make sure wires do not get pinched between the walls and the Roof Panel*...
- Page 18 Step Eight: Once the Roof Panel is securely in place, use a step ladder to view the inside of the Roof Panel to make the proper electrical connections. There are three ribbon cable connections: a two pin (temp sensor), a three pin (chromo therapy light) and an eight pin (power) that come from the Control Panel area through the roof along with one 110/120 volt, three prong electrical cord connection. There are three additional 110/120 volt, three prong electrical cord connections to be made: One in the front right side of the sauna, and two in the back. Step Nine: Install the top dust cover. Feed the main power cord through the hole in the dust cover. It is optional to secure the dust cover with the screws provided. Step Ten: Return to the Installation Bolts on the Left and Right Panels. Using a screwdriver tighten the bolts as necessary. Step Eleven: Install the Door Handle keeping the shiny side out.
- Page 19 Step Twelve: Install the optional accessories: cup holder(s), Magazine Rack and Towel Holder. These items may be installed in any location desired, or not at all. Step Thirteen: Install the Ionizer (this step is optional if you have the Cedar Wood option, as Cedar is naturally anti-bacterial). When you look inside your sauna, you will see a black wire hanging down from the top left side of the ceiling. Screw the Ionizer vertically below the wire, as seen in the picture below. Note that the disk on the back of the Ionizer can stay in the “on” position. Refer to “how-to-use” instructions on page 21 for operation. Step Fourteen: Perform an Operational Check. Proceed to Page 21 of this manual for instructions on how to perform an operational check Step Fifteen: Slide the sauna into the desired location (if applicable).
-
Page 20: Control Panel Instructions
Control Panel Instructions... - Page 21 1. ON/OFF – Press this button to turn the sauna on and off. The power must be on for the Stereo and Chromo therapy lights to operate. 2. TIMER DISPLAY BOX – Displays in minutes the time for the sauna session. Maximum time is capped at 60 minutes. 3. TIMER CONTROL -- Press the arrows below the Timer Display Box to adjust the sauna session time. Time will adjust in five minute increments. Flashing numbers indicate desired time while steady numbers indicate the time remaining for the session. Once the time reaches zero minutes the heaters will shut off but the sauna accessories (lights, stereo, etc.) will remain on. You must reset the time to extend any sauna session. 4. TEMPERATURE DISPLAY BOX – Displays the temperature chosen for the sauna session. 5. TEMPERATURE CONTROL – Press the arrows below the Temperature Display Box to adjust the temperature of the sauna to your desired level (120-135 recommended). Temperature will adjust in five degree increments. Flashing numbers indicate desired temperature while steady numbers indicate the current temperature. To change from Celsius to Fahrenheit, or vice versa, hold both temperature up/down arrows simultaneously. 6. CHROMOTHERAPY LIGHTS – Press the CHROMO button to activate the chromo therapy light. a. To select an individual color, press the button until desired color is reached. b. To have the lights continuously cycle through each color, press the CHROMO button. The first light shown is red. Continue to press the CHROMO button until the red light appears a second time and stop. To stop the cycling of lights, press and hold the CHROMO button for three seconds. 7. READING LIGHTS – Press the INSIDE button to turn on and off the interior reading lights 8. OUTSIDE LIGHTS - Press the OUTSIDE button to turn on and off the outside lights 9. PROGRAMABLE TIMER - Allows the user to designate a time in the future for the sauna to turn on a. Press and hold the ON/OFF button for three seconds. The number “1” will show in the Timer Display Box. b. Immediately press the Up arrow to select the desired number of hours from the current time you want the sauna to turn on.
- Page 22 10. OXYGEN IONIZER – Press button “8” to turn power on. The Ion button (green light) operates the Ionizer. The Ionizer will freshen the air while you are using the sauna. This is optional and not necessary if you have the Cedar Wood model. b. The O3 button (red light) operates the Ozone. The Ozone will kill any bacteria/odors in the unit. Recommended usage is just 10-15 minutes. Some people are sensitive to Ozone, so for this reason we recommend using it between session while you are not in the sauna. 11. OPERATIONAL CHECK - Once the sauna is assembled, a preset operation sequence must be performed. a. Press sauna ON button and red light will appear on control panel b. After 5 minutes, lightly touch each heater making sure you feel heat. Note, that the floor, calve and front heaters are a lower wattage for comfort. If you feel a cold heater, please refer to the FAQ’s. c. Set timer for 60 minutes; set temperature for 140°F d. Sauna should reach approximately 135°F during the first hour of operation e. After the initial preset programming is complete, sauna is ready for personal use.
-
Page 23: Frequently Asked Questions
Frequently Asked Questions Q: WHY WILL MY SAUNA NOT HEAT UP, AND/OR I HAVE A HEATER NOT PRODUCING HEAT? A: Most likely one of the heater banks did not get connected during the installation procedure. Double check that all of the Black 110/120v cords on the top of the unit and under the bench(s) are connected and pushed in all the way. If you still feel a cold heater, unplug the sauna and remove the 6 screws holding the heater cover to the wall. You will see a white electrical connection behind the heater, which connects the heater to the sauna. Make sure this connection is pushed all the way in, as well as the wires going into the white connections. Finally, plug the sauna back in and retest. Q: MY SAUNA IS PLUGGED IN, HOWEVER I DO NOT SEE A RED POWER LIGHT ON THE CONTROL PANEL? A: After checking the outlet for power, check that the large 8-pin ribbon wire on top of the unit is plugged in. Q: WHY IS MY TEMPERATURE DISPLAY BOX SHOWING -22 DEGREES? A: The display of -22 degrees indicates a loose connection of the 2-pin ribbon cable (temperature sensor). This can be located on the top of the sauna above the control panel. If it cannot be located, it may not have been threaded through the roof cap during assembly. Once located, plug the cable to the corresponding 2 pin ribbon cable located on the roof cap that leads to the temperature sensor. Q: WHAT IS THE OPTIMAL TIME/TEMPERATURE FOR A TYPICAL SAUNA SESSION? A: After breaking a sweat, 20-30 minutes is a good session. A temperature setting of 110-135 degrees Fahrenheit is the best range for maximum results. For the first couple of weeks of sauna use, it is recommended that you limit your sessions to every other day and as always, DRINK LOTS OF WATER! Q: CAN I USE MY SAUNA OUTDOORS? A: For ease of use and impromptu access it is recommended that you locate your sauna indoors. Outside use is only recommended in certain parts of the country and must be disclosed at the time of purchase. A cedar wood sauna cabin as well as an outdoor cover is required for outdoor locations in order to maintain your warranty. Q: HOW DO I CLEAN THE INSIDE OF MY SAUNA? A: The areas where sweat may collect can be wiped down with a diluted water and vinegar solution (5:1 ounces) on a damp cloth. Follow up with wiping down the areas with a clean damp cloth containing water only. To save cleaning time, it is safe to place 100% cotton towels within the sauna to help collect sweat. Laying one towel over the floor grate is recommended, as well as layering multiple towels on the bench seat. - Page 24 Q: WHAT CAN I TREAT THE OUTSIDE OF MY SAUNA WITH? A: We recommend an oil blend such as; Hemp, Danish, or Tongue Oil, however any furniture cleaner is fine. Q: WHY DOES MY SAUNA CYCLE OFF ONCE IT REACHES THE SET TEMPERATURE? A: Your sauna has a built-in thermostat based on 5 degree increments. If you set your sauna at 130 degrees, it will cycle off once it gets there, and then cycle back on at 125 degrees. This is normal and means it is functioning properly. Q: MY DOOR IS BINDING TO THE FRAME WHEN I OPEN IT? A: During your sauna’s long journey to your home, or over time the door may get bumped out of alignment. To realign simply loosen the inside of the hinges with an Allen Wrench, realign and tighten. Q: MY SAUNA IS NOT LINING UP, AND/OR, THERE IS A VERY SMALL GAP UNDER ONE OF THE WALLS? A: Most likely the floor clips were not installed properly. This can happen when the clips are setting on top of each other, instead of underneath each other. Remove that wall from the floor and reinstall it making sure to slide the clips underneath each other. You may need to open up the clips with a flat head screw driver if they were pushed in during the initial installation. THANK YOU FOR TAKING THE TIME TO FAMILIARIZE YOURSELF WITH YOUR NEW SAUNA. IF ANY OF THESE SUGGESTIONS DID NOT SOLVE YOUR CONCERNS, PLEASE CONTACT COASTAL SAUNAS AT: 800-327-5122 OR SERVICE@COASTALSAUNAS.COM...
- Page 25 Disclaimer Coastal Saunas/Infrared Innovations LLC and its associates do not provide medical guidance. Consult a doctor for medical advice prior to usage. All of the information contained in this catalogue is for informational purposes only. We reserve the right to change, without notice, anything contained within the catalogue. Coastal Saunas will not be held responsible for printing variations. Wood color variations may occur. Some models shown are with optional features. 1. Please consult your physician if you are taking medications 2. Do not use the sauna under the influence of alcohol or drugs 3. Do not use sauna if you are pregnant 4. Do not allow animals inside sauna cabin 5. Minor children should be supervised in order to prevent injury 6. Do not use the sauna for drying clothes, bathing suits, etc. 7. Do not expose heaters to moisture 8. Do not use the sauna for any other purpose than originally designed and intended Coastal Saunas/Infrared Innovations LLC and any of its subsidiaries and/or associates shall not be held responsible for any misuse of the sauna by the customer. Coastal Saunas shall not be held liable for any damage and/or injury caused by customer misuse of the product.
- Page 26 Warranty and Return Policy I. Coastal Saunas Lifetime Warranty 1. Coastal Saunas provides the best Far Infrared Sauna Lifetime Warranty on wood components against defective material and/or workmanship of cabinetry. Since the wood used in our infrared saunas has been kiln dried, a certain amount of expansion and contraction occurs in the wood within a sauna environment. This may result in minor cracks, which is considered normal, and is not considered a defect. 2. Coastal Saunas provides a Lifetime Warranty on all Nano-Carbon Heater Panels. We provide a Lifetime Warranty on all Electrical Components. i.e.: Control Panels, Thermostat sending unit, CPU, Terminal Blocks and relays, 12v system, wiring harness, etc. All “maintenance” items come with their own 1-year warranty. These items include; Light Bulbs, Stereo, and Ionizer. 3. The standard FM CD Player is covered by a One Year Replacement Warranty through Coastal Saunas. Unauthorized installation or removal of stereo may void warranty. Coastal Saunas must be notified prior to install or removal of stereo for specific instructions. 4. All sales of custom made Seat Cushions and Sauna Covers, and White Glove Assembly Labor are non- refundable. 5. Tempered Glass Door is under warranty through the shipping process. Once the sauna kit has arrived at its final destination and door is intact, any cracking, breakage or damage of the glass door is the responsibility of the client to repair or replace. 6. Sauna mistreatment, misuse, neglect or high traffic “wear and tear” (i.e.: broken cup holders, door handles, wood slats etc.) is not considered a warranty issue. In these cases, Coastal Saunas will decide whether the warranty claim is valid or considered a non-warrantied item. 7. The Lifetime Warranty comes standard with all Coastal Saunas to the original purchaser. Warranty is not transferable between parties. 8. Proof of original purchase must be provided by client. Commercial Application Warranty: All Coastal Saunas used in a commercial application will have a five-year Unlimited Warranty from the original date of purchase. All warranty qualifications and disclaimers apply over the five-year warranty term.
- Page 27 Warranty Disclaimers: We use grade A lumber in our all sauna models. Our saunas are shipped around the globe, and can experience slight blemishes, scratches or scuffs in transit. All structures using wood are susceptible to minor dents, scratches and scuffing which are not covered by warranty. This is normal and will not affect the integrity, operation or Unlimited Lifetime Warranty of your sauna. Wood is a living material that continues to respond to climate conditions, even after being manufactured into a sauna. Prior to shipping, the wood is inspected for consistency, color and quality. Variations in the color or grain, and irregularities such as fine cracks are part of the natural beauty of the wood and in no way, should be considered defects. During normal operation, wood may crack slightly due to the changes in the humidity moisture level of the wood. This will not affect the structural integrity of the sauna. In most cases, minor wood blemishes on the exterior of the sauna may be treated by using a small amount of furniture polish, Tung Oil or other furniture treatment products. Please avoid any treatment containing Benzene or a high concentration of alcohol. Any interior blemishes, scratches, scuffs or chips can be either left alone, sanded or combination of gluing plus sanding. Any compensation for small aesthetic repairs or minor cosmetic damage will be determined solely by Coastal Saunas. Outdoor Use Disclaimer: Saunas used in outside locations require a cedar wood cabin and must have a weather resistant cover purchased from Coastal Saunas to maintain the Unlimited Lifetime Warranty. Covers and thermal liners have a one year warranty from the manufacturer. Failure to utilize the .004 plastic sheet supplied as additional water protection for your sauna will void your warranty. The fabric used for the roof of the waterproof cover is resistant to water penetration; however, it is sewn to the acrylic canvas sides. It is required to place the plastic sheet included directly over the sauna roof prior to installing the weather resistant cover and placing an object on the sauna roof to give the fabric elevation for water run off as further protection. Like any wood exposed to the elements, it is required to treat the exterior wood of the sauna to keep it from deteriorating. PRO TIP: COAT THE TOP SEAMS WITH A SEAM SEALER EVERY 6 MONTHS FOR ADDED PROTECTION. The Lifetime Warranty is deemed void if the sauna has been misused, altered or left exposed to sun, rain, snow, wind or hail.
- Page 28 II. Liabilities 1. Coastal Saunas and any of its subsidiaries and/or associates shall not be held responsible for any misuse of the sauna by the client. We shall not be held liable for any damage and/or injury caused by client misuse of product. 2. Coastal Saunas and any of its subsidiaries and/or associates do not provide medical guidance or diagnosis. It is always recommended that you contact your physician for advice regarding your personal health. III. Cancellation and Return Policy 1. Buyer may cancel and return the sauna, less non-refundable accessories (seat cushions, outdoor cover, pioneer upgrade and installation labor, custom one-way privacy wraps and white glove installation labor) to Seller, subject to the terms and conditions of this policy, within 90 days of proof of purchase date. Buyer shall assume all risk of loss associated with the return as well as shipping, handling, restocking and other fees, costs and expenses as described in this policy. 2. Seller reserves the right to refuse to refund any deposit or payment, or cancel any payment due, and any owing until such time as Seller: a) is in receipt of the goods b) has inspected the goods and c) in the Seller’s discretion, has found the goods to be free of damage. 3. All returned goods must be in their original packaging, along with shipping pallet. Seller may refuse to refund all or any portion of any payment, or cancel payment due and owing if the Buyer fails to fully comply with or violates the terms and conditions of this policy. Shipping, Handling and Restocking Fees All cancelled or returned goods shall be subject to: a) storage fees and costs associated with routing the goods b) handling and restocking fee in the amount of $395.00 USD for each sauna c) all shipping costs to and from the Seller and d) Seller providing a return merchandise authorization (RMA) number. Buyer’s failure to obtain the RMA number shall result in Seller not accepting any returned shipment and Buyer paying all costs and fees. All such costs and fees as determined by Seller shall be paid by Buyer to Seller upon demand by Seller. In addition to manufacturing a high quality far infrared sauna, we are proud to provide our clients an Unlimited Lifetime Warranty. If you should have any questions, don’t hesitate to call us at 1-800-327-5122...
-
Page 29: Safety Certifications
Safety Certifications Coastal Saunas is committed to making safety our #1 priority. Certifications assure you that our infrared saunas have met a certain level of quality construction, as well as safety and performance standards. Below is a list of our current certifications by companies authorized to approve the sauna safety standards in North America, Canada and the European Union. INTERNATIONAL ORGANIZATION FOR STANDARDIZATION Coastal Saunas’ manufacturing facility has implemented a quality management system in order to maintain the highest standards in product development and quality assurance and is proud to have earned the prestigious ISO 9001 Certification. ISO International Standards ensure that products and services are safe, reliable and of good quality. ISO (International Organization for Standardization) is the world’s largest developer of voluntary International Standards. ELECTRICAL TESTING LABORATORIES Electrical Testing Laboratories (ETL) was founded in 1896 by Thomas Edison, and is one of the oldest product safety testing laboratories in the world. Certification by ETL and ETL-C assures you that all Coastal Sauna models have been tested to meet both US and Canadian safety and performance standards. For more information, search Coastal Saunas ETL Certification. CE CERTIFIED EUROPEAN SAFETY STANDARDS The CE Mark is a requirement for products sold to the European Market. The CE Mark identifies a product as complying with the health and safety requirements spelled out in European legislation and is mandatory for equipment operating in the European Union (EU). RoHS DIRECTIVE The RoHS Directive stands for “the restriction of the use of certain hazardous substances in electrical and electronic equipment”. This Directive bans the placing on the EU market of new electrical and electronic equipment containing more than agreed levels of lead, cadmium, mercury, hexavalent chromium, polybrominated biphenyl (PBB) and polybrominated diphenyl ether (PBDE) flame retardants.
Need help?
Do you have a question about the Newport and is the answer not in the manual?
Questions and answers