
Related Manuals for BIO RAD CFX384


Summarization of Contents
System Installation
Unpacking the Optical Reaction Module
Details on unpacking the instrument components like the module, USB cable, and software CD.
System Requirements
Specifies power, environmental conditions, and software compatibility for operation.
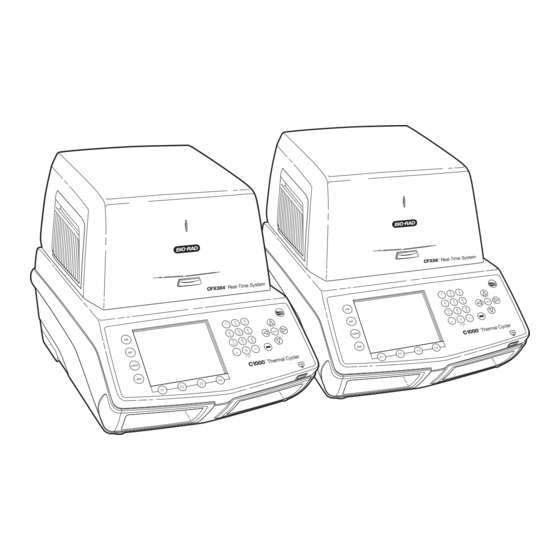
System Overview
Describes the main components of the CFX96/CFX384 system, including modules and base.
Setting up the system
Step-by-step instructions for physically installing the reaction module into the C1000 chassis.
Installing CFX Manager Software
Guide for installing the control and analysis software on a computer.
Installing the Drivers
Process for installing necessary drivers for software-controlled instrument operation.
Introduction to CFX Manager Software
Main Software Window
Overview of the primary interface, including status bar, menu bar, and toolbar.
Startup Wizard
Utility for guiding users through initial software setup and common commands.
Detected Instruments Pane
Displays connected instruments, showing their status and allowing interaction.
Instrument Properties Window
Provides detailed information, serial numbers, and firmware versions for instruments.
Software Files
Explains the different file types (.prcl, .pltd, .pcrd, .mgxd) used by the software.
Tips and Tricks
Offers helpful advice for efficient software usage and navigation.
Running Experiments
Recommended Plastic Consumables
Lists compatible plates and tubes for optimal results with CFX96 and CFX384 systems.
Loading the Block
Instructions on how to properly place samples into the instrument's block.
Run Details Window
Monitors the progress and status of an ongoing experiment in real-time.
Instrument Summary Window
Shows the status of all detected instruments and their blocks.
Protocols
Protocol Editor Window
Interface for creating and editing temperature steps, lid temp, and instrument options.
Protocol Editor Controls
Details on the menu bar, toolbar, and buttons for editing protocols.
Insert Step Button
Functionality for adding new temperature or hold steps before or after existing ones.
Add or Remove a Plate Read
Manages the inclusion or exclusion of plate reading steps within a protocol.
Insert Gradient Button
Adds gradient steps allowing temperature variation across the block.
Insert GOTO Button
Enables the creation of loops for repeating protocol steps.
Insert Melt Curve Button
Adds melt curve analysis steps to a protocol for Tm determination.
Step Options
Customizes parameters like increment, ramp rate, time, and beep for protocol steps.
Delete Step Button
Function for removing steps from a protocol; this action cannot be undone.
Temperature Control Mode
Explains calculated vs. block mode for temperature control based on sample volume.
Protocol AutoWriter
Tool for automatically generating PCR protocols based on experimental parameters.
Plates
Plate Editor Window
Interface for defining plate layout, fluorophores, and well contents for experiments.
Plate Editor Menu Bar
Contains options for saving, settings, and tools within the Plate Editor.
Plate Size and Type
Configuration of plate dimensions and well characteristics for the experiment.
Scan Mode
Selects how fluorescence data is collected from wells (e.g., All Channels).
Select Fluorophores Window
Chooses which fluorophores are active for data collection and analysis.
Well Loading Controls
Defines sample type, targets, replicates, and names for individual wells.
Experiment Settings Window
Manages targets, samples, and analysis parameters for gene expression studies.
Well Groups Manager Window
Organizes wells into subsets for independent data analysis.
Plate Spreadsheet View Window
Displays plate data in a spreadsheet format for export or review.
Stand-Alone Operation
Control Panel
Describes the physical interface, including LCD, keypad, and ports, for instrument control.
Main Menu
Accesses instrument functions, system information, and logs in users.
Experiment Setup
Configures and initiates runs directly on the instrument without a computer.
Exporting Data for Analysis
Methods to transfer acquired data for computer analysis using USB or email.
Exporting Data Using the USB Key
Procedure for saving acquired run data to a USB drive.
Exporting Data Using Email
Configuration for emailing run data directly from the instrument.
Creating a Data File
Converts stand-alone run files (.zpcr) into analyzable data files (.pcrd).
Setting Up Email
Configures the instrument's email client for notifications and data transfer.
Data Analysis Overview
Data Analysis window
The main interface for viewing and analyzing experimental results with multiple tabs.
Data Analysis Toolbar
Provides quick access to common data analysis functions like save, print, and view.
Data Analysis Menu Bar
Contains commands for file management, settings, and analysis tools.
Data Analysis Windows
Quantitation Tab
Displays amplification curves, standard curves, and well selectors for analysis.
Quantitation Data Tab
Shows detailed quantitative data in spreadsheet format (Results, Plate, RFU).
Melt Curve Tab
Analyzes thermal denaturation profiles for PCR products to determine melting temperature.
Melt Curve Data Tab
Provides spreadsheets of melt curve data, including peaks and RFU values.
End Point Tab
Analyzes final fluorescence values to determine sample status (Positive/Negative).
Allelic Discrimination Tab
Assigns genotypes to samples based on fluorophore signals and threshold values.
QC Tab
Validates experimental data against defined quality control rules.
Run Information Tab
Displays protocol details, experiment metadata, and notes.
Reports for Data Files
Generates and customizes reports from analysis results.
Gene Expression Analysis
Gene Expression
Overview of comparing relative expression levels between samples using controls.
Plate Setup for Gene Expression Analysis
Requirements for preparing plates, including targets and reference genes.
Gene Expression Tab
Visualizes normalized or relative gene expression data in charts and spreadsheets.
Experiment Settings Window
Configures targets, samples, reference genes, and analysis parameters.
Gene Study
Compares gene expression across multiple experiments using inter-run calibration.
Gene Study Report Window
Generates customizable reports for gene expression studies.
Frequently Asked Questions
Addresses common queries regarding gene expression analysis and calculations.
Gene Expression Calculations
Explains the mathematical formulas for calculating expression levels.
Users and Preferences
Log in or Select User
Manages user access to the software and displays the current logged-in user.
Change a Password
Process for updating user passwords for security and access control.
User Preferences Window
Allows customization of software settings like email, files, and analysis defaults.
Email Tab
Configures email notification settings for run completion and data transfer.
Files Tab
Sets default folders and file naming conventions for saving and opening files.
Protocol Tab
Defines default settings for protocol creation in the Protocol Editor.
Plate Tab
Sets default parameters for plate creation and analysis in the Plate Editor.
Data Analysis Tab
Configures default analysis settings for quantitation, allelic discrimination, and end point.
Gene Expression Tab
Sets default parameters for gene expression analysis graphs and calculations.
QC Tab
Specifies quality control rules and cut-off values for data validation.
User Administration
Manages user accounts, roles (Principal, Operator, Guest), and permissions.
Assign Rights for User Roles
Defines specific access levels and permissions for different user roles.
Resources
Calibration Wizard
Guides through calibrating fluorophores and plate combinations for accurate readings.
Calibrating the CFX96 or CFX384 System
Step-by-step process for performing dye calibration on the instrument.
Instrument Maintenance
Instructions for cleaning and maintaining the instrument for optimal performance.
Application Log
Records instrument events and logs for troubleshooting issues.
Software Help Tools
Access to help documentation, glossary, and search functions.
Troubleshooting
Guidance for resolving common software, instrument, and communication issues.
Power Failure Options
Describes instrument behavior and recovery after power interruptions.
Instruments, Parts, and Accessories
Lists available instruments, reaction modules, software, and accessories.
Need help?
Do you have a question about the CFX384 and is the answer not in the manual?
Questions and answers