Table of Contents
Advertisement
Advertisement
Table of Contents

Related Manuals for Ecosoft MO 5-50


Summary of Contents for Ecosoft MO 5-50
- Page 1 Ecosoft reverse osmosis system installation and operation manual...
-
Page 3: Table Of Contents
Contents: 1. Product data........................4 2. Principle of operation....................7 3. Product installation diagram..................9 4. Filter installation......................12 5. Faucet installation......................15 6. Using quick connect fittings..................16 7. Supply water quality requirements................17 8. Maintenance........................17 9. Cartridge replacement....................19 10. Warranty........................25... -
Page 4: Product Data
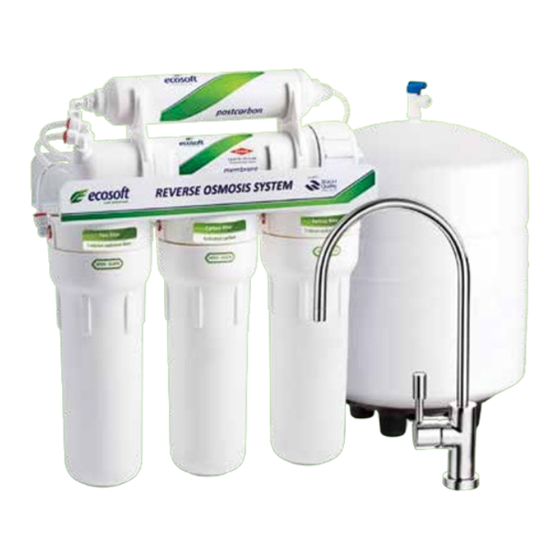
2 - Number of stages. 3 - Nominal membrane flow rate. Ecosoft MO series systems are fitted with 36 gpd (gallons per day) 50 gpd, 75 gpd, or 100 gpd membranes (130 Lpd, 190 Lpd, 280 Lpd, or 380 Lpd respectively). - Page 5 System assembly checklist 1. Filter rack 2. Pressure tank 3. Faucet 4. Feed adapter 5. Feed water valve 6. Tank valve 7. Set of colored flexible tubes (4 pieces) 8. Drain saddle 9. Bowl wrench for pre-filters 10. Filter cartridges (may be packaged or pre-installed) 10.1 Sediment cartridge 10.2 Carbon cartridge 10.3 Fine cartridge...
- Page 6 7. Set of colored flexible 8. Drain saddle 9. Bowl wrench for pre- tubes (4 pieces) filters 10.1 Sediment cartridge 10.2 Carbon cartridge 10.3 Fine cartridge 10.4 Carbon post-filter 10.5 RO Membrane 11. Union tee 12. Automatic shutoff 13. PTFE tape 14.
-
Page 7: Principle Of Operation
2. Principle of operation Reverse osmosis uses a special kind of semi-permeable membrane designed to function similarly to living cell’s membrane. The membrane can be conceived of as having tiny pores, 200 times finer than virus particle and 4000 times finer than most bacteria. The principle of reverse osmotic water purification is modelled after living cell’s natural water cycle. - Page 8 outlet of the union tee is connected to the pressure tank (by means of yellow tube running to the tank valve 6), and the third outlet of the tee is connected to carbon post-filter 10.4. All described components are connected to one another with flexible tubes. The purpose of the pressure tank 2 is accumulating and storing purified water, the need for which arises due to slow nature of reverse osmotic purification of water.
-
Page 9: Product Installation Diagram
3. Product installation diagram Drain Hot water Red tube Cold water Black tube Blue tube Yellow tube Figure 3.1 Installation diagram for standard reverse osmosis system 1. Filter rack; 2. Pressure tank; 3. Faucet; 4. Feed adapter; 5. Feed water valve; 6. Tank valve; 7. Colored tubing; 8. Drain saddle;... - Page 10 Drain Hot water Red tube Cold water Blue tube Black tube Yellow tube Figure 3.2 Installation diagram for reverse osmosis system with re-mineralizing filter 1. Filter rack; 2. Pressure tank; 3. Faucet; 4. Feed adapter; 5. Feed water valve; 6. Tank valve; 7. Colored tubing; 8. Drain saddle;...
- Page 11 Drain Hot water Red tube Cold water Black tube Blue tube Yellow tube Figure 3.3 Installation diagram for reverse osmosis system with booster pump and/or UV disinfection unit 1. Filter rack; 2. Pressure tank; 3. Faucet; 4. Feed adapter; 5. Feed water valve; 6. Tank valve; 7. Colored tubing; 8. Drain saddle;...
-
Page 12: Filter Installation
4. Filter installation Before installing the system, it is necessary to prepare a place under the kitchen sink. Make sure that there is sufficient space for the system and the pressure tank. In case there is not enough empty space under the kitchen sink it is acceptable to install the pressure tank separately from the system within yellow tube stretching distance. - Page 13 anchors if necessary and screw in two screws (not included). 9. Connect the flexible tubes. Layouts for each system model are given in figures 3.1, 3.2, 3.3. 10. Install cartridges in the first and second bowl per water flow direction as in Figure 5. Screw the bowls back on.
- Page 14 Figure 6 Note During the first week of use check the system for leaks daily. It is also recommended to check it routinely afterwards. If you have to leave for extended periods of time, such as a business trip or a vacation, shut off water supply to your system. 17.
-
Page 15: Faucet Installation
5. Faucet installation 1. To prepare for installing the faucet drill a hole with a diameter of 12,5 mm in a suitable spot on the kitchen sink or counter. Caution Metal chips can damage the sink, it is necessary to remove them carefully immediately after the hole is drilled. -
Page 16: Using Quick Connect Fittings
6. Using quick connect fittings Connecting the tubing does not require using any tools. The entire system is connected together as shown on figures 3.1, 3.2, 3.3, depending on your model. To release tube (or a plug) from a quick connect fitting, first remove the locking clip (horseshoe- shaped red plastic clip), push the collet back against the body of the fitting and then gently... -
Page 17: Supply Water Quality Requirements
8. Maintenance Ecosoft reverse osmosis system can only be used with cold water supply. Pre-filter cartridges should be replaced in a regular and timely manner, once in 3 months or more often. Failure to do so will increase fouling load on the membrane and may cause it to wear out prematurely. -
Page 18: Troubleshooting
Troubleshooting Problem Cause Solution Fitting leak Tube is not joined tightly Remove and rejoin the tube Drain saddle is not installed Drain saddle leak Reinstall drain saddle as described in Chapter 4 properly O-ring seal is lacking or Check that the O-ring seal is properly aligned in misaligned the groove Bowl leak... -
Page 19: Cartridge Replacement
3 months stages 1,2,3) for Ecosoft RO 3 months system 3 months 2-pack (membrane + Post- 1 year filter stages 4,5) for Ecosoft RO 1 year system Re-mineralization filter 1 year Lamp for UV disinfection unit 1 year Procedure for replacing pre-filter cartridges 10.1, 10.2, 10.3... - Page 20 3. Remove the expired cartridges. 4. Wash bowls thoroughly with washing liquid and rinse with water. 5. Insert new cartridges in the first and second bowls per direction of water flow. Consult figure 5. Screw the bowls back on by hand. Caution Bowls should be screwed on by hand, do not wrench-tighten! 6.
- Page 21 6. Remove the used membrane (note its orientation and position inside). 7. Grease new membrane’s rubber sealing rings and membrane housing sealing ring with silicone grease. 8. Install the new membrane into the housing, observing orientation as per step 6. 9.
- Page 22 1. Close feed water valve. 2. Close tank valve. 3. Open the faucet to release the pressure. 4. Pull out the tubes that connect the re-mineralizing filter to adjacent units. 5. Remove the used re-mineralizing filter from the plastic brackets. 6.
- Page 23 When replacing the UV lamp it will also be useful to clean the quartz sleeve. Do not use abrasive materials to clean the sleeve, as this may decrease transparency of the sleeve to UV radiation, thereby reducing the efficiency of disinfection. Be careful when removing the quartz sleeve from the housing to avoid damaging or scratching the sleeve.
- Page 24 Sanitization of tank (replace carbon post-filter when sanitizing tank) Caution Wash your hands thoroughly with antibacterial soap before performing any maintenance on your filter. Only use clean tools and make sure to sanitize the workplace beforehand using detergent or bleach. 1.
-
Page 25: Warranty
10. Warranty Thank you for purchasing Ecosoft reverse osmosis system! We hope that this product will serve you long and let you and your family enjoy high quality pure drinking water. Before using the system, please read this instruction manual and check that you have got a valid warranty card. - Page 26 Notes:...
- Page 27 WARRANTY CARD NO._____________ Ecosoft Reverse Osmosis system MO 5-36; MO 5-36P; MO 6-36M; MO 6-36MP; MO 6-36UV; MO 6-36UVP; MO 7-36UVM; MO 7-36UVMP MO 5-50; MO 5-50P; MO 6-50M; MO 6-50MP; MO 6-50UV; MO 6-50UVP; MO 7-50UVM; MO 7-50UVMP MO 5-75; MO 5-75P; MO 6-75M; MO 6-75MP; MO 6-75UV; MO 6-75UVP; MO 7-75UVM; MO 7-75UVMP MO 5-100;...
Need help?
Do you have a question about the MO 5-50 and is the answer not in the manual?
Questions and answers