Table of Contents
Advertisement
Advertisement
Table of Contents

Related Manuals for Mavic Wintech HR


Summary of Contents for Mavic Wintech HR
- Page 1 Wintech USB Wintech Alti Wintech HR Wintech Ultimate...
-
Page 2: Installation
WINTECH USB Ultimate 2010- User Guide The Mavic team has put all its passion, experience and skill into the design and manufacture of 11. SLEEP MODE your computer. It will be an important tool for you in the improvement of your performance. -
Page 3: Product Description
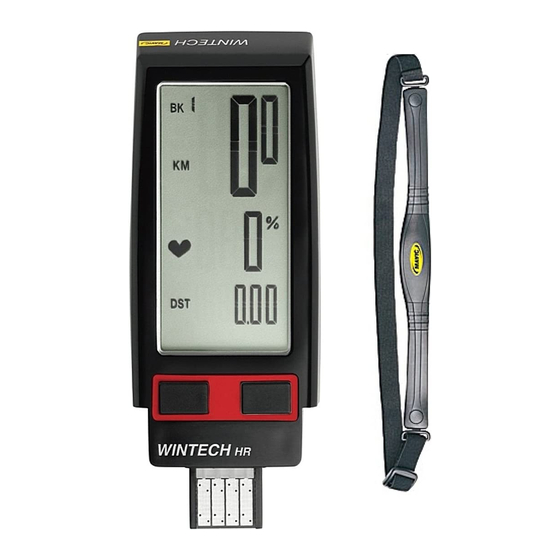
INSTALLATION 1. PRODUCT DESCRIPTION Main Unit Box 2. INSTALLING THE COMPUTER MOUNT Computer Cardio Belt 2.1 Install the mount on the handlebar, Wintech Manager software to the right of the stem. To fix it to an oversize, 25.4 diameter handlebar, Memo stick use the 25.4 adapter. - Page 4 4. INSTALLING THE SPEED SENSORS 4.2. E-Bolt 4.1 E-Skewer The speed sensor is integrated into a fixing nut compatible with all quick-releases on the market. To install it, unscrew the fixing nut on your quick-release. Fit the quick-release lever to the hub, Insert the quick release from the left-hand side of your bike and with the lever to the left (to the right tighten the electronic fixing nut from the right-hand side.
-
Page 5: Basic Navigation
If the current speed equals the average speed, no arrow is displayed. Altimeter indication line (Wintech USB Alti and Wintech USB Ultimate only) 6. INSTALLING THE BATTERIES Vertical speed (up to 2500m/h or 8202,5 ft/h). In meters per hour (m/h) or feet per hour (ft/h) -
Page 6: Entering The Set Up Menu
The set up menu is sequentially organized in sub-menus, in the following order: (Wintech USB HR and Wintech USB Ultimate only) HR alarm and working zone (Wintech USB Alti and Wintech USB Ultimate only) – Trip distance Digital pairing of bike sensor Screen 3 –... - Page 7 From any active display, press and hold the right button (BPR) for 6 seconds. to the upper limit (Hi) using the same On Wintech USB HR and Wintech USB Ultimate, briefly press the left button (BPL) once to 1 click...
- Page 8 To pair a 2 bike sensor or the home trainer sensor, proceed again to (Wintech USB Alti and Wintech USB Ultimate only) the operations described above, selecting the correct bike number The elevation set up menu is divided in 3 parts: and corresponding sensor.
- Page 9 (BPL) 3 times to move to the 1 click (USB) wheel circumferences and distance unit set up section. “Cir” appears on the screen. – On Wintech USB Alti and Wintech USB HR, briefly press the left button (BPL) twice to move to the wheel 1 click...
- Page 10 10.4.3. Set up the wheel circumference of the selected bike. – On Wintech USB Ultimate, briefly Briefly press the left button (BPL) to set up the first digit of the chosen bike wheel circumference. press the left button (BPL) 4 screen Briefly press the right button (BPR) to validate your choice and move to the next digit.
-
Page 11: Sleep Mode
The last active display will be displayed. 5 click (Ultimate) 4 click (Alti, HR) – On Wintech USB Alti and 3 click (USB) Wintech USB HR, briefly When the computer wakes up, the press the left button (BPL) BK displays starts to flash. -
Page 12: Trip Reset
The screen automatically switches to screen 3, displaying the “ATM” of the lap time you have just stopped. Press any button, to return to the overall display of your session. Wintech USB computers can store To start the next lap time, press the right button for another 2 seconds, and so on for the up to 10 trips of 5 hours each in 9 possible lap times. - Page 13 1. Recall of home altitude “Ho” (Wintech USB Alti and Wintech USB Ultimate only) Briefly press the right button (BPR) to 2. Setting up the current altitude “Cu” (Wintech USB Alti and Wintech USB Ultimate only) recall the home elevation. The figure 3.
- Page 14 Enter the elevation set up and data review menu: From any screen, press the left button for 2 seconds. – On Wintech USB Alti and Wintech USB Ultimate, briefly press the left button (BPL) twice to switch to the altitude and heart rate review data section: “Info” appears on the computer screen.
- Page 15 Enter the elevation set up and data review menu: From any screen, press the left button for 2 seconds. – On Wintech USB Alti and Wintech USB Ultimate, briefly press the left button (BPL) 3 times to switch to the lap time data review section: “Cr” appears on the computer screen.
- Page 16 Enter the elevation set up and data review menu: From any screen, press the left button for 2 seconds. – On Wintech USB Alti and Wintech USB Ultimate, briefly press the left button (BPL) 4 times to switch to the odometer review section: “odo” appears on the computer screen.
-
Page 17: Technical Specifications
Read section 20 to 26 of this user guide to learn more about data download and the – Cadence: from 10 to 180 RPM Wintech Manager software. – Heart rate: from 25 to 240 BPM (Wintech USB HR and Wintech USB Ultimate only) - Page 18 (1) Up-to-date list available on request from: MAVIC, 74996 ANNECY CEDEX 9. In the event of a defect on one of its products, Mavic’s sole obligation under this warranty is to (2) Claims made by other means or without obtaining prior consent for return cannot be taken repair or replace, at its discretion, the defective part or product.
-
Page 19: Installation
– Elevation information is only available when using a Wintech USB Alti and Wintech USB Ultimate. – Heart rate information is only available when using a Wintech USB HR and Wintech USB Ultimate. The first time you launch the software, you will be prompted to create a user account. -
Page 20: Data Transfer
21. DATA TRANSFER Shows downloaded trip details Shows downloaded trip reports, by week, When the Wintech computer is plugged to the PC, the Wintech Manager software is (see section 22. Trip of this user guide) month and year automatically launched and the download dialog box opens. (see section 23. - Page 21 – Distance, duration, average and maximum speed, – Average and maximum cadence (if optional cadence sensor used during the trip), – Average and maximum heart rate, time spent in workzone (for Wintech USB HR and Wintech USB Ultimate only, and if heart rate belt used), –...
- Page 22 – Duration – Average cadence (if optional cadence sensor used) – Average heart rate (for Wintech USB HR and Wintech USB Ultimate only, if heart rate belt used) – Total vertical gain (for Wintech USB Alti and Wintech USB Ultimate only)
- Page 23 24. COMPUTER SETTINGS AND USER ACCOUNT MANAGEMENT When the user name is confirmed, you can read the user account and associated computer settings: As you can manage up to 3 different users on the same PC, when you click on Computer settings, the next screen asks you to choose among the registered users, to make sure you will change the parameters of the correct user.
- Page 24 Edit the bike parameters associated to each sensors you may have paired Edit User’s heart rate information (for Wintech USB HR and Wintech USB Ultimate only) Edit User’s elevation information (for Wintech USB Alti and If you choose: Wintech USB Ultimate only) –...
-
Page 25: Bike Settings
Customize the screen displayed using the left button of the Wintech computer. The top line is not customizable. Go to www.mavic.com According to your Wintech computer model (USB, USB Alti, USB HR or USB Ultimate), only the available functions will be... -
Page 26: Technical Specification
27. TECHNICAL SPECIFICATION The Wintech Manager software can store data coming from 3 different users during 10 years , with 300 trips a year of 5 hours each, for each of the 3 users. System requirements: Windows XP or Vista only Processor at 1.3 GHz minimum 512 MB of RAM memory 50 MB of hard drive disk free space...
Need help?
Do you have a question about the Wintech HR and is the answer not in the manual?
Questions and answers