Table of Contents
Advertisement
Quick Links
Advertisement
Table of Contents
Troubleshooting

Related Manuals for RJM Mastermind GT/22


Summary of Contents for RJM Mastermind GT/22
- Page 1 Mastermind GT User’s Manual RJM Music Technology, Inc.
- Page 3 Mastermind GT User’s Manual Version 3.0 8/5/2015 RJM Music Technology, Inc. 2525 Pioneer Ave. Suite 1 Vista, CA 92081 +1-760-597-9450 email: support@rjmmusic.com web: www.rjmmusic.com...
- Page 4 Copyright © 2012-20154 RJM Music Technology, Inc. All Rights Reserved RJM, RG-16, Amp Gizmo, Effect Gizmo, Rack Gizmo, Switch Gizmo, Mastermind, Mastermind GT and the RJM logo are trademarks of RJM Music Technology, Inc. All other trademarks are the property of their respective holders.
-
Page 5: Table Of Contents
Troubleshooting ........................................16 Slave Mode ..........................................16 Selecting Slave Mode ..................................... 17 Setup with RJM Music Products ..............................18 Connections ........................................... 18 Important Notes on Phantom Power! ..............................18 Chaining Multiple Devices ................................... 18 ... - Page 6 Setup Mode Reference ................................... 43 Button Selection ........................................43 Text Entry (Mastermind GT/10 and Mastermind GT/16) ........................44 Number Entry (Mastermind GT/10 and Mastermind GT/16) ........................ 45 Text and Number Entry (Mastermind GT/22) ............................. 45 ...
- Page 7 System ..........................................55 IA Mode ..........................................56 Macro ........................................... 56 Page ............................................56 Preset ........................................... 56 Step ............................................56 Tuner ............................................ 56 Edit Pages ..........................................56 Edit Presets ..........................................56 Expression Pedals .........................................
-
Page 9: Introduction
Each preset can send program and bank changes to each device, plus also send up to 10 general MIDI messages “IA Mode” converts up to 21 (15 on the Mastermind GT/16, 9 on the Mastermind GT/10) of the available buttons to •... -
Page 10: Front Panel
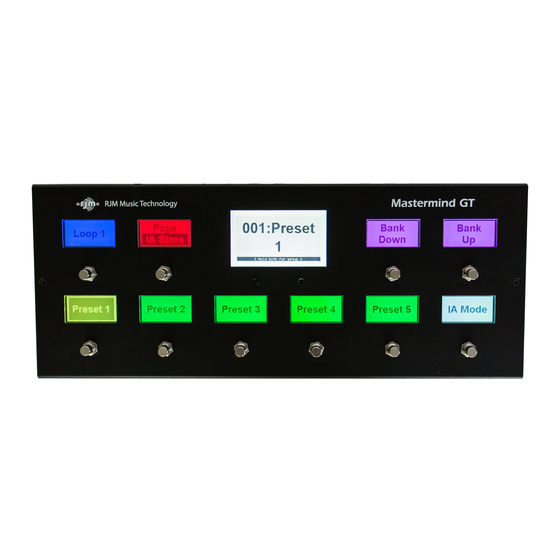
The display format is user configurable, with several options. 2. Button Display – These 22 displays (16 displays on the Mastermind GT/16, 10 displays on the Mastermind GT/10) are present over every button. They indicate the current function the button performs and the status of the button. These displays have RGB color backlights and can be configured for different functions and background colors. -
Page 11: Rear Panel
Rear Panel Rear Panel Connections (left side) Expression Pedals 1-4 – Up to four expression pedals can be connected to these ports using ¼” TRS cables. Refer to the Expression Pedals section for more details. USB A – This is a USB port designed for use with a USB flash drive. A flash drive can be used to back up or transfer settings, and is also used for firmware upgrades. -
Page 12: Rear Panel Connections (Right Side)
MIDI Out (XLR) – (Mastermind GT/22 only) This is a second MIDI output port that is wired in parallel with the other MIDI Out port. This one has a 6-pin male XLR connector designed to connect to RJM Music products such as the Effect Gizmo and Rack Gizmo, or another Mastermind GT. -
Page 13: Basic Operation
Buttons with other functions are indicated by color and text label. The Mastermind GT is configured to control a single Rack Gizmo (our flagship audio loop switcher / function switcher), and to send program change messages on MIDI channel 1. Mastermind GT/10 default button configuration Page Bank... -
Page 14: Presets And Banks
Mastermind GT/22 default button configuration Loop Loop Page 000: Clean IA Store Mode Hold both for setup Loop Loop Loop Loop Loop Bank Loop Function Function Function Function Bank Down Smooth Shred Clean Blues Crunch Gainer Lead Fest Presets and Banks The green buttons are preset selection buttons. -
Page 15: Button Pages
This function is also known as the “IA reveal” on other MIDI controllers. In this mode, you can have up to 21 instant access buttons available (15 IA buttons on the Mastermind GT/16, 9 IA buttons on the Mastermind GT/10). This allows you to switch presets to perform the more dramatic sound changes (perhaps from song to song), then tap the IA Mode button which allows you to fine tune by turning individual effects on and off. -
Page 16: Initial Setup - Adding A Device
Initial Setup - Adding a Device The first thing you’ll probably need to do with the Mastermind GT is to add a device. This informs the GT about what it’s connected to and what it needs to do to control that device. The Mastermind GT has an internal database of information about popular MIDI devices, so often times you might only need to select the device from a list and the Mastermind GT will do the rest of the setup for you. - Page 17 Once a device slot is selected, you are taken to the Device Edit screen. Select the Type button in the upper left hand corner to set the type of this device. Edit Device 1 Type Done Done Select You will be presented with a list of device manufacturers. Select your manufacturer from the list, then select the model of the device in the next list that is presented.
- Page 18 The Device Edit screen shows you the options available for your device: Edit Device 1 Type Name Next Done Rack Gizmo Rack Gizmo Page Rack Gizmo Done MIDI Ch Assign Set Default Set Default Port Preset Offst Buttons Buttons Pedals MIDI Out Max PC # Bank Type...
- Page 19 Get Preset Names Start Preset End Preset Done Select an option Done Dest Preset Start Start Preset and End Preset indicate the numbers of the starting and ending preset on your effect processor that will have their names copied. Dest Preset indicates the first of the presets on the Mastermind GT that will be renamed. Once you press the Start button, the Mastermind GT will query your device starting at the preset indicated by Start Preset.
-
Page 20: Setup With A Fractal Audio Axe-Fx
Setup with a Fractal Audio Axe-Fx The Axe-Fx series of effect processors are commonly used with Mastermind GTs. The Axe-Fx’s advanced MIDI implementation allows the Axe-Fx and Mastermind GT to communicate to each other, with the Mastermind GT sending commands to the Axe-Fx and the Axe-Fx sending status information back to the Mastermind GT. Connections This setup requires slightly different connections than a standard MIDI device would. -
Page 21: Usage
Press the Set Default Pedals button. This sets up the expression pedals to control the Axe-Fx. Optional: Use the Get Preset Names feature to read the preset names from the Axe-Fx. This process is described in the previous section. Exit setup mode. Usage Once it’s set up, you’ll see a standard configuration of preset buttons, bank buttons, and IA buttons. -
Page 22: Selecting Slave Mode
In slave mode, you can select which effect blocks are turned on or off simply by pressing the IA buttons on the Mastermind GT, then holding the “Page / IA Store” button for three seconds to store the new IA state to the current preset. -
Page 23: Setup With A Kemper Profiling Amp
Setup with a Kemper Profiling Amp The Kemper Profiling Amp (or KPA) is another device that is frequently used with the Mastermind GT. The KPA has an extensive MIDI implementation that allows it to communicate bidirectionally with the Mastermind GT, reporting effect block status, effect types, tempo and tuner data. -
Page 24: Usage
Press the Set Default Buttons button, and press 1. This sets up button page 1 with a default set of buttons that control the KPA. Press the Set Default Pedals button. This sets up the expression pedals to control the KPA. Optional: Turn on the Auto Names feature. -
Page 25: Selecting Slave Mode
In this “normal” mode, if you want to change which effect blocks are turned on or off in a particular preset, you need to do the editing on the KPA itself. You can’t update this information on the Mastermind GT. An alternate method is available, which we refer to “slave mode”. -
Page 26: Setup With Rjm Music Products
Setup with RJM Music Products The Mastermind GT is designed to work with other RJM Music products with a minimum of setup. Connections The Mastermind GT only needs a single MIDI cable to connect to one of our products. You can use a standard 5-pin cable to make the connection, and power the Mastermind GT with its own power supply. -
Page 27: Editing Buttons
Editing Buttons The basic device setup in the Initial Setup section is typically enough you get you started using a new device. However, you’ll probably want to change the button arrangement of the controller to your liking. On the Mastermind GT, any button can be set to perform any function, so be sure to take advantage of this ability! Swap Buttons The simplest way to rearrange buttons is to use the Swap Buttons function. -
Page 28: Assign Buttons
buttons will not rearrange the order of presets – the buttons will still have presets assigned to them based on their physical location on the Mastermind GT. As of firmware version 2.2, you can change how the Mastermind GT assigns presets to preset buttons. There’s a parameter called Preset Index that allows you to change the order in which presets are assigned to buttons. -
Page 29: Low Level Editing
Looper Looper Looper Looper Looper Looper On/Off Start/Stop Reverse Play Undo If the list of functions takes up more than one page, the Next Page buttons will be shown. This will let you move between the pages of functions. Once a function is selected, the menu will ask which button should receive the function. This is done using the Button Selection menu described earlier. -
Page 30: Hold Buttons
Edit Button Action Type Delete Done CC Toggle Action Button 14, Page 2 Done Device CC Number Off Value On Value Select Mega FX The Type parameter allows you to select the action you want to perform. This could be sending a MIDI CC, PC or Note message, or it could be a system Action. -
Page 31: Cycle Buttons
The Editing parameter will now control whether you are editing the button’s normal settings or the button’s hold settings. Each button can do something completely different for its normal and hold functions. Most of the parameters available for a normal function can also be set for a hold function, although some parameters like color and momentary are not available. -
Page 33: Editing Presets
Editing Presets The Mastermind GT’s presets are the primary way to get many things to happen with a single button press. Each preset can do the following: Sends a MIDI Program Change (PC) message to any of your connected MIDI devices. Perform up to 10 actions, each of which can send any MIDI message or activate another function on the Mastermind GT. -
Page 34: Name
Name This parameter allows you to edit the name of the preset that will be displayed in the preset buttons and main display when the preset is selected. Button Page The Page option allows you to choose which button page is displayed when the preset is selected. Any of the 16 button pages can be displayed, or you can select the “Same”... - Page 35 program change 2, etc. For devices such as effect processors, you will probably need to customize the program change numbers so that the preset buttons call up your favorite effect programs. There are 16 buttons that show any devices that are defined, and the program / bank numbers that are set to be sent to the device for this preset.
-
Page 36: Song And Setlist Mode
Song and Setlist Mode For live performances, your Mastermind GT presets can be arranged into Songs and Setlists. Using this feature allows you to group presets by song and makes it easy to rearrange those songs for each performance. A Song is a group of presets – up to 16 of them – that are selected for use in a particular song. Each preset is typically chosen for the sounds needed in different parts of a song: intro, verse, chorus, bridge, solo, etc. -
Page 37: Editing Setlists
Select a Song Free Gravy Next Done Bird Train Page Done High Tap Dance Song Song Owner of a Slovakian Wattage Blues Looney Heart Rhapsody The songs are displayed in purple to differentiate them from setlists (which are displayed in white) and presets (which are displayed in green). -
Page 38: Using A Setlist
Select a Setlist Standard Short Next Done Page Done Setlist 3 Setlist 4 Setlist 5 Setlist 6 Setlist 7 Setlist 8 Select one of the lists and the Setlist Edit menu will be displayed: Edit Setlist 2 Name 3:Owner of a Next Done Short Set... -
Page 39: Expression Pedals
Mastermind GT’s built-in buttons can, and is edited using the Edit Buttons menu. To connect the SP1-RJM to the Mastermind GT, you will need two ¼-inch TRS cables. The first one connects from the pedal’s Output 1 jack to one of the Expression Pedal inputs on the Mastermind GT. -
Page 40: Setting Up The Expression Pedal Position Switch
Edit Exp Pedal 1 Name Switch Grp Next Done Pedal 1 None Page (Global) Done Device CC Number Min Val Max Val Assign Calibrate Mega FX Pedal CC Device 2 CC Num. 2 Min Val 2 Max Val 2 Assign Set Switch None Pedal CC 2... - Page 41 To set this up, you first need to select which parameter you wish to control. If you’re using the expression pedal to control a wah effect, you would want to have the expression pedal switch control the effect processor’s “Wah” or “Wah On/Off”...
-
Page 42: Expression Pedal Grouping
The last step is to choose at what point in the pedal’s travel the switch happens. Move the pedal to that spot (typically not quite all the way down or not quite all the way up), then press Set Switch Position. The pedal position will be remembered and the selected function will switch on and off as you move the pedal up and down. -
Page 43: External Switches
RJM Music sells single and dual external switches made to work correctly with the Mastermind GT, and Mission Engineering’s SP1-RJM expression pedal includes a toe switch (similar to the on/off switch on a wah pedal) with an LED that can work as an external switch for the Mastermind GT. -
Page 44: Remote Mode
Remote Mode You can connect multiple Mastermind GTs together and have them operate in unison. Selecting a preset or pressing an Instant Access button on any controller will cause the other controllers to switch similarly. This is a great feature for both stage and studio - you can have multiple controllers at different locations on the stage, have an additional controller operated off-stage by a tech, or have controllers in both the studio and the control room. -
Page 45: External Midi Control
External MIDI Control The Mastermind GT can also be controlled by an external MIDI device such as a computer, sequencer or other type of MIDI controller. To enable this feature, set the MIDI Rx Ch parameter in the MIDI Settings Menu to the desired MIDI channel. -
Page 46: Other Special Features
“001” will jump to the first preset. You can also press the Done button to jump to a preset without typing all the digits: “1”, “Done”. On the Mastermind GT/10, there is not enough room to fit a Done button, so you’ll always need to type in the full preset number with leading zeros. -
Page 47: Macros
When set to “Master”, the Mastermind GT will send a MIDI clock signal out of all MIDI outputs, including the USB port. The tempo will be adjusted any time a tap tempo button is used. Tempo can also be set on a per-song or per-preset basis. -
Page 48: Loading And Saving Settings To A Usb Flash Drive
Load Settings When Load Settings is selected, you are shown a list of the files that are on your flash drive. Only RJM settings files (ending in .rjs) and directories are visible. The Move Up and Move Down buttons move the selection bar up and down. -
Page 49: Connecting To A Computer
Connecting to a Computer In addition to the USB flash drive support, the Mastermind GT’s USB B port allows you to connect your controller to a PC or Mac with a USB port. The Mastermind GT is a class-compliant USB MIDI device, which means it doesn’t need additional driver software. -
Page 50: Upgrading Firmware
The firmware upgrade process is simple: first, download the upgrade file from the RJM Music website using your PC or Mac. Copy the downloaded file to a USB flash drive. All RJM firmware files end in the extension “.rjf”, so it will be easy to tell which files are the ones you want. -
Page 51: Setup Mode Reference
Setup Mode Reference Setup mode allows you to configure all aspects of the Mastermind GT, from the MIDI messages it sends to the way information is displayed on the screens. To enter setup mode, press and hold the two soft buttons located under the main display. After about 2 seconds, the display will change, indicating you’re in setup mode. -
Page 52: Text Entry (Mastermind Gt/10 And Mastermind Gt/16)
Down Preset Preset Preset Preset Preset Preset Text Entry (Mastermind GT/10 and Mastermind GT/16) When editing names and other text, the Mastermind GT/10 and Mastermind GT/16 display the following menu: Edit Button Name CAPS Clear Done Shred Fest Done Cursor... -
Page 53: Number Entry (Mastermind Gt/10 And Mastermind Gt/16)
Number Entry (Mastermind GT/10 and Mastermind GT/16) When editing numbers, the Mastermind GT/10 and Mastermind GT/16 display the following menu: Edit CC Number Done Done -100 +100 You can adjust the number using the minus / plus value buttons in the bottom row. -
Page 54: Special Characters
The letters are placed in groups of two or three. Pressing a letter button will select the first (leftmost) letter, and pressing the button again quickly will move to the next letter. For example, pressing the OPQ button once will place an “O”... -
Page 55: Main Menu
Main Menu The first menu you see upon entering Setup Mode allows you to configure some system options as well as access submenus to edit devices, buttons and presets. Current Pg. – Sets the currently visible button page. This is useful if you accidentally find yourself on a page that doesn’t have a Page Select button defined. - Page 56 Edit Songs – Brings up the Edit Songs menu. This menu is described in the Song and Setlist Mode section. Edit Setlists – Brings up the Edit Setlists menu. This menu is described in the Song and Setlist Mode section. Edit Groups –...
-
Page 57: Display Settings Menu
ShowPageNames – When turned on, the name of the current page is displayed at the top on the main display. If this parameter is turned off, or the current page does not have a name, the current preset and song are displayed normally. ReverseMenus –... -
Page 58: System Functions Menu
SongNmOnly (Song Name only) - When turned on, makes the song name take up the entire main display. When this setting is turned off, both the song name and current preset are shown in the main display. System Functions Menu The System Functions Menu allows you to configure low level parameters and do system maintenance. - Page 59 Set Default Buttons – Sets up a page full of instant access buttons for this device. Once this button is pressed, you are asked which page number you wish to set up. The default buttons will be copied to this page, overwriting any IA buttons on the page.
-
Page 60: Assign Buttons
SndRdunPC (Send Redundant PC) – When set to “Off”, the same PC message will never be sent to a device more than once in a row. Some effects processors will cause a gap or hiccup in the audio when receiving a PC message, so turning this parameter off will help prevent that from happening. - Page 61 Device PC + – Increments the current program number of a specific device. This allows you to scroll through • the list of presets on a specific device without affecting the other connected devices. The button will always display the device’s current PC number (and bank number if appropriate) IA (instant access) –...
- Page 62 IA Off Color – Sets the color of this button when the button is off and the controller is in IA mode. This option is not available for IA buttons. Group - This allows IA buttons to be grouped, where only one button in the group is allowed to be on at a time. Pressing a button in the group turns that button on, and also turns all of the other buttons in the group off.
-
Page 63: Action Edit
Action Edit The Action Edit screen allows you to edit the details of an action assigned to a button. These actions are performed when an instant access button is pressed. An action can be a MIDI message that is sent, or something that affects the system (change to a new button page, etc.) Type –... -
Page 64: Ia Mode
IA Mode The IA Mode function allows you to turn IA mode or or off. This performs the same function as the IA Mode button, but because this is a button action and not a button type, it can be combined with other actions on the same button. -
Page 65: Expression Pedals
Exp Pedals – Brings you to the Expression Pedals menu to allow you to override the global expression pedal settings for this preset. External Switches – Brings you to the External Switches menu to allow you to override the global external switch settings for this preset. -
Page 66: Edit Groups
External MIDI Control section for more details. MIDI Bidir – Turns bidirectional MIDI support on or off for the 7-pin DIN MIDI ports. Certain devices, including most RJM Music products, support bidirectional communication between the device and MIDI controller. This allows you to have two way communication with a single 5 pin or 7 pin MIDI cable. -
Page 67: Sysex Messsages Menu
Remote – Turning this on enables remote mode. This allows more than one Mastermind GT to be connected together and have them all synchronized together. Refer to the Remote Mode section for more information. MIDI Merge – When set to “On”, all MIDI messages that are received through the Remote In or USB B ports are retransmitted through the MIDI Out port. -
Page 68: Specifications
Specifications Dimensions GT/10: 19.4 (W) x 8.1 (D) x 3.25 (H) inches / 49.3 x 20.6 x 8.3 cm GT/16: 19.4 (W) x 11.1 (D) x 3.25 (H) inches / 49.3 x 28.2 x 8.3 cm GT/22: 19.4 (W) x 14.1 (D) x 3.25 (H) inches / 49.3 x 35.8 x 8.3 cm Weight GT/10: 6 lbs / 2.7 kg GT/16: 8 lbs / 3.6 kg... - Page 69 The “+” pins correspond to pin 4 and the “-“ pins correspond to pin 5 on a standard MIDI connector. The recommended mating connectors are Neutrik part number NC6MXX for the XLR Remote in and NC6FXX for the XLR MIDI Out.
-
Page 70: Mastermind Gt Midi Implementation Chart
Mastermind GT MIDI Implementation Chart MIDI Implementation Chart v 2.0 (Page 1 of 3) Manufacturer: RJM Music Technology, Inc. Model: Mastermind GT Version: 3 Date: August 5, 2015 Transmit/Export Recognize/Import Remarks 1. Basic Information MIDI Channels 1-16 1-16 Channel 1 is set by default... - Page 71 MIDI Implementation Chart v 2.0 (Page 2 of 3) Manufacturer: RJM Music Technology, Inc. Model: MasterMind GT Version: 1 Date: August 5, 2015 Control # Function Transmitted (Y/N) Recognized (Y/N) Remarks Bank Select (MSB) Modulation Wheel (MSB) Breath Controller (MSB)
- Page 72 MIDI Implementation Chart v 2.0 (Page 3 of 3) Manufacturer: RJM Music Technology, Inc. Model: MasterMind GT Version: 1 Date: August 5, 2015 Control # Function Transmitted (Y/N) Recognized (Y/N) Remarks Sustain Pedal Portamento On/Off Sostenuto Soft Pedal Legato Footswitch...
Need help?
Do you have a question about the Mastermind GT/22 and is the answer not in the manual?
Questions and answers