Table of Contents
Advertisement
MINIDISC RECORDER
DN - M991R
OPERATING INSTRUCTIONS
BEDIENUNGSANLEITUNG
MODE D'EMPLOI
INSTRUCCIONES DE OPERACION
BRUKSANVISNING
FOR ENGLISH READERS
FÜR DEUTSCHE LESER
POUR LES LECTEURS FRANCAIS
PARA LECTORES DE ESPAÑOL
FÖR SVENSKA LÄSARE
PAGE
006 ~ PAGE
041
SEITE
042 ~ SEITE
078
PAGE
077 ~ PAGE
114
PAGINA
115 ~ PAGINA 150
SIDA
151 ~ SIDA
186
1
Advertisement
Table of Contents

Related Manuals for Denon DN-M991R


Summary of Contents for Denon DN-M991R
- Page 1 MINIDISC RECORDER DN - M991R OPERATING INSTRUCTIONS BEDIENUNGSANLEITUNG MODE D’EMPLOI INSTRUCCIONES DE OPERACION BRUKSANVISNING FOR ENGLISH READERS FÜR DEUTSCHE LESER POUR LES LECTEURS FRANCAIS PARA LECTORES DE ESPAÑOL FÖR SVENSKA LÄSARE PAGE 006 ~ PAGE SEITE 042 ~ SEITE PAGE 077 ~ PAGE PAGINA 115 ~ PAGINA 150...
- Page 2 2. Do not open the top cover In order to prevent electric shock, do not open the top cover. If problems occur, contact your DENON dealer. 3. Do not place anything inside Do not place metal objects or spill liquid inside the MD recorder.
-
Page 3: Safety Instructions
SAFETY INSTRUCTIONS Read Instructions – All the safety and operating instructions should be read before the appliance is operated. Retain Instructions – The safety and operating instructions should be retained for future reference. Heed Warning – All warnings on the appliance and in the operating instructions should be adhered to. - Page 4 NOTE ON USE / HINWEISE ZUM GEBRAUCH / OBSERVATIONS RELATIVES A L’UTILISATION NOTE SULL’USO / NOTAS SOBRE EL USO / ALVORENS TE GEBRUIKEN / OBSERVERA OBSERVAÇÕES QUANTO AO USO • Avoid high temperatures. Allow for sufficient heat dispersion when installed on a rack. •...
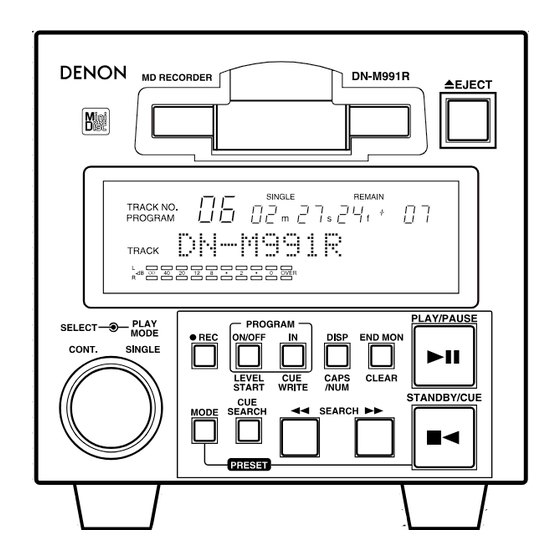
- Page 5 ENGLISH DEUTSCH FRANCAIS FRONT PANEL / FRONTPLATTE / PANNEAU AVANT / PANEL FRONTAL / FRAMSIDA DISPLAY WINDOW / DISPLAY-FENSTER / FENETRE D’AFFICHAGE / PANTALLA DE VISUALIZACION / DISPLAYFÖNSTER DIMENSIONS / ABMESSUNGEN / DIMENSIONS / DIMENSIÓNES / MÅTT 133 mm (5-15/64”) 13 mm (33/64”) 144 mm (5-43/64”)
-
Page 6: Main Features
(–36 to –66 dB, 6 steps) * You can turn off this function. • Auto Track Increment DN-M991R detects the silent portion of the program material and automatically increases the track number. The level of the silent portion can be set within a range of –36 to –66 dB (6 steps). •... -
Page 7: Table Of Contents
Up to three units can be installed in a 19” EIA rack or console. Install shelves on the rack. NOTES: • To be ensure proper operation of the DN-M991R unit, set it so that the slant of its front panel is within 15° of the perpendicular. -
Page 8: Part Names And Functions
ENGLISH 1 PART NAMES AND FUNCTIONS (1) Front Panel Cartridge insertion slot • Insert the cartridge as indicated by the arrow on the top. • Once the cartridge is partially inserted. Display PROGRAM ON/OFF/LEVEL START button PROGRAM ON/OFF (Normal mode) •... -
Page 9: Rear Panel
CUE WRITE (REC, Edit mode) • Press this button during the standby, pause, play, or manual search. When the edit mode and recording mode to record a cue signal. EJECT button • Press this button to eject the cartridge. • The cartridge cannot be ejected during recording or while the UTOC is being written. -
Page 10: Display Window
ENGLISH REMOTE connector • This is a parallel remote connector. Use it to control the DN-M991R with dry contact circuit connections. • Applicable connector: 25-pin D-sub (male) • Connector signal layout: Hot Start ON Pin No. Signal name PLAY CODE 1 tally... -
Page 11: Remote Control Connections
1. PARALLEL REMOTE (1) HOT START OFF (Preset 36)) To control the DN-M991R remotely, refer to the example of remote control connections given below. The rating of REMOTE connector pin 22 (TALLY POWER SUPPLY) is +5 V, 80 mA maximum. -
Page 12: Serial Remote
When a disc is loaded, the REC monitor mode is set automatically. Once recording on the first DN-M991R (DN-M991R-1) starts and the disc’s remaining recording time reaches the time specified with the presettings, an REC E.O.M. tally is output and recording starts on DN-M991R-2. -
Page 13: Preset Functions And Operations
PRESET FUNCTIONS AND OPERATIONS (1) List of Preset Functions • Functions can be preset using the buttons on the front panel. These presettings are stored in a permanent memory, so they are not cleared even when the power is turned off. •... -
Page 14: Presetting Procedure
ENGLISH (2) Presetting Procedure • Functions can be preset using the buttons on the front panel. • The presettings can also be set using serial remote signals (RS232C/RS422A). • Presettings can be made when no cartridge is loaded or when in the stop, standby, pause, recording pause or recording monitor mode. -
Page 15: Detailed Description Of Preset Functions
(3) Detailed Description of Preset Functions (* = initial setting) “Preset Area (*)” (Three different sets (areas) of presettings can be made and used for different purposes.) * Preset Area1 : Set to preset Area 1. Preset Area2 : Set to preset Area 2. Preset Area3 : Set to preset Area 3. - Page 16 ENGLISH 16) “ RecLv (–**) dB” RecLv (–**) dB : Sound detection level for auto record start function. (–66/*–60/–54/–48/–42/–36) 17) “RecOffset (*)” (Recording can be started before sound detection during auto record start operation.) RecOffset (*) : Recording starts the set number of seconds before level detection. (*OFF/1s/2s/3s/4s/5s) 18) “SCMS INH (ENA)”...
- Page 17 33) “Program1 OFF (ON)” Program1 OFF (ON) : Store the contents of program 1 when on. (Initial setting – “OFF”) 34) “Program2 OFF (ON)” Program2 OFF (ON) : Store the contents of program 2 when on. (Initial setting – “OFF”) 35) “Program3 OFF (ON)”...
-
Page 18: Basic Operation
ENGLISH BASIC OPERATION (1) Starting Playback Load the cartridge. Make the presettings according to the usage purpose. (See Page 13.) NOTE: Steps 1, 2 and 3 can be performed in the opposite order. Select the play mode. Turn the PLAY MODE switch. Single track play mode Continuous play mode Select the track to be played. -
Page 19: Play/Pause And Standby/Cue Operations
(3) PLAY/PAUSE and STANDBY/CUE Operations • The operation switches between playback and pause each time the PLAY/PAUSE button is pressed. • When the STANDBY/CUE button is pressed during playback, the pickup returns to the position at which playback was started. The diagrams below show playback patterns when the PLAY/PAUSE and STANDBY/CUE buttons are pressed. -
Page 20: Starting To Record
ENGLISH (6) Starting to Record Load the cartridge. Set the presettings according to the purpose. (Refer to Page 13.) NOTE: Steps 1 and 2 can also be performed in the reverse order. Set the recording pause mode. Press the REC button. Flashing (orange) For a disc on which 3 tracks are already recorded. -
Page 21: Starting Recording Automatically By Detecting The Input Level
(8) Starting Recording Automatically by Detecting the Input Level This function makes it possible to start recording by detecting the input signal level. Set the presettings. Make the following settings, referring to “Preset Functions and Operations” on Page 13. 16) RecLv (–**) dB Recording starts when a signal with a level at or above the set level is input. -
Page 22: Incrementing Track Numbers
ENGLISH (9) Incrementing Track Numbers During recording, track numbers can be incremented either manually or automatically. • Track numbers can be incremented manually in the following three ways: 1) Press the REC button ( ) during recording. This increments the track number. 2) Press the PLAY/PAUSE button ( stop recording for that track number and set the recording pause mode. -
Page 23: Handy Operations
HANDY OPERATIONS (1) Setting Cue Points With this function, cue points can be set at any positions in tracks then searched for during playback. Up to five cue points can be set per track. In the standby, pause, manual search or play mode: Set the EDIT mode. -
Page 24: Direct Search For Cue Points
ENGLISH (2) Direct Search for Cue Points When cue points are stored on a track, they can be used for direct search. Load the cartridge. Set the cue direct search mode. Press the CUE SEARCH button. NOTE: The cue direct search mode cannot be set if no cue points are stored on the disc. -
Page 25: Instantaneous Play (Hot Start)
(3) Instantaneous play (Hot Start) Preset up to 10 tracks using the parallel remote, the serial remote or a key board (PS/2 connector, US keyboard with 101 or 104 keys recomended) to enable instantaneous play of the desired tracks. This function is called instantaneous play (Hot Start). -
Page 26: Programmed Playback
ENGLISH PROGRAMMED PLAYBACK • The tracks can be programmed to play in a certain order. • Up to 25 tracks can be programmed. • Programmed playback is performed according to the play mode (single or continuous) and preset finish mode (stop, next, recue or repeat) settings. -
Page 27: Playing Programs
Inserting a track in the program. Select the position at which to insert a track. Turn the select knob. To insert a track at the third step in the program: Set the program insert mode. Press the SEARCH 7 button. The step number flashes Perform the same operations as in steps 4-1 and 4-2 to select the track to be inserted. -
Page 28: Presetting Programs
ENGLISH (4) Presetting Programs • Programs can be stored in the preset memory. When a cartridge for which a program is preset is loaded, the programmed playback mode is set automatically. • Programs can be stored for up to three cartridges. Input the program. -
Page 29: Editing Functions
EDITING FUNCTIONS (1) Editing Functions There are nine editing functions possible on MDs, as described below. Here we describe these functions briefly. Cue erase function (erasing cue signals) Cue signals (external control signals) recorded on the disc can be erased without affecting the tracks. Track erase function (for erasing specific tracks) An entire track, from beginning to end, can be erased instantaneously simply by operating buttons. -
Page 30: Editing Function Select
ENGLISH (2) Editing Function Select Load the cartridge. Set the edit mode. Press the MODE button. Select the edit track. The track to be edited can be selected (or changed) by turning the SELECT knob. Set the edit function select mode. Select the edit track and press the SELECT knob. -
Page 31: Erasing Tracks ‹Track Erase Function
(4) Erasing Tracks ‹Track erase function› Select the track erase function. (see page 30.) Select “Track Erase?” and press the SELECT knob. Select the erase track. The track to be erased can be selected (or changed) by turning the SELECT knob. -
Page 32: Dividing Tracks Into Two Parts ‹Divide Function
ENGLISH (6) Dividing Tracks into Two Parts ‹Divide function› Use manual search, etc., to find the point at which you want to divide the track. Select the divide edit function. (see page 30.) Select “Divide?” and press the SELECT knob. The section from three seconds before the divide point to the divide point is played repeatedly. -
Page 33: Moving Tracks ‹Move Function
(8) Moving Tracks ‹Move function› Select the move edit function. (see page 30.) Select “Move?” and press the SELECT knob. Flashing Use the SELECT knob to choose where to move which track. To move track 5 to track 1: Press the SELECT knob. Move the track. -
Page 34: Inputting (Changing) Names ‹Title Function
ENGLISH (10) Inputting (Changing) Names ‹Title function› Select the name input edit item. (see page 30.) Select “Track Name?” or “Disc Name?” and press the SELECT knob. Flashing If a name is already set, the name is displayed and the first character flashes. -
Page 35: Exit The Edit Mode Or Undoing Editing ‹Undo Functions
(11) Exit the Edit Mode or Undoing Editing ‹Undo functions› Press the MODE button. • When editing is executed, the message “UTOC Write?” asking you whether or not you want to write the UTOC is displayed. • The edit mode is canceled when editing is not being executed. -
Page 36: Connecting And Operating A Keyboard
SCAN CODE SET 02 (1) Connecting the Keyboard DN-M991R Keyboard NOTE: Turn off the power of the DN-M991R before connecting the keyboard. (2) Keyboard Operations The keyboard’s keys are allocated to specific DN-M991R panel operations. The functions of the keys differ according to the DN- M991R’s operating mode. - Page 37 • When editing names & Backspace " Capslock Enter < > Shift Shift Ctrl Ctrl Letter keys Input small letters (when CapsLock is off) Number keys Input numbers Symbol keys Input symbols Numerical keypad keys Input numbers Inputs “+” symbol –...
-
Page 38: Resetting The Microprocessor
ENGLISH RESETTING THE MICROPROCESSOR • A microprocessor controls disc drive unit, operation panel unit and the display. • If for some reason the microprocessor should malfunction and the unit becomes inoperable, press the SELECT knob and the STANDBY/CUE button at the same time to reset the microprocessor. •... -
Page 39: Messages
MESSAGES Messages appear on the display when operating the set. The meanings of the messages are described below. Message Can , tEdit ** Indicates that editing was not possible. Can , tIncrmnt Indicates that the track number cannot be incremented by pressing the REC button during recording. Can , t Rec! Recording is not possible because of a problem in the TOC recording enable data. -
Page 40: System Limitations
ENGLISH SYSTEM LIMITATIONS (1) Track Number Limits • Up to 255 tracks can be recorded when recording the tracks successively starting from the first track on blank or no-track discs. In the following cases, however, the number of tracks that can be recorded decreases: When editing has been performed. -
Page 41: Specifications
SPECIFICATIONS GENERAL Type: Recordable/Playable Discs: Recording System: Signal Compression System: Rotating Speed: Recording/playback time: AUDIO SECTION Channels: Sampling Frequency: Quantization Bits: Frequency Response: Total Harmonic Distortion: Signal to Noise Ratio: Channel Separation: Analog Output: Connector: Output Level: Monitor Output: Analog Input: Connector: Input Level: Digital Output:...
Need help?
Do you have a question about the DN-M991R and is the answer not in the manual?
Questions and answers