
Related Manuals for Pioneer Elite VSX-84TXSi


Summarization of Contents
Safety and Regulatory Information
CAUTION
Precautions to prevent electric shock by not using polarized plug with extension cord.
ATTENTION
French caution for preventing electric shock with polarized plug.
WARNING
Do not expose appliance to rain or moisture to prevent fire or shock hazard.
FEDERAL COMMUNICATIONS DECLARATION OF CONFORMITY
FCC compliance statement for device operation.
IMPORTANT NOTICE
Locate serial number in the rear and record it on the warranty card.
Information to User
Unauthorized modifications may invalidate user's right to operate equipment.
CAUTION
Use shielded cables and connectors to prevent electromagnetic interference.
Important Safety Instructions
READ INSTRUCTIONS
Read all safety and operating instructions before product operation.
RETAIN INSTRUCTIONS
Keep safety and operating instructions for future reference.
HEED WARNINGS
Adhere to all warnings on the product and in instructions.
FOLLOW INSTRUCTIONS
Follow all operating and use instructions.
CLEANING
Clean product with a polishing or dry cloth; avoid volatile liquids.
ATTACHMENTS
Do not use attachments not recommended by the manufacturer.
WATER AND MOISTURE
Do not use the product near water or in damp areas.
ACCESSORIES
Use only with a cart, stand, tripod, bracket, or table recommended by the manufacturer.
CART
Move product and cart combination with care to prevent overturning.
VENTILATION
Ensure slots and openings are not blocked for proper ventilation.
POWER SOURCES
Operate only from the type of power source indicated on the marking label.
LOCATION
Install the appliance in a stable location.
NONUSE PERIODS
Unplug the power cord when left unused for a long period.
GROUNDING OR POLARIZATION
Safety features of polarized and grounding type plugs.
POWER-CORD PROTECTION
Route power cords to prevent them from being walked on or pinched.
OUTDOOR ANTENNA GROUNDING
Ground antenna/cable systems for protection against voltage surges.
LIGHTNING
Unplug unit and disconnect antenna during lightning storms.
POWER LINES
Keep antenna systems away from overhead power lines.
OVERLOADING
Do not overload wall outlets or extension cords.
OBJECT AND LIQUID ENTRY
Prevent objects or liquids from entering the product openings.
SERVICING
Refer all servicing to qualified service personnel.
DAMAGE REQUIRING SERVICE
Conditions requiring service: damaged cord, spilled liquid, or performance change.
REPLACEMENT PARTS
Ensure service technician uses specified replacement parts.
SAFETY CHECK
Ask technician to perform safety checks after service.
WALL OR CEILING MOUNTING
Product should not be mounted to a wall or ceiling.
HEAT
Situate product away from heat sources like radiators.
Controlling the Rest of Your System
Setting the Remote to Control Other Components
Configure the remote to control other components using preset codes.
Selecting Preset Codes Directly
Input manufacturer preset codes to control components.
Programming Signals from Other Remote Controls
Teach remote individual commands from another device.
Erasing One of the Remote Control Button Settings
Restore a programmed button to its factory default state.
Resetting the Remote Control Presets
Erase all programmed remote control preset codes.
Confirming Preset Codes
Check which preset code is assigned to an input source button.
Renaming Input Source Names
Customize input source names displayed on the remote control.
Direct Function
Control one component while operating another receiver function.
Multi Operation and System Off
Program sequences for multiple components or system shutdown.
Programming a Multi-Operation or a Shutdown Sequence
Create custom command sequences for components.
Using Multi Operations
Start programmed multi-operation sequences.
Using System Off
Switch off multiple components with one button.
Before You Start
Checking What's in the Box
Verify that you have received all supplied accessories.
Ventilation
Ensure proper airflow around the unit for heat dispersal.
Installing the Receiver
Guidelines for placing the unit on a level and stable surface.
Loading the Batteries
Instructions for inserting batteries into the remote controls.
5 Minute Guide
Introduction to Home Theater
Basics of surround sound and home theater setup.
Listening to Surround Sound
Quick setup guide for achieving surround sound.
Automatically Setting Up for Surround Sound (MCACC)
Automatic speaker calibration process using a microphone.
5 Minute Guide
Problems When Using the Auto MCACC Setup
Troubleshooting issues encountered during Auto MCACC setup.
Playing a Source
Basic instructions for playing audio or video sources.
Better Sound Using Phase Control
Improving sound quality via phase matching technology.
5 Minute Guide
Problems when using the Auto MCACC Setup
Troubleshooting issues encountered during Auto MCACC setup.
Playing a source
Basic instructions for playing audio or video sources.
Better sound using Phase Control
Improving sound quality via phase matching technology.
Connecting Your Equipment
Rear Panel
Identify and understand rear panel connection terminals.
Optical Digital Audio Output(s)
Connect to recorders for digital audio output.
USB Audio Input (VSX-84TXSi only)
Connect your PC as an audio source via USB.
Optical and Coaxial Digital Audio Inputs (x6)
Connect digital audio sources like DVD players.
XM Radio Input
Connect the XM Radio receiver unit.
S-400 i.LINK Connectors (x2) (VSX-84TXSi only)
Connect i.LINK audio devices for high-resolution audio.
HDMI Connectors (x4) (VSX-82TXS) (x5) (VSX-84TXSi)
Connect HDMI audio/video components.
Remote Inputs (multi-room and source)
Connect external remote control sensor for multi-room setups.
12V Trigger Jacks (total 50 mA max.) (x2)
Switch components on/off automatically with the receiver.
Multi-room and Source Outputs
Connect a second amplifier for separate room audio.
Component Video Connections (x4)
Connect component video sources for better picture quality.
AM and FM Antenna Terminals
Connect antennas for radio broadcasts.
Connecting Your Equipment
Composite and S-Video Monitor Outputs
Connect monitors and TVs for video output.
Audio/Video Source Inputs/(Outputs) (x6)
Connect various audio/visual sources like DVD players.
Stereo Analog Audio Source Inputs/(Outputs) (x3)
Connect audio sources like CD players or tape decks.
Multichannel Analog Audio Inputs
Connect 7.1 channel analog audio inputs from DVD players.
Control Input/Output
Connect Pioneer components for IR control link.
Multichannel Pre-amplifier Outputs
Connect separate amplifiers for each channel.
iPod Input Terminal
Connect your Apple iPod as an audio or video source.
RS-232C Connector
Connect a PC for Advanced MCACC output.
Speaker Terminals
Connect speakers to the receiver's terminals.
Switched AC Power Outlet (100 W / 0.8 A max.)
Power other components via the receiver's switched outlet.
When Making Cable Connections
Tips for making cable connections to avoid hum.
About the Video Converter
Explanation of the unit's video conversion feature.
Connecting Your Equipment
Connecting Your TV and DVD Player
Basic setup with S-video or composite video connections.
Connecting Your Equipment
Connecting a Satellite/Cable Receiver or Other Set-Top Box
Connect STB to SAT inputs for audio/video.
Connecting a DVD/HDD Recorder, VCR and Other Video Sources
Connect AV inputs for recorders and VCRs.
Connecting Your Equipment
Using the Component Video Jacks
Connect component video sources for superior picture quality.
Connecting Your Equipment
Connecting Digital Audio Sources
Connect digital audio components for playback and recording.
About the WMA9 Pro Decoder
Explanation of WMA9 Pro audio decoding capabilities.
Connecting Your Equipment
Connecting Analog Audio Sources
Connect analog audio sources like tape decks and turntables.
Connecting a Component to the Front Panel Inputs
Connect portable equipment to front panel inputs.
Connecting Your Equipment
Installing Your Speaker System
Connect front, center, surround, and surround back speakers.
Connecting the Speakers
Proper connection of speaker wire to receiver terminals.
Connecting Your Equipment
Bare Wire Connections
How to connect bare speaker wire to terminals.
Banana Plug Connections
How to connect speaker cables using banana plugs.
Placing the Speakers
Guidelines for optimal speaker placement for sound quality.
Connecting Your Equipment
THX Speaker System Setup
Speaker placement recommendations for THX systems.
Connecting Antennas
Connect AM and FM antennas for radio reception.
AM Loop Antenna
Assemble and connect the AM loop antenna.
Connecting Your Equipment
FM Wire Antenna
Connect the FM wire antenna to the 75 Ω terminal.
Connecting External Antennas
Improve FM/AM reception with external antennas.
Plugging in the Receiver
Final step to connect power to the unit after all connections.
AC Outlet
Information on the receiver's switched AC power outlet.
Controls and Displays
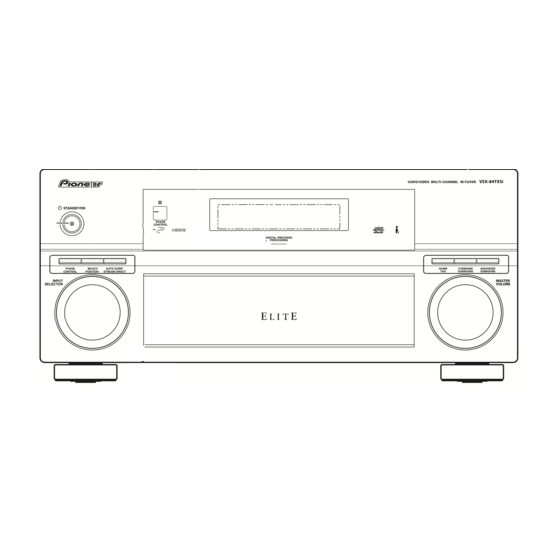
Front Panel
Identify and understand front panel controls and indicators.
INPUT SELECTOR Dial
Select the input source for audio/video.
STANDBY/ON
Switch the receiver between standby and on modes.
PHASE CONTROL
Switch phase correction on or off.
MCACC POSITION
Switch between MCACC presets.
AUTO SURR / STREAM DIRECT
Select Auto Surround or Stream Direct listening modes.
PHASE CONTROL Indicator
Lights when the Phase Control feature is active.
Remote Sensor
Receives signals from the remote control.
HDMI Indicator
Indicates HDMI connection status.
Digital Precision Processing Indicator
Indicates digital processing status.
Character Display
Displays system information on the front panel.
Operating Range of Remote Control Unit
Factors affecting remote control operation range.
Controls and Displays
MCACC Indicator
Lights when an MCACC preset is selected.
i.LINK Indicator (VSX-84TXSi only)
Lights when an i.LINK component is selected.
DIGITAL VIDEO SCALER Indicator (VSX-82TXS only)
Lights when video scaler is active.
Listening Mode Buttons
Select listening modes like THX and Surround.
MASTER VOLUME Dial
Adjust the main volume level.
Front Panel Controls
Accessing controls on the lower third of the panel.
SPEAKERS
Change the speaker system configuration (A, B, or off).
AV PARAMETER
Access the AV options menu.
TUNER EDIT
Memorize and name radio stations.
BAND
Switch between AM and FM radio bands.
MULTI ROOM & SOURCE / REC SEL Controls
Control multi-room listening and recording selection.
VIDEO SELECT
Select the video source for display.
SIGNAL SELECT
Select the input signal source.
SBch PROCESSING
Select surround back channel mode or virtual surround back.
STEREO
Switch to stereo playback mode.
PHONES Jack
Connect headphones; speaker output is muted.
SETUP
Access the System Setup menu.
↑↓←→ (TUNE/ST +/-) / ENTER
Navigate menus and adjust settings.
RETURN
Confirm selections and exit current menu.
MCACC SETUP MIC Jack
Connect the supplied MCACC microphone.
VIDEO/GAME 2 INPUT
Connect components to front panel inputs.
Controls and Displays
Display
Explain the receiver's front panel display indicators.
SIGNAL Indicators
Indicate the currently selected input signal.
Program Format Indicators
Show active channels in digital sources.
Digital Format Indicators
Indicate signal encoded format (Dolby, DTS, etc.).
OVER / ATT
Indicate analog signal level status.
MULTI-ROOM
Indicate when multi-room feature is active.
VIDEO CONV.
Indicate when digital video conversion is on.
V.SB
Indicate Virtual Surround Back processing.
Sound Processing Indicators
Indicate active AV parameter settings.
TUNER Indicators
Indicate tuner status (TUNED, STEREO, MONO).
Master Volume Level
Displays current overall volume level.
Input Source Indicators
Light to indicate the selected input source.
STREAM DIRECT
Lights when Direct / Pure Direct mode is selected.
Speaker Indicators
Indicate the current speaker system (A and/or B).
Listening Mode Indicators
Indicate selected listening mode (THX, etc.).
SLEEP
Lights when the receiver is in sleep mode.
Matrix Decoding Format Indicators
Indicate Dolby Pro Logic IIx or Neo:6 decoding.
Character Display
Displays various system information.
SR+
Lights when the SR+ mode is switched on.
Controls and Displays
Input Source Buttons
Select control of other components.
Number Buttons and Other Receiver/Component Controls
Operate receiver and components directly.
Tuner/Component Control Buttons/SETUP
Access tuner and setup functions.
RECEIVER
Switch remote to control the receiver.
INPUT SELECT
Select the input source.
Controls and Displays
TV CONTROL Buttons
Dedicated buttons to control the assigned TV.
Component Control Buttons
Control selected component after input selection.
RECEIVER
Switch remote to control the receiver.
Controls and Displays
Sub Remote Control Unit (VSX-84TXSi only)
Second remote for multi-room listening feature.
Listening to Your System
Auto Playback
Receiver automatically detects and selects playback mode.
Listening in Surround Sound
How to listen to any source in surround sound.
Standard Surround Sound
Basic surround modes for stereo and multichannel sources.
Listening to Your System
Using the Home THX Modes
Select and use THX listening modes.
Using the Advanced Surround Effects
Select various advanced surround listening modes.
Listening to Your System
Listening in Stereo
Listen through front speakers only.
Using Stream Direct
Hear purest audio reproduction by bypassing processing.
Selecting MCACC Presets
Switch between calibrated settings for different listening positions.
Listening to Your System
Choosing the Input Signal
Select analog, digital, or HDMI input signals.
Using Surround Back Channel Processing
Configure surround back channels (ON, AUTO, OFF).
Using the Virtual Surround Back Mode
Create virtual surround from front speakers without rear speakers.
Listening to Your System
Using the Sound Retriever
Restore quality to compressed audio sources.
Using the Tuner
Listening to the Radio
How to tune in to FM and AM radio broadcasts.
Tuning Directly to a Station
Enter station frequency directly using number buttons.
Improving FM Stereo Sound
Enhance FM stereo reception by switching to mono.
Using the Tuner
Saving Station Presets
Store frequencies for easy recall.
Naming Station Presets
Assign custom names to saved station presets.
Listening to Station Presets
Recall stored station presets using class and preset number.
The System Setup Menu
Making Receiver Settings from the System Setup Menu
Access and navigate the receiver's setup options.
Auto MCACC
Quick and effective automatic surround setup.
Automatic MCACC (Expert)
Detailed automatic speaker calibration setup.
The System Setup Menu
Surr Back System
Configure the use of surround back speakers.
Manual MCACC
Fine-tune speaker settings and acoustic calibration.
The System Setup Menu
Surround Back Speaker Setting
Specify how surround back channels are used.
The System Setup Menu
Manual MCACC Setup
Make detailed manual adjustments to MCACC settings.
Fine Channel Level
Adjust the overall balance of your speaker system.
The System Setup Menu
Fine Speaker Distance
Set precise speaker delay for sound depth and separation.
Standing Wave
Control resonant low frequencies in your listening room.
The System Setup Menu
Acoustic Calibration EQ
Room EQ to neutralize ambient characteristics.
Professional Acoustic Calibration EQ
Advanced room EQ calibration for optimal sound.
The System Setup Menu
How to Use Professional Acoustic Calibration EQ
Guide to advanced EQ calibration process.
How to Interpret the Graphical Output
Analyze EQ results graph for room characteristics.
Setting Professional Acoustic Calibration EQ According to Your Room Characteristics
Manual EQ setup based on room analysis.
The System Setup Menu
Using Professional Acoustic Calibration EQ
Select EQ options and adjust settings.
The System Setup Menu
Data Management
Manage MCACC presets (check, copy, rename, clear).
Checking MCACC Preset Data
View calibrated settings for MCACC presets.
Copying MCACC Preset Data
Copy settings from one preset to another.
The System Setup Menu
Renaming MCACC Presets
Rename MCACC presets for easier identification.
Clearing MCACC Presets
Remove unused MCACC presets from memory.
Manual Speaker Setup
Make detailed speaker configuration adjustments.
Speaker Setting
Specify speaker size, number, and crossover frequency.
The System Setup Menu
Channel Level
Adjust the overall balance of your speaker system.
The System Setup Menu
Speaker Distance
Set precise speaker delay for sound depth and separation.
Bass Peak Level
Prevent bass tones from distorting the sound.
The System Setup Menu
X-Curve
Adjust tonal balance for movie soundtracks.
THX Audio Setting
Configure THX settings for Pioneer plasma displays.
Other Connections
Connecting an iPod
Connect iPod for audio/video playback control.
Connecting Your iPod to the Receiver
Physical connection of iPod to receiver.
iPod Playback
Play music, photos, and videos from iPod.
Finding What You Want to Play
Navigate iPod content by category.
Other Connections
Watching Photos and Video Content
View iPod content on TV using receiver controls.
Using XM Radio
Connect and use XM Radio satellite service.
Connecting Your XM Radio Receiver
Physical connection of XM Radio receiver.
Other Connections
Listening to XM Radio
Select channels and browse information via on-screen display.
Selecting Channels and Browsing by Genre
Navigate XM channels by category.
Saving Channel Presets
Store XM channels for quick recall.
Other Connections
Connecting Using HDMI
Connect HDMI components for digital audio/video transfer.
Other Connections
About HDMI
Explanation of HDMI technology and features.
Using the i.LINK Interface
Connect i.LINK-equipped components.
Other Connections
Checking the i.LINK Inputs
Confirm i.LINK assignments and component recognition.
About i.LINK
Explanation of the i.LINK interface and its capabilities.
Other Connections
About PQLS Rate Control
Explanation of Precision Quartz Lock System for audio.
Creating an i.LINK Network
Chain multiple i.LINK components for data transfer.
Other Connections
Connecting the Multichannel Analog Inputs
Connect analog audio outputs from DVD players.
Selecting the Multichannel Analog Inputs
Select analog inputs for surround sound playback.
Using the USB Interface
Connect computer via USB for audio playback.
Other Connections
Second Zone Speaker B Setup
Set up second zone audio playback using surround back terminals.
Switching the Speaker System
Select speaker system configuration for second zone.
Other Connections
Bi-amping Your Front Speakers
Connect speakers for improved crossover performance.
Bi-wiring Your Speakers
Connect speakers for potential sound improvement.
Other Connections
Connecting Additional Amplifiers
Add external amplifiers to channels via pre-outs.
Multi-room Listening
Power multiple independent systems in separate rooms.
Making Multi-room Connections
Connect for multi-room audio distribution.
Other Connections
Multi-room Listening Options
Table showing available sources per sub room.
Basic Multi-room Setup (ROOM 2)
Setup primary second zone audio/video.
Secondary Multi-room Setup (ROOM 3)
Setup secondary second zone audio.
Surround Back System Multi-room Setup (ROOM 2)
Specific setup for surround back with multi-room.
Other Connections
Using the Multi-room Controls
Adjust sub room volume and select sources via front panel.
Multi-room Remote Controls
Table of remote functions for multi-room operation.
Connecting an IR Receiver
Use IR receiver for remote control in other rooms.
Other Connections
Switching Components On and Off Using the 12 Volt Trigger
Use 12V trigger for automatic component power on/off.
Using this Receiver with a Pioneer Plasma Display
Connect Pioneer plasma for SR+ features.
Other Connections
Using the SR+ Mode with a Pioneer Plasma Display
Enable SR+ features for enhanced integration with plasma display.
Other Connections
Connecting a PC for Advanced MCACC Output
Connect PC for graphical EQ output analysis.
Advanced MCACC Output Using Your PC
Use PC software for MCACC analysis and visualization.
Other Settings
The Input Setup Menu
Assign input sources to specific terminals.
Input Function Default and Possible Settings
Table of default input assignments and options.
Other Settings
The Other Setup Menu
Access other system settings and customizations.
Other Settings
Multi-Room Setup
Set volume control behavior for multi-room listening.
SR+ Setup for Pioneer Plasma Displays
Configure SR+ features for Pioneer plasma integration.
OSD Adjustment
Adjust the position of the on-screen display.
Using Other Functions
Setting the AV Options
Adjust AV parameters for sound and picture settings.
Using Other Functions
Making an Audio or a Video Recording
Record from tuner or external sources.
Playing a Different Source When Recording
Listen to one source while recording another.
Using Other Functions
Reducing the Level of an Analog Signal
Use input attenuator for strong analog signals.
Watching Video and Audio Sources Independently
Select different video and audio sources simultaneously.
Using the Sleep Timer
Set receiver to turn off automatically after a specified time.
Dimming the Display
Adjust front panel display brightness.
Switching the Speaker Impedance
Set impedance for 6 or 8 ohm speakers.
Using Other Functions
Checking Your System Settings
View current receiver settings and configurations.
Resetting the System
Reset receiver to factory default settings.
Controlling the Rest of Your System
Setting the Remote to Control Other Components
Configure remote for other devices using preset codes.
Selecting Preset Codes Directly
Input manufacturer preset codes to control components.
Programming Signals from Other Remote Controls
Teach remote individual commands from another remote.
Controlling the Rest of Your System
Erasing One of the Remote Control Button Settings
Restore a programmed button to its factory default state.
Resetting the Remote Control Presets
Erase all programmed remote control preset codes.
Confirming Preset Codes
Check which preset code is assigned to an input source.
Controlling the Rest of Your System
Renaming Input Source Names
Customize input source names displayed on the remote control.
Direct Function
Control one component while operating another receiver function.
Multi Operation and System Off
Program sequences for multiple components or system shutdown.
Programming a Multi-Operation or a Shutdown Sequence
Create custom command sequences for components.
Controlling the Rest of Your System
Using Multi Operations
Start programmed multi-operation sequences.
Using System Off
Switch off multiple components with one button.
Controlling the Rest of Your System
Controls for TVs
Control assigned TV using the remote.
Controls for Other Components
Control selected components using the remote.
Controlling the Rest of Your System
Operating Other Pioneer Components with This Unit's Sensor
Link Pioneer components for IR control.
Additional Information
Troubleshooting
Resolve operational problems and malfunctions.
Power
Troubleshoot power-related issues.
No Sound
Troubleshoot issues with no audio output.
Additional Information
Other Audio Problems
Troubleshoot various audio-related issues.
Additional Information
Video
Troubleshoot video output and recording issues.
Additional Information
Settings
Troubleshoot issues with receiver settings.
Professional Calibration EQ Graphical Output
Troubleshoot EQ graph display problems.
Display
Troubleshoot issues with the front panel display.
Additional Information
Remote Control
Troubleshoot remote control operation issues.
i.LINK Interface
Troubleshoot i.LINK connection and sound issues.
Additional Information
i.LINK Messages
Explanation of various i.LINK interface messages.
USB Interface
Troubleshoot USB audio connection issues.
HDMI
Troubleshoot HDMI connection problems.
Additional Information
iPod Messages
Troubleshoot iPod connection errors and messages.
XM Radio Messages
Troubleshoot XM Radio connection and signal issues.
Additional Information
Surround Sound Formats
Description of main surround sound formats.
Dolby
Explanation of various Dolby technologies.
Dolby Digital
Explanation of Dolby Digital audio.
Dolby Digital Surround EX
Explanation of Dolby Digital Surround EX.
Dolby Pro Logic IIx and Dolby Surround
Explanation of Dolby Pro Logic IIx.
DTS
Explanation of DTS technologies.
DTS Digital Surround
Explanation of DTS Digital Surround.
DTS-ES
Explanation of DTS-ES.
DTS Neo:6
Explanation of DTS Neo:6.
DTS 96/24
Explanation of DTS 96/24.
Windows Media® Audio 9 Professional
Explanation of WMA9 Pro.
Additional Information
THX Cinema Processing
Explanation of THX Cinema processing standards.
Re-Equalization
Explanation of re-equalization for home theater.
Timbre Matching
Explanation of timbre matching for surround speakers.
Adaptive Decorrelation
Explanation of adaptive decorrelation for surround sound.
THX Select2
Explanation of THX Select2 certification.
THX Surround EX
Explanation of THX Surround EX enhancement.
Advanced Speaker Array (ASA)
Explanation of ASA technology for speaker setup.
THX Select2 Cinema Mode
Explanation of THX Select2 Cinema mode.
Additional Information
THX MusicMode
Explanation of THX MusicMode for multi-channel music.
THX Games Mode
Explanation of THX Games Mode for game audio.
Listening Modes with Different Input Signal Formats
Chart showing listening modes based on signal type.
Additional Information
Multichannel Signal Formats
Table detailing multichannel formats and settings.
Additional Information
Stream Direct with Different Input Signal Formats
Chart showing Stream Direct modes by signal type.
Additional Information
Specifications
Technical specifications of the receiver.
Amplifier Section
Details on power output and distortion.
FM Tuner Section
FM tuner performance specifications.
AM Tuner Section
AM tuner performance specifications.
Miscellaneous
General specifications including power and dimensions.
Furnished Parts
List of supplied accessories.
Audio Section
Audio input/output specifications.
Composite Video / S-Video Section
Video connection specifications.
Component Video Section
Component video connection specifications.
Cleaning the Unit
Instructions for cleaning the receiver.
Additional Information
Our Philosophy
Pioneer's approach to home theater experience.
Features
Highlights of the receiver's key features.
HDMI and Digital Video Conversion
Explanation of HDMI features and conversion.
DCDi
Explanation of DCDi video processing.
iPod and XM Ready
Compatibility with iPod and XM Radio.
Easy Setup Using Advanced MCACC
Overview of MCACC setup benefits.
Phase Correction
Explanation of Phase Control technology.
i.LINK Digital Interface (VSX-84TXSi only)
Explanation of i.LINK interface capabilities.
Additional Information
Dear Customer
A message from the manufacturer to the user.
To Establish a Safe Level
Guidelines for setting safe listening volumes.
Once You Have Established a Comfortable Sound Level
Advice on maintaining safe listening habits.
We Want You Listening For A Lifetime
Message on hearing preservation.
Need help?
Do you have a question about the Elite VSX-84TXSi and is the answer not in the manual?
Questions and answers