Bosch GLI18V-1200C Manual
- Operating/safety instructions manual (37 pages)
Advertisement
Safety Symbols
The definitions below describe the level of severity for each signal word. Please read the manual and pay attention to these symbols.
 This is the safety alert symbol. It is used to alert you to potential personal injury hazards. Obey all safety messages that follow this symbol to avoid possible injury or death.

Indicates a hazardous situation which, if not avoided, will result in death or serious injury.

Indicates a hazardous situation which, if not avoided, could result in death or serious injury.

Indicates a hazardous situation which, if not avoided, could result in minor or moderate injury.

Some of the following symbols may be used on your tool. Please study them and learn their meaning. Proper interpretation of these symbols will allow you to operate the tool better and safer.
| Symbol | Designation/Explanation |
| V | Volts (voltage) |
| A | Amperes (current) |
| Ah | Amp hour (measurement of battery capacity) |
| Hz | Hertz (frequency, cycles per second) |
| W | Watt (power) |
| kg | Kilograms (weight) |
| min | Minutes (time) |
| s | Seconds (time) |
| ⌀ | Diameter (size of drill bits, grinding wheels, etc.) |
| n0 | No load speed (rotational speed at no load) |
| n | Rated speed (maximum attainable speed) |
| .../min | Revolutions or reciprocation per minute (revolutions, strokes, surface speed, orbits etc. per minute) |
| 0 | Off position (zero speed, zero torque...) |
| 1, 2, 3, ... I, II, III, | Selector settings (speed, torque or position settings. Higher number means greater speed) |
 | Infinitely variable selector with off (speed is increasing from 0 setting) |
 | Arrow (action in the direction of arrow) |
 | Alternating current (type or a characteristic of current) |
 | Direct current (type or a characteristic of current) |
 | Alternating or direct current (type or a characteristic of current) |
 | Class II construction (designates double insulated construction tools) |
 | Earthing terminal (grounding terminal) |
 | Designates Li-ion battery recycling program |
 | Designates Ni-Cad battery recycling program |
 | Alerts user to read manual |
 | Alerts user to wear eye protection |
 | This symbol designates that this tool is listed by Underwriters Laboratories. |
 | This symbol designates that this component is recognized by Underwriters Laboratories. |
 | This symbol designates that this tool is listed by Underwriters Laboratories, to United States and Canadian Standards. |
 | This symbol designates that this tool is listed by the Canadian Standards Association. |
 | This symbol designates that this tool is listed by the Canadian Standards Association, to United States and Canadian Standards. |
 | This symbol designates that this tool is listed by the Intertek Testing Services, to United States and Canadian Standards. |
 | This symbol designates that this tool complies to NOM Mexican Standards. |
Functional Description and Specifications
Disconnect battery pack from tool before making any assembly, adjustments or changing accessories. Such preventive safety measures reduce the risk of starting the tool accidentally.
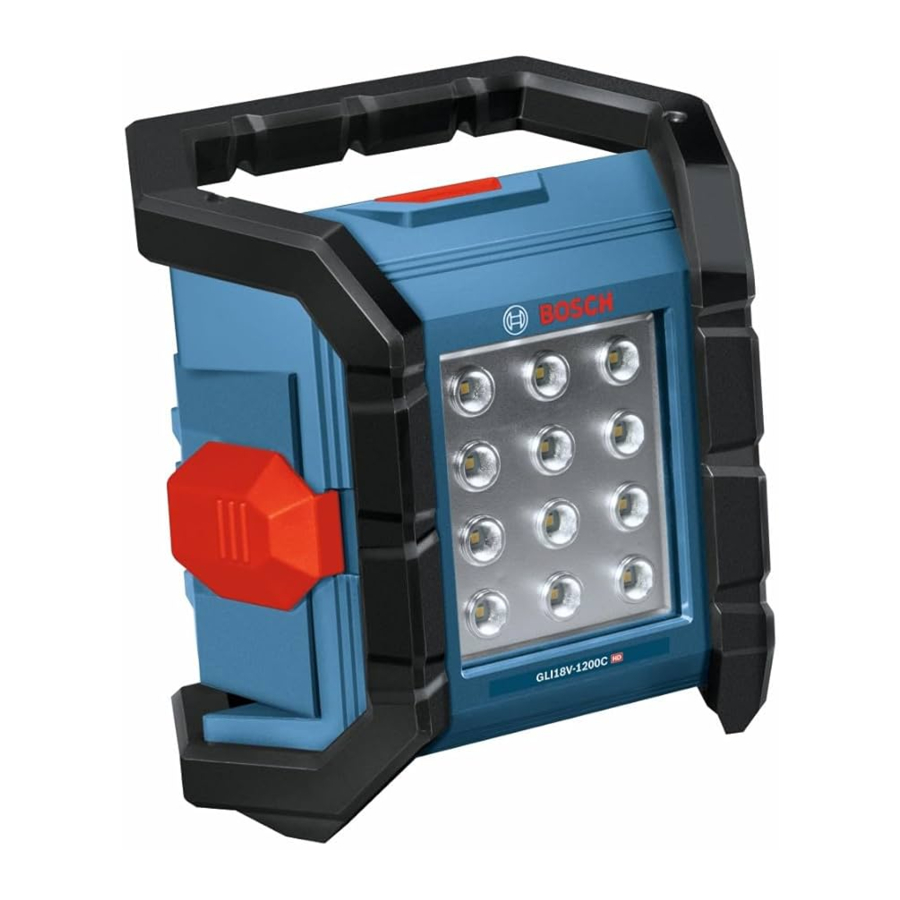
Bluetooth® Connected Cordless Area Light

- Lamp head
- On/off button
- Carrying handle with notches for hanging up
- 1/4"-11 tripod mount
- Battery cover
- Battery cover latch
- Battery release button*
- Battery* **
- Battery compartment*
- Button cell*
- Button cell lid*
- Screw*
- Gasket*
* Not Shown. See further in these operating instructions.
** Available separately
| Model number | GLI18V-1200C |
| Voltage rating | 18V  |
| Bluetooth® range | 100 feet max. |
Allowed ambient temperature:
|
|
NOTE: For tool specifications refer to the nameplate on your tool.
Battery Packs/Chargers
Please refer to the battery/charger list, included with your tool.
Assembly
Inserting and Releasing Battery Pack
Use only Bosch BAT612 or batteries listed in the battery/charger list. Using other types of batteries may result in personal injury or property damage.
Release the locking latch 6 of the battery cover 5 and flip the cover 5 open.

To remove the battery pack 8, press the battery pack release button 7 and slide the battery pack completely out of area light housing.
To insert battery pack 8, align battery pack and slide it into area light housing until it locks into position (an audible click sound is an indication that the battery pack is locked). Do not force.
Ensure that the rubber gasket 13 is in correct position when closing cover. Otherwise, protection against dust and splash water cannot be guaranteed.
Button Cell Activation/Replacement
To enable the communication of this cordless area light in the off state to a mobile terminal/device, the button cell battery 10 needs to be activated.
To activate the included button cell 10:
- Release the locking latch 6 of the battery cover and flip the cover 5 open (Fig. 2).
- If the battery pack 8 is inserted, remove it.
- Using a #1 Phillips screwdriver, loosen the screw 12 of the battery lid and remove the button cell lid 11.
- Remove the protective film.
- Insert the button cell 10. Make sure that the positive pole + is pointing outside. Use only Lithium 3V CR2032 button cell battery.
- Re-attach the button cell lid 11.
- Close battery cover. Make sure that the rubber gasket 13 is in correct position when closing cover. Otherwise, protection against dust and splash water cannot be guaranteed.
When replacing a button cell, follow steps A–C and E–G
The 'Bosch ToolBox' app displays a warning before the button cell runs out of energy.
Chemical Burn Hazard. Keep batteries away from children. This product contains a lithium button/coin cell battery. If a new or used lithium button/coin cell battery is swallowed or securely, stop using the product, enters the body, it can cause severe remove the batteries, and keep it away internal burns and can lead to death in from children. If you think batteries as little as 2 hours. Always completely might have been swallowed or placed secure the battery compartment. If the inside any part of the body, seek battery compartment does not close immediate medical attention.
Operating Instructions
Protection Against Deep Discharging
The lithium ion battery is protected against deep discharging by the "Electronic Cell Protection (ECP)". When the battery is empty, the cordless area light is switched off by means of a protective circuit.
Turning the Area Light On
To turn the area light ON, press the On/Off button 2. To increase the brightness, press the On/Off button a second time. To turn area light OFF, press the On/Off switch a third time (Fig. 1).
Temperature Dependent Overload Protection
In order to protect both the user as well as the area light, the area light switches off if the heat sink temperature reaches 140°F (60°C). Allow the cordless area light to cool down, then switch the cordless area light on again.
Do not continue to press the On/Off switch after the cordless area light has been automatically switched off. The battery can be damaged.
Low Battery Warning
Shortly before the cordless area light switches off because of a low battery, it will flash 3 times and shine with reduced brightness.
Adjusting the Brightness
Pressing the On/Off button 2 will turn on the area light to the low brightness setting. Pressing the button again will turn the area light to the high brightness setting.
Run Time
The run time will depend on the Bosch battery pack capacity and the brightness setting of the area light. The run time on the high brightness setting will be 80 minutes per Ah of the battery pack.
Fastening to the tripod
You can use the tripod mount to screw the cordless area light onto a tripod. Tighten the 1/4" screw. Ensure that the tripod has a firm footing.
Connectivity
The Bluetooth® word mark and logos are registered trademarks owned by the Bluetooth®, SIG, Inc. and any use of such marks by BOSCH is under license.
The cordless area light is equipped with a Bluetooth® module, which enables data transmission via radio technology to certain mobile terminals/devices with a Bluetooth® interface (e.g., smartphones, tablets).
To operate the cordless area light via Bluetooth® you need the Bosch application (app) "Bosch Toolbox". Download the app from the respective app stores (Apple App Store, Google Play Store).


Do not turn on/off the light without line of sight to the light. Operator working near the light may be startled by the sudden bright light (turn light on) or left out in the dark (turn light off). Turning light on/off when there is operator near the light can cause personal injury or property damage.
Note: Once the timer or interval setting has been reached, the light will flash 5 times and then turn off in approximately 60 seconds.
Using 'Bosch Toolbox' app
From the app menu, choose "My tools". Your mobile terminal/device displays all necessary steps to connect the cordless area light.
After pairing your light with a mobile device you can adjust certain functions or check the status of the light using Bosch Toolbox app.
'GLI groups' allows multiple units to be included in a group that can be controlled in unison. They can each be named so that they can be easily distinguished from each other. In unison, they can use the same features as a single light; on/off, brightness, timer mode, and interval mode.

- Help button – tapping this button will bring up help screen.
- Tool photo – tapping on the photo will let you customize the photograph of the tool.
- Power tool battery charge status – the number of green 'batteries' indicates the estimated charge level for the battery pack.
Note: Number of indicator "batteries" may not be equal to the number of LEDs on the battery fuel gauge. - Power tool nickname – tapping on the 'pencil' icon will let you customize the tool nickname. You can also do it when changing the tool photo.
- Connection status bar – Here you can see the connection (signal) strength indicated by vertical bars. You can use toggle switch to disconnect the tool from your mobile device.
- LED – Turn light on and off
- Brightness – Toggle between off, the low setting, and the high brightness setting.
- Timer – Allows the light or group of lights to be automatically switched on or off after a specified amount of time.
Interval – Allows the light or group of lights to be automatically switched on or off at a specified time of day. - Tool alerts – tapping the 'alerts triangle' will display any alerts received from the tool.
- Info button – displays tool information and specifications.
Maintenance
To avoid accidents always dis connect the tool from the power supply before cleaning or performing any main tenance.
Service
NO USER SERVICE- ABLE PARTS INSIDE. Preventive maintenance performed by un au thorized personnel may result in misplacing of internal wires and components which could cause serious hazard. We recom mend that all tool service be performed by a Bosch Factory Service Center or Authorized Bosch Service Station. SERVICE MEN: Disconnect tool and/or charger from power source before servicing.
Batteries
Be alert for battery packs that are nearing their end of life. If you notice decreased tool performance or significantly shorter running time between charges then it is time to replace the battery pack. Failure to do so can cause the tool to operate improperly or damage the charger.
Cleaning
Certain cleaning agents and sol vents damage plastic parts. Some of these are: gasoline, carbon tetrachlo ride, chlo rinated cleaning solvents, ammonia and house hold detergents that contain ammonia.
To avoid damage, clean the plastic lens of the cordless area light only with a dry, soft cloth. Do not use cleaning agents or solvents.
| Robert Bosch No. 405, Zona Industrial, Toluca, Edo. de México, C.P. 50070, Tel. (722) 2792300 | !2610051843! |
IMPORTANT SAFETY INSTRUCTIONS

Read all safety warnings and all instructions in this manual and in the battery charger manual. Failure to follow the warnings and instructions may result in electric shock, fire and/or serious injury.
Keep work area clean and well lit. Cluttered or dark areas invite accidents.
Do not allow children to use the cordless area light. It is intended for professional use. Children can unintentionally blind themselves or other persons.
Do not operate area lights in explosive atmospheres, such as in the presence of flammable liquids, gases or dust. Area lights create heat and sparks, which may ignite the dust or fumes.
Do not expose area lights to rain or wet conditions. Water entering an area light will increase the risk of electric shock or fire.
After the automatic shut-off of the cordless area light, do not continue to press the On/Off button. The battery could become damaged.
Do not direct the light beam at persons or animals and do not stare into the light beam yourself (not even from a distance).
Do not turn on/off the light without line of sight to the light. Operator working near the light may be startled by the sudden bright light (turn light on) or left out in the dark (turn light off). Turning light on/off when there is operator near the light can cause personal injury or property damage.
Do not cover the lamp head while operating the cordless area light. The lamp head heats up during operation and can cause burns or fire when the heat accumulates.
Do not use the cordless area light in road traffic. The cordless area light is not approved for illumination in road traffic.
Remove the battery from the cordless area light before any work on the cordless area light itself (e.g. assembling, maintenance, cleaning, etc.), as well as when transporting and storing.
Do not position the lighted area light head on or near flammable or combustible materials. The lens gets hot during use.
Do not touch the lens while the area light is in operation. Touching hot lens increases the risk of personal injury.
Do not splash the lens of lighted area light with liquids. Hot lens may shatter when cooler liquids are contacted.
The area light is ruggedly constructed. It should, however, be handled with care.
Use only original Bosch accessories.
Keep handles and grasping surfaces dry, clean and free from oil and grease. Slippery handles and grasping surfaces do not allow for safe handling and control of the tool in unexpected situations.
Recharge only with Bosch chargers listed in the battery/charger list. A charger that is suitable for one type of battery pack may create a risk of fire when used with another battery pack.
Use the battery only in conjunction with your Bosch product. This measure alone protects the battery against dangerous overload.
Use only Bosch BAT612 or the batteries listed in the battery/charger list. When using other batteries, e. g. imitations, reconditioned batteries or other brands, there is danger of injury as well as property damage through exploding batteries.
When battery pack is not in use, keep it away from other metal objects like paper clips, coins, keys, nails, screws, or other small metal objects, that can make a connection from one terminal to another. Shorting the battery terminals together may cause burns or a fire.
The battery can be damaged by pointed objects such as nails or screwdrivers or by force applied externally. An internal short circuit can occur and the battery can burn, smoke, explode or overheat.
Under abusive conditions, liquid may be ejected from the battery; avoid contact. If contact accidentally occurs, flush with water. If liquid contacts eyes, additionally seek medical help. Liquid ejected from the battery may cause irritation or burns.
Do not use a battery pack or tool that is damaged or modified. Damaged or modified batteries may exhibit unpredictable behaviour resulting in fire, explosion or risk of injury.
Do not expose a battery pack or tool to fire or excessive temperature. Exposure to fire or temperature above 265°F may cause explosion.
Follow all charging instructions and do not charge the battery pack or tool outside the temperature range specified in the instructions. Charging improperly or at temperatures outside the specified range may damage the battery and increase the risk of fire.
Check the charge level at least once a month, especially if used for emergency purposes. If the light seems dimmer, recharge the battery pack.
User-Maintenance Instruction
All repairs, electrical or mechanical, should be attempted only by trained repairmen. Contact the nearest Bosch Factory Service Center, Authorized Service Station or other competent repair service.
Never service damaged battery packs. Service of battery packs should only be performed by the manufacturer or authorized service providers.
Robert Bosch Tool Corporation 1800 W. Central Road Mt. Prospect, IL 60056-2230
Exportado por: Robert Bosch Tool Corporation Mt. Prospect, IL 60056-2230, E.U.A.
Importado en México por: Robert Bosch, S.A. de C.V., Calle
Robert Bosch No. 405, Zona Industrial, Toluca, Edo. de
México, C.P. 50070, Tel. (722) 2792300
1-877-BOSCH99 (1-877-267-2499)
www.boschtools.com
Documents / Resources
References
Download manual
Here you can download full pdf version of manual, it may contain additional safety instructions, warranty information, FCC rules, etc.
Advertisement


Need help?
Do you have a question about the GLI18V-1200C and is the answer not in the manual?
Questions and answers