Akoma Pet Products Hound Heater Manual
- Setup and operation instructions (12 pages)
Advertisement
OPERATING INSTRUCTIONS
The Hound Heater™ must be properly installed before it is used.
Set the thermostat to the desired temperature in the pet house. By turning the thermostat knob clockwise, this will increase the temperature setting of the Hound Heater. When you turn the thermostat clockwise you will hear a faint click. The unit will turn on and run at maximum power until that chosen temperature is reached.

Approximate settings are as follows:
- LOW - MEDIUM is approximately 35F-50F (1C - 10C)
- MEDIUM - HIGH is approximately 50F-80F (10C - 26C)
The Hound Heater™ pet house furnace is powered by a long lasting 300 watt heating element.
Because all dog houses are different sizes, shapes, insulation values, with varying outside temperatures, etc., reaching the desired temperature will vary greatly. It is EXTREMELY important that your pet house be insulated and preferably have a door/flap.
Installation & Maintenance
Installation
Tools Required:
- Measuring device
- Drill
- 1-1/8" wood drill bit
- Screw driver
- Three wood screws (not included).
Make sure Pet is removed from pet house prior to installation.

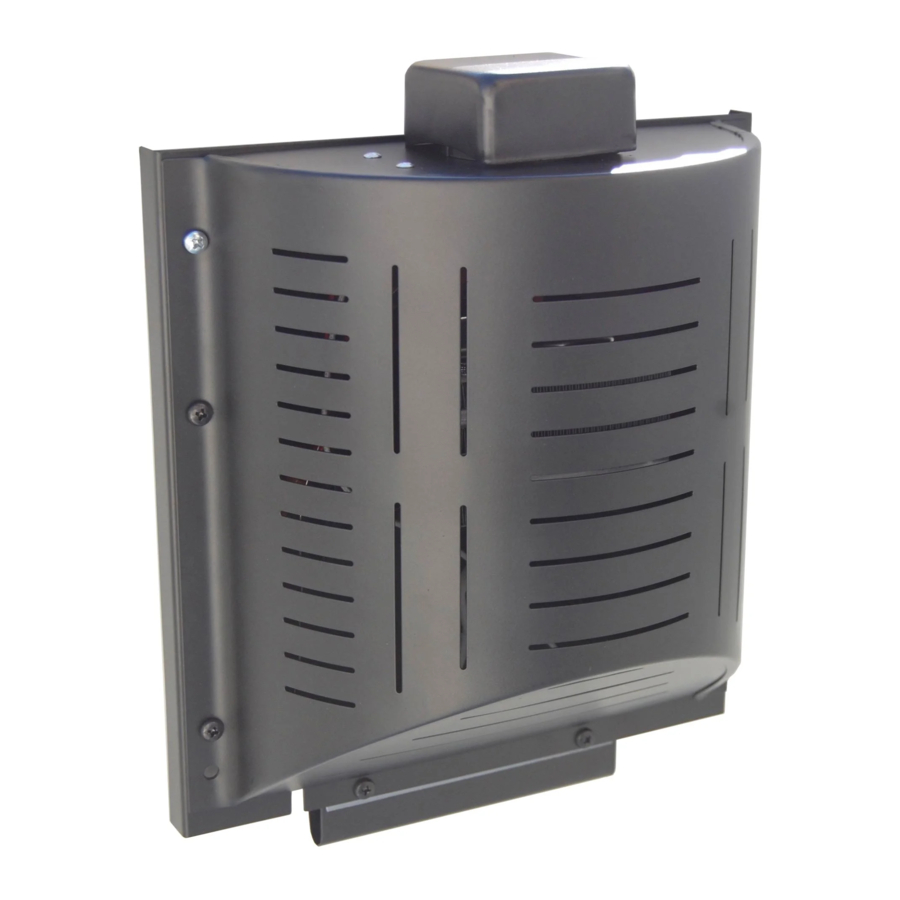
Step 1... The Hound Heater™ must be mounted on a vertical wall of your pet house. Do not mount on the ceiling or floor. Place the heater as high as possible with a minimum of at least 3 inches from the ceiling. Do not place heater near floor of pet house.
Step 2... Using the 1-1/8" drill bit, drill a hole through the wall of your pet house (a minimum of 9" from the ceiling) where the center of the Hound Heater will be placed and the power cord will go through.

Step 3... Carefully feed the cord all the way through the previously drilled hole making sure the cord is not kinked.

Step 4.... Mount the heater with the temperature control knob towards the ceiling and the slant towards the floor using three wood screws or nuts and bolts. Lightly tuck the filter (included in box) in the space between the heater and the wall - behind the temperature control knob. This will help dog hair, dirt and dust from getting in the heater and improve functionality.

Step 5... Plug the unit into a GFI outlet and you are done. If you are using an extension cord, it must be a 3 wire, 18 gauge (outdoor rated) grounded plug cord. Be sure the connection is elevated off any surface and not near water.
Maintenance
Regular maintenance is important to the functionality and safety of the unit.
- The filter must be cleaned at least once per month to keep unit in safe and operable condition. To clean the filter, remove it from the unit and blow air or water through the filter until it is clean. Return the filter once it is dry to the unit.
- During regular maintenance, remove front cover and inspect for hair, dust, and debris. Ensure the fan is free from hair, dust, and debris and is able to move freely. To clean, we recommend wiping it out with a lint free towel and/or a soft bristled brush.
 Please note that maintenance requirements may vary depending on factors such as increased exposure to hair and other particulates.
IMPORTANT INSTRUCTIONS
Read all documentation that is included before installing and using this heater.
Use this heater only as described in this manual.
Any other use not recommended by the manufacturer may cause fire, electric shock, or injury to persons.
When using electrical appliances, basic precautions should always be followed to reduce the risk of fire, electric shock, and injury to persons, including the following:
- Read all instructions before installing or using this heater.
- This heater is hot when in use. To avoid burns, do not let bare skin touch hot surfaces. Keep combustible materials, such as furniture, pillows, ALL TYPES of bedding, papers, clothes, etc. and curtains at least 2 feet from the front of the heater and keep them away from the sides and rear (sides and rear restrictions apply to location dedicated heaters only). A clearance distance is to be determined in accordance with 59.24 or 59.27.
- Extreme caution is necessary when any heater is used by or near children or invalids and whenever the heater is left operating and unattended.
- Do not operate any heater after it malfunctions. Disconnect power at service panel and have heater inspected by a reputable electrician before reusing.
- To disconnect heater, turn controls to off, and turn off power to heater circuit at main disconnect panel (or operate internal disconnect switch if provided) and remove plug from outlet.
- Do not insert or allow foreign objects (refer to #2 above) to enter any ventilation or exhaust opening as this may cause an electric shock or fire, or damage the heater. This includes ALL types of bedding.
- To prevent a possible fire, do not block air intakes or exhaust in any manner.
- A heater has hot and arcing or sparking parts inside. Do not use it in areas where gasoline, paint, or flammable vapors or liquids are used or stored.
- Use this heater only as described in this manual. Any other use not recommended by the manufacturer may cause fire, electric shock, or injury to persons.
- DO NOT alter the heater or cord in any way. This greatly increases your risk of fire and / or injury.
- Any alterations to the heater, heater parts, or cords will void all warranties.
- Dutiful compliance with regular maintenance is required for safe and effective operation. See "Installation and Maintenance" for further details.
If you should experience ANY PROBLEMS with your Hound Heater™, please contact Akoma Pet Products LLC directly. DO NOT contact your place of purchase. Contacting Akoma Pet Products LLC will greatly speed up your service. Please call 888-442-2214 or email: houndheater@gmail.com
SAVE THESE INSTRUCTIONS
ELECTRICAL SAFETY INFORMATION

This heater is for use with 120 volts.
The cord has a plug as shown at A in the diagram.
An adapter as shown at C is available for connecting three-blade grounding-type plugs to two-slot receptacles.
The green grounding plug extending from the adapter must be connected to a permanent ground such as a properly grounded outlet box.
The adapter should not be used if a three-slot grounded receptacle is available.
If an extension cord is used, it needs to be a minimum of 18 gauge wires and it must have a 3 prong grounded plug end. Make sure the connections are elevated off the ground, and are not able to come in contact with water, and plugged into a GFCI outlet.
888-442-2214
Documents / Resources
References
Download manual
Here you can download full pdf version of manual, it may contain additional safety instructions, warranty information, FCC rules, etc.
Advertisement

Need help?
Do you have a question about the Hound Heater and is the answer not in the manual?
Questions and answers