Breville Smart Grinder Pro BCG820BSS Manual
- Instruction book (20 pages)
Advertisement
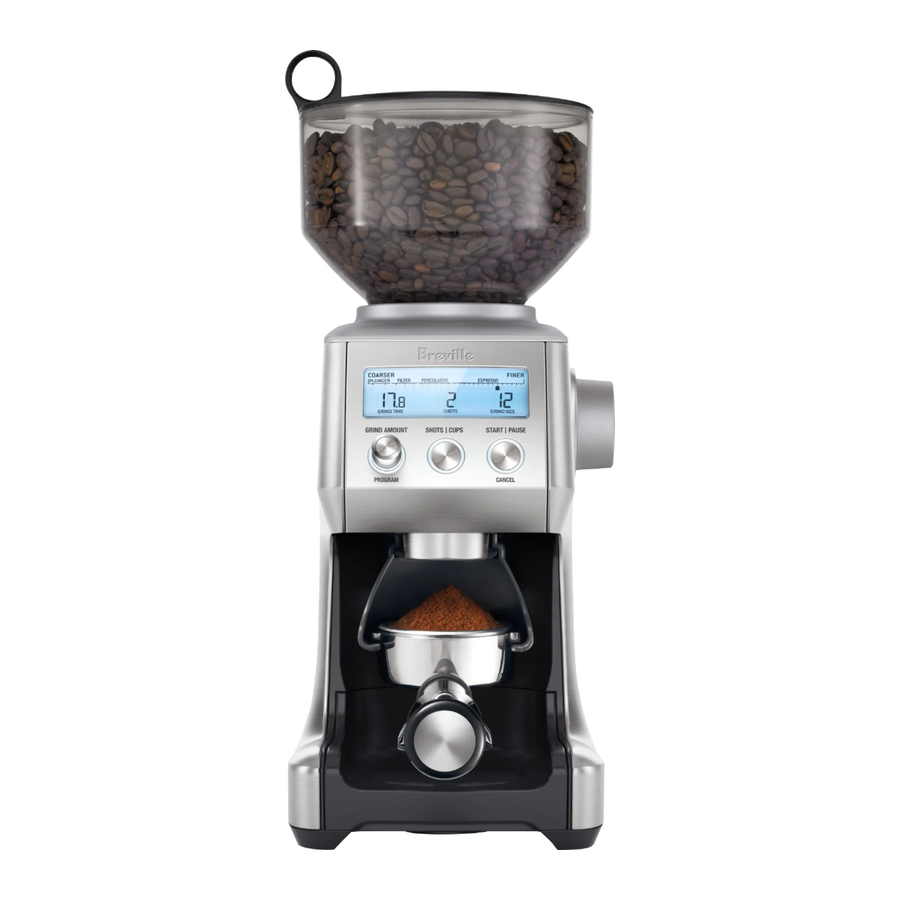
KNOW YOUR NEW APPLIANCE

- Bean Hopper Lid
Air tight seal to maximize bean freshness. - Bean Hopper
1lb bean hopper with locking system for easy removal and bean transfer. - Hardened Stainless Steel Conical Burrs Maximizes particle size for full flavor potential.
Removable and Adjustable Upper Burr - Backlit LCD Screen
Displays grind setting, grind size, number of shots or cups and current grind time. - GRIND AMOUNT|PROGRAM Dial
Adjusts programmed amount to increase or decrease dose. - SHOTS|CUPS Button
Selects number of shots or cups. - Grind Outlet
- Grind Tray
Catches grind overflow.
Removable for easy cleaning. - Grind Size Dial
60 custom grind settings from espresso to press. - START|PAUSE|CANCEL Button
Starts, Pauses and Cancels operation. - Portafilter Activation Switch
Activates or cancels grinder with a press of the portafilter.
ACCESSORIES
- Portafilter Cradle 50–54mm
- Portafilter Cradle 58mm
- Conical Burr Cleaning Brush
- Grinds Container For storing ground coffee.
Oi - Container Cap
Oii - Container Lid
NOT SHOWN
Grinding Chamber
Minimizes static of beans before dispensing.
Automatic Thermal Safety Shut Off
Protects motor from overheating.
Power Saving/Sleep Mode
Unit powers down to standby after 5 minutes of non use.
Cord Storage
OPERATING YOUR NEW APPLIANCE
GRIndER ovERvIEW
Your Smart Grinder™ Pro uses hardened stainless steel concial burrs to grind whole bean coffee suitable for a range of brewing methods, from the finest setting for espresso to the coarsest setting for press. You are able to select the amount of shots or cups with a single button. The grind amount (dose) for all coffee types is controlled by a digital timer. The default dose for each brew method can be adjusted by turning the Grind Amount Dial and changing the time the grinder will run. Once you have the desired dose, you can press and hold the PROGRAM button to set your custom time. You can grind directly into a portafilter, grinds container or drip coffee filter basket.
BEfoRE fIRSt USE
Remove and safely discard all promotional labels and packing materials attached to your Breville product.
Wash hopper, cradles, grind container, container lid and cleaning brush in warm soapy water and dry thoroughly. Wipe exterior of grinder with a soft damp cloth and dry thoroughly. Place grinder on flat level surface and plug power cord into 120V outlet.
| EnERGy SAvInG fEAtURE |
| The grinder will automatically switch off if not used for 5 minutes. To reactivate the machine whilst in POWER SAVING/SLEEP MODE, press any button on the grinder control panel. |
| NOTE |
| If bean hopper has not been locked into position, 'PLEASE LOCK HOPPER' message will be displayed on the LCD screen disabling the operation of the grinder for safety. |
ASSEMBLInG yoUR BREvILLE SMARt GRIndER™ PRo
Bean Hopper
Align tabs on the base of the bean hopper and insert hopper into position. Turn the bean hopper dial 90° to lock into position. Fill with fresh coffee beans and secure lid on top of bean hopper.

The bean hopper can be removed by turning dial anti clockwise and lifting hopper to pull out. The locking system allows you to remove and transfer beans in the hopper to a storage container safely.
Within each brew method (espresso, percolator, drip or press), there is a range of grind size settings. Between each brew method the grind size settings will differ. This is due to each method requiring different grind sizes for optimum extraction.
Experiment with different grind size settings by rotating the Grind Size dial to achieve the brew that best suits your taste.

GRIndInG foR ESPRESSo CoffEE
Use single wall filter baskets when grinding fresh coffee beans. Use the finer 1–30 settings in the ESPRESSO range.

- Insert the appropriate portafilter cradle size. Insert your portafilter into the cradle.
notE
You can change the amount already selected during operation by pressing the SHOTS|CUPS button. Maximum number of shots with the cradle inserted is 2.

- Selecting your SHotS|CUPS
Select the desired amount of ground coffee required by pressing the SHOTS|CUPS button.
![]()
Continue pressing the SHOTS|CUPS button until desired amount is displayed. The maximum number of shots or cups for each brew method is shown in the coffee chart over page. The amount dispensed will vary depending on the brew method selected and the grind amount.
Rotate the Grind Amount Dial to adjust the grinding time to achieve the correct amount of coffee. Increasing time will increase the dose and decreasing the time will decrease the dose.


CoffEE CHARt
| COFFEE TYPE | ESPRESSO | DRIP FILTER / PERCOLATOR | FRENCH PRESS | |
| GRIND SIZE | FINE | MEDIUM | MEDIUM COARSE | COARSE |
| GRIND SETTING | 1-30 | 31-48 | 49-54 | 55-60 |
| AMOUNT | 1 UP TO 5 SHOTS | 1 UP TO 12 CUPS | 1 UP TO 12 CUPS | 1 UP TO 12 CUPS |
| USE SETTING FOR | ESPRESSO MACHINES If using Dual Wall Filters, we recommend starting at grind setting 30 and moving to a finer grind if needed. STOVETOP PERCOLATOR / MOCHA MACHINES | PERCOLATORS (with coarse screen filter) DRIP COFFEE (with GoldTone filter) | PERCOLATORS (with fine screen filter) DRIP COFFEE (with paper filter) STEAM ESPRESSO (non pump) | FRENCH PRESS |
- Select your grind size
For espresso, we recommend selecting Grind Size setting 12 as a starting point and moving the Grind Size dial Coarser or Finer to adjust the flow of espresso as required. This should be done in conjunction with setting the grind amount (dose).

You will need to extract a shot of espresso to determine if a change in grind size and/or grind amount is necessary to achieve the correct rate of flow. Traditionally, a single shot of espresso is defined as 1oz in 30 seconds and a double shot of espresso as 2oz in 30 seconds.

| NOTE |
| If the Grind Size Dial is tight, run the grinder by pressing the START|PAUSE| CANCEL button while turning the Grind Size Dial. This will release coffee grounds caught between the burrs. |
GRIndInG Into A GRIndS ContAInER oR CoffEE fILtER
Remove cradle by sliding out from under the grind outlet.

Slide in grinds container with cap open or coffee filter directly under grind outlet.


- Select the required amount of ground coffee by pressing the SHOTS|CUPS button.
- Press the START|PAUSE|CANCEL button to start grinding operation.


You can grind into grinds container without the lid. However, we recommend keeping the lid on to prevent coffee grinds from escaping.
fEAtURES of yoUR BREvILLE SMARt GRIndER™ PRo
Automatic Grinding
Grinding automatically allows you to grind hands-free. The grinder will automatically stop when the preset amount of coffee is dispensed.
- Press and release either the START|PAUSE|CANCEL button or push the handle of your portafilter once. This will activate the PORTAFILTER SWITCH.
- Grinding will automatically stop when the preset amount is dispensed.


It is normal for the correct amount of coffee to appear overfilled in your portafilter. Un-tamped coffee is approximately three times the volume of tamped coffee.

| NOTE |
| Programming a custom grind amount/ time only sets it for that particular brew method. This will not change the other Shots or Cups settings. |
Pause function
You can pause the grinder during operation allowing you to collapse or settle the coffee in the portafilter.

- Press and release the START|PAUSE|CANCEL button to start the grinding operation.
- During grinding, press the START|PAUSE|CANCEL button again to pause the operation for 10 seconds.
- Press again within this time to resume grinding the remaining dose.
Program function
Once you have set your required dose, you can program this time into the number of shot(s) currently displayed on the LCD. Press and hold the PROGRAM button, grinder will beep twice to confirm. Only the shot displayed will be programmed, all other shots will remain unchanged.

Manual Grinding
Grinding manually allows you to have complete control over how much coffee is dispensed.
- Press and hold either the START|PAUSE|CANCEL button or push the handle of your portafilter to activate the PORTAFILTER SWITCH for as long as you require.
- Release START|PAUSE|CANCEL button or PORTAFILTER SWITCH and grinding will stop.


AdJUStInG yoUR GRInd AMoUnt
The Grind Amount Dial gives you the ability to modify the preset SHOTS|CUPS amounts to deliver more or less ground coffee into your portafilter or grinds container.
Increasing the Grind Amount
To increase the grind amount selected, turn the GRIND AMOUNT dial to the right.
Each adjustment will increase the grind time by 0.2 of a second.

Decreasing the Grind Amount
To decrease grind amount selected, turn the Grind Amount Dial to the left.
Each adjustment will decrease the grind time by 0.2 of a second.

RESEttInG to dEfAULt
To RESET the grind amount/time to the default settings, press and hold the SHOTS|CUPS button until a long beep sounds.
AdJUStInG ConICAL BURRS
Some types of coffee may require a wider grind range to achieve an ideal extraction or brew. A feature of your Smart Grinder™ Pro is the ability to extend this range with an adjustable upper burr. We recommend making only one adjustment at a time.
- Unlock hopper
![]()
- Hold hopper over container & turn dial to release beans into container
![]()
- Align hopper into position
![]()
- Run grinder until empty
![]()
- Remove hopper
![]()
- Remove upper burr
![]()


- Remove wire handle from both sides of the burr
![]()
- Default setting is 6
![]()
- Move adjustable top burr, 1 number, coarser or finer
![]()
- Align the number with the handle opening
![]()
- Insert wire handle from both sides of the burr
![]()
- Push upper burr firmly into position
![]()
- Lock upper burr
![]()
- Align hopper into position
![]()
- Lock hopper
![]()
- Check your extraction
![]()


CARE, CLEANING & STORAGE
- Empty beans from the hopper and grind out any excess beans (see below).
- Unplug power cord from power outlet before cleaning.
- Wash the grind container and lid, bean hopper and lid in warm soapy water, rinse and dry thoroughly.
- Wipe and polish exterior of appliance with a soft damp cloth.
NotE
Do not use alkaline or abrasive cleaning agents, steel wool or scouring pads, as these can damage the surface.
NotE
Please do not clean any grinder parts or accessories in the dishwasher.
CLEAnInG ConICAL BURRS
Regular cleaning helps the burrs achieve consistent grinding results which is especially important when grinding for espresso coffee.
- Unlock hopper
![]()
- Hold hopper over container & turn dial to release beans into container
![]()
- Align hopper into position
![]()
- Run grinder until empty
![]()
- Remove hopper
![]()
- Remove upper burr
![]()
- Clean upper burr with cleaning brush
![]()
- Clean lower burr with cleaning brush
![]()
- Clean grind outlet with brush
![]()
- Push upper burr firmly into position
![]()
- Lock upper burr
![]()
- Align hopper into position
![]()
- Lock hopper
![]()


MAKING GOOD COFFEE
MAKInG BEttER qUALIty CoffEE
- Freshly ground coffee is the key to making coffee with more flavor and body.
- Coffee flavor and strength is a personal preference. Vary the type of coffee beans, amount of coffee and fineness of grind to achieve the flavor you prefer.
- Use freshly roasted coffee beans with a 'roasted on' date to maximize flavor, not a use-by or best before date.
- Use coffee beans between 5 and 20 days after the 'roasted on' date for optimal freshness.
- Store coffee beans in a dark, cool and dry place. Vacuum seal if possible.
- Buy in small batches to reduce the storage time.
- Once coffee is ground, it quickly loses its flavor and aroma. For the best results, grind beans immediately before brewing.
- Do not store beans in the bean hopper. Place them back in an airtight container.
- When storing the appliance, run grinder empty to clear ground beans left in chamber.
- Run grinder for 2 seconds to purge some coffee before each use, for maximum freshness.
- Clean the bean hopper and conical burrs regularly.
fREnCH PRESS
Follow these easy steps for a great cup:
- Using a variable temperature kettle, heat the appropriate volume of water to 200˚F. This is an ideal temperature for brewing coffee. Do not use boiling water.
- Select grind size setting 58.
- Select the number of cups you are brewing. Adjust the amount of coffee to suit the strength you prefer.
- Place the ground coffee in the plunger vessel.
- Pour the heated water into the plunger in a swirling manner to ensure all the ground coffee is soaked and the plunger vessel is full. The 'bloom' (expanding coffee and gases) should reach the top of the plunger.
- Using a timer, wait 4 minutes.
- Using a spoon, break the 'crust' (the bloom becomes dense and a bit hard).
- Insert the plunger and carefully press down.
- Do not press too hard. Gently release pressure by pulling up slightly and press down again if you have pressed too hard.
TROUBLESHOOTING
| PRoBLEM | PoSSIBLE CAUSE | WHAt to do |
| Grinder does not start after pressing StARt| PAUSE|CAnCEL button |
|
|
| Motor starts but no ground coffee coming from grind outlet |
|
|
Motor starts but operates with a loud 'racket' noise |
|
|
Unable to lock bean hopper into position |
|
|
Not enough/ too much coffee grind |
|
|
Portafilter overfills |
| |
Emergency stop? |
|
IMPORTANT SAFEGUARDS
We at Breville are very safety conscious. We design and manufacture consumer products with the safety of you, our valued customer, foremost in mind. In addition, we ask that you exercise a degree of care when using any electrical appliance and adhere to the following precautions:
REAd ALL InStRUCtIonS
- Carefully read all instructions before operating the appliance for the first time and save for future reference.
- Remove and safely discard any packaging materials and promotional labels before using the appliance for the first time.
- To eliminate a choking hazard for young children, remove and safely discard the protective cover fitted to the power plug of this appliance.
- To protect against electrical shock, do not immerse the power plug, power cord or motor base in water or any other liquid.
- Always use the appliance on a dry, level surface.
- Do not use the appliance on a sink drain board.
- Do not place the appliance near the edge of a bench or table during operation. Vibration during operation may cause the appliance to move.
- Do not place the appliance on or near a hot gas or electric burner, or where it could touch any other source of heat.
- Unwind the power cord fully before use.
- Do not allow the power cord to hang over the edge of a table or counter, touch hot surfaces or become knotted.
- Always ensure the appliance is completely assembled before connecting to the power outlet and operating. Follow the instructions provided in this book.
- Avoid contacting with moving parts.
- Check the Bean Hopper for presence of foreign objects before using.
- Do not operate this appliance for longer than 2 minutes at a time as this can cause overheating. Allow to cool for at least 2 minutes after each use. Allow the appliance to cool down 10-15 minutes after long operation.
- Remove the power plug from the power outlet if the appliance is to be left unattended, if not in use, before attempting to move the appliance, before cleaning, disassembling, assembling and when storing the appliance.
- Strictly follow the care and cleaning instructions described in this book.
- This appliance is for household use only. Do not use the appliance for anything other than its intended purpose as described in this book. Do not use outdoors. Do not use in moving vehicles or boats.
- The use of attachments not sold or recommended by Breville may cause fire, electric shock or injury.
- Do not leave the appliance unattended when in use.
- This appliance is not intended for use by young children or infirm persons without supervision. Young children should be supervised to ensure that they do not play with the appliance.
- Regularly inspect the power plug, power cord and actual appliance for any damage. Do not operate if damaged in any way or after the appliance malfunctions. Immediately cease use of the appliance and visitwww.Breville.com or call Breville Customer Service on 1-866-BREVILLE for replacement, repair or adjustment.
- For any maintenance other than cleaning, visit www. Breville.com or call Breville Customer Service on 1-866-BREVILLE.
- Consult a qualified electrician if the grounding instructions are not completely understood, or if doubt exists as to whether the appliance is properly grounded.
BREvILLE ASSISt™ PLUG
Your Breville appliance comes with a unique Assist™ Plug, conveniently designed with a finger hole in the power plug for easy and safe removal from the wall outlet. For safety reasons it is recommended you plug your Breville appliance directly into its own electrical outlet on a dedicated circuit separate from other appliances. If the electric circuit is overloaded with other appliances, your appliance may not function properly. Use in conjunction with a power strip or extension cord is not recommended.
SHoRt CoRd InStRUCtIonS
Your Breville appliance is fitted with a short power supply cord as a safety precaution to prevent personal injury or property damage resulting from pulling, tripping or becoming entangled with a longer cord. Do not allow children to use or be near this appliance without close adult supervision. Longer detachable power supply cords or extension cords are not recommended but may be used if care is exercised. If an extension cord is used,
- the marked electrical rating of the cord set or extension cord should be at least as great as the electrical rating of the appliance,
- the cord should be arranged so that it will not drape over the countertop or tabletop where it can be pulled on by children or tripped over unintentionally and
- the extension cord must include a 3-prong grounding plug.
FoR HoUSEHoLd USE onLy SAvE tHESE InStRUCtIonS
Documents / Resources
References
Download manual
Here you can download full pdf version of manual, it may contain additional safety instructions, warranty information, FCC rules, etc.
Advertisement


Need help?
Do you have a question about the Smart Grinder Pro BCG820BSS and is the answer not in the manual?
Questions and answers