Behringer U-PHONO UFO202 Manual
- User manual (96 pages) ,
- Brochure & specs (3 pages) ,
- User manual (16 pages)
Advertisement
Introduction
You will now be able to transfer all your great albums from the vinyl and tape eras into the digital realm with the help of this easy-to-use device. It features stereo RCA inputs and outputs to allow both monitoring and recording of the audio source. The USB connection will work with either PCs or Mac computers, so no drivers are needed for installation, and power is supplied through the USB cable. The separate headphones output allows you to play back your recordings at any time, even if you don't have any loudspeakers available. We've also included free software to help you transfer and edit the music in a streamlined fashion, allowing you to spend less time fidgeting with settings and more time listening to your favorite songs.
Before You Get Started
Shipment
Your UFO202 was carefully packed at the assembly plant to assure secure transport. Should the condition of the cardboard box suggest that damage may have taken place, please inspect the unit immediately and look for physical indications of damage.
- Damaged equipment should NEVER be sent directly to us. Please inform the dealer from whom you acquired the unit immediately as well as the transportation company from which you took delivery. Otherwise, all claims for replacement/repair may be rendered invalid.
- Please always use the original packaging to avoid damage due to storage or shipping.
- Never let unsupervised children play with the equipment or with its packaging.
- Please dispose of all packaging materials in an environmentally friendly fashion.
Initial operation
Please make sure the unit is provided with sufficient ventilation, and never place the UFO202 on top of an amplifier or in the vicinity of a heater to avoid the risk of overheating. The current supply is made via the USB connecting cable, so that there is no external power supply unit required. Please adhere to all required safety precautions.
Online registration
Please register your new Behringer equipment right after your purchase by visiting behringer.com and read the terms and conditions of our warranty carefully.
Should your Behringer product malfunction, it is our intention to have it repaired as quickly as possible. To arrange for warranty service, please contact the Behringer retailer from whom the equipment was purchased. Should your Behringer dealer not be located in your vicinity, you may directly contact one of our subsidiaries. Corresponding contact information is included in the original equipment packaging (Global Contact Information/European Contact Information). Should your country not be listed, please contact the distributor nearest you. A list of distributors can be found in the support area of our website (behringer.com).
Registering your purchase and equipment with us helps us process your repair claims more quickly and efficiently.
System Requirements
- The UFO202 is PC and Mac-compatible.
Therefore, no installation procedure or drivers are required for the correct functioning of the UFO202.
To work with the UFO202, your computer must fulfill the following minimum requirements:
| PC | Mac |
| Intel or AMD CPU, 400 MHz or higher | G3, 300 MHz or higher |
| Minimum 128 MB RAM | Minimum 128 MB RAM |
| USB 1.1 interface | USB 1.1 interface |
| Windows XP, 2000 | Mac OS 9.0.4 or higher, 10.X or higher |
Hardware connection
Use the USB connecting cable supplied with the UFO202 to connect the unit to your computer. The USB connection also supplies the UFO202 with current. You can connect a variety of devices and equipment to the inputs and outputs.
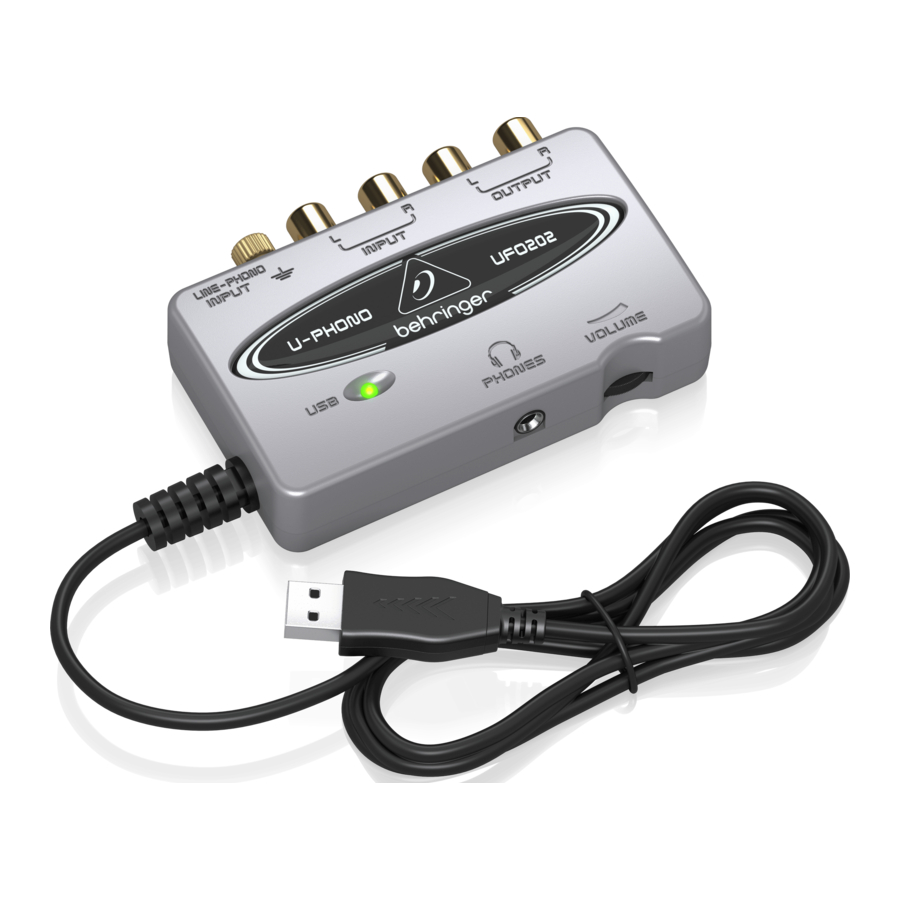
Operating Elements and Connections

- L AND R RCA OUTPUTS: Connect an external monitoring device, such as a pair of monitor speakers, to the left and right RCA outputs. (this step is optional)
- L AND R RCA INPUTS: Connect the audio source (record player, tape player, etc.) to the left and right RCA inputs.
- GROUND CONNECTION: Some record players have a separate ground cable. If so, attach the cable to the ground terminal to avoid excessive noise and hum.
- LINE/PHONO SWITCH: Move the switch on the top left to PHONO if transferring from a record player. For all other sources, select LINE.
![warning]() Note: The PHONO inputs only support moving magnet cartridges. These are the most common type, so unless you know your player uses a moving coil cartridge, assume that your system will work.
Note: The PHONO inputs only support moving magnet cartridges. These are the most common type, so unless you know your player uses a moving coil cartridge, assume that your system will work.
- HEADPHONES OUTPUT: Plug your headphones into the PHONES output using a 1/8" mini plug.
- HEADPHONES VOLUME: Adjust the headphones volume with the adjacent control.
- USB CABLE: Plug the USB cable into a free USB port on your computer.
- POWER INDICATOR: Upon connection, the UFO's power indicator will light up and the computer should automatically recognize the connection.
Software Installation
- This device requires no special setup or drivers, just plug it into a free USB port on a PC or Mac computer
- A free download of Audacity audio editing software is available on behringer.com. Simply navigate to the UFO202 product page, click the download tab, and scroll down to the Apps section where you can download the 'Audio Software for Windows' or 'Audio Software for Mac' bundle. This will help make the transfer process quick and simple. You can, of course, use another audio program of your choice.
Hookup Diagram
Hooking up a record player

- To transfer music from a record player, a special pre-amplification process must take place in order to boost the low signal level coming from the player. To do this, simply move the LINE/PHONO switch on the UFO202 to the right (PHONO selected).
- Connect a stereo RCA cable from the record player outputs to the RCA inputs on the UFO202. The player will also likely have a ground cable that needs to be attached to the ground terminal on the UFO202.
- Connect a monitoring device. You may plug speakers into the RCA outputs or connect a pair of headphones to the PHONES output.
- Connect the attached USB cable to a free USB port on your computer.
Hooking up a tape player

- Move the LINE/PHONO switch on the UFO202 to the left (LINE selected).
- Connect a stereo RCA cable from the tape player outputs to the RCA inputs on the UFO202.
- Connect a monitoring device. You may plug speakers into the RCA outputs or connect a pair of headphones to the PHONES output.
- Connect the attached USB cable to a free USB port on your computer.
Recording Process
- After hookups have been made and software installed, you are ready to record the audio. Make sure your audio recording program is set to record input from the USB port. For simple record, cut, and export of stereo audio, you may prefer to use Audacity
- If recording from a tape player, make sure the player's volume is turned up all the way
- Adjust the input sensitivity of the recording program to achieve optimal sound quality. Too much signal will cause the recording to distort; too little signal will sound faint and thin, so record a test clip to ensure quality sound. The recording program should have meters that display the levels as the audio streams
- Set your recording program on your computer to RECORD, and begin playing the start of the tape or record immediately after
- Let the audio play all the way through the first side. Once the music stops, press STOP on the recording program
- Flip the tape or record over and repeat the recording process
- Once both sides are recorded, you may edit the file to cut out any extra time before or after the audio was captured. You may also cut the long track into individual songs and save the files separately. This process differs slightly depending on what program you are using, so refer to the software manual for editing procedures
- You can play back your stereo recorded audio through the UFO202 RCA outputs and PHONES output. You may want to apply equalization or other processing if your software application is so equipped
- If you plan to burn these files to a CD for use in a home stereo or car, save the audio in WAV format
Audio Connections
Although there are various ways to integrate the UFO202 into your studio or live set-up, the audio connections to be made will basically be the same in all cases:
Wiring
Please use standard RCA cables to connect the UFO202 to other equipment:

You can also use a ¼" adapter cable:

Headphones connection
The UFO202 is provided with a headphones jack. Here, you can connect any standard pair of stereo headphones with a 1 / 8 " TRS connector.

Important Safety Instructions

RISK OF ELECTRIC SHOCK
DO NOT OPEN
 Terminals marked with this symbol carry electrical current of sufficient magnitude to constitute risk of electric shock. Use only high-quality professional speaker cables with ¼" TS or twist-locking plugs pre-installed. All other installation or modification should be performed only by qualified personnel.
This symbol, wherever it appears, alerts you to the presence of uninsulated dangerous voltage inside the enclosure - voltage that may be sufficient to constitute a risk of shock.
 This symbol, wherever it appears, alerts you to important operating and maintenance instructions in the accompanying literature. Please read the manual.
To reduce the risk of electric shock, do not remove the top cover (or the rear section). No user serviceable parts inside. Refer servicing to qualified personnel.
To reduce the risk of fire or electric shock, do not expose this appliance to rain and moisture. The apparatus shall not be exposed to dripping or splashing liquids and no objects filled with liquids, such as vases, shall be placed on the apparatus.

These service instructions are for use by qualified service personnel only. To reduce the risk of electric shock do not perform any servicing other than that contained in the operation instructions. Repairs have to be performed by qualified service personnel.
- Read these instructions.
- Keep these instructions.
- Heed all warnings.
- Follow all instructions.
- Do not use this apparatus near water.
- Clean only with dry cloth.
- Do not block any ventilation openings. Install in accordance with the manufacturer's instructions.
- Do not install near any heat sources such as radiators, heat registers, stoves, or other apparatus (including amplifiers) that produce heat.
- Do not defeat the safety purpose of the polarized or grounding-type plug. A polarized plug has two blades with one wider than the other. A grounding-type plug has two blades and a third grounding prong. The wide blade or the third prong are provided for your safety. If the provided plug does not fit into your outlet, consult an electrician for replacement of the obsolete outlet.
- Protect the power cord from being walked on or pinched particularly at plugs, convenience receptacles, and the point where they exit from the apparatus.
- Use only attachments/accessories specified by the manufacturer.
![]()
Use only with the cart, stand, tripod, bracket, or table specified by the manufacturer, or sold with the apparatus. When a cart is used, use caution when moving the cart/ apparatus combination to avoid injury from tip-over.- Unplug this app aratus during lightning storms or when unused for long periods of time.
- Refer all servicing to qualified service personnel. Servicing is required when the apparatus has been damaged in any way, such as power supply cord or plug is damaged, liquid has been spilled or objects have fallen into the apparatus, the apparatus has been exposed to rain or moisture, does not operate normally, or has been dropped.
- The apparatus shall be connected to a MAINS socket outlet with a protective earthing connection.
- Where the MAINS plug or an appliance coupler is used as the disconnect device, the disconnect device shall remain readily operable.
- Do not install in a confined space, such as a book case or similar unit.
- Do not place naked flame sources, such as lighted candles, on the apparatus.
- Please keep the environmental aspects of battery disposal in mind. Batteries must be disposed-of at a battery collection point.
- This apparatus may be used in tropical and moderate climates up to 45°C.

Documents / Resources
References
Download manual
Here you can download full pdf version of manual, it may contain additional safety instructions, warranty information, FCC rules, etc.
Advertisement


Need help?
Do you have a question about the U-PHONO UFO202 and is the answer not in the manual?
Questions and answers