Advertisement
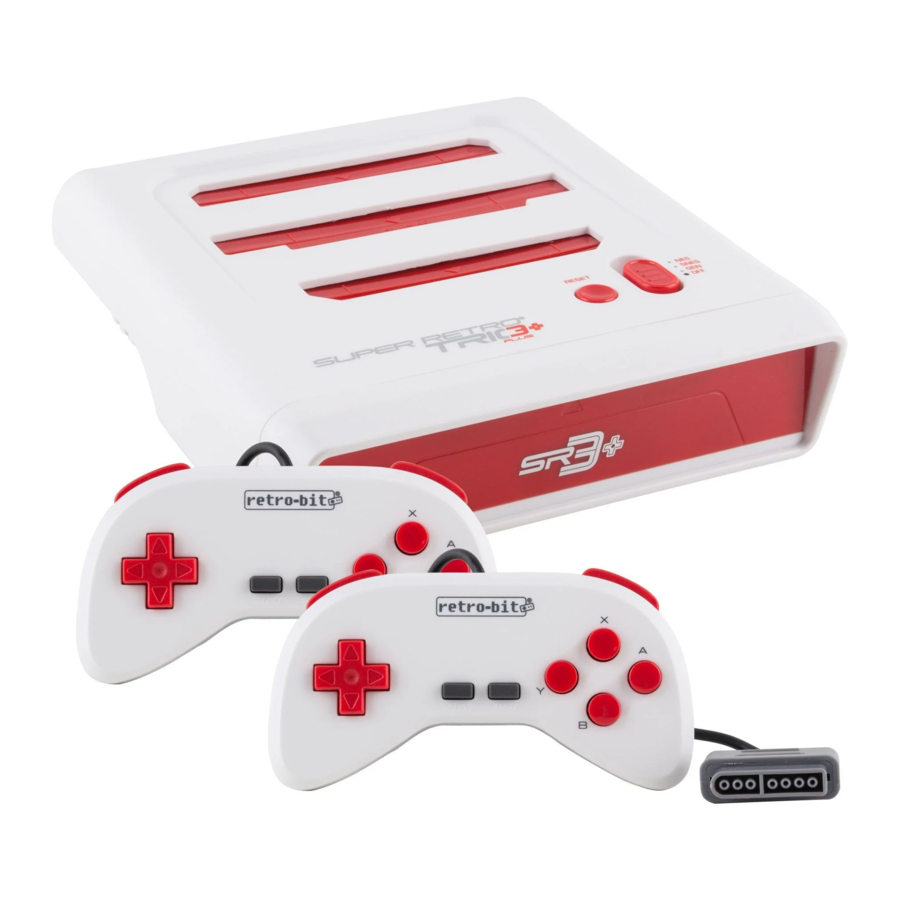
Console components & functions

TOP
- 8- bit game cartridge slot for NES cartridge
- 16- bit game cartridge slot FOR SFC/SNES cartridges
- GENESIS game cartridge slot for MD/ Genesis cartridges
- Power Switch Indicators
- 8- bit indicator—Lights up green when playing NES game cartridges
- 16- bit indicator—Lights up red when playing SNES game cartridges
- Genesis indicator—Lights up blue when playing GENESIS game cartridges
- Power Switch
- Reset Button

BACK
- HDMI port
- AV Port (V L R)
- DC Port

FRONT
- Controller port door
- SNES & NES/SNES/Genesis Controller switch
- Controller Slots – Connect original or third party controllers
- SNES Port
- NES Port
- GENESIS Port
- Genesis Region Switch
- NTSC
- PE
- NJ
- PA

CONTROLLER
- L & R Buttons.
- D-Pad
- Select
- Start
- Operation Buttons (A,B,X,Y)


Hooking up your device
Connecting the AV/HDMI cable
- Connecting the AV/HDMI cable into the Super Retro Trio Plus Console AV/HDMI port located on the back of the console:
- HDMI into HMDI socket
- Red & white into the (L R) sockets
- Yellow into the (V) socket
- Plug the other end into the signal input ports on the TV set, also matching the colors indicated.
Connecting the AC Adapter
- Plug the DC end of included power adapter into the DC socket on the back of the Super Retro Trio Plus Console
- Plug the other end of the power adapter into wall outlet
Precautions on Using the Super Retro Trio Plus Adapter
- Use ONLY the Super Retro Trio Plus AC Adapter included.
- Using a different AC Adapter can damage your Super Retro Trio Plus Console
- When not in use, unplug the AC adapter from the electrical outlet.
- Do not leave the system or any of its parts in direct sunlight, in damp areas or near a heater.
- Do not disassemble the console or any of its parts. Doing so will void the 60-day warranty offered by Retro-Bit.
Setting the TV Channel
- Make sure the HDMI or Audio/Video Cable is connected correctly.
- Select the Audio/Video Input setting on your TV, monitor, VCR or DVD Player that corresponds to the input connection your console is plugged into (e.g., "Video 1").
Operating your Device

- Make sure the power is "Off"
- Plug your Super Retro Trio Controllers into the respective Controller Slots on the Front of the console (see next section for more details on using controllers).
- Insert the game cartridge, label facing forward, into the cartridge slot. Press it fully into the slot until secure.
- To turn the power on, slide the power switch on to select the corresponding game cartridge.
- 8- bit indicator—Lights up green when playing NES game cartridges
- 16- bit indicator—Lights up red when playing SNES game cartridges
- Genesis indicator—Lights up blue when playing GENESIS game cartridges
- To reset to the game's start screen during game play, press the "Reset" button on the console to the left of the power switch
Note: Never attempt to remove a cartridge from the console while the power is switched on.
Connecting your controllers to your Super Retro Trio Plus Console Super Retro Trio Plus Console Controller Ports arrangement:
You may use your Super Retro Trio Plus controllers to play games for all three consoles. Simply plug the controller into the SNES controller port and move the Controller Select Switch to the SNES position. Follow these same directions if you wish to use an original or other third-party Genesis controller, or if you wish to use an included Super Retro Trio Plus controllers with your NES game cartridges.
If you wish to use an original or other third-party NES or SNES controller, insert it into the correct controller port and move the Controller Selector Switch to the position. You cannot use the SR3 controllers while the Controller Selector Switch is on the position.
GENESIS Regional Switch
The Genesis Regional Switch allows you to select one of the four different regions listed below. Check your game cartridge for the correct region and slide the switch to the corresponding region position.
NTSC - USA NTSC
PE - EUROPE PAL
NJ – JAPAN NTSC
PA – ASIA PAL
Troubleshooting
No picture on screen
- Are the contacts on the game cartridge dirty or damaged?
- Is the console turned on?
- Is the AC adapter properly plugged in?
- Is the TV turned on?
- Is there power to wall socket?
- Is the cartridge properly inserted?
- Is the Audio/Video or HDMI Cable connected properly?
- Is the region switch on the correct setting for your game cartridge?
- If connecting through the VCR/DVD player, is the VCR/DVD player turned on?
- If connecting through the VCR/DVD, is the VCR/DVD set to receive line input?
Screen flickers or no color
- Are the contacts on the game cartridge dirty or damaged?
- Is the Audio/Video or HDMI Cable connected properly with corresponding colors?
- Are the cables plugged in until secure?
- Are the TV channel fine-tuning adjustments properly set?
- Is the cartridge properly inserted?
- Turn the console off, wait one minute, then turn the console on again.
- Is the region switch on the correct setting for your game cartridge?
No game sound
- Are the contacts on the game cartridge dirty or damaged?
- Is the TV volume too low or muted?
- Have the connection cables come loose or become disconnected?
- Have you checked the connection between the TV and any speakers connected to the TV?
- Is the region switch on the correct setting for your game cartridge?
Picture on TV screen is not steady
- Are the contacts on the game cartridge dirty or damaged?
- Adjust the vertical and horizontal hold controls on your TV.
- Check to see if there are any damages to the wires being connected.
Fringes appear on TV during a game
- Are the contacts on the game cartridge dirty or damaged?
- Adjust the manual fine-tuning controls on the TV.
- Do fringes appear on TV during a broadcast? If so, it may be a problem with your TV set.
- Is the antenna cable properly connected?
- Turn the console off, wait one minute, then turn the console on again.
- Is the region switch on the correct setting for your game cartridge?
Safety Instructions

Stationary images in video games can "burn" into some television screens and may cause permanent picture damage or mark phosphor of the CRT. Avoid repeated or extended use of video games on large-screen projection televisions. Consult with your TV owner's manufacturer manual before playing any games.

Before playing video games, be sure to observe and apply the following:
- Take intermittent 15 minute breaks, at least once an hour, when playing for extensive periods at a time.
- Refrain from playing if you are drowsy or fatigued.
- Play in a well-lit room
- Sit or stand at a relatively far distance from the TV when playing video games.


Safety
Read carefully before operating your Super Retro Trio Plus console
This product has been designed with the highest concern for safety. However, any electrical device, if used improperly, has the potential for causing fire, electrical shock or personal injury. To help ensure accident-free operation, follow these guidelines:
- Observe all warnings, precautions and instructions.
- Stop use and unplug the AC power cord from the electrical outlet immediately if the device functions in an abnormal manner or produces unusual sounds or smells.
- If the Super Retro Trio Plus console is not working properly after troubleshooting, contact customer support at service@retro-bit.com
- Do not remove the console exterior or disassemble the console.
- Do not use the console near water.
- Keep the console and all connecting cords and cables out of the reach of children.
- Do not touch the plug of the AC power cord with wet hands.
- Do not touch the console or connected accessories during an electrical storm.
![]()
Do not touch the console or AC adapter for extended periods of time while the console is turned on as extended contact may cause low-temperature burns.- Do not place the console and connected accessories on the floor or in a place where they may cause persons walking by to trip or stumble.
![shock hazard]() Do not touch or pull out the game cartridge(s) in any cartridge slot during gameplay as it may create an electric shock and/or spark.
Do not touch or pull out the game cartridge(s) in any cartridge slot during gameplay as it may create an electric shock and/or spark.

Health
- Stop Playing and consult a physician if you experience any of the following:
- Loss of awareness
- Lightheadedness, nausea or a sensation similar to motion sickness
- Altered vision
- Disorientation or confusion
- Facial muscle twitches à Shaking of arms or legs
- Tired, uncomfortable or aching hands or arms
- Tired, dry or aching eyes
- Any unusual physical sensations
- When operating the unit, play in a well-lit room and keep a safe distance from the TV screen.
- Avoid prolonged use of the console. Take a break of about 15 minutes during every hour of play.
- Do not use the console when you are tired or short of sleep.
- Listening to sound continuously for a long time with a high volume may adversely affect the ears. Be careful especially when using headphones. Adjust the volume so that surrounding sounds can be heard.
- Do not let any children under the age of 5 operate the Super Retro Trio Plus Console without supervision.
For questions, inquiries, or technical support, email us at service@retro-bit.com

Join the conversation!
@retrobitgaming
For more info and to stay up to date on everything, visit our website at retro-bit.com
Documents / Resources
References
Download manual
Here you can download full pdf version of manual, it may contain additional safety instructions, warranty information, FCC rules, etc.
Advertisement


Need help?
Do you have a question about the SUPER RETRO TRIO+ and is the answer not in the manual?
Questions and answers