Table of Contents
Advertisement
Quick Links
Download this manual
See also:
User Manual
TABLE OF CONTENTS
INTRODUCTION
3
PRODUCT OVERVIEW
3
6
BEFORE YOU BEGIN
7
8
8
9
CHECKING REMOTE AND INDOOR
TEMPERATURE AND HUMIDITY
9
11
12
12
13
14
14
14
STATEMENT
16
17
2
Indoor / Outdoor
Weather Station
(TM005)
USER MANUAL
Please read this manual carefully before
setting up or using the weather station
HONEYWELL(SONTAX) TM005X MANUAL (ENG)
SIZE: W65 X H105 (mm)
BY WING TSUI 20/09/07
INTRODUCTION
Thank you for selecting the Honeywell Indoor/Outdoor
Weather Station with Remote Sensor. This device
monitors and displays temperature and humidity both
indoor and outdoor from up to three remote locations.
In this package you will find:
• One main unit (receiver)
• One remote sensor (transmitter) TS33
• One User Manual
Please keep this manual handy as you use your new
item. It contains practical step-by-step instructions,
as well as technical specifications and precautions
you should know.
PRODUCT OVERVIEW
MAIN UNIT
FEATURES
• Wireless transmission of the temperature and
humidity from the remote sensor to the main unit
from up to 30 metres away
• Indoor temperature and relative humidity display
• Remote temperature and relative humidity display
• Auto scan feature
• Comfort level indicator
• User-selectable temperature display in Celsius or
Fahrenheit
• Memory for the indoor and remote temperature and
humidity readings
• Wall mount or desktop option
• Low battery indicator
3
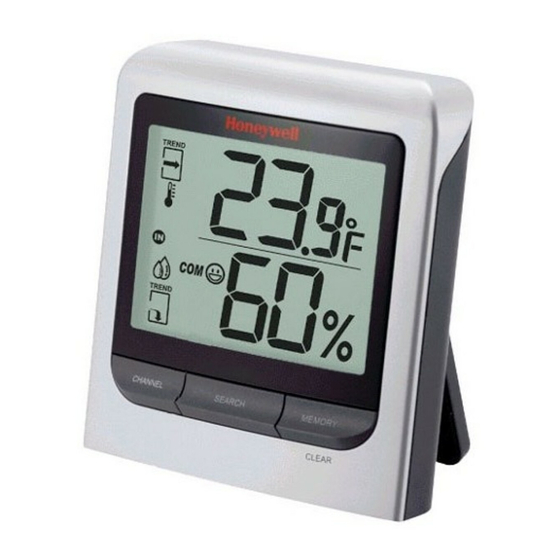
FRONT VIEW
A. TEMPERATURE AND HUMIDITY
INFORMATION IN A TWO LINE
LCD DISPLAY
CHANNEL
SEARCH
MEMORY
CLEAR
C
D
B
B. CHANNEL BUTTON
• Selects the desired remote channel or indoor
readings
C. SEARCH BUTTON
• Enforces the remote sensors signal search
D. MEMORY BUTTON
• Toggles between current, minimum and maximum
readings of the indoor and remote temperature
and humidity
• Clears the maximum and minimum memory of
registered temperature and humidity
4
REMOTE SENSOR
FEATURES
• Remote temperature and humidity transmission to
the main unit via 433 MHz signal
• 30 metres transmission range without interference
• LCD display of measured temperature and humidity
• Three (3) channels selection
• Selection of the temperature display in Celsius or Fahrenheit
• Case can be wall mounted using built-in hanger
E
1
C
F
A
D
B
THERMO – HYGRO SENSOR
A. LED INDICATOR
• Flashes once when the remote sensor transmits a
reading to the main unit.
• Flashes twice when battery power is low.
B. BATTERY COMPARTMENT
• Holds two AA-size batteries
C. RESET
• Resets all readings
D. CHANNEL SELECTOR
• Selects the desired channel
E. WALL-MOUNT RECESSED HOLE
• Keeps the remote sensor on the wall
F. °C/ °F SWITCH
• Selects the temperature display in Celsius or
Fahrenheit
6
REAR VIEW
E
F
SIZE AA / UM3
SIZE AA / UM3
G
°C/°F
H
E. WALL-MOUNT RECESSED HOLE
• Keeps the main unit on the wall
F. BATTERY COMPARTMENT
• Accommodates 2 (two) UM-3 or AA 1.5V
alkaline batteries.
G. °C/°F SWITCH (located inside the
battery compartment)
• Selects temperature display in Celsius or
Fahrenheit
H. UNFOLDING TABLE STAND
• Supports the main unit on a flat surface
5
BEFORE YOU BEGIN
• The remote sensor can be placed indoors or
outdoors; the main unit must be placed indoors.
• We recommend using alkaline batteries for the remote
sensor and main unit when temperatures are above
0°C (32°F). We recommend using AA lithium
batteries for the remote sensor when temperatures
are below 0°C (32°F).
• Avoid using rechargeable batteries. (Rechargeable
batteries cannot maintain correct power requirements).
• Insert batteries before first use, matching the polarity
in the battery compartment.
• ALWAYS install batteries in the remote sensor
before the main unit.
• Press RESET after each battery change with a paper
clip or similar tool.
• During an initial setup, place the main unit as close
as possible to the remote sensor.
• After reception is established (the remote temperature
will appear on the main unit's display), position the
remote sensor and the main unit within the effective
transmission range of 30 metres.
NOTE:
1. Avoid pressing any buttons on the main unit before
the remote temperature is displayed for about 2
minutes.
2. The effective operating range may be influenced by
the surrounding building materials and how the
receiver and transmitter are positioned.
3. Place the remote sensor so that it faces the main unit
(receiver), minimizing obstructions such as doors,
walls, and furniture.
4. Though the remote sensors are weather-resistant,
they should be placed away from direct sunlight, rain
or snow.
7
Advertisement
Table of Contents

Related Manuals for Honeywell TM005X - Wireless Indoor/Outdoor Thermo-Hygrometer


Summary of Contents for Honeywell TM005X - Wireless Indoor/Outdoor Thermo-Hygrometer
- Page 1 INTRODUCTION • The remote sensor can be placed indoors or FEATURES Thank you for selecting the Honeywell Indoor/Outdoor • Remote temperature and humidity transmission to outdoors; the main unit must be placed indoors. the main unit via 433 MHz signal •...
- Page 2 NOTE: GETTING STARTED MAXIMUM AND MINIMUM MEMORY LOST COMMUNICATION When the temperature falls below freezing, the After batteries are installed; remote sensor will transmit The maximum and minimum record of the indoor and If the main unit display mode for the remote sensor batteries in the outdoor remote sensor may have temperature readings at 45 second intervals.
- Page 3 Copyright (2005) Hideki Electronics Inc. All Rights receiver. Reserved. * Consult the dealer or an experienced radio/TV The Honeywell Trademark is used under license from technician for help. Honeywell Intellectual Properties Inc. Honeywell International Inc. makes no representations or warranties with respect to this product.
Need help?
Do you have a question about the TM005X - Wireless Indoor/Outdoor Thermo-Hygrometer and is the answer not in the manual?
Questions and answers