Table of Contents
Advertisement
Available languages
Available languages
I
gb
f
d
nl
e
p
gR
RASAERBA ELETTRICO
ELECTRIC LAWN MOWER
TONDEUSE ÉLECTRIQUE
ELEKTRO-RASENMÄhER
ELEKTRISChE GRASMAAIER
CORTACÉSPED SEGADOR
ELÉCTRICO
CORTA-RELVAS ELÉCTRICO
ΗΛΕΚτΡΙΚΟ ΧΛΟΟΚΟπτΙΚΟ
Leggere attentamente le presenti istruzioni
I
prima del primo impiego.
Read this operators manual careful before
gb
the first use.
Lire avec attention ces instructions avant la
f
première utilisation
Vor der Anwendung die vorliegenden Anweisun-
d
gen aufmerksam lesen.
Lees aandachtig deze instructies door alvorens het
nl
apparaat voor het eerst in gebruik te nemen.
Leer con cuidado estas instrucciones antes de la
e
primera utilización.
Leia com atenção estas instruções antes de utilizar
p
pela primeira vez o aparelho.
gR
Πριν χρησιμοποιήσετε το μηχάνημα για πρώτη
φορά, διαβάστε προσεκτικά αυτές τις οδηγίες.
Advertisement
Table of Contents

Related Manuals for Sandri Garden GI36E


Summary of Contents for Sandri Garden GI36E
- Page 1 RASAERBA ELETTRICO ELECTRIC LAWN MOWER TONDEUSE ÉLECTRIQUE ELEKTRO-RASENMÄhER ELEKTRISChE GRASMAAIER CORTACÉSPED SEGADOR ELÉCTRICO CORTA-RELVAS ELÉCTRICO ΗΛΕΚτΡΙΚΟ ΧΛΟΟΚΟπτΙΚΟ Lees aandachtig deze instructies door alvorens het apparaat voor het eerst in gebruik te nemen. Leer con cuidado estas instrucciones antes de la Leggere attentamente le presenti istruzioni primera utilización.
- Page 2 SEGNALETICA DI SICUREZZA - WARNING SYMBOLS - SYMBOLES DE SECURIE WARNZEICHEN - WAARSCHUWINGSYMBOLEN - SEÑALIZACIÓN DE SEGURIDAD - SINAIS DE SEGURANÇA - ÓÇÌÁÔÁ ÁÓÖÁËÅÉÁÓ SIGNIFICATO DEI SIMBOLI DEFINITIONS OF SYMBOLS SIGNIFICATION DES SYMBOLES ERKLÄRUNG DER WARNSYMBOLE BETEKENIS VAN DE WAARSCHUWINGSSYMBOLEN DEFINICIOND DE LOS SIMBOLOS SIGNIFICADO DOS SÍMBOLOS ÓÇÌÁÓÉÁ...
- Page 3 SEGNALETICA DI SICUREZZA - WARNING SYMBOLS - SYMBOLES DE SECURIE WARNZEICHEN - WAARSCHUWINGSYMBOLEN - SEÑALIZACIÓN DE SEGURIDAD - SINAIS DE SEGURANÇA - PERICOLO - Non mettere in moto e non utilizzare il rasaerba in prossi- mità di persone, specialmente bambini o animali. DANGER - Never use the rotary lawnmower while people, especially children, or pets are nearby.
- Page 4 SEGNALETICA DI SICUREZZA - WARNING SYMBOLS - SYMBOLES DE SECURIE WARNZEICHEN - WAARSCHUWINGSYMBOLEN - SEÑALIZACIÓN DE SEGURIDAD - SINAIS DE SEGURANÇA - Attenzione - Mantenere il cavo di alimentazione lontano dagli organi taglio Keep supply flexible cord away from cutting means Maintenir le cable souple d’...
- Page 5 SEGNALETICA DI SICUREZZA - WARNING SYMBOLS - SYMBOLES DE SECURIE WARNZEICHEN - WAARSCHUWINGSYMBOLEN - SEÑALIZACIÓN DE SEGURIDAD - SINAIS DE SEGURANÇA - Eliminação de aparelhos utilizados 1. Quando este símbolo com a lixeira de refugos atravessada com uma cruz é aplicado sobre um produto, isto signi ca que este está coberto pela directiva Europeia 2002/96/EC.
- Page 6 SEGNALETICA DI SICUREZZA - WARNING SYMBOLS - SYMBOLES DE SECURIE WARNZEICHEN - WAARSCHUWINGSYMBOLEN - SEÑALIZACIÓN DE SEGURIDAD - SINAIS DE SEGURANÇA -...
- Page 7 ENGLISH ITALIANO DEUTSCH FRANÇAIS NEDERLANDS ESPAÑOL PORTUGUÊS...
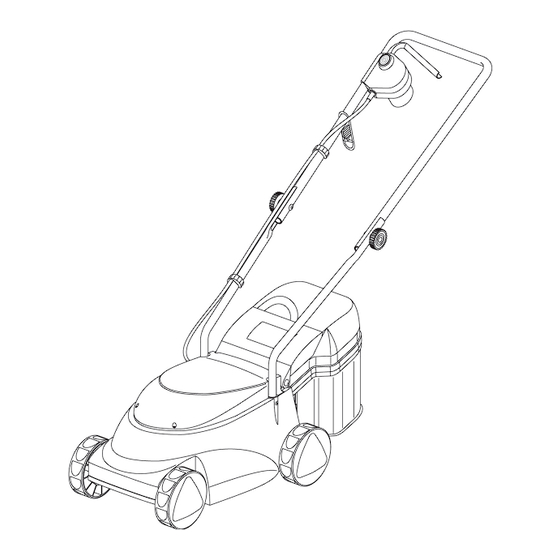
- Page 8 ILLUSTRATIONS FOR THE ASSEMBLY PROCESS - ILLUSTRAZIONI PER IL MONTAGGIO ABBILDUNGEN ZUR MONTAGE - ILLUSTRATIONS DE MONTAGE MONTAGE-AFBEELDINGEN - ILUSTRACIONES PARA EL MONTAJE ILUSTRAÇÕES PARA A MONTAGEM -...
- Page 9 ILLUSTRATIONS FOR THE ASSEMBLY PROCESS - ILLUSTRAZIONI PER IL MONTAGGIO ABBILDUNGEN ZUR MONTAGE - ILLUSTRATIONS DE MONTAGE MONTAGE-AFBEELDINGEN - ILUSTRACIONES PARA EL MONTAJE ILUSTRAÇÕES PARA A MONTAGEM -...
-
Page 10: Know Your Mower
INSTRUCTION MANUAL or jerk the cable to seperate the 1) KNOW YOUR MOWER connectors. Keep the cable away from Read all of this manual carefully, heat sources, oils or sharp edges. observing all the recommended safety Check the condition of your cable instructions before, during and after before use and do not use if damaged. -
Page 11: Operation
INSTRUCTION MANUAL • Always check that your lawn or cutting well away from the blade. path is clear of all sticks, stones, wire • Do not use your mower in the rain and and other debris. Contact with such do not allow it to get wet. Avoid using debris may be dangerous as it may your mower in wet grass, if possible. -
Page 12: Double Insulation
INSTRUCTION MANUAL are defective; discard all defective parts safety instructions and safe working and fit new parts before use. practices given in this manual. • Keep all nuts, bolts and screws tight to be sure your mower is in a safe working condition. - Page 13 INSTRUCTION MANUAL machine body. • Place the bulk of the supply cable on To assemble the grass collection basket the lawn close to the starting point (see proceed as follows: Fig. H, position 1). • Fit the support rod in the specific holes •...
-
Page 14: Blade Maintenance
INSTRUCTION MANUAL from it before putting it away. Refer to the from the electrical supply before 'Care and maintenance' section. changing the blade. Note: To obtain the best results cut your • Turn your mower over on its side so lawn or grass area regularly and do not that the underside of the mower body cut when the grass is wet. - Page 15 INSTRUCTION MANUAL • Always keep your mower clean and on the underside of the cutter cover is free from grass cuttings, especially the removed using a blunt scraper. underside of the cutter deck and the • Clean all plastic components with a air vents.
-
Page 16: Manuale Istruzioni
MANUALE ISTRUZIONI • Non trascinare mai l'apparecchio tirando- 1) IMPARARE A CONOSCERE lo per il cavo né strappare quest'ultimo per LA MACCHINA staccare i connettori. Tenere il cavo lonta- Leggere attentamente tutto il manuale di no da fonti di calore, olii od oggetti con istruzioni e osservare tutte le precauzioni spigoli taglienti. -
Page 17: Funzionamento
MANUALE ISTRUZIONI Controllare frequentemente che tutte le viti • Non avvicinare le mani o i piedi né metterli e i bulloni siano ben stretti. sotto le parti rotanti. • Controllare sempre che nel prato o nella • Tenersi sempre a distanza dalle aperture zona di taglio non vi siano ramoscelli, pie- di scarico. -
Page 18: Sicurezza Elettrica
MANUALE ISTRUZIONI MANUTENZIONE E CONSERVA- spositivo per corrente residua ad alta sensibi- lità (RCD), ideato per fornire un elevato grado ZIONE di protezione personale contro gli effetti inde- • Riponete la macchina non in uso in un siderati della corrente elettrica in caso di gua- luogo asciutto e lontano dalla portata dei sti. - Page 19 MANUALE ISTRUZIONI (Fig. F), posizionare l'anello sopra al gan- 7) MONTAGGIO DEL CESTO cio e tirare il cavo indietro attraverso la fes- RACCOGLIERBA (FIG. E) sura il cavo è ora saldamente bloccato. Prima di impiegare questo accessorio legge- re le istruzioni di sicurezza all'inizio del pre- Vi consigliamo di procedere al lavoro secon- sente manuale.
-
Page 20: Manutenzione Della Lama
MANUALE ISTRUZIONI La macchina resterà in funzione fino a che 10) MONTAGGIO DI LAME terrete premuta la leva interruttore. Per fer- NUOVE (FIG. L & M) marla, rilasciate la leva. Osservare tutte le attenzioni specifi- che prima di cambiare la lama. Avendo terminato di usare il rasaerba, vi consi- Attenzione! Scollegare la spina dalla gliamo di rimuovere tutti i detriti prima di riporlo. - Page 21 MANUALE ISTRUZIONI tuare mai riparazione temporanee o per- muovere con una spatola i rimasugli di erba manenti. attaccati sotto al rasaerba. • Pulire tutti i componenti in plastica con un • Tenere l'utensile sempre pulito e libero da panno umido. detriti, in particolare la parte inferiore del copri Attenzione: Non usare solventi o altri lama e le scanalature di ventilazione.
- Page 22 BEDIENUNGSSANLEITUNGEN Netzsteckdose an. 1) MACHEN SIE SICH MIT DEM • Tragen Sie das Gerät niemals am Kabel und GERÄT VERTRAUT zerren Sie auch nicht am Kabel, um dieses Lesen Sie diese Anleitung sorgfältig durch. aus der Steckdose zu ziehen. Halten Sie Beachten Sie vor, während und nach dem das Kabel fern von Heizquellen, Öl oder Arbeiten...
-
Page 23: Betrieb Des Gerätes
BEDIENUNGSSANLEITUNGEN potentielle Gefahrenquelle darstellt. Prüfen • Halten Sie Hände und Füße von den Sie bitte auch, ob die Messerschraube fest rotierenden Teilen fern. und sicher angezogen ist. • Halten sie jederzeit von allen • Vergewissern Sie sich,daß Ihr Auslaßöffnungen Abstand. Arbeitsbereich immer frei von Steinen, •... -
Page 24: Wartung Und Lagerung
BEDIENUNGSSANLEITUNGEN WARTUNG UND LAGERUNG Fehlerstrom-Schutzschaltern (FI-Sicherung) ausgestattet sein Bitte beachten Sie dies vor • Bewahren Sie das Gerät, wenn Sie es dem Einsatz Ihres Rasenmäher - sprechen nicht benutzen, an einem trockenen Ort Sie ggf. mit Ihrem Elektroinstallateur. und außer Reichweite von Kindern auf. •... - Page 25 BEDIENUNGSSANLEITUNGEN Haken herum und ziehen Sie das Kabel MONTAGE fest. Das Kabel ist nun gesichert. GRASFANGBOX (ABB. E) Bitte beachten Sie die Sicherheitshinweise im Wir empfehlen die Mähweise, wie sie in Zusammenhang mit der Grasfangeinrichtung Abb.Ha dargestellt ist. Sie erzielen so ein zu Beginn dieser Bedienungsanleitung.
-
Page 26: Wartung Und Pflege
BEDIENUNGSSANLEITUNGEN bei welcher zum Kabel hin gearbeitet wird, 10) MONTAGE DES MESSERS da dies gefährlich sein kann. (ABB. L & M) Beachten Sie alle zweckdienlichen Solange Schalterhebel Warnungen bevor Sie das Messer herunterdrücken, läuft Ihr Rasenmäher weiter. auswechseln. Lassen Sie den Schalterhebel los um den Warnung! Ziehen Sie den Stecker Ihrer Rasenmäher anzuhalten. - Page 27 BEDIENUNGSSANLEITUNGEN Achtung! Nur einwandfreie Kabel andere Beschädigungen überprüfen. • verwenden! Schadhafte Kabel müssen Wir empfehlen Ihnen, nach jedem umgehend ersetzt werden. Nehmen Sie Mähvorgang das Gras, das sich an der selbst keine Reparaturen daran vor. Unterseite der Messerabdeckung angehäuft hat, mit einer trockenen Bürste zu entfernen. •...
-
Page 28: Apprenez À Connaître Votre Machine
MODE D'EMPLOI • Branchez votre machine sur une prise de 1) APPRENEZ À CONNAÎTRE courant, et non pas sur une douille d'éclairage. VOTRE MACHINE • Ne soulevez jamais votre machine par le câble Lisez ce manuel avec soin, en prenant et ne secouez jamais le câble pour la note de toutes les précautions de sécurité... -
Page 29: Entretien Et Rangement
MODE D'EMPLOI • Vérifiez toujours qu'il n'y a pas de bâtons, soin, conformément aux instructions et en pierres, morceaux de fil de fer ou autres débris veillant à ce que vos pieds soient à l'écart sur votre pelouse. Ces débris peuvent être de la lame. -
Page 30: Double Isolation
MODE D'EMPLOI de nettoyage pour nettoyer votre machine. degré élevé de protection personnelle contre Utilisez un grattoir émoussé pour dégager les courants électriques nocifs produits en cas l'herbe et les saletés de la lame. de défaut. Débranchez toujours de l'alimentation électrique avant de nettoyer. - Page 31 MODE D'EMPLOI Nous vous recommandons d'utiliser la 7) ASSEMBLAGE DU SAC méthode afin d'obtenir une meilleure perfor- (FIG. E) mance de tonte. Veuillez lire la notice de sécurité au début de ce manuel avant d'utiliser cet accessoire. • Placez le câble-rallonge sur la pelouse à •...
-
Page 32: Entretien Des Lames
MODE D'EMPLOI Si lors de la tonte, des paquets d'herbe • En utilisant un bout de tissu placé sur la apparaissent derrière la tondeuse, le sac est lame ou des gants épais pour vous protéger probablement plein. les mains, saisissez la lame, desserrez et retirez l'écrou de l'axe du moteur à... - Page 33 MODE D'EMPLOI Attention: N'utilisez pas de solvants ou d'abrasion ou autre. • Après chaque session de coupe, nous de liquides nettoyants car ceux-ci recommandons dégager pourraient endommager les pièces l'agglomération de débris sur le dessous plastiques de votre machine. Nettoyez du couvercle de la lame en utilisant un toutes les pièces en plastique avec un grattoir émoussé.
-
Page 34: Ken Uw Machine
BEDIENINGSHANDLEIDING • Draag uw machine nooit bij het snoer en 1) KEN UW MACHINE trek niet aan het snoer om de verbinding Lees deze handleiding aandachtig door. te verbreken. Houd het snoer uit de buurt Neem alle voorgeschreven van warmtebronnen, olie of scherpe randen. veiligheidsmaatregelen in acht, voor, Controleer de conditie van uw snoer voordat tijdens en na het gebruik van uw machine,... -
Page 35: Onderhoud En Opbergen
BEDIENINGSHANDLEIDING worden. Controleer tevens of de moer goed aanwijzingen en blijf met uw voeten uit de is bevestigd. buurt van de messen. • Controleer steeds of er geen takken, stenen, • Gebruik uw machine niet wanneer het draad of ander afval op uw grasveld of uw regent en laat haar nooit nat worden. -
Page 36: Elektrische Veiligheid
BEDIENINGSHANDLEIDING schoonmaakt. dient steeds • Gebruik uw machine niet als een veiligheidsinstructies en het stuk onderdeel gebreken vertoont. Vervang alle aangaande de veilige bediening die in beschadigde onderdelen door nieuwe deze handleiding beschreven worden, in voordat u de machine gebruikt. acht te nemen. - Page 37 BEDIENINGSHANDLEIDING bak en een zeil (18) die ondersteund wordt wordt gehinderd. door een stalen U-profiel (19) die eerst in elkaar gezet moeten worden alvorens ze • Leg het grootste deel van het verlengsnoer op het machineblok aan te sluiten. op het gazon dicht bij het beginpunt (Fig. Om de grasopvangbak in elkaar te zetten Ha, positie 1).
-
Page 38: Handige Tips
BEDIENINGSHANDLEIDING Opmerking: Om de beste resultaten te Waarschuwing! Verwijder de stekker krijgen, moet u het gazon of de grasvlakte uit het stopcontact voordat u het mes regelmatig maaien en het gras niet maaien gaat vervangen. terwijl het nat is. • Draai uw machine op zijn kant, zodat de Wanneer u tijdens het maaien merkt dat er onderzijde van het afsluitpaneel vrijkomt. - Page 39 BEDIENINGSHANDLEIDING • • Controleer regelmatig het netsnoer en het Reinig kunststof onderdelen met een verlengsnoer. vochtige doek. • We raden aan om na het maaien het gras Let op: Gebruik geen oplosmiddelen of dat aan de onderzijde van het afsluitpaneel is vastgeplakt met een botte schraper te schoonmaakmiddelen, aangezien deze verwijderen.
-
Page 40: Conozca Su Máquina
MANUAL DE INSTRUCCIONES corriente: nunca use un casquillo 1) CONOZCA SU MÁQUINA portalámparas. Estudie cuidadosamente todo este • En ninguna circunstancia debe llevar la manual, y, antes, durante y después de máquina sujeta del cable, ni debe tirar del usar la máquina, cumpla todas las normas cable para separar los conectores. - Page 41 MANUAL DE INSTRUCCIONES mal estado. Las cuchillas estropeadas y • Nunca haga funcionar la unidad cuando los pernos gastados son muy peligrosos. esté sobre el lado ni intente parar las púas: También compruebe si la cuchilla está siempre permita que se detenga sola. bien sujeta (revise con frecuencia todas •...
-
Page 42: Seguridad Eléctrica
MANUAL DE INSTRUCCIONES MANTENIMIENTO encarecidamente que se suministre energía eléctrica a la máquina a través de un disposi- ALMACENAMIENTO tivo de corriente residual de alta sensibilidad • Cuando no use la máquina, guárdela en un (RCD). Estos dispositivos están diseñados lugar seco, fuera del alcance de los niños. -
Page 43: Montaje De La Bolsa
MANUAL DE INSTRUCCIONES cable estará ahora sujeto. 7) MONTAJE DE LA BOLSA (FIG. E) Para sacar el máximo partido de su Antes de usar este accesorio, lea las cortacésped y evitar que la cuchilla pase sobre instrucciones de seguridad al principio de este el cable, le recomendamos seguir el método manual. -
Page 44: Mantenimiento De Las Cuchillas
MANUAL DE INSTRUCCIONES recomendamos que lo limpie bien antes de INSTALACIÓN guardarlo. Antes de limpiarlo, es importante CUCHILLAS NUEVAS (FIG. L & M) desenchufarlo de la corriente. Lea la sección Al usar su cortacésped, siga todas de 'Cuidados y mantenimiento'. las precauciones pertinentes. - Page 45 MANUAL DE INSTRUCCIONES se refieren al cuidado y mantenimiento del eléctricos, por si estuvieran gastados, cuerpo principal de su cortacésped. quemados o deteriorados por cualquier otro motivo. Atenci ón! No use alargaderas que • Le recomendamos que, al final de cada puedan estar estropeadas por algun sitio.
-
Page 46: Manual De Instruções
MANUAL DE INSTRUÇÕES • Ligue a máquina a uma tomada - não a 1) A MÁQUINA um casquilho de lâmpada. Leia este manual com atenção. Cumpra • Nunca transporte a máquina pendurada pelo todas as instruções de segurança cabo, nem puxe por este para o retirar da recomendadas antes, durante e depois da tomada. - Page 47 MANUAL DE INSTRUÇÕES encontram avariadas. Lâminas danificadas Deixe que a máquina pare sozinha. e parafusos gastos constituem um perigo. • Não coloque as mãos ou os pés perto ou Verifique também se a lâmina se encontra debaixo de peças em movimento. bem presa.
- Page 48 MANUAL DE INSTRUÇÕES MANUTENÇÃO aparelho seja efectuado por um dispositivo RCD. Este dispositivo foi concebido para proporcionar ARMAZENAMENTO um elevado grau de segurança pessoal contra • Quando não utilizar a máquina, guarde-a correntes prejudiciais, em caso de falha. num local seco, de preferência longe do alcance das crianças.
- Page 49 MANUAL DE INSTRUÇÕES encontram no início deste manual, antes de Recomendamos o uso do método direccional utilizar este acessório. tradicional de corte (Fig. H), de modo a tirar o • O cesto de recolhimento da grama é máximo rendimento do seu aparelho. constituído de um contentor de plástico e tela (18) segurado por um ferro redondo a •...
-
Page 50: Manutenção Das Lâminas
MANUAL DE INSTRUÇÕES relva molhada. • Volte a máquina de lado para poder ver a parte de baixo da base do corta-relvas. Se, ao cortar a relva, começar a ficar muita • Utilizando um pedaço de pano ou luvas relva no chão, deve verificar se o saco de fortes para proteger as mãos, segure a recolha está... - Page 51 MANUAL DE INSTRUÇÕES ou se se encontram de qualquer modo • Limpe todas as partes de plástico com danificados. um pano húmido. • Recomenda-se que, no fim de cada sessão de corte, retire a erva acumulada Aviso! Não utilize diluentes ou líquidos por baixo da cobertura da lâmina com uma de limpeza para não danificar as partes espatúla.
- Page 57 GI3000 GI3000 GI3600 1200 W, 1300W, 1400W 2006/42/EC (EN 836:2006) 2006/95/EC (EN60335-2-77:2006, EN50366:2003) 2004/108/EC (EN61000-3-2:2007,EN61000-3-3+A1:2002, EN55014-2+A1:2002), EN55014-1:2008, GI3000 GI3600 (K=0.5) (K=0.5) (K=0.5) (K=0.5) 01-01-2010 SANDRI GARDEN Direttore Generale Alberto Cattaneo...
- Page 58 SPARE PARTS - PARTI DI RICAMBIO ERSATZTEILE - PIECES DE RECHANGE VERVANGINGSONDERDELEN - PARTES DE RECAMBIO PARTES DE REPOSIÇÃO -...
- Page 59 SPARE PARTS - PARTI DI RICAMBIO ERSATZTEILE - PIECES DE RECHANGE MANUALE ISTRUZIONI VERVANGINGSONDERDELEN - PARTES DE RECAMBIO PARTES DE REPOSIÇÃO - POS. CODICE Q.TA POS. CODICE Q.TA 2034620 2034890 GI3000 1000W 1 284470 2034750 GI3600 1200W 1 2034610 22 2034980 GI3000 850W 2034660 2034990 GI3000 1000W 1 3034680...
- Page 60 note ______________________________ note ______________________________ _________________________________________________ _________________________________________________ ____________________________________________________ ____________________________________________________ _________________________________________________ _________________________________________________ ___________________________________________________ ___________________________________________________ ___________________________________________________ ___________________________________________________ _________________________________________________ _________________________________________________ ____________________________________________________ ____________________________________________________ _________________________________________________ _________________________________________________ ___________________________________________________ ___________________________________________________ ___________________________________________________ ___________________________________________________ _________________________________________________ _________________________________________________ ____________________________________________________ ____________________________________________________ _________________________________________________ _________________________________________________ ___________________________________________________ ___________________________________________________ ___________________________________________________ ___________________________________________________ _________________________________________________ _________________________________________________ ____________________________________________________ ____________________________________________________ _________________________________________________ _________________________________________________ ___________________________________________________ ___________________________________________________ ___________________________________________________...
- Page 61 note ______________________________ note ______________________________ _________________________________________________ _________________________________________________ ____________________________________________________ ____________________________________________________ _________________________________________________ _________________________________________________ ___________________________________________________ ___________________________________________________ ___________________________________________________ ___________________________________________________ _________________________________________________ _________________________________________________ ____________________________________________________ ____________________________________________________ _________________________________________________ _________________________________________________ ___________________________________________________ ___________________________________________________ ___________________________________________________ ___________________________________________________ _________________________________________________ _________________________________________________ ____________________________________________________ ____________________________________________________ _________________________________________________ _________________________________________________ ___________________________________________________ ___________________________________________________ ___________________________________________________ ___________________________________________________ _________________________________________________ _________________________________________________ ____________________________________________________ ____________________________________________________ _________________________________________________ _________________________________________________ ___________________________________________________ ___________________________________________________ ___________________________________________________...
- Page 62 La SANDRIGARDEN si riserva il diritto di apportare modifiche sia tecniche che estetiche senza preavviso. SANDRIGARDEN reserves the right to make any technical modifications or changes to the design without prior notice. Die Fa. SANDRIGARDEN behält sich das Recht vor, jederzeit und ohne Vorankündigung technische und ästhetische Änderungen an Ihren Produkten vorzunehmen.
Need help?
Do you have a question about the GI36E and is the answer not in the manual?
Questions and answers