Advertisement
- 1 APP INSTALLATION
- 2 CONNECTING
- 3 INSTRUCTIONS FOR QUICK USE
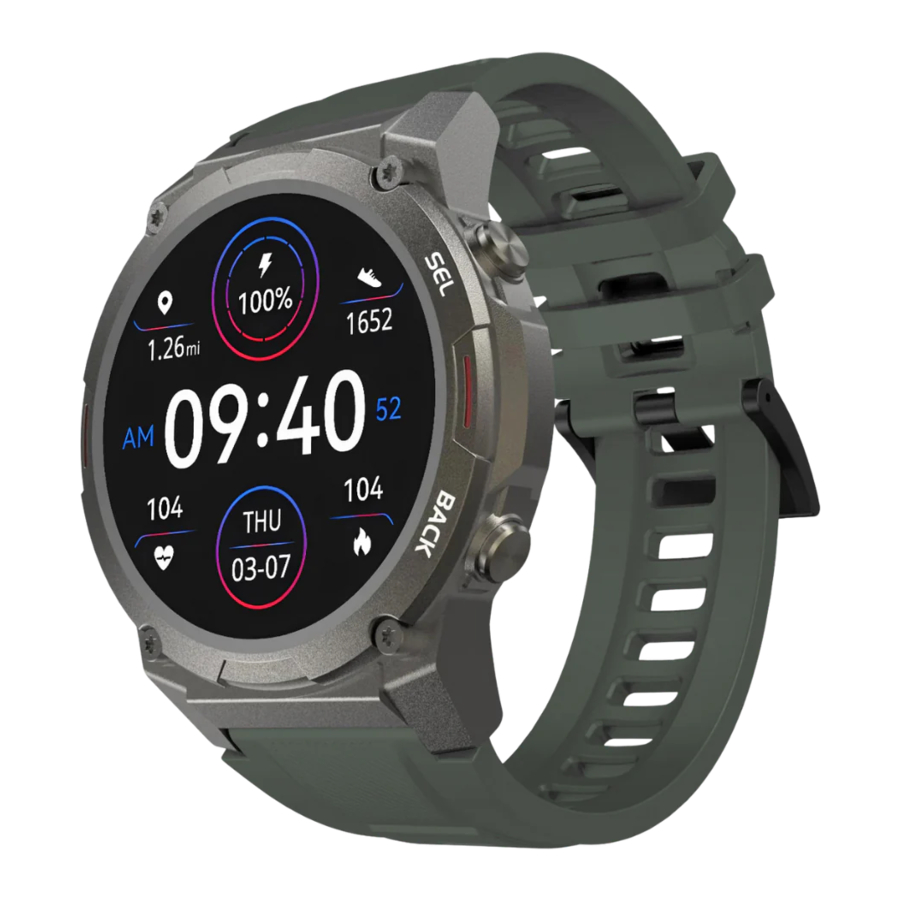
- 4 SCREEN ACTIVITY AND DISPLAY
- 5 SPORTS - ACTIVITIES MONITORING
- 6 DAILY ACTIVITIES STATUS
- 7 CALLING AND APP MESSAGES
- 8 HEART RATE MONITORING
- 9 BLOOD OXYGEN MONITOR
- 10 MENSTRUAL CYCLE
- 11 SLEEP FOLLOWING
- 12 Weather
- 13 MUSIC CONTROL
- 14 ALARM CLOCK SETTINGS
- 15 BREATHING TRAINING
- 16 WATER DRINK REMINDER
- 17 SEDENTARY REMINDER
- 18 AUTOMATIC HEALTH CHECK
- 19 FIND MY DEVICE
- 20 IMPORTANT INFORMATION
- 21 Documents / Resources
APP INSTALLATION
- Scan the QR code below or download the "GloryFit" app from application markets to install the linked app.
- Device requirements: iOS 9.0 or higher; Android 4.4 or higher, with support for bluetooth 5.3.
CONNECTING
- Device connection:
Open the app GloryFit. You will be asked for your email address, then press ''get captcha''. A ''captcha'' (5-digit code) will be sent by email. Fill it in at ''Captcha'' and press ''Log in'' Next, you will be asked for an information sheet about background activities, press ''Ignore'' here. Then fill in the requested information. You can go to the next screen by pressing ''>'' at the bottom. Once you have entered the information, click on ''Select Device'', click on the appropriate model and follow the instructions to connect. - Bluetooth connection:
Bluetooth connection: After successful pairing, the APP will automatically save the Bluetooth address of the GARD PRO. And it will always remain connected during use. To activate various functions, you need to click on ''Device'' at the bottom of the GloryFit app. Here you can enable and disable all functions. Think Bluetooth calling, texting, Whatsapp, Facebook & Gmail.
- If the connection between your GARD PRO and your phone is broken, follow these steps:
- Go to your phone's settings and select Bluetooth.
- Find your GARD PRO connection and select ''Forget this device''.
- Restart your phone.
- Launch the GloryFit app and follow the binding instructions.
- Synchronized contacts:
While setting up the Gard Pro Ultra, you will be asked to provide access to use your contacts. You must allow this.
- Open the GloryFit app.
- Open ''Device.''
- Then press ''Bluetooth Call.''
- Follow the instructions at ''Sync Contacts''
INSTRUCTIONS FOR QUICK USE
- Switch on the GARD PRO Ultra 2+:
- Charge the GARD PRO if necessary.
- Press and hold the power button (Power Key) for 3 seconds.
- The GARD PRO will vibrate to indicate it is turned on.
- Switch off the GARD PRO Ultra 2+:
Switch to the home screen by pressing the power button once, then pressing and holding it again for 3 seconds. Press ''Power Off''.


SCREEN ACTIVITY AND DISPLAY
Press either button on the right to light up the screen. If there is no further operation, the screen will automatically turn off after five seconds. You can adjust the ''Duration bright screen'' of the GARD PRO in the settings of your GARD PRO.
- Adjust duration bright screen:
- From the home screen, swipe down.
- Select settings.
- Go to ''Bright screen display''.
- Go to ''Duration bright screen'' to select your desired time.
- Adjust the brightness of your screen:
- From the home screen, swipe down.
- Select settings. (or press the brightness icon directly).
- Go to ''Bright screen display''.
- Go to ''Screen brightness'' to select your desired brightness. Adjust the screen brightness by tapping the ''-'' or ''+ ''button.
- Tilt to activate the screen:
- At the bottom of the FitCloudPro app, go to ''Device''.
- Select ''Up to wake up''.
- Turn on the feature. The gray bar will turn orange when the feature is on.
- Then you can select a start and end time. This prevents the GARD PRO when you are lightly sleeping, for example.
- Always on function:
- From the home screen, swipe down.
- Select ''settings''.
- Go to ''Bright screen display''.
- Go to ''Screen clock''. Then select how you want the ''Always on'' feature displayed.
NOTE: These functions require a lot of battery power. This will reduce the battery life considerably.
Swipe up: Here you can view all messages. Tap the message to read long sentences and delete messages.

Swipe left: Now open the hotkey interfaces such as, daily activity status and heart rate etc.

Swipe right: Now the main menu opens. From here you can start virtually any function individually.

Swipe down: Now the control menu opens. Here you have a choice of settings, functions and information.

Dial - background
- Changing your dial:
- At the bottom of the FitCloudPro app, go to ''Device''.
- Select ''Watch face'' and wait for all watch faces to load.
- Choose your favorite watch face to download it.
- Now the dial will appear on your GARD PRO.
- You also have a choice of 4 preset dials on your GARD PRO.
- Hold the home screen for ± 3 seconds and swipe right or left.
SPORTS - ACTIVITIES MONITORING
Choose from more than 100 different sports
- Sports performance tracking:
- From the home screen, swipe right.
- Select ''Sports'' to select, which sport you want to track. After 3 seconds, the sports activity will start.
- To stop the sports activity, press either button on the right side of the GARD PRO. Then click ''End'' to end the monitoring session.
- Add additional sports:
- At the bottom of the FitCloudPro app, go to ''Device''.
- Select ''Push Sports'' and wait for all sports to load.
- Choose your favorite sport.
- Then press ''Confirm'' to push the sport to the GARD PRO.
- Wait until the sport is fully loaded.
TIP: To see your route when going for a walk, for example, you need to start the sports activity via the FitCloudPro app. You do this in the top left corner of the app. (For this you need to have the location feature on)
DAILY ACTIVITIES STATUS
- Pedometer, distance and calorie consumption view:
Access the activity status, by swiping left on the home screen, to view the current number of calorie consumption, steps, and distance traveled.
Distance and calories are calculated and displayed based on current steps
and height and weight set in the app. By having location feature on, you ensure that measurements are more accurate. You can turn this on in your phone's app settings.
- Adjust your personal information & steps goal as follows:
- At the bottom of the FitCloudPro app, go to ''my''.
- Select the top bar to enter/change a profile picture, name, and your information.
- To change your steps goal press ''Daily Steps Goal''.
CALLING AND APP MESSAGES
- Turn on/off calling with the Gard Pro Ultra 2+:
- At the bottom of the FitCloudPro app, go to ''Device''.
- Select ''Push notifications''.
- Then press the bar to the right of ''Call''.
- When the bar turns orange, you can call with the GARD PRO.
- Enable/disable app notifications on the Gard Pro Ultra 2+:
- At the bottom of the FitCloudPro app, go to ''Device''.
- Select ''Push notifications''.
- Then press the individual apps you want to receive notifications from on your GARD PRO.
- When the bar turns orange your messages will receive notifications.
- Message notifications via vibration enable/disable:
- From the home screen, swipe down.
- Select ''Vibration intensity'' to adjust the vibration function.
- You can also turn off message notifications via vibration by turning on non-intrusive mode. This is the ''moon'' icon after swiping down.
- Enable/disable call notifications via vibration:
- From the home screen, swipe down.
- Select ''Vibration intensity'' to adjust the vibration function.
- You can also turn off call notifications via vibration by turning on non-intrusive mode. This is the ''moon'' icon after swiping down.
HEART RATE MONITORING
During a sports activity, the GARD PRO continuously monitors your heart rate. To use the heart rate monitor on your GARD PRO, follow these steps:
- From the home screen, swipe right.
- Press ''HR'' and the GARD PRO will start measuring immediately.
- The result of the measurement will now also appear on the home screen. This depends on the chosen watch face. Not every watch face shows the heart rate.
BLOOD OXYGEN MONITOR
- Automatic blood oxygenation measurement:
- From the home screen, swipe right.
- Select ''Bo'' and the blood oxygen measurement will start automatically.
- The blood oxygen reading is displayed on the screen.
![]()
For accurate results, make sure the GARD PRO is worn securely and has good contact with the wrist. Avoid movement during the measurement

MENSTRUAL CYCLE
- Tracking menstruation:
NOTE: This feature is only available if you entered ''female'' under gender.
- At the bottom of the FitCloudPro app, go to ''my''.
- Select ''Women's Health''.
- When the bar turns orange, the feature is on.
- Now you can enter the requested information to be kept informed of your cycle.
SLEEP FOLLOWING
- Sleep quality control:
![]()
Put the GARD PRO on the sleep interface when you go to sleep.
- From the home screen, swipe right.
- Select ''Sleep'' to come out to the sleep interface.
- On this screen, you can swipe up to view the data. The data can also be viewed in the FitCloudPro app under ''Sleep''.
Weather
- Weather and temperature conditions:
Switch to the weather interface to view weather and temperature. Weather conditions are automatically updated 24 hours a day.
- From the home screen, swipe right.
- Select ''Weather'' to exit to the weather interface.
- At the bottom of the FitCloudPro app, go to ''Device''.
- Select ''Weather Messages'' when the bar turns orange the feature is on.
NOTE: Make sure your ''Location facility'' is on your cell phone for the FitCloudPro app.
MUSIC CONTROL
- Music playback controls:
After successfully connecting the paired app - FitCloudPro, the GARD PRO can control music playback functions such as volume adjustments, pause, and previous/next song when the phone is playing music.
- From the home screen, swipe right.
- Select ''Music'' to come out to the music interface.
- Here you can control the music you have playing on your cell phone.
ALARM CLOCK SETTINGS
- Managing alarm clocks:
Go to the alarm clock interface to add or remove alarm clocks. You can set up to 8 groups of alarm clocks.
- At the bottom of the FitCloudPro app, go to ''Device''.
- Select ''Alarm''.
- Press ''+'' at the top right to add a new alarm clock.
- Now on your GARD PRO under ''Alarm Clock'' you can turn the alarm on or off.
TIP: You can set multiple alarm clocks that you can control from your GARD PRO.
BREATHING TRAINING
- Automatic respiratory rate measurement:
Go to the breath test interface to start the automatic breath measurement. Use the menu to re-measure. - Training of breathing rhythm:
Go to the breathing training function and follow the animation for breathing rhythm training.
WATER DRINK REMINDER
- Setting reminders:
- At the bottom of the FitCloudPro app, go to ''Device''.
- Select ''Water drink reminder''.
- When the bar turns orange, the function is on.
- Now you can set a start and end time and the desired interval.
SEDENTARY REMINDER
- Setting motion inhibitors:
- At the bottom of the FitCloudPro app, go to ''Device''.
- Select ''Motion reminder''.
- When the bar turns orange, the feature is on.
- Now you can set a start and end time and a do not disturb time.
AUTOMATIC HEALTH CHECK
- Setting automatic readings over the day:
- At the bottom of the FitCloudPro app, go to ''Device''.
- Select ''Automatic health check''.
- When the bar turns orange, the feature is on.
- Now you can set a start and end time.
NOTE: This function requires a lot of battery power. This will reduce the battery life considerably.
FIND MY DEVICE
- Find my GARD PRO:
- At the bottom of the FitCloudPro app, go to ''Device''.
- Select ''Find bracelet''.
- The GARD PRO will start vibrating loudly.
- Find my GARD PRO:
- From the home screen, swipe right.
- Select ''Search for phone''.
- Your phone will vibrate and give a notification.
IMPORTANT INFORMATION
- Inaccurate measurements:
Usually, inaccurate readings occur due to poor contact between the GARD PRO's sensor and the wrist. So make sure there is full contact between the sensor and the wrist during measurements. Soiled, damp or hair density can affect the measurements. - Inaccurate sleep data:
Sleep monitoring simulates natural sleep and wake times, so wearing it correctly is important. Errors can occur if you start wearing the GARD PRO too late at night. No sleep data is monitored during the day. Standard period for sleep monitoring is from 9:30 p.m. to 12:00 a.m. the next day. - Bluetooth problems:
Reboot the GARD PRO and reconnect to the FitCloudPro app. Is this not working?
- Close the FitCloudPro app completely.
- Turn off your cell phone.
- Give your GARD PRO a reset by going to ''Settings'' and then pressing ''System'' and then ''Reset''.
- Restart your cell phone and ensure a proper connection between the FitCloudPro app and your GARD PRO.
Documents / ResourcesDownload manual
Here you can download full pdf version of manual, it may contain additional safety instructions, warranty information, FCC rules, etc.
Advertisement


Need help?
Do you have a question about the ULTRA 2+ and is the answer not in the manual?
Questions and answers