Advertisement
Quick Guide
Download and install the XbotGo app.
Search for "XbotGo" in the app store or scan the QR code to download and install.
 XbotGo Chameleon requires iOS 15.0 or later.


XbotGo Chameleon requires Android 10.0 or later.


Tips
- Ensure your XbotGo Chameleon is fully charged before first use.
- Always power off your XbotGo Chameleon when not in use.
- For optimal recording, ensure that the rear camera on your phone is on the same side as your XbotGo Chameleon's tracking lens, with your phone's camera on the right side (see picture below).
- When mounting your phone, securely tighten the locking knob on your XbotGo Chameleon to prevent accidental drops.
Proper Phone Placement:

To learn how to use your XbotGo Chameleon for automatic sports tracking and filming, please scan the QR code. Our video provides step-by-step instructions for optimal use of your device.

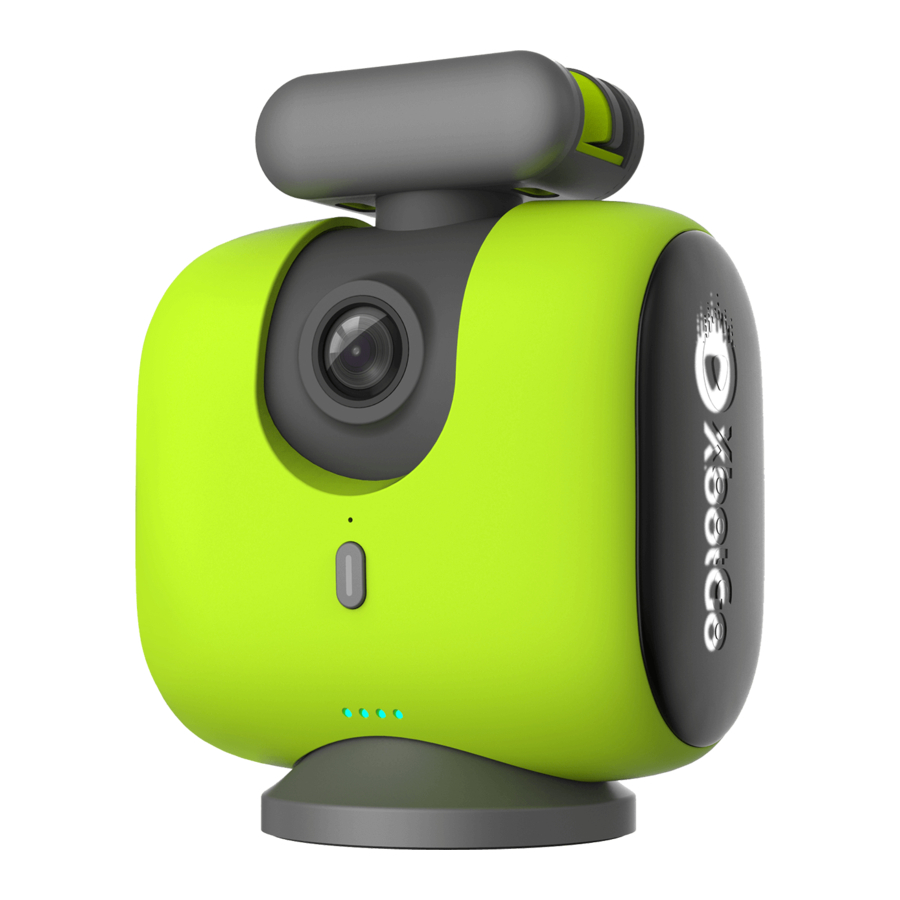
XbotGo Chameleon Parts and Controls

- Power button
- Battery indicator light
- Tracking lens
- Side light + Bluetooth indicator light
- Phone clamp
- Locking knob
- Type-C charging port
- 1/4-inch threaded mount (compatible)
Preparation
Charge your XbotGo Chameleon
Connect the provided cable to the Type-C charging port on the back of your XbotGo Chameleon.

- Plug the other end of the cable into a power source (5V/2A adapter recommended).
- The battery indicator light flashes when charging normally.
- If the light doesn't turn on, check the cable connections.
- A 3.5-hour charge provides 8 hours of use.
Installation
Please follow these steps to install your smartphone on your XbotGo Chameleon:
- Before installing, we recommend removing your phone case for:
- A more secure fit in the phone clamp.
- Better heat dissipation in hot conditions (prevents overheating shutdown).
- To position your phone, face your Chameleon's tracking lens towards the playing field. Align your phone's rear camera in the same direction. Place your phone centrally in the clamp to prevent your phone from slipping and ensure optimal tracking functionality.
Place your phone centrally in landscape or portrait orientation and tighten the knob. (Portrait orientation shooting is currently only supported in FollowMe mode.)

- When mounting your XbotGo Chameleon onto a tripod, hold the device base and rotate to secure it. Do not twist the main body as this may cause damage to the device.


Selecting Shooting Locations
When filming sports events, position your XbotGo Chameleon near the field's center line (see illustration).
(Example of a soccer field)

To ensure the camera covers the entire field adequately in all game modes (excluding basketball half-court), please follow these steps:
- Ensure the tracking lens covers the entire field, avoiding any blind spots.
- Adjust the distance and height to ensure the camera captures the entire field of play.


Keeping the camera view clear:
- Raise the tripod or position it near the field's sidelines.
- Be mindful of spectators near the camera and adjust to ensure an unobstructed view.


Operation
Device Overview
- Power button
![]()
- Power on/off: Press and hold the power button to turn your XbotGo Chameleon on or off. When powered on, the power and side indicator lights illuminate. When powered off, the power and side indicator lights will turn off.
- Bluetooth reset: When your XbotGo Chameleon is powered on, double-press the power button to reset Bluetooth, unpairing it from previously connected devices to allow quick pairing with a new device.
- Side Light (Bluetooth Indicator):
Light pattern Status description Breathing flash (Slow flash) Bluetooth not connected Steady light Bluetooth connected - Tracking lens reset:
Auto Reset: The lens automatically returns to the center position when your XbotGo Chameleon is powered on or off.
- Battery indicator charging status
Indicator status Battery level First light blinking 0% - 25% Second light blinking 25% - 50% Third light blinking 50% - 75% Fourth light blinking 75% - 99% All four lights steady on 100% - Camera Horizontal: 360°; Tilt: +/- 15°
- Side light
The side light illuminates when your XbotGo Chameleon is powered on. - 1/4 threaded mounting points
There is a 1/4 threaded mount on both the phone clamp and the bottom of the device.- The bottom of the device is compatible with tripod mounting for increased stability.
- The bottom of the phone clamp is compatible with other small brackets for use with other accessories.

Specifications
| Product weight | 544g (without phone) |
| Device dimensions | 125mm×100mm×60mm |
| Operating temperature | 32°F - 104°F |
| Usage Time | 8 hours |
| Input Voltage | 5V |
| Input Current | 2A |
| Operating voltage | 3.4–4.2V (standard 3.7V) |
| Compatible phone size | Diagonal: ≤180mm Width: 55–90mm Thickness: ≤9.5mm |
| Charging time | 3.5 hours (using a 5V/2A charger) |
Precautions
- During startup, ensure your XbotGo Chameleon can rotate freely without any interference
- Mount your XbotGo Chameleon securely on a tripod before use.
- Your XbotGo Chameleon is not waterproof. Keep the device dry.
- Do not dismantle your XbotGo Chameleon. If accidental disassembly causes a malfunction, contact official customer service for assistance.
- Extended use may cause the device's surface to heat up. Handle with caution.
- Handle with care to avoid drops or impacts, as this may affect normal operation.
- Keep the product out of reach of children and pets.
- Keep your XbotGo Chameleon away from heat sources like stoves or heaters. Avoid storing in high-temperature areas (e.g., hot cars or rooms).
- Store your XbotGo Chameleon in a dry environment.
- Avoid overcharging to prevent damage to the battery.
- Use your XbotGo Chameleon within the temperature range of 32°F and 104°F (0°C and 40°C).
XbotGo App
When used with the XbotGo app, your XbotGo Chameleon can support features such as automatic tracking, manual shooting, and live streaming.
Pairing
- Enable Bluetooth from your mobile phone settings.
- Sign up and log in to your XbotGo account.
- Open the XbotGo App and go to the main page. iPhone users, please follow the on-screen prompts to grant the required permissions, ensuring a smooth experience. Rest assured that these permissions are used solely to enable product features and do not involve your personal information.
- The app will search for an XbotGo device named "XBotGo-xxxxxx". Once detected, select it to establish a connection. If an XbotGo device is not detected, please check your phone's Bluetooth settings, as the XBotGo device may be paired with other phones.
![]()
![warning]() Double-press the XbotGo Chameleon's power button consecutively to reset Bluetooth and disconnect from the previously paired phone, enabling rapid pairing with a new phone.
Double-press the XbotGo Chameleon's power button consecutively to reset Bluetooth and disconnect from the previously paired phone, enabling rapid pairing with a new phone. - When the XbotGo device is connected for the first time, a pairing reminder will appear, allowing you to choose whether to connect to the XbotGo device. After a successful pairing, the XbotGo App will automatically connect during future use without requiring further confirmation.
![]()
- If the pairing reminder does not appear, try locating and tapping the "Record
![]() " button within the app.
" button within the app. - Connected devices (Chameleon/remote) will display corresponding icons and Bluetooth identifiers on the main interface of the XbotGo App.
![]()
- Users can also manually add XbotGo Bluetooth devices. Tapping allows you to manually add a Chameleon/ remote.
![]()


 " button within the app.

 Only one XbotGo Chameleon and one remote can be connected at the same time.
Recording
- After establishing a Bluetooth connection, you can select a sports activity within the app and enter recording mode.
- Before starting a recording, it is recommended to enable the "Do Not Disturb" mode on your phone to prevent interruptions such as incoming calls during the recording session.
Shooting Interface Overview
Upon entering the shooting interface in the XbotGo app, tap the corresponding icons on the screen to adjust the following parameters:

- Video recording
![]() Press the red Record button to initiate automatic tracking and recording.
Press the red Record button to initiate automatic tracking and recording.
![]() Tap the Pause button to pause video recording.
Tap the Pause button to pause video recording. - Focal length settings
![]()
- Various zoom factors are preset for various shooting modes to optimize shooting effects and tracking performance in different scenarios.
- You can also manually adjust the focal length by tapping or dragging.
- Scoreboard functionality
![]() This device supports manual recording and modification of match scores. To use the scoreboard function, the monitor function must be enabled. For detailed operation instructions.
This device supports manual recording and modification of match scores. To use the scoreboard function, the monitor function must be enabled. For detailed operation instructions. - Live streaming
![]()
- Tap the "Start Live Stream" button located on the left side of the shooting interface. Follow the system prompts to select an image as the live stream's cover and enter a title.
- Live streaming is hosted by the XbotGo platform and can be shared externally by sharing the live stream link. Users can set a viewing password to restrict the live stream's audience.
- Camera flip
![]() Switch between front and rear cameras.
Switch between front and rear cameras. - Recording parameter settings
To modify the recording parameters, make the desired changes and click "Save Current Settings" to ensure the adjustments take effect. To restore the default settings, click "Restore Default Settings.- Screen power saving mode:
Disabled by default and can be enabled as needed. Enabling this mode reduces screen brightness to the lowest level, extending your phone's battery life. - Timestamp settings:
Enabled by default and can be disabled as needed. - Mute:
Enabled by default and can be disabled as needed. - Resolution:
- The default resolution is 1080p HD. For iPhone 12 and earlier models, the default resolution is 720p HD.
- Select from 4K, 1080p, or 720p.
- Note that some older model phones may experience frame drops when recording 4K & 1080p videos with AI processing due to insufficient processing power.
- Users recording in the default 720p resolution can manually upgrade to 4K or 1080p recording, although tracking and recording results may vary.
720p HD (Data Saving) Approximately 12MB per minute 720p HD/30fps Approximately 38MB per minute 1080p HD (Default Data Saving) Approximately 19MB per minute 1080p HD/25 (PAL) Approximately 60MB per minute 1080p HD/30fps Approximately 60MB per minute 1080p HD/60fps Approximately 60MB per minute 4K/24fps Approximately 270MB per minute 4K/25fps (PAL) Approximately 270MB per minute 4K/30fps Approximately 300MB per minute 4K/60fps Approximately 400MB per minute
- Auto zoom:
Disabled by default and can be enabled as needed. When enabled, the device will automatically adjust the focal length during shooting based on the scenario and timing. - Auto tracking:
Enabled by default and can be disabled as needed. - XbotGo pan angle:
Sets your XbotGo Chameleon's maximum angle limits for left and right rotation to prevent excessive movement that may cause misjudgment. You can manually adjust the angle limits to modify the shooting range.- Supports pan angle settings from 60° to 150°. If "Auto Tracking" mode is disabled, your XbotGo Chameleon will stop panning.
- The red area represents the XbotGo Chameleon's pan range, while the yellow area indicates the visible shooting area.

- Tracking speed:
Tracking speed refers to the rotation speed of the XbotGo Chameleon. The adjustable range is 200 to 1000, with a default value of 1000. In most cases, no adjustment is needed, and it is recommended to keep the default setting.
- Screen power saving mode:
 Press the red Record button to initiate automatic tracking and recording.
 Tap the Pause button to pause video recording.


 Switch between front and rear cameras.
Monitor
When the shooting device is mounted at a high position (e.g., on a 3-4 meter tripod), another smartphone can be used to enable Monitor Mode for real-time viewing of the shooting frame. This allows remote control of recording adjustments, adding markers, parameter adjustments, and more, providing a seamless "one device for recording, one device for control" experience.
- Device pairing
Please ensure that both the main camera phone and the monitoring phone are connected to the same network (either the same hotspot or Wi-Fi network).- Main camera phone (shooting device):
- Enter the "Recording" interface.
- Tap the "Monitor" button (
![]() ) at the top-right corner of the screen to enable real-time monitoring.
) at the top-right corner of the screen to enable real-time monitoring.

- Monitoring phone (remote control device):
- Open the XbotGo app on the second phone and tap the "Monitor" button (
![]() ) at the bottom-right corner of the home screen.
) at the bottom-right corner of the home screen. - Find the main camera phone in the device list and connect. The monitoring phone will then display the live feed from the main camera phone.
![]()
- Open the XbotGo app on the second phone and tap the "Monitor" button (
- Permission request:
When a permission request appears, please tap "Allow" to ensure the monitor mode functions properly.
![]()
- Main camera phone (shooting device):
- Real-time monitoring and control
- Monitoring view:
The main camera's feed is synchronized in real-time to the monitoring device, ensuring the captured content can be viewed remotely. - Remote operation feature:
Recording controls ![]()
Tap the "Start/Stop Recording" button to remotely control the recording status of the primary device. Marking ![]()
MarkingDuring the match, tap the "Marking" button to record key moments (e.g., goals) in real-time, allowing you to locate them quickly during post-editing. Manually Adjusting the Recording Angle ![]()
Direction ControllerTap the Direction Controller button to display the direction controller. You can either drag the white dot on the controller or tap the directional arrows on the screen to remotely control the gimbal movement of the main device. Drag
![]()
Tap
![]()
Scoreboard settings ![]()
ScoreboardTap the Scoreboard button to enter the score, team names, and other information, which will be synchronized and displayed on the recording screen of the main device.
The scoreboard currently offers four styles:
General, Soccer, Basketball, Ice hockey
The corresponding scoreboard style will be applied based on the selected sports mode during recording. All sports modes other than soccer, basketball, and ice hockey will use the general style.Mute ![]()
MuteEnable or disable ambient sound recording. Interface Hide ![]()
Display or hide all control icons in the recording interface.
- Monitoring view:
 ) at the top-right corner of the screen to enable real-time monitoring.


Network requirements
- It is recommended to use a mobile hotspot to ensure stable data transmission.
- Avoid excessive distance between the main camera phone and the monitoring phone (recommended distance ≤ 25 meters).
Compatibility:
The monitoring device must have the XbotGo App installed.
Android: Version 2.8.0 or later, iOS: Version 3.8.0 or later.
Video Storage:
Recorded videos are stored within the XbotGo app. To access these videos, navigate to "Files" to view all saved videos.
Upload/Download:
 On the app's homepage, tap "Files," then tap the selection icon
  in the upper right corner to choose the local video for upload or download.
 Uploaded videos can be viewed in the "Cloud Management" interface, while videos downloaded to the phone can be found in the "Local Files" section.
Video Sharing:
 Click on the "Files" tab on the home page to enter cloud management, select the icon , choose the video you want to share, and tap the "Share" icon below to share the video with others through various methods.
Live Stream Viewing:
Tap "Live" on the app's homepage to explore ongoing live streams. Each sports category is labeled accordingly, displaying relevant details such as location, viewer count, and stream popularity.
Video Editing:
The video editing feature is located on the"Files" → "Local files" page. Once editing is complete, the video can be directly shared on various media platforms. Click the "+" button to create a new editing task.

- Merge and export:
Select at least 2 and up to 5 video clips to merge into a single long video and export it to local files. In the selection interface, you can manually drag clips and adjust the editing order. - Select "Markers Editing":
The marking function allows users to mark specific moments in a video for quick locating and exporting during post-editing. Select at least 1 and up to 5 video clips to enter the highlight editing page.- Manual marker editing:
- Manually add or remove markers and set the clip duration before and after each marker. The exported video will be a compilation of the selected highlights of each key point.
- Marker clip duration: The default clip length for marker editing is 10 seconds before and 3 seconds after each marker. This duration can be manually adjusted, and the final clips will be generated based on the saved settings.
- AI highlights (
![]() only):
only): - When editing basketball game footage recorded by an XbotGo device, AI can automatically analyze and extract key moments. Manual markers can also be added. The exported video will be an AI-curated basketball highlight reel.
- AI marking accuracy: The default setting is "Precise Mode," which offers more accurate analysis but requires a longer processing time. Users may also select "Quick Mode," which provides quicker analysis with a more concise result.
- During AI analysis, the highlights accuracy, editing sequence, and the addition or deletion of videos cannot be modified.
- Manual marker editing:

A minimum of 2GB of available storage is required for editing tasks; otherwise, the task cannot be completed. If the video files to be edited are large, additional available storage may be necessary for successful editing.
Jersey Number Tracking (Beta Version):
This feature utilizes intelligent recognition of basketball jersey numbers and is applicable to FollowMe mode shooting scenarios. The system automatically locks onto the target athlete by recognizing the jersey number, enabling precise tracking and recording.
Process
- Add jersey number (to be added in real-time each time it is used)
- Enter "FollowMe Mode" → Select "Jersey Number" → Enter the athlete's jersey number.
- Take photos: Capture full-body photos of the athlete from the front and back, ensuring they are wearing the jersey with the corresponding number.
(To improve recognition accuracy, please take the photos in a well-lit environment with a clean, non-distracting background on the basketball court.)
- Device placement
Place your XbotGo Chameleon at the centerline of the court sidelines to ensure complete capture of the athlete's tracking footage.Full-court recording Half-court recording Align the center of the shooting frame with the centerline to ensure complete tracking of the recording area. Align the center of the shooting frame with the basketball hoop to ensure complete tracking of the recording area. ![]()
![]()
Once the preparation is complete, click "Start recording."
Chameleon will automatically track the athlete wearing the selected jersey number.


FAQ
- What's the correct way to mount my XbotGo Chameleon on a tripod?
- Ensure that the rear camera of your phone is on the same side as your XbotGo Chameleon.
- When mounting, only tighten the connection using the round base plate at the bottom of your XbotGo Chameleon - never twist the device body.
- XbotGo Chameleon works with any tripod that has a standard 1/4" mount. The new XbotGo tripod with its upgraded mounting system offers the quickest setup, while other tripods can be mounted using a quick-release plate.
- Why is my XbotGo Chameleon having tracking issues?
- Your XbotGo Chameleon has low battery. Please ensure it is fully charged before use.
- Your XbotGo Chameleon's tracking lens is obstructed by smudges. Please clean the tracking lens before use.
- Bluetooth pairing error. Avoid pairing with multiple devices simultaneously.
- Improper placement or angle of the device. Ensure your XbotGo Chameleon's tracking lens is aligned with the court's centerline, as demonstrated in the video tutorial.
- Incorrect selection of venue and sport type. Please ensure the subject, venue, and recording mode are all set consistently.
- Interference from crowds along the court sidelines. Position the device along the sidelines and away from crowded areas for optimal performance.
- Can my XbotGo Chameleon track a specific athlete?
- In the basketball half-court recording mode, tracking a specific player can be achieved through the jersey number tracking feature in FollowMe mode. Note: This feature is currently in beta phase, and tracking performance may be unstable.
- My XbotGo Chameleon won't turn on. What should I do?
- Charge for 3-4 hours, then unplug the charging cable.
- Press and hold the power button for 15 seconds to force restart the device. Check whether it powers on successfully.
- Use the original charging cable. If it doesn't work, try other cables.
- Avoid high-power chargers.
- My phone's Bluetooth is unable to connect to my XbotGo Chameleon. How do I resolve this?
- Can you see your XbotGo Chameleon's Bluetooth name (XBotGo-xxxxxx) in the XbotGo App device list?
- Yes,
- Ensure your XbotGo Chameleon is fully charged.
- Click the Refresh button at the top right corner of the device management page.
- Close and reopen the XbotGo app.
- Reset XbotGo Chameleon's Bluetooth by double-clicking the power button.
- Restart your XbotGo Chameleon and try again.
- If your XbotGo Chameleon's side light is solid, this means it is connected to another phone. Please disconnect it and try again.
- Check if there are too many connections in your phone's Bluetooth history. Try removing/forgetting some devices and try again.
- Update the XbotGo app to the latest version and try again.
- No,
- Ensure your XbotGo Chameleon is fully charged.
- Check your phone settings to ensure the XbotGo app has Bluetooth permission. If not, please grant permission.
- Ensure your phone's Bluetooth is turned on. If not, please turn it on.
- Confirm that your XbotGo Chameleon is powered on (the device is powered on when it completes its vertical high/low calibration).
- Turn off your phone's low power mode/Do Not Disturb mode and try again.
- Reset your XbotGo Chameleon's Bluetooth by double-pressing the power button.
- Restart your XbotGo Chameleon and try again.
- Close and reopen the XbotGo app.
- If XbotGo Chameleon's side light is solid, this means it is connected to another phone. Please disconnect it and try again.
- Check if there are too many connections in your phone's Bluetooth history. Try removing/forgetting some devices and try again.
- Upgrade the XbotGo App to the latest version and try again.
- Yes,
- Can you see your XbotGo Chameleon's Bluetooth name (XBotGo-xxxxxx) in the XbotGo App device list?
- What's the general troubleshooting process for any issue?
- For most issues, start by restarting both the device and the app. If the problem continues, try resetting the Bluetooth connection and reconnecting the device. These simple steps often resolve common issues.
Remote Controller
Specifications

| Model | XbotGo RC1 |
| Battery type | CR2032 |
| Signal reception range | 10m |
| Operating temperature | -5°C ~ 60°C )23°F ~ 140°F) |
Quick Start Guide

- Open the battery compartment cover, remove the insulation plastic film from the bottom of the battery, insert the battery, and close the cover.
- Press and hold the power button for 3 seconds to turn the remote controller on or off.
- Once powered on, use the function selection button to switch between different modes.
- Bluetooth pairing (first use):
- Press and hold the remote's power button. The phone connection indicator light will flash red when it powers on.
- Open the XbotGo app near your device. Tap "Add Device", and select the XbotGo Chameleon (named "XbotGo-XXXXXX") from the list. The phone connection light turns blue when connected.
![]()
- Signal range exceeded:
If the menu and ring lights flash red, the remote has disconnected. If the remote re-enters the reception range within one minute, the connection will be automatically restored. (blue light indicates success). - Sleep and Power Off:
Sleep mode activates after 3 seconds of inactivity. Press any button to wake the remote. The remote automatically powers off if left in sleep mode for over 30 minutes. To reconnect, press the power button and bring the remote closer to your device.

During operation, a disconnection of the remote control will only affect the remote's functionality and will not interrupt the currently running program. If the XbotGo app is unable to detect the remote, press and hold the power button for 3 seconds to turn off the remote, then press and hold the power button again for 3 seconds to restart it. Once re-paired, normal operation will resume.
XbotGo RC1 Remote Controller

- Power button
- Function selection button
- Confirm button
- Directional pad
- Battery compartment
Button Functions
Before use, please familiarize yourself with the remote controller functions.
Camera function
Press the function selection button to switch to Camera Mode. Press the Confirm button in camera mode to start or stop recording.

- On Remote Controller:
- Single "beep" sound: XbotGo app has started recording.
- Two consecutive "beep" sounds: XbotGo app has stopped recording.
- In the XbotGo app:
A blue prompt appears for 3 seconds, and then disappears. You are now in camera mode. Please check recording status for further instructions.
Photo function

- Press the Function Selection button to switch to photo mode.
- In photo mode, press the Confirm button to take photos.
Pan/Tilt function

- Press the function selection button to switch to Pan/Tilt mode.
- Use the directional pad (up, down, left, and right buttons) to rotate the camera accordingly.
Marking function (for video recording)
This feature allows users to mark exciting moments during recording, facilitating swift location and export during subsequent editing processes.

- Start video recording.
- Switch the remote controller to marking mode.
- Press the Confirm Button to mark key moments.
- After recording, special color markers will appear on the video timeline at marked points.
Battery
The remote device uses a CR2032 button cell battery.
For optimal performance:
- Do not mix different types of batteries.
- Remove the battery if not using the device for over two months.
- Dispose of batteries according to local regulations. Do not dispose in regular trash.

THIS PRODUCT CONTAINS A BUTTON BATTERY.
It contains hazardous substances and must not be ingested.
Please keep it out of reach of children. Ingestion of the battery may result in chemical burns, soft tissue perforation, or even death. Severe burns may develop within two hours of ingestion; seek immediate medical attention.
Remote Controller Notes
- Use within 33 feet (10 meters) of your smartphone for recording.
- The XbotGo app will prompt you to pair when it detects the remote signal.
Apple Watch App
User Guide
- Once your XbotGo app on the phone enters recording mode, open the XbotGo app on your Apple Watch to preview the phone's recording screen.
- Use the directional buttons (up, down, left, right) to control the XbotGo Chameleon's movement.
![]()

Control Interface
On the app's homepage, swipe left to access the recording control interface.

- Video recording:
Tap the recording button on the left to start or stop recording. - Photo capture:
Tap the photo button to take photos while recording. Photos can be viewed in the XbotGo app's local files. - Marking function:
By manually adding markers, you can highlight key moments within the video, facilitating swift location and export during subsequent editing processes.
If there are updates, you will not receive separate notifications. For more information, please visit the official Blink Tech website.
www.xbotgo.com
Documents / Resources
References
Download manual
Here you can download full pdf version of manual, it may contain additional safety instructions, warranty information, FCC rules, etc.
Advertisement
Need help?
Do you have a question about the Chameleon and is the answer not in the manual?
Questions and answers