Advertisement
Package Contents
Please check all the supplied accessories are included in the packing list:

Product Introduction
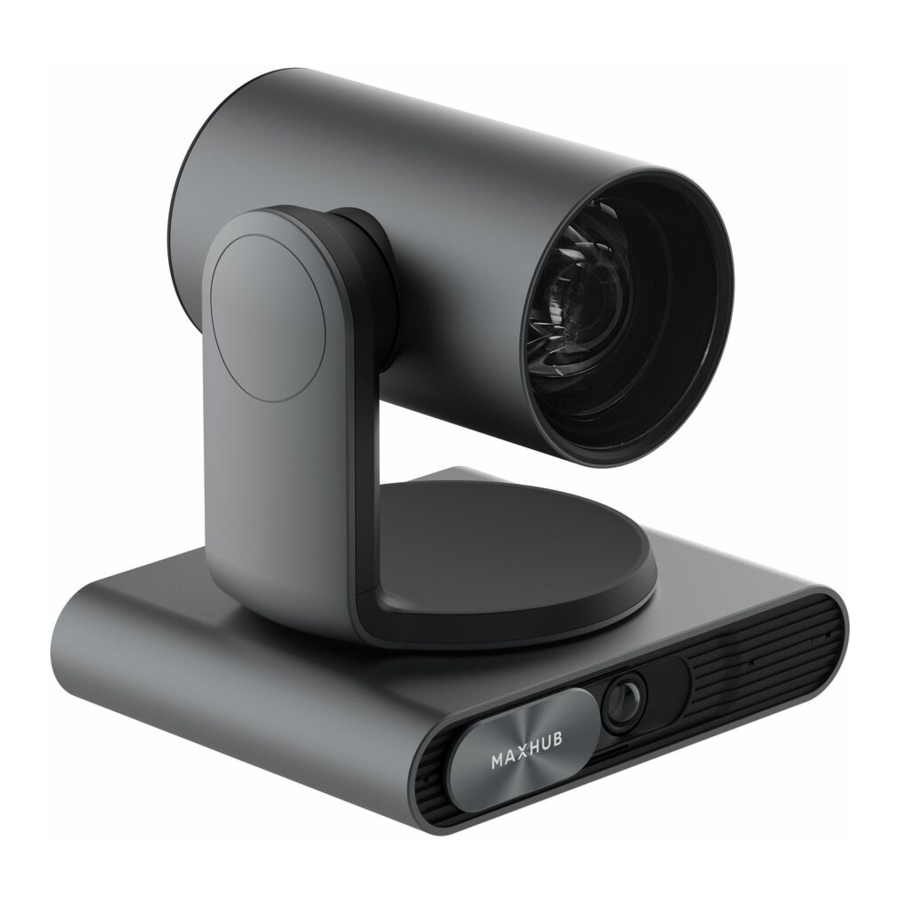
Overview
Camera:

| No. | Item | Description |
| 1 | Tele-Camera | Optical zoom lens, for displaying the image. |
| 2 | Wide Camera | AI lens, for AI detection and recognition. |
| 3 | Status LED* | For indicating the various states of the device by light flashing. |
| 4 | Built-in Microphone Array | Only for voice tracking. |
| 5 | Kensington Lock | For locking the device via universal security cable. |
| 6 | Audio Port | Only for custom development, not suitable for standard audio device. |
| 7 | HDMI Out Port (HDMI 1.4) | For display the image on other screen through the HDMI channel. |
| 8 | USB 2.0 Port | Type-A (host) |
| 9 | USB 3.0 Port | Type-C (device, to connect PC) |
| 10 | LAN Port | 10M/ 100M/ 1000M, Support PoE+ |
| 11 | RS232 In/Out Port | Supports VISCA/ Pelco-D/ Pelco-P. |
| 12 | DC 12V Power Jack | For connecting to power adapter. |
| 13 | Adjustment Button (AI Lens) | Adjust the vertical angle of the AI lens (± 10°). |
* LED Indicator:
| LED Status | Description |
| Solid Red | Power-off (only when power cable is connected) |
| Solid Orange | Power-on / USB cable is connected but camera doesn't have any streaming out. |
| Soild White | Video on |
| Flashing Blue | Firmware upgrading |
| Flash Once | Receive remote control signals. |
Remote Control:

| No. | Buttons | Description |
| 1 | Power | To enter power saving mode (only when power cable is connected). |
| 2 | Number Buttons 0-9 | To Save a Preset–Move camera to desired position. Press the PRESET button and then the Number buttons 0-9 to store the current camera position. Press the Number buttons 0-9 to load a saved camera position. |
| 3 | * | To be used in conjunction with other buttons. |
| 4 | PRESET | To Save a Preset–Move camera to desired position. Press the PRESET button and then the Number buttons 0-9 to store the current camera position. |
| 5 | OK | In OSD menu, press the OK button to confirm your selection. In other menus, press the OK button to return PTZ camera back to the HOME position. |
| 6 | Return | In OSD menu, press the Return button to go back to previous menu. |
| 7 | Zoom In/Out | Zooms camera in or out at a slow or fast speed. |
| 8 | L/R SET | Press the L/R SET button and then the Number button [1] to make camera pan in a forward direction. Press the L/R SET button and then the Number button [2] to make camera pan in a reverse direction. |
| 9 | FOCUS Buttons |
|
| 10 | CAMERA SELECT Buttons 1/2/3/4 | Select one of the cameras to control. One remote controls up to four cameras of MAXHUB UC P30.
|
| 11 | # | To be used in conjunction with other buttons. |
| 12 | AI Modes | Switch to a specific AI mode.
|
| 13 | RESET | Press the RESET button and then the Number buttons 0-9 to clear the preset camera position. |
| 14 | Directional Buttons |
|
| 15 | Menu | Press the Menu button to pull up or exit OSD menu. |
| 16 | MANUAL MODE | Press the Manual Mode button to enter the Camera Manual Tracking mode. |
| 17 | P/T RST | Press the P/T RST button to preset Pan/Tilt self-test. |
| / | Shortcut Set |
|
Dimension
Unit: mm / in

 NOTE
NOTE
The dimension data with inch unit are converted from the data with mm unit. In case of deviation or error, please always refer to the data with mm unit.
Pan and Tilt Angle:
The camera can be rotated ±170˚ horizontally and ±90˚ vertically.

Installation
Wall Mount Installation
Take out the wall mount kits and install the camera according to the following steps:
- Attach the wall bracket on the devcie with 5 pcs of screws. Installation direction is as below:

- Attach the wall bracket on the wall with 4 pcs of screws, keeping the camera horizontally.


- For ceiling mounting, please check with your reseller or local installer for a suitable ceiling mount bracket as the installation would depend on the type of ceiling you have.
- For TV mounting, please check with your reseller or local installer for a suitable TV mount bracket as the installation would depend on the brand, model and size of your TV.
Connection
Interface Description

RS232 Interface
 | No. | Function |
| 1 | DTR | |
| 2 | DSR | |
| 3 | TXD | |
| 4 | GND | |
| 5 | RXD | |
| 6 | GND | |
| 7 | IR OUT | |
| 8 | NC |
The correspondence between the camera and Windows DB-9 pin:

NOTE
The above disgram is only an example. The specific situation depends on the camera controller you have.
GUI Setting
MENU
Press [MENU] button to display the Main Menu on the screen, and use arrow button to move the cursor to the item to be set. Press [OK] button to enter the corresponding sub-menu.

EXPOSURE
Move the main menu cursor to [EXPOSURE], and press [OK] key enter the Exposure page, as shown in the following figure.

Mode: Exposure mode, optional items: Auto, Manual, SAE, AAE, Bright.
ExpCompMode: Exposure the compensation mode, optional items: On, Off (Effective only in Auto mode).
Backlight: Set the backlight compensation, optional items: On, Off (Effective only in Auto mode).
Bright: Intensity control, optional items: 0 ~ 17 (Effective only in Bright mode).
Gain Limit: Maximum gain limit, optional items: 0 ~ 15 (Effective only in Auto, SAE, AAE, Bright mode).
Anti-Flicker: Anti-flicker, optional items: Off, 50Hz, 60Hz (Effective only in Auto, AAE, Bright mode).
Meter: Optional items: Average, Center, Smart, Top.
Iris: Aperture value, optional items: F1.8, F2.0, F2.4, F2.8, F3.4, F4.0, F4.8, F5.6, F6.8, F8.0, F9.6, F11.0, Close (Effective only in Manual, AAE mode).
Shutter: Optional items: 1/30, 1/60, 1/90, 1/100, 1/125, 1/180, 1/250, 1/350, 1/500, 1/725, 1/1000, 1/1500, 1/2000, 1/3000, 1/4000, 1/6000, 1/10000 (Effective only in Manual, SAE mode).
Gain: Optional items: 0 ~ 7 (Effective only in Manual mode).
DRC: DRC strength, optional items: 0 ~ 8.
COLOR
Move the main menu cursor to [COLOR], and press [OK] key enter the Color page, as shown in the following figure.

WB-Mode: White balance mode, optional items: Auto, Indoor, Outdoor, One Push, Manual.
RG Tuning: Red gain fine-tuning, optional items: -10 ~ +10 (Effective only in Auto mode).
BG Tuning: Blue gain fine-tuning, optional items: -10 ~ +10 (Effective only in Auto mode).
Saturation: Optional items: 60% ~ 200%.
Hue: Optional items: -10 ~ +10.
RG: Red gain, optional items: 0 ~ 255 (Effective only in Manual mode).
BG: Blue gain, optional items: 0 ~ 255 (Effective only in Manual mode).
IMAGE
Move the main menu cursor to [IAMGE], and press [OK] key enter the Image page, as shown in the following figure.

Luminance: Brightness adjustment, optional items: 0 ~ 14.
Contrast: Contrast adjustment, optional items: 0 ~ 14.
Sharpness: Sharpness adjustment, optional items: Auto, 0 ~ 15.
Flip-H: Image flipped horizontally, optional items: On, Off.
Flip-V: Image Flip Vertical, optional items: On, Off.
B&W-Mode: Optional items: On, Off.
Style: Optional items: Default, Norm, Bright, PC.
P/T/Z
Move the main menu cursor to [P/T/Z], and press [OK] key enter the P/T/Z page, as shown in the following figure.

SpeedByZoom: The depth of field scale switch, optional items: On, Off.
AF-Zone: Interested in focusing area, optional items: Front, Top, Center, Bottom.
AF-Sense: Automatic focusing sensitivity options, optional items: Low, Normal, High.
L/R Set: Optional items: STD, REV.
Display Info: Optional items: On, Off.
Image Freeze: Optional items: On, Off.
Digital Zoom: Optional items: Off, 2x, 4x, 8x, 16x.
Call Preset Speed: Optional items: 1 ~ 24.
Pre Zoom Speed: Optional items: 0 ~ 7.
NOISE REDUCTION
Move the main menu cursor to [NOISE REDUCTION], and press [OK] key enter the Noise Reduction page, as shown in the following figure.

NR2D-Level: 3D noise reduction.
NR3D-Level: 3D noise reduction.
optional items: Off, 1 ~ 9.
SETUP
Move the main menu cursor to [SETUP], and press [OK] key enter the Setup page, as shown in the following figure.

Language: Optional items: EN, Chinese, Russian.
Auto HDMI: On/Off.
Video Format (Optional items in Auto HDMI Off mode): 1080P60, 1080P50, 1080I60, 1080I50, 1080P30, 1080P25, 720P60, 720P50, 1080P29.97, 1080I59.94, 1080P59.94, 720P59.94, 4KP29.97, 4KP25, 4KP30.
HDMI FRAME: Feature/Panarama. Auto Patrol: Off/On (Residence Time: 1-60; Call Pset Speed: 1-24.)
Auto Sleep Time: 5-120.
Other:
Auto Inversion: On/Off.
OSD Flip: On/Off.
USB Mode: BULK/ISOC.
UVC H264: On/Off.
Auto Sleep: On/Off.
IP Config: DHCP.
COMMUNICATION SETUP
Move the main menu cursor to [COMMUNICATION SETUP], and press [OK] key enter the Communication Setup page, as shown in the following figure.

Protocol: Control protocol type, optional items: Auto, VISCA, PELCO-D, PELCO-P.
V_Address: Optional items: 1 ~ 7. (Effective only in Auto, VISCA protocol).
V_AddrFix: Optional items: On, Off (When set to On, useless in 88 30 01 FF Command).
P_D_Address: Optional items: 0 ~ 254. (Effective only in Auto, PELCO-D protocol).
P_P_Address: Optional items: 0 ~ 31. (Effective only in Auto, PELCO-P protocol).
Net Mode: Set the serial port network control, optional items: Serial, Paral.
Baudrate: Serial port baud rate, optional items: 2400, 4800, 9600, 38400.
RESTORE DEFAULT
Move the main menu cursor to [RESTORE DEFAULT], and press [OK] key enter the Restore Default page, as shown in the following figure.

Restore: Confirm restore factory settings, optional items: Yes, No.
Web Setting
Visit/Access the Camera
How to Obtain an IP Address
You can find out the IP address in one of the following three ways:
- The default IP address is 192.168.100.88.
- Connect the camera to a display via a HDMI cable and then press [*] + [#] + [7] buttons on the remote control one by one, the IP address will be shown on the screen.
![]()
- Connect the camera to a display via a HDMI cable and then select [Menu] → [Other] → [Network Info] on the remote control, the IP address will be shown on the screen.
![]()


How to Access the Camera
- Enter the IP address obtained via the methods below (it is recommended to use the IE web browser, as other browsers may cause little latency). A login window will pop up.
- Then input username: admin, password: admin to login to the homepage of the web server.


NOTE
IE browser does not support H5, so you need to visit the VLC website (http://www.videolan.org/vlc) to download and install the 32-bit VLC media player. Other mainstream browsers already support H5 and do not need to install the VLC plug-in.
How to Modify the IP Address
You can modify the IP address through the web server:

- Go to [Network] → [Lan Settings].
- Change the [IP Configuration Type] to [Fixed IP Address], and then change the IP address as needed.
- Restart the device, and the IP address will be updated.
Function Introduction
After login in, the homepage will be shown as below:

- Parameter Settings: Live, AI Settings, Video, Image, Audio, System, Network, Information.
- PTZ Setup: Direction control, Preset Setting, etc.
- Language Selection: Chinese, English, Russian.
Parameter Settings
- Live
The live window must be the same as video resolution, the higher the resolution, the larger the playing area.
Double click viewing window, will show full-screen, double click again, will return to initialized size. Status bar in viewing window shown as below:

- Video playback pause button: control real-time video pause, stop the last picture, click recoverable video again.
- Audio control buttons: can adjust the volume or set silent mode.
- Full screen switch button.

- AI Settings
You can switch on/off the AI settings and select AI mode as needed:

- Feature Displays the image captured by the close-up camera.
- Panorama Displays the image captured by the panoramic camera.
- AI Modes AI mode includes four types: Auto Framing, Voice Tracking, People Tracking, Smart Gallery.
Auto Framing
![]()
People Tracking
![]()
Voice Tracking

Smart Gallery


- Video Settings


- Encode Level
Support mainprofile and highprofile two levels. - Encode Codec
Support H.264, H.265 and MJPEG three protocols. - Resolution
First stream support 3840x2160, 1920x1080, 1280x720, 1024x576, 720x480, 720x408, 640x480, 640x360. Second stream support 720x480, 720x408, 640x480, 640x360, 480x320, 320x240; The bigger resolution is, the clearer the image will be, more network bandwidth will be taken. - Bit Rate
The user can specify the bit rate. Generally speaking, the larger of the bit rate, the clearer of the image. However, the configuration of the bit rate needs to be combined with the network bandwidth. When the network bandwidth is narrow and the bit rate is configured larger, the video stream cannot be transmitted normally, and the visual effect is worse. - Frame Rate
User can specify the size of the frame rate, generally, the frame rate greater, the image more smooth; Frame rate is smaller, the more sense of beating. - I Key Frame Interval
Set interval between 2 I frame, the bigger interval is the response will be lower from viewing window. - Bit Rate Control
Code stream control way:
Constant Bit Rate: Video coder will be coding according to preset speed. Variable Bit Rate: Video coder will adjust the speed based on preset speed to gain the best image quality.
- Image Setting

Image:

- Brightness
Image bright 0 ~ 14, slider control, on the right shows the corresponding numerical. Default value is 6. - Contrast
Contrast 0 ~ 14, slider control, on the right shows the corresponding numerical. Default value is 9. - Sharpness
Sharpness 0 ~ 15, slider control, on the right shows the corresponding numerical. Default value is 3. - Flip & Mirror
Tick Flip to realize image upside down, tick mirror to realize image around the mirror. Default value is not tick. - B&W-Mode On/Off.
- Gamma
Default, 0.48, 0.50, 0.56, 0.63, EXT. - Style
Norm, Bright, Clarity, Face, Soft, Custom.
- Audio Setting
![]()
- Audio Switch: Turn on or off audio switch.
- Audio Network Switch: Turn on or off audio network switch.
- Audio Type: Audio type AAC, G711A.
- Sample Rate: Optional items: 44.1K, 48K.
- Bit Rate: Optional items: 96K, 128K.
- Input Type: Optional items: LINE IN.
- Input Vol: The volume of the channel input.
- ADTS Options: On/Off.

- System Setting


- Initialize
Reboot and Factory Default. - Username and password
The user can modify the password (letters and Numbers only). - U Disk Record
Record settings
- Network Setting
- Lan Settings
The default IP address is 192.168.100.88, and the MAC address cannot be modified.
![]()
- Port Settings
![]()
- Lan Settings


- HTTP Port
IP address identifies the network device, the device can run multiple web applications, each network program using network port to transmit data, so data transmission to be carried out between the port and port. Port setting is to set up web server program using which port to transmit. When port mapping, need to be consistent with the port number (default port: 80). - RTSP Port
The video conference camera support RTSP protocol, use the VLC tools broadcast, default port: 554. - PTZ Port
Support TCP connection then control camera, default port: 5678. - UDP Port
Support UDP protocol, default port: 1259. - Sony Visca
Support Sony Visca, default value: 52381.
- RTMP(S) Settings
Setting the MRL of RTMP, select enable or disable video and audio. You can select control code stream of "On", "Off", "Video", "Audio" between in the two streams.

- SRT Settings
Turn On/Off SRT, Setting the SRT Port, SRT Encry and SRT Password.


- RTSP Settings
Turn On/Off the RTSP Auth.

- ONVIF Settings
Turn On/Off the ONVIF and ONVIF Auth.

- Multicast Settings
Turn On/Off multicast. Setting the multicast address (default value is 224.1.2.3) and port (default value is 6688, then 6688 is the multicast port of the first stream; 6690 is the multicast port of the second stream).

- NTP Settings
Turn On/Off NTP time sync, main time show and sub time show. Setting NTP server address, time interval, main stream position and sub stream position.


- Information
Display the current device information as below figure.


PTZ Setup

- Pan and Tilt Control
Up, Down, Left and Right arrows and the home button allow you to manually drive the camera to the desired position. - Zoom
Zoom In and Zoom Out buttons allow for wide or narrow view of the space. - Focus
Focus In and Focus Out buttons allow for fine manual focus adjustment if the camera has any problems auto focusing on the difficult object. - PTZ Speeds
Pan speed can be set at any rate between 1 ~ 24, Tilt speed can be set at any rate between 1 ~ 20. Zoom and Focus speeds can be set at any rate between 0 ~ 7. - PTZ Presets
After manually setting up a shot that you would like to return to later, you can save presets for quick recall of these positions. Type a number between 0 and 254 into the Preset box. Click the "Set" button to save the current location with that preset number. Click the "Call" button to cause the camera to return to that position. This enables smooth, quick and convenient control without the need to manually drive the camera. You can set up preset that user want as below. Method: Type a number into the Preset box. Preset: Optional items: 0 ~ 254. - PTZ / OSD Dropdown
From the dropdown menu, clicking the OSD option will open the on-screen display menu of the camera giving you control from within the IP interface.
Language Selection
Select the system language of the webpage: Chinese, English, or Russian.

Firmware Upgrade
You can visit https://www.maxhub.com to download the Firmware and connect to your PC with USB cable. And then upgrade the Firmware via MAXHUB Align.

Camera Calibration
The following situations require camera calibration:

- Initial setup, after change of installation position or panoramic camera angle, or
- Deviation in display from expected results in AI mode, such as the portrait not being centered, or the portrait being too high or too low in the PTZ view.
You can adjust the vertical angle of the AI lens by toggling the adjustment button on the bottom of the camera first to get the correct view, and then calibrate the PTZ lens through one of the two methods below.
Method 1: From the remote control.

- Install the camera in the desired position, and place a calibration object (such as a model, book, etc.) approximately 5 meters in front of the camera.
- Use an HDMI or USB cable to connect the P30 PTZ camera to the minitor, and open the windows to view the image from the camera.
- Press the [Manual Mode] button on the remote control to switch to manual mode.
- Sequentially press the remote control buttons [#] + [*] + [5], and a "Picture-in-Picture" screen will appear.
- Use the directional buttons on the remote control to adjust the screen position so that the calibration cross on the screen is aligned with that on the object.
- When the two calibration crosses are aligned, sequentially press the remote control buttons [#] + [*] + [6] to save the setting.
- A "Saves, exiting" prompt will appear, and the calibration is complete.
Method 2: From the web server side.

- Go to the Web server side and log in to the homepage.
- Go to [AI Settings] → [General Setting].
- In the Lens Calibration option, select [Show Check Cross]. A calibration crosshair will appear on the feature screen.
- Use the PTZ control on the left side to align the centre of the calibration cross on the feature screen with the centre of the calibration cross on the panorama screen.
- When the two calibration crosses are aligned, click [Check] in the [Lens Calibration] option. A prompt will then appear.
- Click [HOME] to confirm if the calibration was successful.
- Click [Reset]. If the home position is aligned with the calibration position, the calibration is complete.
AI Tracking Modes
You can select AI mode or manual mode from the remote control for the tracking mode of the camera. The AI mode includes four types of tracking modes: Auto Framing, Voice Tracking, People Tracking, Smart Gallery.
| Icon |  |  |  |  |
| Mode | Auto Framing | Voice Tracking | People Tracking | Smart Gallery |
Auto Framing
Auto Framing is mainly based on AI detection, which provides real-time detection and position tracking on all faces in the meeting room.
The camera can be automatically adjusted based on changes in the number and location of participants.
The wide camera provides a wide view of the meeting room to keep all participants in view, and it enables tele-camera to automatically frame all participants.
You can select the tracking speed from the remote control.

Voice Tracking
Based on the Auto Framing feature, Voice Tracking can automatically detect the speaking participant and zoom in on his video image for an optimal close-up of the speaker. The built-in microphone array cannot be used as an audio input source for video conference. It is specially designed for audio tracking.

NOTE
It is recommended to keep the tracking distance within 6 m (19.69 ft).
People Tracking
People Tracking feature enables the camera to follow a presenter that is moving about on stage. You can select who wil be tracking before the mode begins. The tracking stops when the presenter leaves the stage.
![]()
Smart Gallery
Smart Gallery, also known as Intelligent Focus, can automatically separates in-room participants into their own individual video tile and captures all participants with a close-up view.

In Smart Gallery mode, the single PTZ can frame up to 8 people. Due to the single camera limitation, people standing further away from the camera may appear pixelated as the camera algorithm crops the video stream.
Maintenance
Camera Maintenance
- If not be used for a long time, please turn off the device, and disconnect AC power cord of AC adaptor to the outlet.
- Make sure to clean the camera cover with soft cloth or tissue.
- Make sure to use the soft dry cloth to clean the lens. If the camera is dirty, please clean it with diluted neuter detergent.
- Do not use any type of solvents, which may damage the surface.
Unqualified Application
- No shooting extreme bright object for a long time, such as sunlight, light sources, etc.
- No operating in unstable lighting conditions, otherwise image will be flickering.
- No operating close to powerful electromagnetic radiation, such as TV or radio transmitters, etc.
Troubleshooting
Image Troubleshooting
The monitor shows no image
- Ensure that the camera power supply is connected, the voltage is normal, and the power indicator light is always on.
- Turn off the power switch to check whether the camera is self-testing.
- Check the cables of video platform and TV if are correctly connected.
The video or image displayed by the camera is shaking.
- Check if the camera installation is secure.
- Check if anything is obstructing the camera lens.
No video displayed in browser
Non-IE browsers and non-IE-based browsers are not supported. It is recommended to use Google Chrome, Firefox, or Edge browsers.
Cannot access the camera via browser
- Check if the network connection works properly by connecting the PC to the network. Rule out issues such as cable faults or network issues caused by PC viruses. Ensure that the PC and the camera can successfully ping each other.
- Disconnect the camera from the network and connect it directly to the PC. Reset the camera's IP address if necessary.
- Check if the camera's IP address, subnet mask, and gateway settings are correct.
- Ensure there are no conflicts with the MAC address.
- Check if the Web port has not been changed from the default, which is 80.
Forgot IP address or web login password
Default Camera IP Address: 2.0.0.8; Default Username: admin; Default Password: admin. If you have forgotten the IP address or the web login password for your camera, you can try the default settings provided above to regain access.
Control
Remote control cannot control
- Replace the new battery for the remote controller.
- Check whether the camera working mode is correct.
- Check whether the address of remote control can match the camera.
Serial port cannot control
- Check whether the camera protocol, address and baud rate is the same.
- Check whether the control line is connected well.
 www.maxhub.com
 www.linkedin.com/company/maxhub-official
 sales@maxhub.com
 www.facebook.com/MAXHUB.Global/
- Electrical Safety
All installation and operational procedures must comply with the relevant electric safety standards. - Caution to Transport
Avoid stress, vibration or soakage in transport, storage and installation. - Power Supply
The power supply of this product is +12V, with a maximum electrical current of 2A. For your reference, the polarity of the power supply plug is illustrated below:
![]()
- Installation Precautions
To avoid damage to the camera lens, do not grasp or touch the lens by hand. Do not use the camera in a corrosive liquid, gas, or solid environment to prevent damage to the plastic material covering the lens. Ensure that there are no obstacles within the camera's rotation range before powering on. Do not power on the camera before installation is complete.
![]()
Do not Dismantle the Camera. We accept no liability for any unauthorised modification or dismantling. Electromagnetic fields of specific frequencies may affect the camera's functionality and image quality. - More Help
For FAQs, technical support, software and user manual download, please visit: https://www.maxhub.com


Documents / Resources
References
Official download of VLC media player, the best Open Source player - VideoLAN
![www.maxhub.com]() MAXHUB, Where Inspiration Moves Ahead.
MAXHUB, Where Inspiration Moves Ahead.![www.maxhub.com]() MAXHUB, Where Inspiration Moves Ahead.
MAXHUB, Where Inspiration Moves Ahead.

Download manual
Here you can download full pdf version of manual, it may contain additional safety instructions, warranty information, FCC rules, etc.
Advertisement


Need help?
Do you have a question about the UC Series and is the answer not in the manual?
Questions and answers