Advertisement
Table of Contents
Contents
Zanflare C4 Manual
Introduction
You have chosen a high quality product designed from the latest technology. For the best use of our products, please read this instruction manual carefully.
Product features
- 4 different charge current options to choose from (300mA/ 500mA / 700mA / 1000mA).
- It can charge simultaneously rechargeable batteries of different specifications (18650, 26650, 26500, 22650, 18490, 17670, 17500, 17355, 16340, 14500, 10440, A, AA, AM, SC sizes).
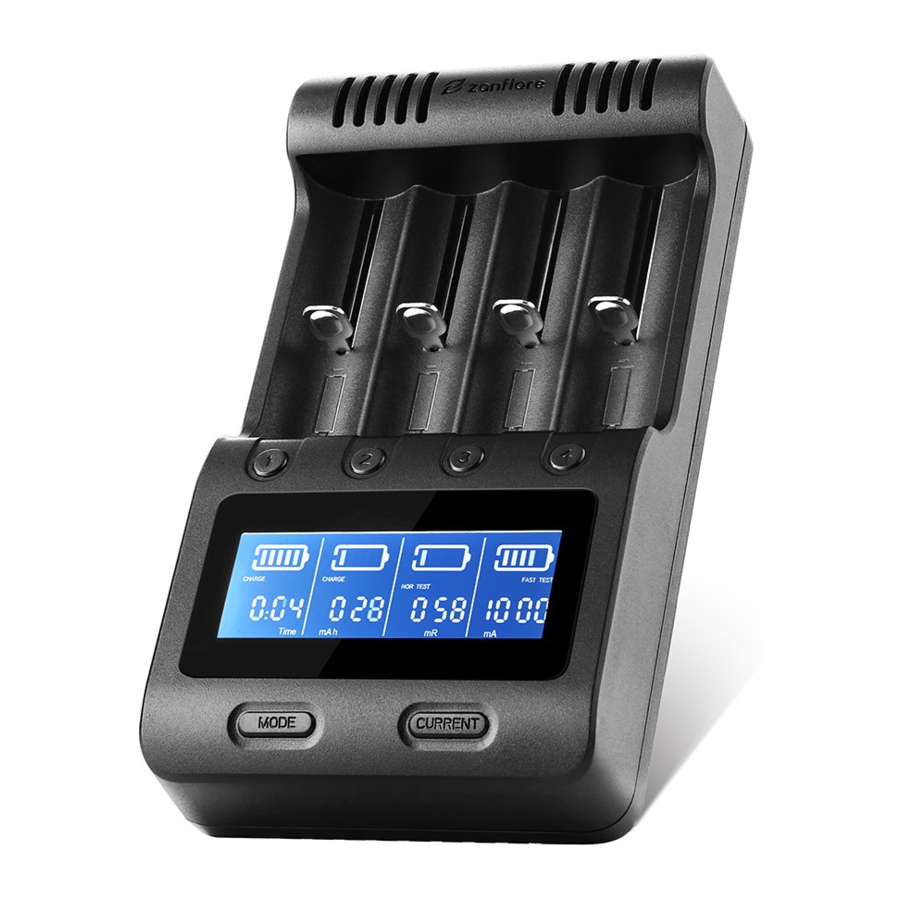
- ' Provided with integrated LCD display to monitor the information of the four charging slots. Each battery parameter such as voltage (V), current (mA), time (h), capacity (mAh), internal resistance (mR) can be viewed independently by pressing the corresponding digital key.
- Features multi-protection function: overcharge and overdischarge protection, short circuit protection, temperature control, OV voltage activation function, (-
![]() V & 0
V & 0 ![]() V), smart identification of damaged batteries and battery reverse polarity protection.
V), smart identification of damaged batteries and battery reverse polarity protection. - The 4 slots work independently, you can select and use the three modes 'CHARGE, FAST TEST and NOR TEST' simultaneously,
- CHARGE mode: the 4 slots work independently, you can choose different charge current, and charge at the same time Li-ion batteries and Ni-MH batteries.
- FAST TEST mode: the 4 slots work independently, you can choose different discharge current to quickly detect (first discharge and then recharge) Li-ion batteries and Ni-MH batteries capacity.
- NOR TEST mode: the 4 slots work independently, you can choose a different discharge current to detect (first charge fully, then discharge, and then recharge) Li-ion batteries and Ni-MH batteries capacity.
- You can set the same operating mode and current option for the 4 battery slots simultaneously, the process is easy and immediate, you just need to insert the 4 batteries at the same time within 10 seconds and press MODE key and CURRENT key,
- Comes with 5V / 2A output function and can be used as a power bank, If you install 2 or more 18650 batteries, the output current can reach 5V 2A, if you only install one 18650 battery, the output will be 5V, 1A (USB output function will be enabled only if you cut off the power and insert the battery; this does not apply to Ni-MH batteries).
 V & 0
V & 0 Specifications
- Input: ACIOO-240V 50/60Hz O.6A max. DC 12V 1.5A
- Charge current: rechargeable Li-ion batteries 4.2V, 300mA/500mA/ 700mA/1000mA, rechargeable Ni-MH batteries 1.48V, 300mA/500mA /700mA/1000mA
- Rechargeable battery specifications: 18650, 26650, 14500, AA, AAA, etc rechargeable battery
- Discharge current: 300mA, 500mA
- Output: 5V 2A
- Material: ABS
- Weight: 0.27KG
- Dimensions: 17.5 x 9.5 x 3.5cm
- Environmental conditions of use: humidity 5%-90%; temperature: 0 ºC -40 ºC
Buttons guide
6 buttons
- MODE: work mode key, press the MODE key to choose between CHARGE, FAST TEST, NOR TEST operating modes.
- CURRENT: current selection key, press CURRENT, and then select charge / discharge current.
- (1,2,3,4) NUMBER BUTTONS: press the number keys to view the voltage / capacity / internal resistance / time / current of the corresponding battery slot. Press the number key for 2 seconds to reselect the operating mode of the corresponding battery slot.
- Once you have installed the battery, the battery symbol will flash for 10 seconds; please press the MODE key to select the operating mode (CHARGE, FAST TEST, NOR TEST) within 10 seconds; press the CURRENT button to select the charge current (300mA / 500mA / 700mA /
![]() 1000mA) or discharge current (300mA/500mA), then the charger will automatically enter the selected working state, while the battery symbol will stop flashing.
1000mA) or discharge current (300mA/500mA), then the charger will automatically enter the selected working state, while the battery symbol will stop flashing.
Operating instructions
CHARGE
- When the charger is connected to the power supply, the LCD screen will bright up, if the battery is not inserted, wrongly inserted, or damaged, the screen will display 'null'.
- Once the battery is inserted, the battery symbol will start flashing; the charger will automatically enter the charging mode, with default charge current of 500mA. The user can select the charge current (300mA / 500mA / 700mA / 1000mA) by pressing the CURRENT key within 10 seconds, then the charger will automatically enter the selected working state, while the battery symbol will stop flashing. If the setting is not adjusted within 10 seconds, the battery symbol will stop flashing and the system will automatically charge at 500mA default charge current. To change this setting, you should press the corresponding number key of the battery slot for two seconds to reset (or reload the battery).
- Within 10 seconds after the battery is inserted, the user can independently change the current for each inserted battery and use different batteries at the same time. The user can press the MODE key to select the operating mode, press CURRENT to select the current. 10 seconds later the charger will start working and the battery symbol will stop flashing. Please select the charge current according to the capacity of the battery. If you do not need fast charging, it is recommended to use 500mA to charge, which is the safest option.
- The charger supports different battery types and current flows, please set firstly the mode and current options for one single battery, and after 10 seconds, when the charger enters the selected working state (the battery symbol will stop flashing), insert the next battery and set mode and current accordingly.
- During charging mode, you can press the number keys to monitor voltage, current, time, capacity, and internal resistance of the corresponding battery. When the battery is fully charged, "END" symbol will start flashing and the LCD will display the battery voltage.
FAST TEST
- Once the battery is inserted into the battery slot, the battery symbol will start flashing. The user can select "FAST TEST" by pressing the MODE key, and set the desired current (300mA / 500mA) by pressing the CURRENT key. 10 seconds later, the charger will automatically enter the selected working state, while the battery symbol will stop flashing.
- The system will work according to the fast battery capacity detection method: first discharge, then fully charge; the charger will record data to detect the battery capacity. If you want to change operating mode during the Fast Test mode, you should press the correspondent number key of the desired battery slot for two seconds to reset the settings (or reload the battery).
- The charger supports different battery types and current flows during the Fast Test mode; please set firstly the mode and current options for one single battery, after 10 seconds when the charger enters the selected working state (the battery symbol will stop flashing), insert the next battery and set mode and current accordingly.
- During Fast Test mode, you can press the number keys to view the corresponding battery voltage, current, time, capacity and internal resistance. When the fast battery capacity detection process is completed, "END" symbol will start flashing and the LCD will display the battery capacity.
NOR TEST MODE
- When the battery is inserted into the battery compartment, the battery symbol will start flashing, The user can select "NOR TEST" by pressing the MODE key, and choose the desired current (300mA / 500mA) by pressing the CURRENT key. 10 seconds later, the charger will automatically enter the selected working state, while the battery symbol will stop flashing.
- The system will work according to the normal battery capacity detection method: first fully charge, then discharge and finally recharge, the charger will record data to detect the battery capacity. If you want to change operating mode during the Normal Test mode, you should press the correspondent number key of the desired battery slot for two seconds to reset the settings (or reload the battery).
- The charger supports different battery types and current flows during the Nor Test mode, please set firstly the mode and current options for one single battery, and after 10 seconds, when the charger enters the selected working state (the battery symbol will stop flashing), insert the next battery and set mode and current accordingly.
- During Nor Test mode, you can press the number keys to view the corresponding battery voltage, current, time, capacity and internal resistance. When the normal battery capacity detection process is completed, "END" symbol will start flashing and the LCD will display the battery capacity.
Note
- This charger can only charge cylindrical Li-ion batteries and Ni-MH batteries, it can not charge LiFeP04 batteries, or any other.
- Please carefully refer to the instruction manual before use, pay attention to the recommended rechargeable battery charge current, do not exceed the recommended charge current.
- Please use this product in normal working environment. Please unplug after use. Do not use AC charging and vehicle charging simultaneously in order to avoid security risks.
- Do not disassemble, alter, or use this product elsewhere,
- Do not allow children to use the charger, please keep out of reach of children.
- Do not use other power adapters for charging.
- This product is for indoor use only, do not place or store in a humid environment.
Package content
- 1 x zanflare C4 Battery Charger
- 1 x Power Adapter
- 1 x Car Charger
- 1 x English Instruction Manual
Documents / ResourcesDownload manual
Here you can download full pdf version of manual, it may contain additional safety instructions, warranty information, FCC rules, etc.
Advertisement


Need help?
Do you have a question about the C4 and is the answer not in the manual?
Questions and answers