Advertisement
- 1 PARTS AND SPECIFICATIONS
- 2 INITIAL SET-UP
- 3 SHOT COUNTER ASSEMBLY
- 4 FEATURE LOCATIONS
- 5 SHOT COUNTER INSTALLATION
- 6 NET SYSTEM
- 7 ADJUSTING THROWING DISTANCE
- 8 TIPS FOR PLACEMENT ON COURT
- 9 GETTING READY TO WORKOUT
- 10 TRACK STATS & TEAM MANAGEMENT
- 11 ACCESSORIES
- 12 TROUBLESHOOTING
- 13 IMPORTANT SAFETY INSTRUCTIONS
- 14 Documents / Resources
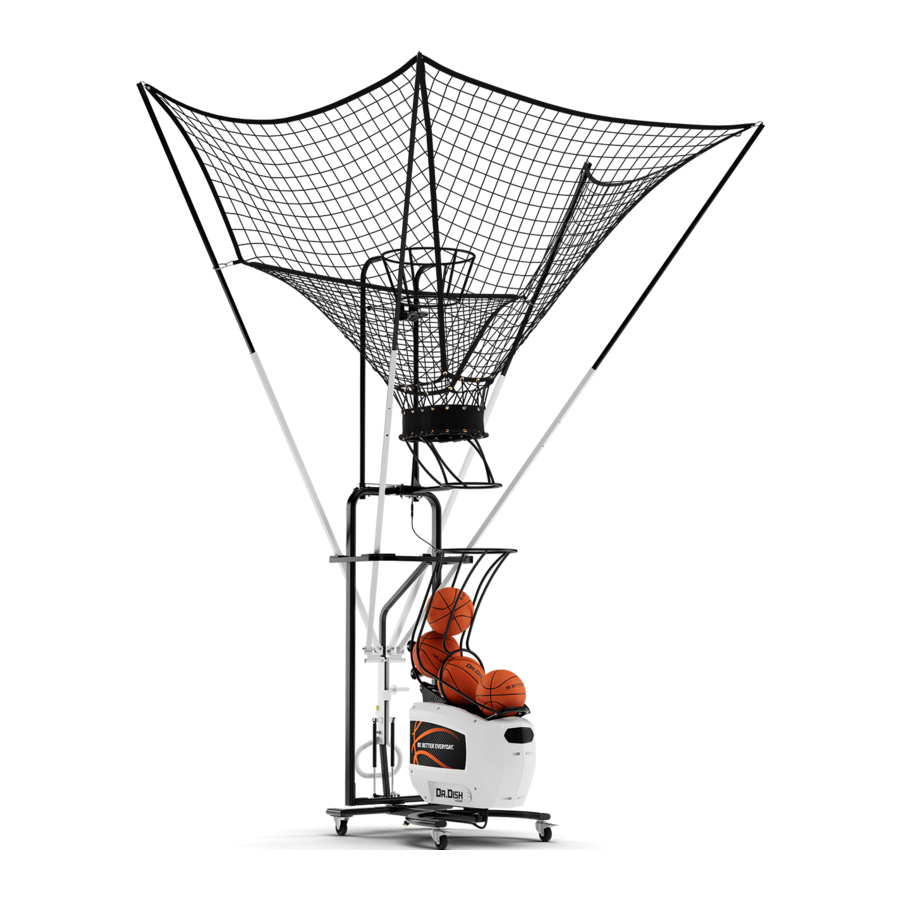
PARTS AND SPECIFICATIONS
PRODUCT SPECIFICATIONS
Product Storage Dimensions: 48" x 32" x 78" (L x W x H)
Product Weight: 270 lbs
APPLICABLE STANDARDS
ASTM F2276-10
Standard Specification for Fitness Equipment
POWER SUPPLY SPECIFICATIONS
Power Input: 115Vac @ 7A or 230Vac @ 4A
Frequency: 50/60hz
Output Rating: 24Vdc, 350W
NOTE: If using a 230V outlet, please contact manufacturer prior to plugging in machine.
COMPONENTS IN BOX
Remove all packaging cable ties that are securing the counter, ball ramp, and net poles prior to use. A wire cutter may be helpful.

ITEMS ON NET FRAME
Remove all packaging cable ties that are securing the counter, ball ramp, and net poles prior to use. A wire cutter may be helpful.

USEFUL TOOLS

LOST OR MISSING PARTS? Contact us at drdishbasketball.com/service
INITIAL SET-UP
ATTACH BALL FEEDER
- Attach ball feeder while machine is still on pallet.
![]()
- Install ball feeder using two Washers and two M8 Bolts with the 6mm Allen Wrench.


ATTACH BALL DISTANCE KNOB

- Attach ball distance knob to screw thread.
- Twist clockwise to tighten and move lever to lower position.
ATTACH PLATE
- Attach plate using four Washers and four M6 Bolts with the 5mm Allen Wrench.


SHOT COUNTER ASSEMBLY

ROUTE POWER CORD
- Insert power cord in tube of handle, coming out the bottom oval hole.


SLIDE AND BOLT TOGETHER

- Insert Head Assembly into Handle.
- Bolt together using 8mm Allen Wrench and 17mm Open Wrench.
FEATURE LOCATIONS

| NO. | DESCRIPTION |
| 1 | Ball Feeder |
| 2 | Extension Cord Holder |
| 3 | User Interface (Power Switch, Pause Button, and LED Indicator) |
| 4 | Shot Counter (Stored) |
| 5 | Net System Handle |
| 6 | Power Plug |
| 7 | Ball Distance Adjustment |
SHOT COUNTER INSTALLATION
REMOVE SHOT COUNTER
- Remove Shot Counter from frame. Shot Counter rests on hooks.
TIP: Lift up and out to remove.


PLACE ON FRAME
- Place Shot Counter on frame. Shot Counter Basket should face forward.


SECURE AND PLUG IN
- Hand tighten knob and firmly push plugs together.


NET SYSTEM
ROTATE MACHINE
NOTE: Machine must be rotated at least 45° in either direction to prevent damage.

EXTEND POLES
- Ensure net is not caught on frame. Extend all four poles until they click into place.

NOTE: Net has a high and low setting. For taller players and three-point shots use higher setting.

RAISE NET
- Use both hands to rotate handles clockwise to raise net.


SECURE
- Flip down safety latch to lock net in up position.


ADJUSTING THROWING DISTANCE
MOVE DISTANCE ADJUSTER
- Push knob on distance adjuster down to be able to select a different ball launch distance.
NOTE: Distance varies based on player height.


TIPS FOR PLACEMENT ON COURT
POSITIONING MACHINE
Place the Dr. Dish™ machine under the hoop until rear net poles are even with the face of the backboard. Center frame of the machine with the center of the backboard.

LOCKING WHEELS
Lock from wheel to keep machine from moving.

GETTING READY TO WORKOUT
USE EXTENSION CORD TO PLUG IN
Use extension cord to plug in and power on. Securely attach extension cord to connector under machine. Main on/off power switch is under net frame. This product requires a type W extension cord that is certified and rated for at least 120 V. 14 AWG minimum grounding conductor.

POWER ON AND CONNECT TO MACHINE VIA BLUETOOTH
Dr. Dish™ Home requires the use of the Dr. Dish™ Player App and connects using Bluetooth. Search for Dr. Dish™ in Google Play or App Store to download. Flip power switch to on position (|) to power on. Use the app to connect via Bluetooth. A flashing LED indicates Dr. Dish™ Home is not connected. A solid LED indicates Dr. Dish™ Home is connected.

TRACK STATS & TEAM MANAGEMENT
CREATING A DR. DISH™ ACCOUNT
ACCESS THE PROFILE MENU
After plugging the machine into a power outlet to turn it on, you'll see a navigation bar on the left side of the screen. Tap the profile jersey icon to open the account creation menu.
CREATE AN ACCOUNT
You can create an account by using an email. Follow the on-screen prompts to enter your details to create your account. This account will allow you to:
- Save and track your shooting stats while using the machine.
- Log in to tms.drdishbasketball.com to manage teams, customize workouts, and access additional features.
DOWNLOAD THE DR. DISH™ PLAYER APP
Have your players download the Dr. Dish™ Player App from the App Store or Google Play. They can create an account in the app or on the machine and the app will help allow them to set goals, view progress, and more directly from their mobile device.
ACCESSORIES

For pricing and ordering visit: DRDISHBASKETBALL.COM/ACCESSORIES
TROUBLESHOOTING
After extensive use the net may stretch. Tighten the net by feeding excess bungee cord through the frame working from the front to back on each side. Feed the excess through the cord stops. Cut excess cord off with a scissors.
To ensure each pass is consistent, make sure to use properly inflated basketballs. The machine works best with 4 to 5 basketballs.
If you think you are missing a part or have any questions about set up or usage, please contact the Dr. Dish™ Support+ team at drdishbasketball.com/service.
IMPORTANT SAFETY INSTRUCTIONS

SERIOUS INJURY CAN OCCUR WHILE USING THIS PRODUCT. READ AND FOLLOW ALL PRODUCT WARNINGS AND INSTRUCTIONS THOROUGHLY BEFORE CONTINUING.
PLEASE READ THE OWNER'S MANUAL FOR A COMPLETE LIST OF IMPORTANT INSTRUCTIONS FOR THE SAFE AND PROPER USE, MAINTENANCE, AND STORAGE OF THIS PRODUCT.
- This is not a toy and is intended for use by or under the supervision of adults.
- Do not contact moving parts. Keep hands, fingers, and other body parts clear of possible pinch points to avoid risk of serious injury.
- Check to ensure that all straps, pins, locks, fasteners, and other safety devices are in place before use.
- Do not attempt to move, adjust height, or collapse the basketball backboard system while this product is in use.
- Make sure there is adequate clearance on all sides of this product. Use caution when walking, running, or jumping under or around this product.
- Because this product contains metallic parts, never play basketball, or stand near this product, during a storm or if you notice thunder or lightning.
- Do not use this product with metal nets, use only nylon or polyester nets.
- Do not use this product improperly or for purposes not intended.
- Do not modify or otherwise alter any element or component of this product.
- Always adequately warm up and do not overexert the user with any exercise program.
- Only use the attachments recommended or sold by the manufacturer.
- Do not leave outdoors or expose to rain or moisture.
- To disconnect, turn all controls off, then remove plug from outlet.
- Do not remove electrical cord attached to the base frame of the machine.
- To unplug, grasp the plug. Do not unplug by pulling on cord.
- Unplug from outlet when not in use and before servicing or cleaning.
- Do not operate machine if it is damaged in any way such as damaged electrical cord or plug, after machine malfunctions, is dropped or damaged in any other manner. Call manufacturer for examination, repair, or to make electrical or mechanical adjustment.
- See "Maintenance". If further maintenance is required, please contact manufacturer.
- This machine incorporates an earth ground connection for functional purposes only.
- The Dr. Dish™ can be moved with one person on a flat and level surface. If moving on an incline, two people are recommended.
- The Dr. Dish™ should be used on a solid, level surface.
 ATTENTION
THIS IS NOT A TOY AND IS INTENDED FOR USE BY OR UNDER THE SUPERVISION OF ADULTS.

TO REDUCE THE RISK OF ELECTRICAL SHOCK, UNPLUG BEFORE CLEANING OR SERVICING.
GROUNDING INSTRUCTIONS
This appliance must be grounded. In the event of malfunction or breakdown, grounding provides a path of least resistance for the electric current to reduce the risk of electrical shock. This appliance is equipped with a cord having an equipment grounding conductor and a grounding plug. The plug must be plugged into an appropriate outlet that is properly installed and grounded in accordance with all local codes and ordinances. Improper connection of the equipment-grounding conductor can result in a risk of electrical shock. Check with a qualified electrician if you are in doubt as to whether the appliance is properly grounded. Do not modify the plug provided with the appliance. Never remove the grounding prong from the plug. If damaged, have it repaired by manufacturer before use. If the plug will not fit the outlet, have a proper outlet installed by a qualified electrician.
GENERAL INFORMATION
PERSONAL SAFETY
To reduce the risk of serious injury, read all important precautions and instructions in this manual and all warnings on the product before use. It is the responsibility of the owner to ensure that all users of this product are adequately informed of all warnings and precautions. Use the product only as described in this manual.
Airborne Athletics® assumes no responsibility for personal injury or property damage sustained by or through the use of this product.
EXERCISE & HEALTH CONSIDERATIONS
Playing basketball or engaging in basketball training is considered exercise. Frequent and strenuous exercise should be approved by a doctor before initiation.
Warming up is an important part of your workout and should begin every session as it reduces the risk of injury. It prepares your body for more strenuous exercise by heating up and stretching out your muscles, increasing your circulation and pulse rate, and delivering more oxygen to your muscles.
If discomfort arises during product use, individuals are advised to stop exercising and consult a doctor. During any exercise routine, consuming an adequate amount of fluids is crucial to avoid dehydration. Individuals are encouraged to work at their own pace during exercise routines.
ADULT SUPERVISION
Please keep all children away from the product when product is unattended. Adult supervision is required at all times during use of this product.
Please ensure this product is assembled and installed by adults.
PRODUCT USAGE GUIDELINES
Inspect the Dr. Dish™ before use to ensure working order.
Proper storage and regular maintenance are required to ensure the product's longevity and performance. Regularly inspect and properly tighten all parts of the product to prevent damage and ensure safety.
REGISTER YOUR PRODUCT
Visit drdishbasketball.com/register to complete registration and ensure proper warranty coverage.
MAINTENANCE

Avoid Damage! Excessive use may require more frequent service intervals. Please use the following timetables to perform routine maintenance on your machine. Proper maintenance will help to ensure overall performance and longevity of the machine. Our maintenance videos can be found online and offer a step by step demonstration of the following intervals. *** Before any internal inspections are performed, machine must be unplugged to ensure safety. On Dr Dish™ model machines, please be sure that the throwing arm is in the most forward position to prevent an accidental launch during inspection.***
TO REDUCE THE RISK OF ELECTRICAL SHOCK, UNPLUG BEFORE CLEANING OR SERVICING.
The total shots can be found by going into Settings on the machine screen and looking for Total Shots.
SERVICE INTERVALS
Break-In After 2,000 Shots
- Check all shroud bolts (tighten if necessary)
- Check Touch Screen mounting bolts (tighten if necessary)
- Check front and rear caster mounting bolts (tighten if necessary)
- Inspect that all visible cables/wires are secure (replace cable ties if necessary)
Weekly (Daily During Times of Heavy Use)
- Wipe machine down (a multi-purpose cleaner is recommended)
- Blow out interior of machine with compressed air (canned air used for electronics, keyboards, computers, etc. is recommended}
- Inspect for loose cables/wires (replace cable ties if necessary)
- Keep It Clean
Every 20,000 Shots or Annually
- Check all shroud bolts (tighten if necessary)
- Check Touchscreen mounting bolts (tighten if necessary)
- Verify power cable connection is tight
- Check Touchscreen pivot function (adjust if necessary)
- Check front and rear caster mounting bolts (tighten if necessary)
- Remove any debris from casters
- Inspect that all visible cables/wires are secure (replace cable ties if necessary)
- Check to make sure photo eye is clean and tightly secured
- Check net tension
- Check counter harness connections (visually inspect for damaged plugs and cables)
- Check net system shaft/shaft bolt tightness
- Visually inspect upper feeder and counter head for any stress fractures
Every 75,000 Shots or Every 2 Years
- Remove shrouds and visually inspect components
- Blow out interior of machine with compressed air (canned air used for electronics, keyboards, computers, etc. is recommended)
- Wipe down interior of machine (a multi-purpose cleaner is recommended)
- Inspect cable/wire management (replace cable ties if necessary)
- Verify all harness connections to power board are secure
- Ensure terminals on power supply terminal block are tight
- Check all visible fasteners, making sure they are both present and tight
- Check rotation motor gears and mounting bolts
- Visually check reed switch gaps (ensure switches are secure)
- Verify launch arm bumpers are intact and tight (Qty. 2 lower blue bumpers and Qty. 1 black/orange upper bumper)
Every 150,000 shots or Every 5 years
- Inspect all internal white rollers (replace if necessary)
- Check bearings on both machine and net system
- Check launch arm bolt (remove and grease if necessary)
- Replace launch arm bumpers (Qty. 2 lower blue bumpers and Qty. 1 black/orange upper bumper)
- Inspect all internal components for excessive wear
MORE QUESTIONS?
If you have questions, or to begin the service process, please contact us at drdishbasketball.com/service
QUESTIONS OR CONCERNS?
Our Dr. Dish™ Support+ team is here to help you as you set up and utilize your new Dr. Dish™ machine. If you have questions related to set up, troubleshooting or usage contact the Dr. Dish™ Support+ team at drdishbasketball.com/service.
Phone: +1 612-412-4410
Email: info@airborneathletics.com
Fax: +1 952-443-8485
Mail: 1701 W 94th St, Suite 225
Bloomington, MN 55431
USA
SCAN FOR SUPPORT
Scan or click the QR code, or visit DRDISHBASKETBALL.COM/SERVICE

LET'S CONNECT
Download the DR. DISH™ PLAYER APP and follow @DRDISHBBALL for the latest basketball drills, inspiration, tips, and more. Stay connected and tag #drdishfam to show us how you are putting your Dr. Dish™ to work.


Documents / Resources
References
![drdishbasketball.com]() Customer Service & Support | Dr. Dish Basketball
Customer Service & Support | Dr. Dish Basketball![drdishbasketball.com]() Shop Dr. Dish Accessories | Dr. Dish Basketball Online Store
Shop Dr. Dish Accessories | Dr. Dish Basketball Online Store![www.apple.com]() App Store - Apple
App Store - Apple![play.google.com]() Google Play
Google Play
Download manual
Here you can download full pdf version of manual, it may contain additional safety instructions, warranty information, FCC rules, etc.
Advertisement
Need help?
Do you have a question about the HOME and is the answer not in the manual?
Questions and answers