Advertisement
- 1 Overview
- 2 Hardware Overview
- 3 Start Up
- 4 Play+ Audio Structure
- 5 Display Layout
- 6 QWERTY Keyboard
- 7 Settings Menu Map
- 8 First Steps with Projects
- 9 Parameter Overview
- 10 Sample Pool
- 11 Synthesizers
- 12 Patterns in the Play+ Grid
- 13 Pattern Mode
- 14 Play Modes
- 15 Pick & Place to Create A Pattern
- 16 Live Recording
- 17 View Mode
- 18 Piano Roll
- 19 Fill Tool
- 20 Track Variations
- 21 Perform Mode
- 22 Perform Mode Quick Reference
- 23 Effect Architecture
- 24 Basic MIDI Concepts for Play+
- 25 MIDI Mode
- 26 MIDI Quick Start
- 27 Audio Output Over USB
- 28 Generic Firmware Update
- 29 Emergency Firmware Update
- 30 Quick Reference Commands
- 31 Documents / Resources
Overview
Polyend Play+ is a 16-track sample and synthesizer-based groove box with multitimbral polyphonic sounds, stereo functionality, and audio over USB. Play+ takes the features and experience of the original Play instrument to new heights. Play+ is a complete musical production and live performance instrument using both stereo sample and synthesis engine audio sources for creating beats and building musical arrangements. Three synthesizers can be configured from the five available synthesis models. Samples can also be used as the sound source. Over 5000 stereo and mono samples are provided to get started, but you can add your own using the supplied Micro SD Card. Both the capacity to create complete song arrangements and the skill to engage in live improvisation are equally supported. The freedom to mix, play, and sequence tracks, work both with synths and audio samples, and control external polyphonic MIDI devices balances the 'in the box' thinking with 'out of the box' integration. Play+ is ideal as the central element in an integrated studio setup using the 8 Polyphonic MIDI / Synth tracks alongside the 8 audio tracks. A set of onboard effects, including delay, reverb, and saturation, spice up the entire mix. Play+ has an expansive range of features, including audio over USB for even tighter integration with other audio gear and digital audio workstations. The objective is to create and perform by coupling less traditional techniques alongside familiar processes to capture musical ideas and perform full song arrangements. User experience is at the heart of Play+ workflow and follows simple processes that enable almost instantaneous productions and advanced audio design and music creation
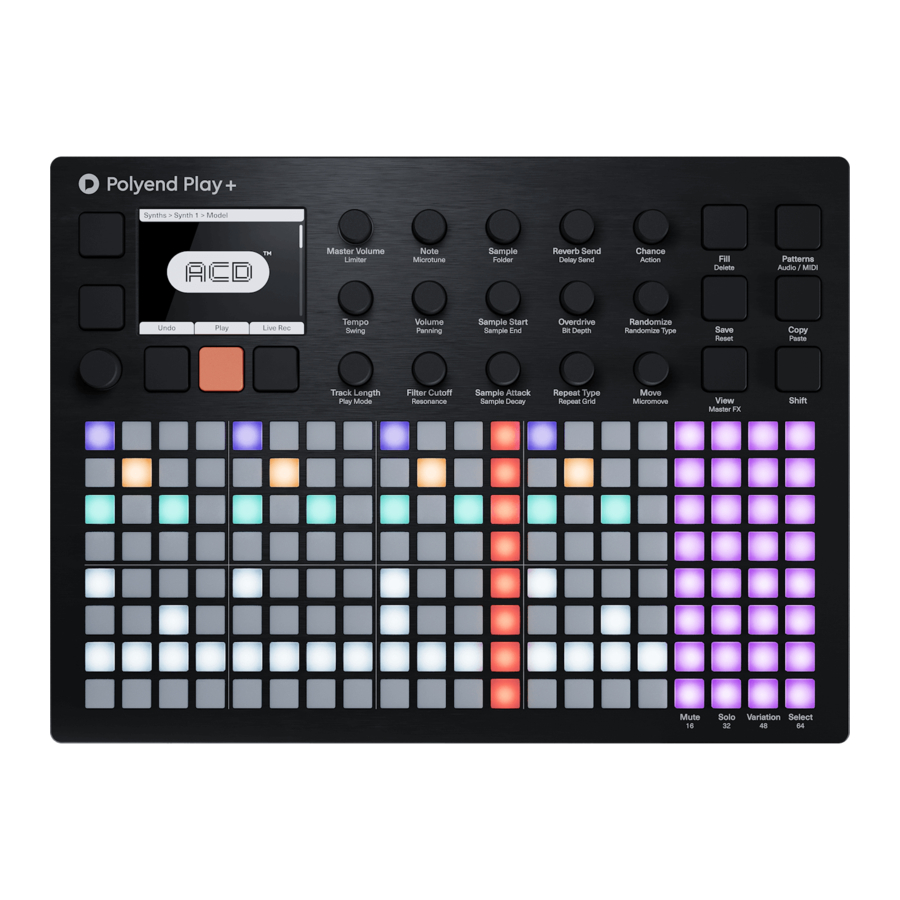
Hardware Overview

Start Up
Play+ is a low power user and can therefore be powered from the supplied mains USB adapter or from a rechargeable battery power bank. When restarting Play+ the previously open project will be re-opened
POWERING ON / OFF PLAY+
- Connect the supplied USB-C Mains cable between Play+ and the supplied USB plug. Also Play+ can operate with a portable USB power bank*. Play+ requires a 5V, 1A rated supply.
- Ensure the SD Card is installed correctly for Play+ to operate.
- Quickly press the small power button located on the rear left (looking from the top). Play+ will start up and the previous project reopened.
- To power off, press and hold the small power button located on the rear left (looking from the top) until the timer bar ends. Play+ will power off.

Alternatively use a battery power bank. Start up instantaneous current is approx 1.2A with normal state around 0.5A

* It is recommended by Polyend to use a standard power bank without smart features. Intelligent / smart power banks or PC / Mac power may have features that interfere with the continuous supply required by Play+. USC - C to USB - A cable supplied.
Play+ Audio Structure


The 8 x 20 gird pads are not velocity sensitive.
- LCD Display Hi
Resolution Display. - Screen Buttons
5 Dynamic [Screen buttons]. Dependant on the function displayed for each button. - Multi-Functional Screen Knob
Clickable encoder. - Track Sequencer Pads
8 x 16 Silicone Pads. Track step columns used for sequencing, performing and arranging. - Function Pads
8 x 4 Silicone Pads. Multifunction columns used for Mute, Solo, Variation, Select and chromatic mode. - Master Volume & Limiter
Control of primary master volume dB level and the secondary limiter threshold option. - Note & Microtune
Note pitch adjustments relative to a C4 note sample and micro tuning -100 to +100 cents - Sample & Folder
Sample selection from sample pool. Select sample folder. Sets device and patch in MIDI/Synth mode. - Reverb & Delay Sends
Reverb and Send levels to adjust the effect intensity. - Chance & Action
Determines if / when an action occurs. Special action after a step. - Tempo & Swing
Adjusts global or track BPM Tempo and swing value. - Sample Volume & Panning
Sample volume level deviation from 0dB original sample. Pan Left/Right. - Sample Start & End
Trims the start and the end point of the sample. - Overdrive & Bit Depth
Overdrive grit and amplification or reduces bit resolution. - Randomize & Randomize Type
Percentage randomization and type determines which step parameters are affected. - Track Length & Play Mode
Track length in steps between 1-64. Selects one of 35 play modes - Filter Cutoff & Resonance
Adjusts the DJ style filter cutoff or resonance - Sample Attack & Decay
Sample start attack, fade-in time and the end of sample fade-out time - Repeat Type & Grid
Selects the step repeat type from the list of options. Step repeat density is selected with grid. - Move & Micromove
Move a step placement on the grid left or right and in smaller adjustments with micro move. - Fill & Delete Button
Fill utility for generating and populating sequences. Delete option for various functions. - Patterns & Audio/MIDI Button
Pattern selection mode. Toggle between MIDI / Synth tracks and Audio sampling tracks - Save & Reset Button
Save current state of pattern and also recall using shift to restore the saved state. - Copy & Paste Button
Copy and Paste various functions. - View & Master FX Button
Changes the function pads to a chromatic input controller. Access audio processors using shift. - Shift Button
Hold shift plus another knob or button to access it's secondary function.
Some knobs change functionality when in MIDI / Synth mode. Audio Sampling mode is the default state.
Display Layout
Each page will display the parameter information and control options for the selected function. While generally this is based on the context and mode of operation, there are some common features and navigation principles that apply across all (or most) of the generic pages of Play+.

Physical screen buttons represent the command displayed on the screen directly above or to the right of the buttons. The Play / Stop tab will show the playback progress bar when playing.
The top part of the screen will display the value setting of the primary parameter selected. The parameter knobs are touch sensitive and selected by tapping the knob. The primary parameter is labelled in the large font under the knob. The lower, smaller font labelled parameter refers to the secondary parameter for the knob, accessed by double tapping the knob, the value of which is displayed in the lower part of the display.
The two left side dynamic buttons also can be used to select between the two upper and lower parameters. The left buttons can be used to perform the same 'select' action as pressing the (Screen) knob. Otherwise the buttons activate the function labelled on the screen
QWERTY Keyboard
Some pages will require text editing for naming items i.e. projects. The same functionality applies whenever the alpha numeric pop-up editor is used. The screen will display the QWERTY keys and the text to edit, while part of the 8 x 16 pad grid will act as the keyboard's keys. The dynamic screen buttons are used to Confirm, Caps Lock, Back or Auto Name.

The screen will display the keys which are represented by the grid pads. The 'f' and 'j' keys are highlighted to give a reference between the pads and the screen characters. Current character is lit orange. Text can be typed in to enter.

The following Play buttons also operate in the naming editor when the naming screen is presented:-
- The characters can also be selected by turning (Screen).
- Press (Screen) to add the highlighted character at the current cursor position.
- Press [Fill] to backspace delete the character before the cursor
- Move character cursor left / right within in the text name to edit by holding [Shift] + Turn (Screen)
Settings Menu Map
As a quick guide to the settings and menu hierarchy in Play+ the following diagram illustrates the main pages.

| Menu | Option | Description |
| File | New Project | Create a blank new project |
| File | Open Project | Open an existing saved project |
| File | Save Project | Save the current project |
| File | Save Project As | Save and rename the current project |
| File | Export | Export patterns, chains and pattern stems |
| Samples | View Sample Pool | View current project samples. Create & rename folders. |
| Samples | Load Sample Pack | Loads a sample pack from SD to Project |
| Samples | Load Files or Folders | Loads a folder and complete structure of files to project sample pool. |
| Samples | Delete Unused Samples | Remove all samples from project that are not used. |
| Synths | Synth 1, 2, 3 | Synthesizers x3. Configurable with 1 of 4 synth models plus patches. |
| Scales | Scale Filter | Sets the scale filter on or off. This ensures notes remain within a scale. |
| Scales | Scale Type | Select from a range of scale options. |
| Scales | Scale Root Note | Select root note. |
| MIDI | CC Mapping | Parameter knob mapping to CC numbers |
| MIDI | Clock In | Clock source, Internal, MIDI In jack or MIDI In USB |
| MIDI | Transport In | Sets the input of transport control commands, Off, MIDI In jack or MIDI In USB |
| MIDI | Clock Out | Sets the clock output, Off, MIDI Out jack or MIDI Out USB, MIDI Out USB and Jack |
| MIDI | Transport Out | Sets the transport output, Off, MIDI Out jack or MIDI Out USB, MIDI Out USB and Jack |
| MIDI | Notes In | Sets the input routing of external notes in. Set to Off, MIDI In jack or MIDI In USB. |
| MIDI | Notes In Channel | Specific channel for notes in for the work step. Omni refers to all channels. |
| Settings | View Layout | Sets the view pad option to layout as piano style or grid note style |
| Settings | Grid Brightness | Sets the grid illumination brightness to a level of High, Medium or Low. |
| Settings | Knob Double Tap | Sets knob tap behaviour. Double tap can be turned on or off. |
| Settings | Knob Preview | Selects how the audio preview is performed. Can be set to; Off, Stopped, Playback, Stopped & Playback. |
| Settings | Variation Page | Sets the behaviour of the variation page between separate tracks or all tracks. |
| Settings | Quantize Recording | Quantize recording on or off. |
| Settings | Overdub Recording | Overdub recording on or off. |
| Settings | Fill Config | Sets the source for the MIDI fill notes for beats and MIDI channels for beat and melody fills |
| Settings | Firmware | Displays version and initiates a firmware update from a selected update file |
First Steps with Projects
A project must be open when working in Play+. The previously selected project will be opened automatically on start up. Other projects however can be opened or created. Ensure the SD Card is installed into Play+.
MANAGING PROJECTS
- When powering on the previous project will be restored. Projects can be changed or new ones created. Projects are stored on the SD Card.
- Press (Screen), the multi-functional screen encoder. The main menu will be displayed. Turning (Screen) will navigate the menu.
- Turn (Screen) to highlight 'File' in the menu.
- Press (Screen) to select the highlighted 'File' option and to open the submenu options.
- Turn (Screen) to highlight the option required.
- New Project. Will create a new blank project. A prompt to save the existing project may be presented. It is advised to save once a project has been created. Press (Screen) to select the highlighted 'New Project' option.
- Open Project. Will present the available projects to open. A prompt to save the current project may be presented. Project folders are presented in orange text. Press [Open] dynamic key to open the highlighted option as the active project
- Save Project. A project can be saved to overwrite the existing project or 'Save As' to name the project to a new file. Press (Screen) to select the highlighted option.
![]()

In order to get started with a new empty project, samples or a sample pack should be loaded and a sample or synth assigned to a work step in order to build patterns. The quick steps for samples are;
- Press (Screen) to open main menu,
- Turn & Press (Screen) to choose and select 'Samples',
- Turn & Press (Screen) to choose and select 'Load Sample Pack',
- Turn & Press (Screen) to choose and select the sample pack to load. Once loaded, samples are available and can be assigned with the (Sample) Knob.
Parameter Overview
The 15 rotary knobs are used to set the parameter values. Each knob controls two parameters. These are labelled under the knob. Some functions change when in MIDI / Synth Mode, indicated in Italic text to reflect a MIDI or a Synth parameter.
| Parameter | Primary / Secondary | Description |
| Master Volume | Primary | Controls the master volume level for the audio output. |
| Limiter | Secondary | Dynamic processor to control volume levels |
| Tempo | Primary | Global tempo. Also sets track speed. |
| Swing | Secondary | Generates a natural shuffle to a track. |
| Track Length | Primary | Adjusts number of steps in the track up to 64 |
| Play Mode | Secondary | Determines the order of the track steps |
| Note | Primary | Tunes the sample note in semitone steps |
| Microtune | Secondary | Tunes sample pitch in cents |
| Volume | Primary | Adjusts the sample volume level / Velocity |
| Panning | Secondary | Adjust the sample panorama position L-R / Pitch Bend |
| Filter Cutoff | Primary | Adjusts the Filter Cutoff Frequency / CC or Macro |
| Resonance | Secondary | Adjust the Filter Resonance amount / CC or Macro |
| Sample | Primary | Selects a sample from the folder / Port Chan or Synth |
| Folder | Secondary | Sample folder from where to choose / PC or Patch |
| Sample Start | Primary | Start of sample play with respect to length / Chord |
| Sample End | Secondary | End position of sample play with respect to length |
| Sample Attack | Primary | Envelope attack, % of sample fade in / CC or Macro |
| Sample Decay | Secondary | Envelope decay, % of sample fade out / CC or Macro |
| Reverb Send | Primary | Audio amount sent to the reverb effect / CC |
| Delay Send | Secondary | Audio amount sent to the delay effect / CC |
| Overdrive | Primary | Overdrive amount applied to the sample / CC or Macro |
| Bit Depth | Secondary | Bit depth setting / CC or Macro |
| Repeat Type | Primary | Sets the number of repeats on the step |
| Repeat Grid | Secondary | Sets the density for the repeats set on the step |
| Chance | Primary | Determines the probability of an action occurring |
| Action | Secondary | Sets the action to occur after a step trigger |
| Randomize | Primary | Strength of randomization applied. |
| Randomize Type | Secondary | Determines what is affected by the randomization |
| Move | Primary | Moves steps across the grid in 1 step intervals |
| Micromove | Secondary | Moves steps across the grid in micro intervals |
Sample Pool
Each project uses samples located within the projects sample pool. In order to build a pattern a projects sample pool must be loaded with a sample pack or user samples, or both. Samples can be mono or stereo and can be loaded during playback. The normal workflow requires samples to be copied from the SD card to the sample pool of the project. Sample Packs are formatted specifically to operate and integrate into Play+ functions. The Fill command, for example uses sample packs intelligently.

POPULATING AND VIEWING THE SAMPLE POOL
- Ensure the project in which to work is open and active.
- Press (Screen) knob to open the options menu.
- Turn (Screen) to navigate the menu options. The menu may display the position level previously navigated. If required, Press [Back] screen button to back up through the menu hierarchy.
- Highlight the 'Samples' option and press (Screen) to select.
- Highlight the option to execute. The available memory is also displayed.
- Load Sample Pack. Sample pack list is presented and packs are loaded as a complete folder, these are preceded by '/'. Press [Load Pack] screen button.
- Load Files or Folders. Hold [Shift] + Turn (Screen) to select multiple files. Press the dynamic screen button [Load Wav] or [Load Folder] to load the selected file or folder. Destination folder is required for WAV files.
- View Sample Pool. To view and navigate the existing state and contents of the sample pool. Press (Screen) to audition a file. New folders can also be created from within the sample pool browser.


Synthesizers
Play+ has 3 synthesizer slots each of which can be assigned 1 of 5 synthesizer models. These include 3 Analog emulations, 1 FM Operator model and a percussion synth. Each synthesizer has six editable macros directly available within the knob section and which contribute to the overall synth patch. These macro parameters will vary depending on the synth engine selected. Synth patches are also available for direct selection. Play+ operates with up to 8 Voices, assigned per patch.
ACD

ACD transports you back to the golden age of electronic music with its recreation of iconic singleoscillator monophonic analog synths. Paying homage to Japanese legends, ACD not only captures the essence of these classics but also propels you into the future with a lightning-fast synthesis experience. It offers a rich palette of options, ranging from faithful monophonic analog recreations to entirely unique and innovative soundscapes.
VAP

VAP is a virtual analog polysynth, boasting a dual-oscillator architecture and a versatile modulation matrix. Complete with multiple filter flavors and pulse width modulation, VAP allows you to sculpt intricate patterns. This engine shines when it comes to creating mesmerizing, evolving textures, crafting lush pads, and conjuring up one-of-a-kind sound effects.
PERC

PERC is a unique drum machine that is loaded into one synth engine instrument. It uses 1 voice but can play back up to five unique drum sounds at once. Drums include a Kick, Tom, Snare, open and closed Hi-Hats, Cymbal, and Perc. The perc drum has multiple options including snare, clap, cowbell and more. Each drum is individually tweakable with multiple parameters for each hit, for a massive variety of drum tones.
FAT

FAT is a powerhouse synth engine that epitomizes the lush, vintage warmth of classic analog synthezisers. At its core, FAT hosts three virtual analog oscillators and offers an intuitive drift and detune control, ensuring you can effortlessly sculpt iconic massive sounds. The presets contain two distinct flavors of ladder filters inspired by two unique analog classics. It offers a versatile range of sounds, from deep reese basses to ethereal pads, expressive leads and classic keyboards.
WTFM

WTFM is a unique 2-operator FM synth engine that utilized wavetable based oscillators driven by a 3x feedback system. The operators are based on sweeping wavetables, ranging from fundamental sine waves to harmonically rich timbres, offering a diverse tonal palette. Whether you're sculpting smooth, enveloping pads or crafting cutting-edge metallic tones, WTFM empowers you to achieve unique textures with precision and authenticity.
To select a Synth:
Press (Screen) to select the options and select 'Synths'. Choose a Synth slot in order to assign a model. Select from the 5 available synth models to assign per slot. The synth patch editor is also contained in the patch selection window.
SELECTING A SYNTH
- Ensure the project in which to work is open and active.
- Switch Play+ to change Audio/MIDI Mode. Press [Shift] + [Audio/MIDI]. The Function buttons will be lit purple for MIDI and Synth tracks as opposed to green when purely in audio sample track mode.
- Turn the (Sample) knob which is now assigned to the device list. The three synth slots can be found in the device list along with the MIDI device options.
- Double tap (Sample) or press the lower left screen button to choose the secondary patch parameter. Turn (Patch) to select a synth preset patch.
- Press a [Pad] to place on a step. The synth selected will determine the pad colour: Synth 1, Violet; Synth 2, Yellow; Synth 3, Green.
- The synth parameters consist of 6 available macro controls allocated to the Play+ knobs and assigned automatically based on the synth patch selected.
- The synth model can be changed for each of the four synthesizers within the settings options by pressing (Screen) and selecting 'Synths'. Each of the 3 synths can then be assigned a discrete synth model.
Synth Track Parameters
When MID / Synth Mode is selected, Synth specific parameters are available within the knob section. However, these are labelled as per the original audio sample nomenclature and will revert to the synth parameters and macros per synth engine when a Synth is selected

(1) reserved for future Use.
Patterns in the Play+ Grid
The grid is a multi-functional 8 x 16 button matrix used for various functions. When working with patterns the grid can operate in sequencer mode or pattern mode. Sequencer mode allows the creation and editing of individual patterns across 8 tracks and a maximum of 64 steps. This is the normal default view. Pattern mode helps manage the entire set of patterns, where each grid button represents one of the 128 individual patterns available within each project.
Default view is Sequencer Mode. Press [Patterns] to switch to Pattern Mode.

Last four columns 17-20 are function buttons that control pattern / track options.
This is available in pattern mode, sequencer mode and also when in perform mode.

Mute: Silence the selected tracks. Press a [Mute] pad
Solo: Plays only the selected tracks. Press [Solo] pad
Variation: Track variation selection. Press a [Variation] pad
Select: Selects track to edit. Press a [Select] pad
Sequencing mode grid allows sequencing of patterns by adding note steps Each row represents a track. The grid consist of 8 rows with 16 columns of pad buttons. The function of the pads depends on the mode selected. The first 16 columns left to right represent the pattern steps. The final 4 right side columns represent function pads, used to control mute, solo, variation and selection of each of the tracks. The function pads can also be used to set the pattern length and view each pattern page.

 Off. Step is empty and does not trigger any event. Tap [Pad].
 White. Step has an active sample or MIDI note event. Tap [Pad].
 Violet. Step has an active Synth 1 note event. Tap [Pad].
 Yellow. Step has an active Synth 2 note event. Tap [Pad].
 Green. Step has an active Synth 3 note event. Tap [Pad].
 Blue. Selected, note event step. Hold [Shift] + [Pad].
 Dim Blue. Selected, empty step. Hold [Shift] + [Pad].
 Orange. Playhead on currently active step for a track. [Play].
 Red. Playhead on currently active step - Live Rec Mode. [Play].
Pattern Mode
Pattern mode also uses the multi-functional 8 x 16 grid. The normal default view is sequencing mode where an individual pattern is created or edited. Pattern mode offers control over the entire set of 128 patterns, where each grid button represents an individual pattern in a project.
A pattern should be selected for editing and sequencing. By default pattern 1 is represented by the first, upper left pad and is normally selected. Patterns can be copied and pasted in pattern mode. In pattern mode, patterns can be chained for sequential playback all together or in sections.
Press [Patterns] to access the Pattern Mode.

The currently active pattern is lit  Orange and other available patterns lit
  Blue. Dimmed
  Green Pads signify empty patterns. Flashing pads indicate a pattern pending play.
To play chained patterns, Hold [Shift] + Press [Play]. This will play, left to right from the current pattern and then the next in series. An empty pattern slot signals the end of the chain and loops playback back to the first pattern in the chain.
SELECTING PATTERNS IN PATTERN MODE
- Press [Patterns] from sequencer mode to select pattern mode. If in pattern mode already, pressing [Patterns] will toggle to the sequencer mode.
- To select a pattern, Press [Pad] for the pattern to edit or play. Pads are laid out across the 8 x 16 grid with a total of 128 pattern slots available. Empty patterns are dimmed green, available patterns are blue and the currently active pattern will be lit orange.
- The selected pattern can now be played or edited in sequencing mode, selected by pressing [Patterns] from pattern mode.
Play Modes
Normal playback of a pattern including all tracks is to play steps forwards in sequence, left to right. Play modes allow the playback of the step sequence to be changed for Audio and MIDI / Synth tracks. This gives the ability to remix and shuffle arrangements. There are 35 play modes, each of which will determine the order of the steps when playing a pattern. Play modes consist of classic, pre-defined modes as well as custom modes.
To play the current single pattern: Press [Play]..... Press [Stop] to Stop
To play a chained series of patterns: Hold [Shift] + Press [Play]..... Press [Stop] to Stop
SELECTING A PLAY MODE FOR A TRACK
- Ensure at least one track is selected, ie Column 20 [Select] will be lit bright green for selected tracks.
- Tap (Track Length) to view the track length and play mode options.
- Double tap (Play Mode) to select the play mode option in focus. Also pressing the left screen buttons will switch between track length and play mode selection.
- Turn (Play Mode). Also turning (Screen) encoder knob will change the options when the play mode parameter is selected in view. Default, normal play mode is 'Forward'.
Default Play Mode: Forward
Each Track will play through the defined step length by default, forwards. Playback will then loop back to play from the start to end or move to the next pattern if playing a chain. Tracks play on loop.

Play progress bar will follow the duration of the longest track pattern. This will not show any progress if any tracks speed is set to pause.
| Play Mode | Description |
| Forward | Default play mode. Starting at step 1, plays through to the last step. Plays all steps to the end, then restarts from step 1 and continues to loop play. |
| Reverse | Starting at the last step, plays through to the first step. Plays all steps in reverse, end to start, then restarts from the end and continues to loop play. |
| First Steps | Repeats first 4 steps instead of 4 to 8. Shuffles steps in playback order later in the pattern especially when extending step pages. |
| Go Go | Similar to first steps but includes reversing playback across sections. |
| 2stepper | Plays only the first 8 steps from the start, then reverses on the 9th step playing backwards to the start. With extended step count pages steps may shuffle, but still only across the first 8. |
| Thumper | Plays across max 32 steps. Plays forward. Plays the step 7 twice, skipping step 8. Cycle repeats for each set of 8 steps, ie doubles 15, skips 16, doubles 23, skips 24 etc. |
| Doublestep | Plays across max 32 steps. Skips 14 & 16 and instead plays steps 13, 15 & 12. Step 13 is doubled. Steps are shuffled for 25, 26, 27, 29, 32. |
| Euphoria | Plays across max 32 steps. Skips steps and plays on the start of each bar for first 16 steps, then shuffles first and second step per bar on steps 17-32. |
| Tristram | Shuffles step forward and backwards playback across only first 1-5 steps irrespective of length of pattern. Shuffle behaviour is changed based on the total pattern length despite only playing up to the first 5 steps. |
| Funkster | Plays only steps 1, 3 & 5 forwards and backwards. The behaviour of the 3 step shuffle is based on the overall track length. |
| Trigger | Plays across max 32 steps. Shuffles playback across only steps 1, 2, 4, 5, and 14 or 30 depending on the total step length of the track. |
| Hattrick | Plays across max 16 steps. Shuffles playback across only steps 1, 3 & 5, and will also include step 2 if the track length is set greater than 16. |
| Averidger | Plays across max 16 steps. Shuffles playback back and forth across only steps 1, 2 & 5. |
| Reorganizer | Plays across max 16 steps. Shuffles playback back and forth across only steps 1, 2, 3, 4, 5, 8, 12 & 13. |
| Mashup | Plays across max 16 steps. Shuffles playback back and forth across only steps 1, 2, 5, 7, 9, 10, 11 & 12. |
| Mirror | Plays across max 16 steps. Playback of each bar played in reverse, i.e. Step 4, 3, 2 & 1, Step 8, 7, 6 & 5 etc through the 16 steps. |
| Clublab | Plays across max 16 steps. Shuffles playback back and forth across only the first 5 steps. |
| Clubdub | Plays across max 16 steps. Similar playback to Clublab but slight variation on the latter steps in the pattern. |
| Repeater | Plays across max 16 steps. Repeats on step 5 and on step 1, alternating in 1 bar sections throughout the 16 steps. |
| The End | Plays across max 16 steps. Shuffles playback back and forth across only steps 1, 2 & 5. |
| Tripler | Plays across max 16 steps. Shuffles playback back and forth around only steps 1 & 2 plus the addition of step 5. |
| Breaker | Plays across max 16 steps. Shuffles playback back and forth around only steps 1, 2 & 5 plus the addition of step 4. |
| Stomper | Plays across max 16 steps. Shuffles playback back and forth around only steps 1, 2, 4, 5, 6, 10 & 16 on the last step. |
| Tetris | Plays across max 16 steps. Shuffles playback back and forth through the cycle of only steps 5, 2 & 1. |
| Recognizer | Plays across max 16 steps. Playback of only steps 1 & 5 then shuffles across steps 2, 5 & 1. |
| Varibeat | Plays across max 16 steps. Playback cycles within only steps 1, 2, 3, 5 & 9. |
| Complicator | Plays across max 16 steps. Playback cycles within only steps 2, 3, 4, 5 & 9. |
| 9th Grade | Plays across max 16 steps. Playback alternates only between steps 9 & 2. |
| Irregulario | Plays across max 16 steps. Playback starting on step 9 and shuffling back and forth across steps 1-5. |
| Stepper | Plays across max 16 steps. Playback shuffles back and forth across steps 19, skipping step 7. |
| Revizor | Plays across max 16 steps. Playback starts and alternates between step 1 and backwards through 3 steps 15, 14, 13 then 12, 11, 10 and 8, 7, 6 finishing on 4, 3, 2. |
| Baker | Plays across max 16 steps. Playback shuffles back and forth across 1-5. |
| Lab | Plays across max 16 steps. Playback shuffles back and forth across steps 1, 2 & 5 and adds step 7 in the cycle. |
| Dub | Plays across max 16 steps. Similar to Lab. Playback shuffles back and forth across steps 1, 2 & 5 only. |
| Pixelizer | Plays across max 16 steps. Playback shuffles back and forth across steps 1, 2, 3, 4, 5, 7, 8, 9 & 16 only and 13 on the last step. |
Pick & Place to Create A Pattern
The first step in sequencing a pattern in Play+ is to pick a sample or synth and place it on the sequencer grid. This will populate steps in order to build a melody or a beat. General selection of a sample or synth and adjustments of its base parameters creates a work step. Subsequent placement into steps on the grid will populate each step selected with the same work step settings. This is performed in sequencer mode. All 3 Synths as well as samples can be combined together into a pattern.

- Select Pattern
Press [Patterns] and select from the pattern grid a pattern to work on. Pattern 1 top left. Press [Patterns] to switch back to sequencer mode to create the pattern steps. - Select Sample / Synth
Tap and Turn (Sample) to select. Double tap to select and turn to change the sample folder or the synth patch.

- Adjust Parameters
Adjust the sample or synth related parameters in order to create a general work step ready for placement.
![]()
- Ensure Sequencer Mode
Ensure sequencing mode is visible. Press [Patterns] or [Perform] to switch back from pattern and perform mode views. Pattern mode is used only to manage all patterns.

- Sequence Steps
Tap on each desired grid steps to place the work step and create note steps. Empty steps are unlit and note steps are lit white for samples and coloured respective to each synth. The sample or synth and settings are identical on each step placed.


Live Recording
Step recording allows manual placement of notes in the sequencer. Alternatively, live recording operates in real-time allowing notes and parameter adjustments to be recorded into the pattern as they are played.
- Select Tracks to Edit
Press [Select] function pad for the track to select.
Selected tracks illuminate light green and grid blue.

- Select Live Rec
Press [Live Rec] Screen button to engage live recording mode. Screen button is lit red.

- Play the Pattern
Press [Play] Screen button to play the pattern. Screen button shows playback progress bar. - To Add Notes
Press [View] to select the view controller. The right side 4 columns convert to an onboard MIDI keyboard. Play notes in. Alternatively use an external MIDI controller to play notes in.

- Record Parameter Changes
Turn (Parameter) knob to record in any parameter variations into the sequence in time with the pattern steps. The (Screen) knob can also be used.


View Mode
View mode presents an internal / virtual MIDI keyboard controller using the last four function pad rows. The keyboard can be changed to pad style in main menu configurations. The keyboard is laid out in two rows of keys to allow note entry in live recording mode. The notes applied are influenced by Play+ scale setting.
- Select View Mode
Press [View] to select the view controller. - View Mode Keyboard
The right side 4 columns convert to an onboard MIDI keyboard to play notes in. Scale setting influences the view mode keyboard.

- To Add Notes
Use the view pads to play and record notes in live mode. Green pads change the octave range for the keyboard.
![]()


Piano Roll
The piano roll presents the 8x16 Pad grid in a keyboard note format where each row represents an individual note within the selected scale. Audio and MIDI / Synth sequencers can be created using the piano roll. The pads are laid out in note rows with the root note indicated by the pink pad rows. The notes applied are influenced by Play's scale setting.
- Select View Mode
Hold [View] greater than 1 sec to select the Piano roll.
Tracks must be selected as pre-requisite. The number of which will dictate the available voices / notes.
![]()
- Piano Roll Keyboard
The 8 rows convert to piano style notes. Pink rows show the root note. A maximum of 8 Voices can be selected i.e. 8 notes max.

- To Add Notes
Use the grid pads to record notes. The available notes are dependant on the scale selected and scale filtering state. Rows are notes, columns are steps.
Examples: Root C, Scale Filter 'On', show notes in scale.


Fill Tool
Step sequencing and live recording provide manual functions for programming pattern sequences. The Fill Tool offers an automated option to populate steps in a track in an intelligent way. Fill can be initiated with the fill button and 'fills' can be generated several times to get the a pattern that is suitable for your needs.
- Load Sample Pack
Ensure the desired sample packs are loaded into the sample pool. Press (Screen) to access samples menu.
![]()
- Select Tracks, or a selection of steps, to Edit
Press [Select] function pad for the tracks to select.
Selected tracks illuminate light green and grid blue.

- Select Fill Mode
Press [Fill] button to engage Fill mode. Each subsequent press of the Fill button will generate a pattern fill on the tracks or steps selected and based on chosen algorithm.
![]()
- Select the Algorithm
Use the (Screen) knob to adjust the fill parameter in-focus. Use the left side [Screen] buttons to select the upper or lower parameter in-focus.
![]()
Fill Type sets the algorithm to apply when triggering a fill action. This is the upper parameter displayed. The lower parameter is the secondary parameter associated with the algorithm type. This will change depending on the algorithm selected. ![]() Initiate a 'Fill'
Initiate a 'Fill'
Each press of the [Fill] button will trigger the application of fill based on the algorithm settings, sample pack / sample, synth, track / step. Some algorithms like beat fills have pre-defined patterns while random placement of steps is also possible.- Experiment and Iterate
Try experimenting with multiple triggers of the fill command. Try different algorithms and even mix algorithms across different tracks. Iterate adjustments and fills to create and revise patterns to find an acceptable position.
![]()


 Initiate a 'Fill'
Fill Algorithm Summary
Fill algorithms are at the heart of the creative process in generating patterns. Experimentation is encouraged and coupling fill generated patterns with other parameters such as chance. Fill can be a quick and easy way to get started in generating patterns followed by fine tuning and editing of patterns towards a final state.
| Algorithm | Secondary Option | Description |
| Random | Density 10% - 100% | Randomly populates a number of steps governed by the density option across the selected track. |
| Euclidean | Events 1 - 64 | Populates an equally spaced number of steps governed by the events option across the selected track. |
| Beat | Genre (various) | Populates steps based on one of 128 predefined genre based patterns. Operates on up to 3 Tracks. Uses a variety of Kick, Snare and HiHat samples from the sample pool sample pack. |
| Kick | Genre (various) | Operates similar to beat fill but only for the individual instrument i.e. kick on a single track. |
| Snare | Genre (various) | Operates similar to beat fill but only for the individual instrument i.e. snare on a single track. |
| HiHat | Genre (various) | Operates similar to beat fill but only for the individual instrument i.e. HiHat on a single track. |
| Chords | Genre (various) | Populates steps based on one of 48 predefined genre based patterns. Operates on 4 Tracks to create polyphonic chords and note patterns. Uses the 'Synth' folder samples. |
| Bass | Genre (various) | Populates steps based on one of 48 predefined genre based patterns. Operates on 1 Track to create a bass line. Uses the 'Bass' folder samples. |
| Chords and Bass | Genre (various) | Populates steps based on one of 48 predefined genre based patterns. Operates on 5 Tracks to create polyphonic chords and a bass line. Uses the 'Bass' and 'Synth' folder samples. |
The configuration of the beat and melody fills is also possible in the Setting menu. The 'Fill Config' allows setting of the note to use for beat fills I.e a fixed note or use the fill template. Also for beat and melody fills the output MIDI channel can be set up to allow each fill instrument track to control its own external instrument via the MIDI channel.
![]() Fill algorithms are at the heart of the creative process in generating patterns. Experimentation is encouraged and coupling fill generated patterns with other parameters such as chance. Fill can be a quick and easy way to get started in generating patterns followed by fine tuning and editing of patterns towards a final state.
Fill algorithms are at the heart of the creative process in generating patterns. Experimentation is encouraged and coupling fill generated patterns with other parameters such as chance. Fill can be a quick and easy way to get started in generating patterns followed by fine tuning and editing of patterns towards a final state.
Tab.1
| Algorithm | Secondary Option | Description | |||||||||
| Random | Density 10% - 100% | Randomly populates a number of steps governed by the density option across the selected track. | |||||||||
| Euclidean | Events 1 - 64 | Populates an equally spaced number of steps governed by the events option across the selected track. | |||||||||
| Beat | Genre (various) | Populates steps based on one of 128 predefined genre based patterns. Operates on up to 3 Tracks. Uses a variety of Kick, Snare and HiHat samples from the sample pool sample pack. | |||||||||
| Kick | Genre (various) | Operates similar to beat fill but only for the individual instrument i.e. kick on a single track. | |||||||||
| Snare | Genre (various) | Operates similar to beat fill but only for the individual instrument i.e. snare on a single track. | |||||||||
| HiHat | Genre (various) | Operates similar to beat fill but only for the individual instrument i.e. HiHat on a single track. | |||||||||
Tab.2
| Beat Fill Genre | Variants | Beat Fill Genre | Beat Fill Genre | Beat Fill Genre | ||
| Acoustic | 1 -15 | x Backtrack | x Intellektual | x Robot Drum | ||
| Breakbeat | 1 - 8 | x Bicycle Fail | x Jump Up | x Sewers | ||
| Drum and Bass | 1 -16 | x Break It | x Jumpy | x Slow Down | ||
| Dub | 1 - 4 | x Cat Hat | x Kick It | x Snaresky | ||
| Electro | 1 - 8 | x Crocko | x Look Up | x Spaciality | ||
| Exotic | 1 - 9 | x Destroyson | x Market Beat | x Spill That | ||
| Garage | 1 - 8 | x Driller | x Melty | x Step Up | ||
| HipHop | 1 - 10 | x Drowner | x Metal Hits | x Swing It | ||
| House | 1 - 16 | x Dubzap | x Mind Glowing | x Swoosh | ||
| IDM | 1 - 16 | x Fade In | x Nice Break | x Take It | ||
| Latin | 1 - 4 | x Fast Walker | x Oh Wait | x Think | ||
| Techno | 1 - 8 | x Fill It | x Pattern Break | x Tin | ||
| Trap | 1 - 6 | x Half Life | x Pitcher | x Too Basic | ||
| x All Different | x Hat Trick | x Playing Funny | x Two People | |||
| x Always Late | x Hi-Hat Uzi | x Rewind | x Way Too Late | |||
| x Autumn Fall | x Hitman | x Ridge Racer | ||||
Track Variations
While patterns in themselves cover all 8 tracks, it is also possible to create and store variations of each track. This is useful in creating arrangements but also a great performance tool. Up to 16 variation slots are available for each track.
A variation is an alternative version of a track that can be created and then selected manually either to change an arrangement or used to add variety during on-the-fly and live performances.
![]() Press [Variation] pad for the desired track row to access one of 16 variations.
Press [Variation] pad for the desired track row to access one of 16 variations.

Variations operate at track level. They can be selected manually but it is not possible to automatically select or chain track variations together.
Variation Mode - 8x16 Grid Pad Colours
 Orange. Currently active / loaded track variation.
 Yellow. Empty Variation Slot.
 Bright Yellow. Available Variations.
Perform Mode
Perform mode presents a playable pad grid that generates punch-in effects for audio or MIDI / Synth tracks. Parameter adjustments are also possible. This creates an environment perfect for live and improvised performances.
USING PUNCH-IN EFFECTS IN PERFORM MODE
- Press [Perform] Screen Button. Perform mode is available for Audio and MIDI / Synth tracks.
- The Perform button tag on the display will illuminate yellow when in perform mode. In Perform mode switch between Audio Tracks - right pad rows green and MIDI / Synth tracks - right pad rows purple, Hold [Shift] + Press [MIDI / Synth].
- Perform Mode Considerations;
![]() If 'Live Rec' mode is active when entering Perform Mode, it will automatically exit. If pressing [Live Rec] when in Perform Mode then Perform Mode is exited and Live Rec selected.
If 'Live Rec' mode is active when entering Perform Mode, it will automatically exit. If pressing [Live Rec] when in Perform Mode then Perform Mode is exited and Live Rec selected.- The following primary / secondary parameters are not available in Perform Mode: Repeat Type / Repeat Grid, Chance / Action, Move / Micromove. For MIDI tracks Sample State / Sample End and Sample / Folder parameters are also disabled. Other parameters can be edited in Perform Mode.
- Any latched punch-in effects applied on the pads when exiting Perform Mode will be re-activated when re-entering Perform Mode. Not applicable to control knobs.
- The display will show the effect selected when in Perform Mode.
- The right side function buttons columns operate as normal re track selection, variations, mute and solo.
- To exit Perform Mode, Press [Perform] again. The Perform button display tag will revert to white.
- If selecting [Patterns] mode, the latched effects will remain in place.
Perform Mode Quick Reference
Perform Mode presents the 8x16 grid pads as an instrument controller which allows punch-in effects to be manually triggered. The pads are colour coded which represents one of the 8 headline categories of effect. Each pad then triggers a variation of the effect which can be a parameter value change, preset application or a change in the sequence. The screen display will indicate the last effect triggered when in Perform Mode.

Perform Mode: Press [Perform]
Latch / Unlatch an effect: Tap [Pad] Temporary Trigger an effect: Hold [Pad], Release [Pad]
Ensure tracks are selected to apply effects.
When perform mode is used in either the Audio track page or the MIDI / Synth page, the Delay, Reverb, and Loop will be applied to audio tracks.
Effect Architecture
Play+ has various effects which operate in different configurations. Sound FX and Saturation enhance the main output, while Delay and Reverb can be mixed into the main sound from each step or track. Many effects operate using presets found in the Master FX menu although custom settings are also possible. The mixer is an internal function with no user adjustable parameters. The diagram is for illustration purposes and indicates the user available parameter options.

 Preset available in the [Shift] + [Master FX], Master FX Menu
 Parameter available directly on knob
Master FX Presets - Hold [Shift] + [Master FX]
 Reverb
Big Room *
Small Room
Uncharted
Drone
Analog Repeats
Late
Bounce
Stereo Drums
Bright Sky
Space
Transparent Hall
 Delay
Delay
Dubster *
Triple Dubster
Bucket
Nanorobot
Widea
Brighteen
Monoroom
Stereoroom
Pipe
Degradah
Mononono
Cleanio
Twoism
Warbliani
Rabbithole
Stringston
Metalhead
Shock
Stringston Jr
Superfario
 Sound
Sound
Flat *
Clean Mix
Scoopy Doo B
Boom Box
Outside
Radio Call
Bass Mid Push
Wide
Sounds Good
Gradual F
ifuci Boost
 Limiter
Squishy
Boom
Release Me
Slo Attack
Heavy Nice and Low *
Broken Bones
Squish That Cat
Distortion
Waves
Sidechain Track 1
Sidechain Track 2
Sidechain Track 3
Sidechain Track 4
Sidechain Track 5
Sidechain Track 6
Sidechain Track 7
Sidechain Track 8
 Saturation
Hard Clip
Soft Clip *
Saturate
Overdrive
Overdrive+
Basic MIDI Concepts for Play+
![]() Play+ can be switched to MIDI mode when controlling external gear. MIDI mode is selected using [Shift] + [Audio/MIDI]. MIDI / Synth mode is indicated by the 4 column function pads being lit purple. A pre-requisite to working with MIDI is to ensure that the configuration settings are applied for the desired MIDI gear setup and a MIDI device selected using (Sample). MIDI Mode operates at a per step level. The parameter knob switches functionality from their faceplate labelled audio parameters to the unlabelled MIDI functions. The display will show the MIDI Parameter. Play+ can assign note data and specific channel settings at a step level to send MIDI out from the sequencer pattern.
Play+ can be switched to MIDI mode when controlling external gear. MIDI mode is selected using [Shift] + [Audio/MIDI]. MIDI / Synth mode is indicated by the 4 column function pads being lit purple. A pre-requisite to working with MIDI is to ensure that the configuration settings are applied for the desired MIDI gear setup and a MIDI device selected using (Sample). MIDI Mode operates at a per step level. The parameter knob switches functionality from their faceplate labelled audio parameters to the unlabelled MIDI functions. The display will show the MIDI Parameter. Play+ can assign note data and specific channel settings at a step level to send MIDI out from the sequencer pattern.

MIDI Mode
Play+ must be in MIDI Mode to program steps and send MIDI data out. The parameter options change when in MIDI mode where the knobs represent MIDI orientated functions. A MIDI device must be selected using (Sample) to access the features. These are not labelled and some can be configured specifically in the MIDI menu.

(1) reserved for future Use.
MIDI Quick Start
To get up and running with basic control of external MIDI devices here is a quick start guide to programming a MIDI sequence including Notes and CC messages. The general principles of setting steps and using work step parameters is applied the same as audio patterns.
CREATING A MIDI SEQUENCE
- For this example ensure that the device to control, i.e. an external synth, is connected via MIDI DIN Out. USB also transmits MIDI. Ensure it receives clock, transport and notes on channel 1.
- Press (Screen) knob to open the configuration menu. Set the MIDI Settings to Clock In = Internal, Clock Out = MIDI Out Jack, Transport In = Off, Transport Out = MIDI Out Jack.
- Switch Play+ to MIDI Mode. Press [Shift] + [Audio/MIDI]. The Function buttons will be lit purple as opposed to green when in audio mode.
- Press a [Select] Pad to choose one or more tracks or simply program the Grid [Pads] to sequence a pattern. Hold the step to apply and edit the parameters to only selected steps or use work step approach to set the values followed by programming the steps. Following examples are per step.
- Hold [Pad] + Turn (Sample) to assign MIDI output channel. This can be set 1-16 for MIDI Jack and also separately for USB. Set to Jack Channel 1. It is important to select a MIDI device at access MIDI parameters on the knobs.
- Hold [Pad] + Turn (Note) to assign a note to output. The option to set 'No Note' is possible which is useful to just send CC or PG data without a note message.
- Hold [Pad] + Turn (Volume) to set the Velocity for the step.
- Double Tap (Panning) to ensure the secondary option is in view. This is Note length in MIDI Mode. Hold [Pad] + Turn (Panning)
- Optionally, Hold [Pad] to assign a CC value to the step. Knobs can be assigned to send CC messages with defaults in place. With the sequencer stopped manual CC knob changes are sent while steps should be programmed for a sequence of CC change messages to be sent in sync to the pattern steps.
- Press [Play] on Play+ and the sequence will play the external device based on the notes and parameters set.
Audio Output Over USB
Play+ can send audio out over a connected USB connection. This will send 28 channels of mono audio or 14 stereo channels out to the connected device. The configuration is automatic within the Play+ and any compatible device connected to the USB connection will be able to access the audio channels from Play+.
| Channel | Outputs | Command |
| 1 | 1 & 2 | Master Output |
| 2 | 3 & 4 | Track 1 Stereo Audio Output |
| 3 | 5 & 6 | Track 2 Stereo Audio Output |
| 4 | 7 & 8 | Track 3 Stereo Audio Output |
| 5 | 9 & 10 | Track 4 Stereo Audio Output |
| 6 | 11 & 12 | Track 5 Stereo Audio Output |
| 7 | 13 & 14 | Track 6 Stereo Audio Output |
| 8 | 15 & 16 | Track 7 Stereo Audio Output |
| 9 | 17 & 18 | Track 8 Stereo Audio Output |
| 10 | 19 & 20 | Synth Tracks Stereo Output |
| 11 | 21 & 22 | Reserved |
| 12 | 23 & 24 | Reserved |
| 13 | 25 & 26 | Delay Stereo Audio Output |
| 14 | 27 & 28 | Reverb Stereo Audio Output |
Aggregate Device
To ensure compatibility with the USB Audio features of Play+ it is highly recommended to use a Mac or PC set up with an aggregate device. An aggregate device is a virtual interface created on the PC or Mac to integrate several audio in and out elements together. This overcomes any issues with multiple / separate devices used for inputs and outputs to a PC or Mac and allows audio software such as a DAW to connect seamlessly.
The process of setting up an aggregate device may differ depending on the operating system of the PC or Mac and also any connected devices. A general guide is provided in the full Play+ Manual downloadable from your Polyend account.
The ability to connect audio via USB is possible. An example is when using a PC or Mac via USB which hosts a compatible application, for example Ableton Live DAW. It is recommended to connect directly between devices as Play+ does not support USB hubs.
Example Configuration: Play+ out to Ableton Live.

Generic Firmware Update
Firmware updates may be provided by Polyend from time to time, to fix bugs or add new features. The process of updating can be performed in several ways. When performing updates it is strongly advised to follow the Polyend instructions supplied with each update. The instructions here are a generic guide only.
FIRMWARE UPDATE
- Download the latest firmware. Access firmware updates for your device from your registered account at Polyend.
- Copy the downloaded.ppf firmware file into the /Firmware folder. This can be found in the root directory of the SD Card.
- Insert the SD card into Play+ and power up.
- Press (Screen) knob to open the configuration and settings menu.
- Navigate through the 'Settings' and 'Firmware' menus. Open the 'Firmware Update' function, highlight the firmware version to install.
- Press (Screen), knob to select firmware.
- The screen will prompt "yes' or 'No' to confirm using the left screen buttons. To continue press [Yes].
- The firmware will install and the on screen prompts provided will guide. The install process is typically less than 1 minute.
- Play+ should restart automatically. If not and only when the update is 100% completed, Press On/Off to perform a manual start.


Emergency Firmware Update
Firmware updates are available from the polyend portal for your registered device. A reset button is provided, recessed behind the rear panel for emergency situations. A reset can be performed if there are issues with the update method or to clear Play+ issues but should not be used as a regular process for updates.
PLAY+ FIRMWARE RESET
- Download the latest firmware. Access firmware updates for your device from your registered account at Polyend.
- Copy the downloaded.ppf firmware file into the /Firmware folder. This can be found in the root directory of the SD Card. Also ensure any previous update files remain in the firmware folder.
- Insert the SD card into Play+.
- Use a pin or thin object to press the internal reset button. This is located on the rear of the device behind the case next to the USB connection.
- Play+ will reset and search the firmware folder on the SD Card. A random firmware will be selected and installed in order to recover Play+ to a working state. The install process is typically less than 1 minute.

The reset option is useful if any lock ups or freezing occurs on Play+. It is not necessary in these situations to download a new OS. It is advised to keep a series of official, known good, firmware releases in the / firmware folder. For example 1.2.0, 1.3.0, 1.4.0. That way steps 4-5 can be performed in case of issues and a random update will be performed from a known state. A manual update in the main menu to select the latest version can then follow. If problems persist, try updating after removing the 'workspace' folder from the SD Card.

Quick Reference Commands


Documents / ResourcesDownload manual
Here you can download full pdf version of manual, it may contain additional safety instructions, warranty information, FCC rules, etc.
Advertisement


Need help?
Do you have a question about the Play+ and is the answer not in the manual?
Questions and answers