
Related Manuals for Anker SOLIX C200 DC


Summary of Contents for Anker SOLIX C200 DC
- Page 1 What's in the Box Overview Recharge Your Power Station Powering Your Device LCD Screen Guide The Anker App for Smart Control Specifications USB Power Distribution Table...
- Page 2 How to Recharge Your C200 DC Notes: · Only the USB-C3 port can be used to recharge. Use an 18W or higher wall charger (9V-28V). · Use the included 140W USB-C cable and your own 140W adapter for the best charging experience.
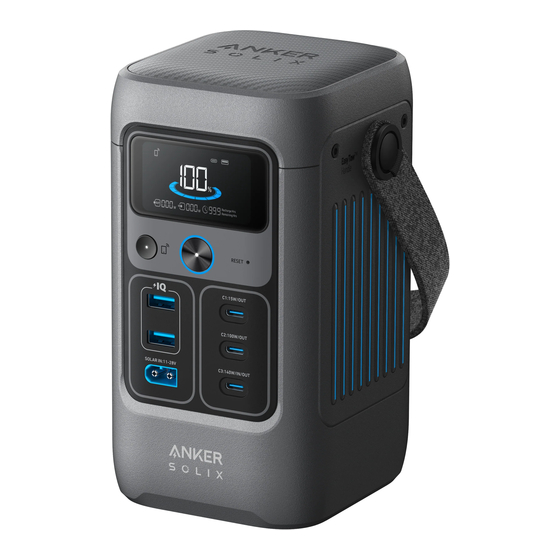
- Page 3 What's in the Box Anker SOLIX C200 DC 140W USB-C to USB-C Important Safety Instructions Portable Power Station Charging Cable Overview LCD Screen IOT Button Main Power Button 12W USB-A Output Port Solar Input and Car Input Handle* Reset 15W USB-C Output Port...
- Page 4 Recharge Your Power Station Solar Panel Recharging (100W Max) Recharge your power station with a maximum solar input of 100W by connecting up to one Anker 100W / 60W Solar Panel as shown in the figure with a solar charging cable*.
- Page 5 USB-C Recharging (140W Max) Recharge* your power station by connecting to a wall adapter with a USB-C cable**. *Only 140W USB-C Input / Output Port can be used to recharge. **Use the included 140W USB-C cable and your own 140W adapter for the best charging experience. Car Recharging Recharge your power station by connecting to a car's output port with the car charging cable*.
-
Page 6: Powering Your Device
When the "Remaining Battery" indicator shows on the LCD screen, your power station is ready to charge devices. • When powered on, press the main power button to turn the screen on or off. • The screen will automatically turn off after 30 seconds of lighting up. The auto-off time can be set in the Anker app. - Page 7 LCD Screen Guide IoT: Press the IoT button once to turn on Bluetooth and Wi-Fi, and connect your devices via the app when this icon appears on the screen. Press the IoT button for 2 seconds to turn off Bluetooth and Wi-Fi. Press the IoT button for 7 seconds to reset Bluetooth and Wi-Fi.
- Page 8 The solar input supports an 11-28V solar charger with an XT-60 connector. We recommend using Anker 100W / 60W Solar Panel for the best compatibility. Q2: Can the USB-C ports be used to charge Anker SOLIX C200 DC Portable Power Station (input only), or are they output only? The USB-C1 and USB-C2 ports are output only.
- Page 9 Note that the time cannot be changed. To reactivate the ports, unplug the connection cable, then plug it back in. Q8: Why didn't the Anker SOLIX C200 DC automatically shut down after I set the device timeout to 30 minutes? Anker SOLIX C200 DC Portable Power Station automatically shuts down under these two conditions: 1) If "Device Timeout"...
-
Page 10: Specifications
Specifications Cell Capacity 192Wh Solar Panel Input 11-28V 8.2A Max (100W Max) USB-C3 Input 9V 3A / 15V 3A / 20V 5A / 28V 5A (140W Max) USB-A Output (each port) 5V 2.4A (12W) USB-C1 Output 5V 3A (15W Max) USB-C2 Output 5V 3A / 9V 3A / 15V 3A / 20V 5A (100W Max) USB-C3 Output...
Need help?
Do you have a question about the SOLIX C200 DC and is the answer not in the manual?
Questions and answers