Advertisement

PLEASE READ THE FOLLOWING INSTRUCTIONS CAREFULLY AND RETAIN FOR FUTURE REFERENCE!
Technical specifications
- Dimensions: approx. 52 cm × 14 cm (W × H)
- Output/nominal voltage: 400–800 W / 230 V
- Protection type: IP20 (Keep device dry!)
- Protection class I
- Cord length: approx. 185 cm (with safety plug)
- Net weight: approx. 2 kg
- Geprüfte Sicherheit (GS; "Tested Safety"):
- Heat radiation and temperature distribution tested in accordance with the medical product standard (IEC60601-2-21:2009, AMD1:2016)
- GS-approved
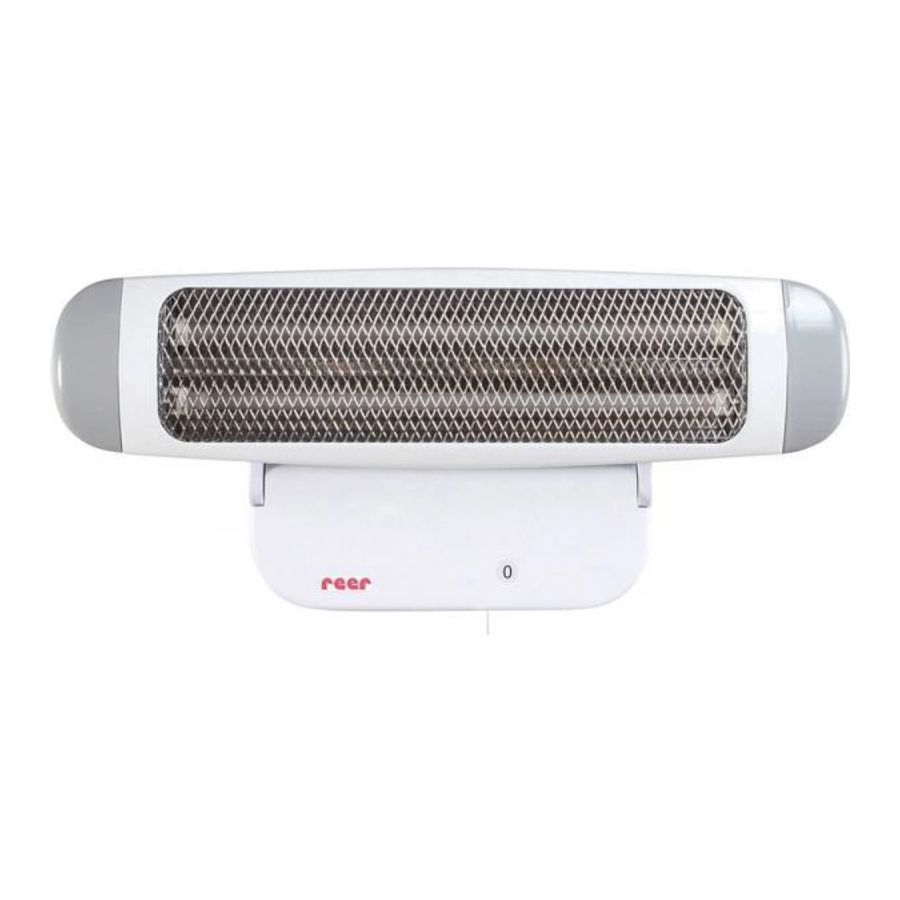
Scope of delivery Part description

A1 Heater with 2 heating tubes
A2 Heat setting indicator
A3 Switch for switching the automatic switch off function (timer) on/off
A4 Pull cord for switching the unit on/off
A5 Screws and wall plugs for wall mounting
A6 User manual
Safety instructions
 The instructions in the manual must be followed to avoid damaging the changing table heater. At worst, the unit may constitute a safety or accident hazard for your child, yourself or others.
Safety instructions regarding installation
- This product is not intended as a main heating unit!
- The unit may not be used in small rooms that are occupied by people who cannot leave the room independently.
- Please use the article only for its intended purpose.
- The unit is for personal use only, and is not intended for commercial operation.
- Improper use will lead to the loss of any warranty entitlement.
- Do not use the unit outdoors.
- Remove all packaging material before use.
- Check the unit for visible damage before each use. Do not use the unit if it or the power cord has been damaged.
- Check whether the information on the rating plate corresponds to your mains voltage.
- Do not subject the device to physical shocks.
- Do not move the unit during operation!
- Repairs must be carried out by qualified and skilled personnel only. Improper repairs may pose considerable risks to the user – this includes changing the power lead.
Warnings
Fire hazard:
- Do not cover! Never place anything on the unit, even when it has cooled down.
- Take note of minimum distances! Position the unit at least 65 cm away from combustible materials, such as wood, textiles, etc. A minimum distance of 35 cm between the heater and the ceiling must be observed.
- The unit must be connected directly to the power socket. Do not connect any control devices, such as timer switches, remote control switches, etc., to the unit.
- Keep the supply line away from all hot equipment components, as well as other electrical appliances.
- There is a risk of fire if these instructions are not followed! In case of an emergency, make sure you know in advance where the nearest fire extinguisher is located. In the event of a fire, please pull the plug out immediately and tackle the fire.

- To avoid the risk of electric shock and/or fire hazard, do not submerge the unit or the plug in water, other fluids or flammable cleaning materials.
- Risk of electric shock! Do not use this unit close to bath tubs, showers, sinks or other containers filled with water. Never touch the plug or unit with wet hands! Proximity to water also represents a hazard when the unit is switched off.

- The unit may never be used without supervision.
- The maximum exposure period may not exceed 15 minutes. Small children with a raised temperature may not be subject to exposure. There is a risk that their body will overheat.
- Avoid additional heat radiation, such as sunlight or other sources of radiation, as this can cause your baby's body temperature to rise.
- A minimum distance of 100 cm between the heater and the table must be observed at all times.
- This unit is not equipped with a setting to regulate room temperature. The heating unit may not be used in small rooms that are occupied by people who cannot leave the room independently.
- This product is not a toy! Do not allow children to play with the unit.
- Risk of strangulation! The power lead must be secured out of the reach of children to avoid any risk of strangulation.

- Risk of injury: Do not touch the unit during operation.
- Do not use the unit within the reach of children. Secure power leads and ensure that they cannot be pulled on by mistake, causing the unit to fall to the ground.
- This equipment is not intended for use by persons (including children) with reduced physical, sensory or mental capabilities, or lack of experience or knowledge, unless they are supervised whilst using it or have been shown how to use it correctly by a person responsible for their safety.
Wall-mounted assembly

- Remove the assembly plate from the unit as shown.
- Hold the wall bracket on the wall taking into account the minimum distances and mark the drill holes with a pencil.
- Use a spirit level to position it horizontally.
- Bolt the wall bracket to the wall using the supplied screws and wall plugs.
- Slide the changing table heater into the relevant grooves on the wall bracket.
- Screw the changing table heater to the wall bracket using the screws removed in fig.
Safety instructions for wall mounting:
- The changing table heater may only be mounted on the wall in a fixed position and horizontally. It may not be attached to the ceiling!
- The changing table heater must not be mounted on wood, plastic or other flammable materials or under plug sockets.
Putting into operation

- Insert the mains plug into the power socket.
- Pull the pull cord to switch the heater on. The heater can be set to two heat settings: 400 W (setting "1") and 800 W (setting "2").
- By pulling on the pull cord again, the heat setting can be changed or the unit can be switched off again (setting "0").
Automatic switch-off function

- To activate the automatic switch-off function, switch the timer switch on the bottom of the unit to the „ON" position. The unit switches off automatically after 10 minutes.
- There are 2 ways of switching the unit on after automatic switch-off:
- Move the rocker switch to the „Off" position or
- pull the pull cord, until the heat setting indicator shows „0".
If the pull cord is pulled again on heat setting „1" or „2", the unit is switched on again.
Troubleshooting
| Issue | Possible causes | Remedial action? |
| No heat radiation despite heat setting indicator showing „1" or „2". |
|
|
Cleaning, maintenance
Before you commence cleaning, make sure that the unit is switched off and cool (pull plug out). Clean the surface with a dry or slightly damp cloth. The reflector and heating rods should only be cleaned by skilled personnel. The unit is not waterproof and so should not be immersed in water or exposed to direct moisture. This product does not require any special maintenance. Repairs to the unit must be carried out by skilled personnel only.
Muehlstr. 41 • 71229 Leonberg • Germany • www.reer.de
Documents / ResourcesDownload manual
Here you can download full pdf version of manual, it may contain additional safety instructions, warranty information, FCC rules, etc.
Advertisement


Need help?
Do you have a question about the FeelWell and is the answer not in the manual?
Questions and answers