Advertisement
Quick Links
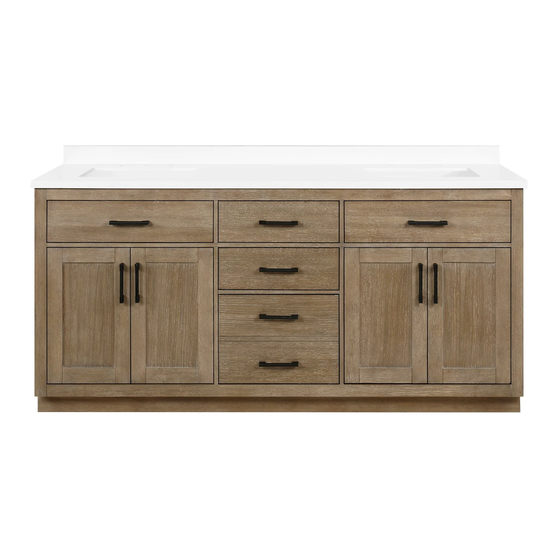
8" [204]
4" [102]
4" [102]
6X
2X
ø1 3/4" [44]
2024-08-16
INSTALLATION MANUAL | MANUEL D'INSTALLATION | MANUAL DE INSTALACIÓN
72" [1830]
8" [204]
4" [102]
ø1 3/8" [35]
43 1/4" [1098]
Questions, problems, need help?
Call our customer service department at
1-866-839-2888, 8 a.m. - 5 p.m., EST, Monday - Friday
Questions, problèmes ou besoin d'aide?
Contactez notre service à la clientèle au
1-866-839-2888, du lundi au vendredi de 8h00 à 17h00 HNE.
Preguntas, problemas o necesita ayuda?
Llame a nuestro departamento de servicio al cliente al
1-866-839-2888, 8 am. - 5 pm., HDE, Lunes a Viernes.
www.ovedecors.com | customerservice@ovedecors.com
DIMENSIONS
DIMENSIONS
DIMENSIONES
10" [254]
4" [102]
Ø2 15/16" [75]
BAILEY 72
Measures: inch [millimeter]
Mesures: pouce [millimètre]
Medidas: pulgadas [milímetros]
72" [1830]
10" [254]
PAGE 1
Advertisement

Related Manuals for OVE BAILEY 72


Summary of Contents for OVE BAILEY 72
- Page 1 BAILEY 72 INSTALLATION MANUAL | MANUEL D’INSTALLATION | MANUAL DE INSTALACIÓN Measures: inch [millimeter] Mesures: pouce [millimètre] Medidas: pulgadas [milímetros] DIMENSIONS DIMENSIONS DIMENSIONES 72” [1830] 72” [1830] 8” [204] 8” [204] 10” [254] 10” [254] 4” [102] 4” [102] 4” [102] 4”...
- Page 2 HOW TO MOVE THE VANITY COUNTERTOP COMMENT DÉPLACER LE DESSUS DE LA VANITÉ CÓMO MOVER LA ENCIMERA DEL VANITY NEVER LIFT THE VANITY TOP FROM ITS SHORT SIDE LIFT THE VANITY BY HANDLING IT ON ITS LONGEST SIDE COMMENT DÉPLACER LE DESSUS DE LA VANITÉ SOULEVER LE MEUBLE EN LE TENANT PAR SON CÔTÉ...
-
Page 3: Parts List Liste Des Pièces Lista De Piezas
PARTS LIST LISTE DES PIÈCES LISTA DE PIEZAS PART # DESCRIPTION QUANTITY CODE # DE PIÈCE DESCRIPTION QUANTITÉ CODE PARTE # DESCRIPCIÓN CANTIDAD CÓDIO Countertop Comptoir 99VCT2269-EI Encimera Backsplash Dosseret 99VBS-U3GO4129 Salpicadero Basin Lavabo 99VBA2100-FY Lavabo Dark Ebony / Ebène foncé / Ébano oscuro: 99VDO-6HH6SH3L-FY Sahara Birch / Bouleau Sahara / Abedul Sahara: 99VDO-HV4S7976-FY Tilt-down drawer (left) Tiroir rabattable (gauche) - Page 4 PARTS LIST (Continued) LISTE DES PIÈCES (suite) LISTA DE PIEZAS (Continuación) PART # DESCRIPTION QUANTITY CODE # DE PIÈCE DESCRIPTION QUANTITÉ CODE PARTE # DESCRIPCIÓN CANTIDAD CÓDIO Dark Ebony / Ebène foncé / Ébano oscuro: 99VDO-30A331L8-FY Sahara Birch / Bouleau Sahara / Abedul Sahara: 99VDO-FEN0V75V-FY Door (left) Porte (gauche) White / blanc / blanco: 99VDOX11544-EI...
- Page 5 SUPPLIED HARDWARE LIST QUINCAILLERIE FOURNIE CONTENIDO DE HARDWARE Screw Spanner Tornillo Clé de serrage Llave de tuercas Spring washer Rondelle à ressort Rondana de presión WARNING! THE HARDWARE (AA to DD) IS PRE-INSTALLED ON THE Flat washer MDF BOARD. Rondelle plate DO NOT DISCARD THE HARDWARE.
- Page 6 GFCI ACCESIBILITY GUIDELINE LIGNE DIRECTRICE D’ACCESSIBILITÉ GFCI DIRECTRIZ DE ACCESIBILIDAD GFCI GFCI (plug with reset button) GFCI (prise avec bouton reset) GFCI (enchufe con botón de reinicio) Receptacle panel Panneau réceptacle 1.1. Prior to vanity installation, ensure that the wall outlet is in an unobstructed Panel de receptores easily accessible area at the rear of the vanity in order to have the GFCI (plug with reset button) accessible.
- Page 7 GFCI FIRST TIME USAGE GUIDELINES DIRECTIVES POUR LA PREMIÈRE UTILISATION DUDDFT DIRECTRICES DE USO DE LA GFCI POR PRIMERA VEZ • This GFCI is shipped from the factory in the tripped condition and cannot be reset until power is supplied to the device. Plug the GFCI to your receptacle. Ensure that the GFCI is still in the tripped condition by pressing the TEST button.
-
Page 8: Preparation Préparation Preparación
PREPARATION PRÉPARATION PREPARACIÓN Remove all the mounting hardware on the basin and the MDF board. Important: The Basins are very fragile. Take caution when handling them, and have someone assist you. Retirez toutes la quincaillerie de montage sur le bassin et le panneau MDF. Important : Les bassins sont très fragiles. - Page 9 BASIN INSTALLATION INSTALLATION DU BASSIN INSTALACIÓN DE CUENCAS 1.1. Carefully turn the countertop over, resting it on a soft, stable surface to prevent damage. Important: The countertop is very fragile. Take caution when handling it, and have someone assist you. Caution: Basin overflow must be positioned across from the faucet holes.
- Page 10 BASIN INSTALLATION INSTALLATION DU BASSIN INSTALACIÓN DE CUENCAS 2.1. Carefully place the basins upside down on the countertop, positioning them within the marked outline. Once positioned, press firmly into place. 2.2. Reuse the hardware, install the new basin brackets (FF), spring washers (BB) and washers (CC) into the glued basins mounting base in the countertop using the screws (AA), attach the basin brackets against the basin lip as illustrated.
-
Page 11: Installation Installation Instalación
INSTALLATION INSTALLATION INSTALACIÓN 3.1. Apply silicone lines onto the vanity cabinet where the countertop will be placed. Place the countertop on top of the vanity. 3.2. Wipe off the area of the countertop where the backsplash will sit using a clean cloth. Apply a line of silicone onto the unfinished bottom side of the backsplash. - Page 12 INSTALLATION INSTALLATION INSTALACIÓN 4.1. Apply silicone sealant along the edge underneath the counter where it meets the top trim. 4.2. Wipe away any seeping silicone from underneath the backsplash (B) with caulk finishing tool and clean cloth. 4.3. Place the metal ring and tube as illustrated. 4.4.
- Page 13 DRAWER ADJUSTMENT (HOW TO REMOVE) RÉGLAGE DU TIROIR (COMMENT L’ENLEVER) AJUSTE DEL CAJÓN (CÓMO QUITARLO) *If necessary, each drawer is designed to be removed or replaced: 1.1. Pull out the drawer until the lock pins located at the sides of the drawer are easy to reach. Pull up the lock pin on the left side of the drawer, and push it down on the right side to release the drawer.
- Page 14 DRAWER ADJUSTMENT (HOW TO REMOVE) RÉGLAGE DU TIROIR (COMMENT L’ENLEVER) AJUSTE DEL CAJÓN (CÓMO QUITARLO) *If necessary, each drawer is designed to be removed or replaced: 3.1. Pull out the drawer until the lock pins located at the bottom of the drawer are easy to reach. 3.2.
- Page 15 SHELF ADJUSTMENT (HOW TO REMOVE) RÉGLAGE DE LA TABLETTE (COMMENT L’ENLEVER) AJUSTE DE LA ESTANTERÍA (CÓMO QUITARLA) *Each shelf can be removed or repositioned to create more space: 1.1. Uninstall the screws and remove the shelf. 1.2. Pull out the shelf holders. *Chaque étagère peut être retirée ou repositionnée pour créer plus d’espace : 1.1.
- Page 16 HOW TO ADJUST THE DOOR’S POSITION COMMENT RÉGLER LA POSITION DE LA PORTE CÓMO AJUSTAR LA POSICIÓN DE LA PUERTA To adjust the door front In and Out in-depth, loosen screw (A), align the door, and tighten screw (A). Pour régler la profondeur d’entrée et de sortie de la porte, desserrer la vis (A), aligner la porte et serrer la vis (A). Para ajustar la profundidad de entrada y salida de la puerta, afloje el tornillo (A), alinee la puerta y apriete el tornillo (A).
- Page 17 MAINTENANCE AND CARE ENTRETIEN ET MAINTENANCE MANTENIMIENTO Y CUIDADO Cabinet care- • For daily maintenance, use a wet cloth and a soft liquid cleaner and wipe dry. • Never use abrasive cleaners or strong bleach, scrapers, metallic brushes, or other objects or any products which can graze or tarnish surfaces. Touch-up pen (applicable to paper laminated finish only): Shake the pen a few times before use.
- Page 18 Cet appareil est conforme aux limites d’exposition aux radiations fixées par la FCC pour un environnement non contrôlé. Informations sur la partie responsable : • Nom : OVE Decors ULC • Adresse (Canada) : 950 MICHELIN, LAVAL, QUEBEC H7L 5C1, CANADA •...
- Page 19 WARRANTY NOT VALID IN MEXICO LIMITED 1 YEAR WARRANTY This warranty applies to the DISTRIBUTOR vanities installed for commercial and residential use. The DISTRIBUTOR warrants that, when installed in accordance with the Recognized Plumbing Industry Practice, the vanities are free of manufacturing defects for a period of one (1) year from the date of purchase. We guarantee your satisfaction with each vanity.
Need help?
Do you have a question about the BAILEY 72 and is the answer not in the manual?
Questions and answers