Advertisement
- 1 PRODUCT DIAGRAM & PARTS
- 2 SERIAL NUMBER
-
3
ASSEMBLY INSTRUCTIONS
- 3.1 PREPARATION
- 3.2 UNPACK YOUR RIDE
- 3.3 ATTACH & ADJUST THE HANDLEBARS
- 3.4 FIXING THE FRONT WHEEL
- 3.5 ATTACH THE DISPLAY
- 3.6 ATTACH THE PEDALS
- 3.7 ATTACH REFLECTORS
- 3.8 ATTACH FENDERS AND HEADLIGHT
- 3.9 SADDLE ADJUSTMENT
- 3.10 BRAKES
- 3.11 CHECK & ADJUST FRONT BRAKES
- 3.12 CHECK & ADJUST REAR BRAKES
- 3.13 INFLATE TIRES
- 3.14 REGISTER YOUR RIDE
- 4 BEFORE RIDING
- 5 OPERATION
- 6 BATTERY CARE & MAINTENANCE
- 7 TROUBLESHOOTING
- 8 PRODUCT INSPECTION CHECKLIST
- 9 SAFETY INSTRUCTIONS
- 10 OWNER RESPONSIBILITY
- 11 RIDING PRECAUTIONS
- 12 Documents / Resources
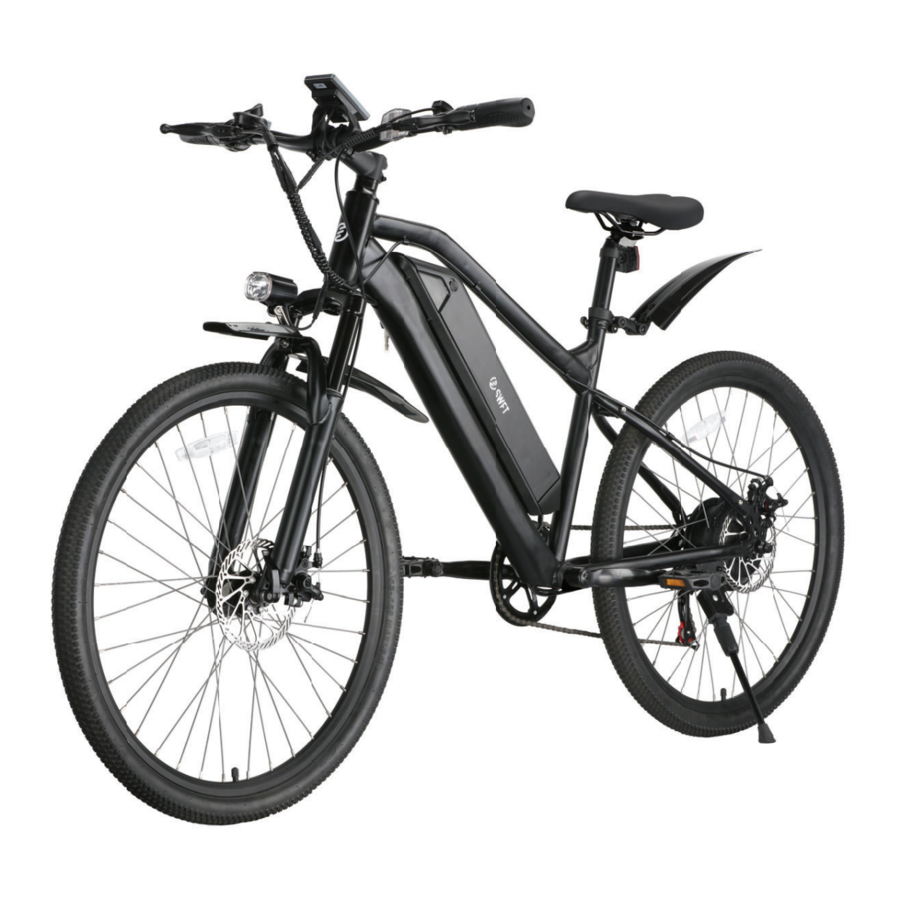
PRODUCT DIAGRAM & PARTS

- Tire
- Motor
- Disc-Brake
- Saddle
- Frame
- Monitor Display
- Handlebar Stem
- Handlebar
- Headlight
- Battery
- Chain
- Chain Wheel
- Kickstand
- Crank & Pedal
- Fork
- Fender

SERIAL NUMBER
EACH BICYCLE HAS A SERIAL NUMBER AFFIXED ONTO THE BOTTOM OF THE E-BIKE (SEE ILLUSTRATION).
Record this number HERE to keep for future reference. This number can be helpful to the manufacturer in customer complaints or issues.
THIS INFORMATION IS ONLY AVAILABLE ON THE E-BIKE ITSELF.
There is no record of your serial number at the store purchased or with our company. It is your responsibility to record this information.
Serial

ASSEMBLY INSTRUCTIONS
Your new bicycle was assembled and tuned in the factory and then partially disassembled for shipping. The following instructions will enable you to prepare your bicycle for years of enjoyable cycling. For more details on inspection, lubrication, maintenance and adjustment of any area please refer to the relevant sections in this manual.
If you have questions about your ability to properly assemble this bicycle, please consult a professional bicycle mechanic before riding.

TO AVOID INJURY, THIS PRODUCT MUST BE PROPERLY ASSEMBLED BEFORE USE. WE STRONGLY RECOMMEND THAT YOU REVIEW THE COMPLETE ASSEMBLY GUIDE AND PERFORM CHECKS SPECIFIED IN THE OWNER'S MANUAL BEFORE RIDING.
PREPARATION
It is important that you read this owner's manual before you start to assemble your bicycle.
WE HIGHLY RECOMMEND THAT YOU CONSULT A PROFESSIONAL BICYCLE MECHANIC IF YOU HAVE DOUBTS OR CONCERNS AS TO YOUR ABILITY TO PROPERLY ASSEMBLE, REPAIR, OR MAINTAIN YOUR E-BIKE.
Remove all parts from the shipping carton. Check to make sure no parts are loose on the bottom of the carton. Carefully remove the front wheel which is attached to the side of the bicycle for shipping. Carefully remove all other packing material from the bicycle. This includes zip ties, axle caps and material protecting the frame.
UNPACK YOUR RIDE
Congrats on your new ride! This manual will show you how to assemble the SWFT EDGE e-bike. We recommend getting a friend to lend a hand as you go along for extra support. If you're new to e-bikes, we recommend having a professional check your work after completing assembly. SWFT is not liable for damages that occur due to improper assembly of the bike.
Carefully lift the bike out of the box and stand it upright in a clear working space. Remove additional bike parts and smaller boxes from inside the package and place them on the ground in your work area. You should have a box containing your operation manual, quick start guide, charger, pedals and assembly tools, including three Allen wrenches and a multi-purpose wrench.
Remove additional packaging material from your bike, including protective foam, cardboard and zip ties. Now you're ready to get started.
TO AVOID INJURY, THIS PRODUCT MUST BE PROPERLY ASSEMBLED BEFORE USE. WE STRONGLY RECOMMEND THAT YOU REVIEW THE COMPLETE ASSEMBLY GUIDE AND PERFORM CHECKS SPECIFIED IN THE OWNER'S MANUAL BEFORE RIDING.
ATTACH & ADJUST THE HANDLEBARS
Your handlebars have two main parts -- the bar itself and the stem. If your bar has been removed for shipping you will need to attach it to your stem.

Please refer to the above diagram and steps for attaching your handlebar.
- Position the bar in the center of the stem to be sure that your handlebar grips are in the correct place and that the angle of the bar itself is comfortable for you.
- Tighten the screws to hold the bar in place in an X-pattern, ensuring all brake and display cables are clear. The suggested torque of these screws is 5-6N.m.
- Tighten the stem screw located at the top of the handlebar stem. The suggested torque between the frame and the stem should be 12-15N.m.
- You may adjust the handlebar stem angle by loosening the allen screws underneath the stem. Tighten the stem adjustment screw after repositioning the stem. The suggested torque of the upper stem should be 8-10N.m.
Check that the forks and the handlebars are facing forward and straight. Stand at the front of your e-bike, squeeze the front wheel with your legs, and twist the handlebar ensuring that the front wheel faces perfectly straight with your handlebar.
FIXING THE FRONT WHEEL
Your e-bike front wheel axle comes equipped with a Quick Release mechanism. This makes it easier to attach or remove your wheel when necessary without the need for tools.
The Quick Release uses a long bolt (called a skewer) with an Adjusting Nut on one end and a cam lever on the other. Follow the below steps to attach your front wheel.

- With the Quick Release lever in the open position (curved away form the e-bike), insert the front wheel into the open ends of your e bike fork.
- Ensure that the springs are located in the correct position as indicated in the above diagram, and insert the Quick Release Lever through your front wheel hub to the other side, attaching the Spring and Adjusting Nut as shown above.
- While holding the Quick Release lever in one hand, tighten the Adjusting Nut on the opposite end of your wheel until it stops.
- Pivot the Quick Release lever slowly toward the e-bike to the closed position. You should feel resistance as you do this at the halfway mark. There must be a firm resistance against the lever, or else it means the wheel is not set correctly. If you feel no resistance, reopen the Quick Release lever, hold it in your hand, and tighten the Adjusting Nut further before trying again.
- Continue to move the lever all the way to the closed position so that the curved part of the lever faces the e-bike.
- The Quick Release lever is open when you are able to read "OPEN" on the lever. Verify the Quick Release lever is set to the closed position. When closed, you will be able to read "CLOSED" on the lever arm.
ALWAYS MAKE SURE THE QUICK RELEASE LEVER IS SET IN THE "CLOSED" OR LOCK POSITION PRIOR TO RIDING
ATTACH THE DISPLAY

Locate your display and the double-arm bracket.
- Remove the screws holding the bracket arms closed and set them aside.
- Position the bracket arms over the center stem of your handlebars as shown, with the display facing the rider. Your display brackets should fit outside of your handlebar bracket.
- Replace the screws and tighten the bracket. Do not over-tighten as this may damage the bracket.
ATTACH THE PEDALS

Pedals are marked with "L" and "R" to indicate left and right. Do not remove these labels until after you finish assembling your pedals. Align your right pedal to the pedal crank on the right side. Tighten in a CLOCKWISE direction, as if you are pedaling forward. Align your left pedal to the pedal crank on the left side. Tighten it in a COUNTER-CLOCKWISE direction, as if you are pedaling forward. Check your pedals before each ride to ensure that they are tight.
ATTACH THE PEDALS IN THE DIRECTIONS INDICATED. WHEN ATTACHING THE LEFT PEDAL, COUNTER-CLOCKWISE IS CORRECT. THIS IS COUNTER-INTUITIVE TO HOW MOST ITEMS TIGHTEN, BUT WILL ENSURE YOU DO NOT STRIP YOUR PEDALS. STRIPPING PEDALS CAN LEAD TO SERIOUS INJURY, AND WILL DAMAGE YOUR E-BIKE AND INVALIDATE YOUR WARRANTY.
ATTACH REFLECTORS
HANDLEBAR-MOUNTED FRONT REFLECTOR
Your front reflector is pre-attached to the mounting bracket.

- Position your front reflector on the center of your handlebar, with the reflector facing forward.
- Insert the screw into the bracket to tighten the bracket onto the handlebar. Do not over-tighten the screw to prevent cracking or breaking the bracket.

Ensure your reflector is positioned at a 90 degree angle from the ground. If the reflector is aimed up or down, oncoming headlights may not reflect properly and you may not be visible to others on the road.

SEAT POST REFLECTOR
Slide your seat post reflector onto the mounting bracket. You will need to attach it to the bottom of your seat post.
- Locate the reflector bracket and your reflector. Slide the reflector onto the bracket until it clicks into place.
- Side the mounted reflector and bracket onto the bottom of your seat post so it sits directly under the saddle.
- Tighten the clamp screw to hold your reflector in place, and adjust to ensure it is upright and facing away from the bike.
Ensure your reflector is positioned at a 90 degree angle from the ground. If the reflector is aimed up or down, oncoming headlights may not reflect properly and you may not be visible to others on the road.
ATTACH FENDERS AND HEADLIGHT
INSTALLING YOUR FRONT FENDER
Your front fender will share the same bolt as your front headlight bracket (the silver arm that holds your headlight upright). Your headlight bracket will come attached to your fork bridge (the black bridge between the two front forks of your e-bike). To install your front fenders, follow the instructions below.

- Remove the bolt holding your headlight bracket to your fork bridge.
- Position your fender above the center of your fork bridge as shown in the photo on the right. The shorter end of your fender should face forward.
- Use your original headlight bracket bolt and attach your headlight bracket arm to your front fender to hold it in place as shown in the diagram on the right.
INSTALLING YOUR REAR FENDER
Your rear fender attaches underneath your seat post, underneath your reflector. Please see the photo below for reference. Attaching your rear fender is similar to attaching your rear reflector.

- Locate your rear fender, ensuring that the rubber ring is in the center of the bracket.
- Slide the fender and bracket onto the bottom of your seat post, making sure your fender is positioned below your rear reflector.
- Position as desired and tighten the clamp screw to hold your fender in place.
- To adjust the angle of your rear fender, you can loosen the adjusting nuts on the fender arm and adjust the tilt and angle of your rear fender. Please make sure that your fender is clear of your rear wheel spin before riding.
SADDLE ADJUSTMENT

Your seat height is adjusted by a quick release. Pull the quick release lever. Insert your seat post past the minimum insertion line marked on the post. This ensures that the seat lock has a secure grip on your seat post. Adjust the seat to your desired height, and then tighten the adjusting nut on the quick release lever, then push the quick release lever closed to lock your seat in place. Ensure you do not over-tighten the adjusting nut by the quick release lever. Make sure your seat feels stable after you attach it.
Adjust the seat angle to your preferred comfort by loosening the nuts that attach the seat to the seat rail. Ensure that the nuts are tightened firmly and that the seat does not move forward or back while you're sitting on it.
BRAKES
Make sure your brakes are adjusted correctly at all times prior to riding. The left brake lever controls the front wheel. The right brake lever controls the rear wheel. If you have any questions, we recommend having a professional check your work after completing assembly.
CHECK & ADJUST FRONT BRAKES
Locate your caliper on your front wheel. It is located on the left side next to the disc brake. Tighten the positioning screw on the tip of the caliper. The sensitivity of your brakes will depend on how far you tighten the screw on the caliper. You can adjust brake sensitivity by loosening or tightening this screw.
Check your brakes by lifting the bike frame and spinning the front wheel. The front wheel should spin smoothly. Pull the left brake lever to check brake function and sensitivity. Adjust your brake sensitivity to your comfort, but ensure after every adjustment, your front wheel still spins smoothly.
It is important that you check brake function before every ride. The left brake lever controls the front brakes. The right brake lever controls the back brakes. If your brakes are squeaking or under-performing, please seek help from a professional to have them serviced.
CHECK & ADJUST REAR BRAKES
Your bike comes with the rear wheel assembled and the rear brakes pre-calibrated. However, if you would like to adjust the sensitivity of your rear brakes, follow these next steps.
Locate your rear brake caliper on the left side of your rear wheel. The sensitivity of your brakes will depend on how far you tighten the screw on the caliper. You can adjust brake sensitivity by loosening or tightening this screw.
Check your rear brakes' sensitivity by lifting the bike frame and spinning the rear wheel. The wheel should spin smoothly. Pull the right brake lever to check brake sensitivity. Adjust your brake sensitivity to your comfort, but ensure after every adjustment, your front wheel still spins smoothly.
INFLATE TIRES
Your tires will arrive inflated and ready to ride, but always check tire pressure before hitting the road. Your EDGE has a maximum inflation of 50 PSI - this means pounds per square inch and we recommend checking this with a pressure gauge, which can be found on an air pump. We recommend checking your tire pressure often. If you need to add air to your tires, the EDGE tires can be filled with a bicycle hand pump, which you can find at most bike shops or sporting goods stores. Safely inflated tires should feel firm and slightly compressible between your thumb and index finger when squeezed.
REGISTER YOUR RIDE
After reading through the pre-ride checklist and ensuring that bike parts are securely fastened and adjusted (including your handlebars, saddle, brakes, and pedals), you're almost ready to hit the road. If you're new to e-bikes, we recommend having a professional at your local bike shop check your work before your first ride.
But first, be sure to register your e-bike and activate your warranty at rideSWFT.com
You'll need your serial number found on your bike. Store your manual with your records in a safe place, and refer to it for more tips and recommendations so you can continue riding smoothly and safely.
Lastly, get moving and have an awesome ride! If you have any questions, reach out to our support line at 833-747-4631 or email us at hello@rideswft.com. We're here to help!
BEFORE RIDING
Just a minute before each ride can significantly improve your safety and the enjoyment of your ride. So, each time before you ride, make a habit of performing the following safety checks:
PRE-RIDE CHECKLIST
- Stand in front of the bicycle facing rearward and hold the front wheel securely between your legs. Try to twist the handlebars and verify that they do not move. Then pull the handlebars up, trying to lift the bike. There should be no movement.
- Try to push the front wheel from side to side and confirm that it feels tight and will not wobble. Lift the front wheel up by the handlebars and strike the wheel downward with the heel of your hand to confirm that it is securely attached to the wheel. Spin the front wheel and confirm that it does not wobble or contact the fork or brake pads.
- Try to lift/push down on and twist the seat to confirm it is tight.
- Inspect the connection of the pedals to the crank arm. You should not see pedal screw threads and the pedal should feel firm and be parallel to the ground.
- Apply your brake(s) and make sure they feel firm to the touch, and then spin the wheel(s). Apply the brakes. The brakes should stop the wheel(s).
- Check to be sure that the fenders and accessories (if equipped) are firmly attached and will not contact any moving parts. Make sure all reflectors are in position and not broken.
- Now, put on your BICYCLE SAFETY HELMET and enjoy your ride. Your safety is well worth just a minute. Also, be sure to read and follow the warnings and instructions in this manual.
CORRECT FRAME SIZING
When selecting a new bicycle, the correct choice of frame size is a very important safety consideration. The ideal clearance will vary between types of bicycles and rider preference. This makes straddling the frame when off the saddle easier and safer in situations such as sudden traffic stops.
| Approximate Rider Leg Length | Suggested Frame Size for Racing/Touring Bicycle | Suggested Frame Size for Mountain/Hybrid Bicycle |
| 24-27in / 61-69cm | - | 14.5in / 37cm |
| 26-30in / 66-76cm | - | 17in / 43cm |
| 28-31in / 71-79cm | 19.5in / 50cm | 18in / 45cm |
| 30-33in / 76-84cm | 21.5in / 55cm | 19.5in / 50cm |
| 31-34in / 79-86cm | 22.5in / 57cm | 20.5in / 52cm |
| 32-35in / 81-89cm | 23,5in / 60cm | 21-22in / 53-56cm |
| 34-37in / 86-94cm | 25in / 63cm | 23-23.5in / 58-60cm |
NOTE
THERE SHOULD BE A CLEARANCE OF NO LESS THAN 1-2 INCHES BETWEEN THE GROIN AREA OF THE INTENDED RIDER AND THE TOP TUBE OF THE BICYCLE, WHILE THE RIDER STRADDLES THE BICYCLE WITH BOTH FEET FLAT ON THE GROUND.

NOTE
THE SEAT POST "MINIMUM INSERTION" / "MAXIMUM HEIGHT" MARK SHOULD NOT BE VISIBLE WHEN THE SEAT POST IS INSERTED INTO THE SEAT MAST OF THE BIKE. DO NOT RAISE THE SEAT POST BEYOND THIS MARK.
NOTE
THE SEAT POST OR FRAME MAY BREAK CAUSING YOU TO LOSE CONTROL AND FALL. ALWAYS CHECK TO MAKE SURE THE SEAT POST ADJUSTING MECHANISM IS TIGHTENED SECURELY BEFORE RIDING.
OPERATION
Your e-bike is driven by a motor embedded in the hub of the rear wheel and can not be driven directly by throttle. The motor is powered by a battery. The amount of power delivered to the motor and hence the accelerating force on the e-bike, is controlled by you in a way according to the power-assisted mode you choose.
START YOUR UNIT
Press the power button (M) on the monitor display for 3 seconds. The monitor display and battery will turn on.
Once your monitor display is ON, verify that the Battery Indicator shows sufficient charge for your ride. If the battery does not have sufficient power for your ride, please refer to instructions on how to charge the battery.
Be sure to turn the bike and battery power off when not in use or while recharging.
START YOUR RIDE
Once you begin riding, you can choose the appropriate assistance level using the INCREASE PEDAL ASSIST [  ] or DECREASE MOTOR ASSIST [
  ] buttons on your display.
The motor will assist you once you start pedaling. There are 3 levels of assistance on the display.
HEADLIGHT
Press and hold up arrow for 3 seconds to turn on the headlight. Repeat to turn off the headlight.
NOTE
During riding, excessive braking and accelerating will deplete the battery faster. When in pedal assist mode the motor will stop assisting once you stop pedaling. Your e-bike's rated maximum load is 220lbs/100kg- 265lbs/120kg including the rider. Do not overload your e-bike.
When walking the bike or no longer riding it is important to turn the battery off by pushing the power button next to the display screen. Otherwise, there is risk of activating the motor and the crank arm while pushing the bike which may lead to an accident.
FOR YOUR SAFETY, PLEASE MAINTAIN AND CLEAN YOUR E-BIKE REGULARLY.
MONITOR DISPLAY
Your e-bike is equipped with an LCD control display that monitors motor assist, speed, odometer, trip distance, riding time, and battery energy level. Before turning on the display, make sure the e-bike battery is charged.

- Battery Life Indicator
- Speed
- MODE: Pedal Assist Level
- ODO: Odometer
- Distance
- KM / Kilometers
- MILE
- TRIP: Single Trip Distance
- Error Code
- Cruise Control
- Headlight Status
- Walk-Assist On/Off
- Single Trip Riding Time
TURNING ON THE DISPLAY ON
Press the power button (M) on the button selector located near the left grip on the handlebars to turn the display on. You can adjust the motor-assist power level by pressing the INCREASE PEDAL ASSIST [ ] button or DECREASE PEDAL ASSIST [ ] button.
The bars of the battery indicator display the amount of power remaining in the battery. The more bars that are displayed, the more battery power available. When not riding the bike, you can turn off the display by holding down the power button (M) for several seconds.
PEDAL ASSIST
When first riding your e-bike, you will notice that when the pedal assist function is activated, the motor will supply power when you pedal forward.
In pedal assist level 1, you will activate assistance measuring around 20% motor power. In level 3, you will activate assistance utilizing 100% of the motor's power. When the monitor display is powered off, the bicycle will operate without motor assistance. The assistance level will reset when the bike and monitor are powered off.
Experiment with the different levels of pedal assist to become familiar with how much power you want. You will need different levels of assistance for different riding conditions.
NOTE
When the e-bike is not used for 5 consecutive minutes, the LCD control display and power supply will shut off automatically.
THROTTLE & CRUISE CONTROL
The throttle allows you to activate the motor with or without pedaling. Locate the throttle on to the right handle and gently twist clockwise to become acquainted with motor power released by the throttle. Turn further clockwise to increase power until you reach a comfortable speed.
To activate cruise-control, you must first pedal at a speed faster than 5 mph, then press and hold the down arrow button for 3 seconds to engage cruise control. Your motor will work together with your battery to maintain your speed. To disengage cruise-control, accelerate using the throttle, or squeeze the brake lever.
BATTERY CARE & MAINTENANCE
CHARGING THE PRODUCT
Fully charge your battery before your first ride and then after any operation, especially after long-distance riding.
Park the e-bike where an electric outlet is available. With the battery off, insert the round charging plug of the charger into the charging port on your e-bike frame, and then plug the other end into a standard 100-240 volt AC outlet.
The charging indicator will turn red when the battery is charging. The indicator will turn green when the battery is fully charged.
It takes up to 4.5 hours to fully charge a 7.5Ah battery pack.
When the charging is finished, unplug the electrical plug from the wall outlet first, then disconnect the charging plug from the e-bike.

NOTES FOR CHARGING
- Always charge your bike and ensure that you are equipped with ample battery power prior to riding.
- PLEASE CHARGE THE BATTERY IN A DRY, WELL VENTILATED AREA WITH ADEQUATE POWER SUPPLY.
- To protect the battery, only use the original charger designated for your e-bike. Please do not use the enclosed charger to charge other e-bike models or batteries.
- The charger contains a high-voltage circuit. Do not dismantle it.
- Only charge the battery while it is switched off.
- Keep the charger away from liquids and foreign substances.
- Protect the charger from impact and avoid dropping it or letting objects drop onto it.
- Do not cover the charger when it is charging.
- Please keep and use your charger in a dry and ventilated area.
- During charging, if the charger emits any smell or it becomes excessively hot, please stop charging and contact customer service.
- Do not charge your e-bike without supervising the charging process.
YOUR PRODUCT'S BATTERY PACK

You can check your battery life from your display. However, you can also check battery life directly from your battery, press the power button on the battery to have the housing indicate remaining power supply. The LED lights will indicate remaining battery life.
- Red Blinking: 25% Power Remaining
NOTE: YOUR 25% INDICATOR LIGHT WILL REMAIN RED DURING CHARGING AND REGULAR USE.
NOTE: You can still ride your e-bike as a regular bike while the battery is dead.
Your e-bikes battery pack is removable. It is recommended you remove your battery pack if you are not riding your e-bike for extended periods of time, storing it, or have parked your e-bike in an unsecured location.

UNLOCK BATTERY
Insert your e-bike key into the keyhole and tum counterclockwise to unlock battery.
LOCKING THE BATTERY
Align your battery into place and press it down to affix it to your frame. Insert your key into the keyhole and tum clockwise to lock your battery to the frame.

CHARGING THE BATTERY PACK
Before charging your e-bike battery, ensure that your battery and e-bike are turned off. Shift the protective flap covering the charge port. Connect your charger to your e-bike until your charger indicator light turns green, indicating it is fully charged.
BATTERY OPTIMIZATION
- Extend your battery lifespan by regularly charging your battery when it reaches 50%-70% depletion rather than fully exhausting the battery power before recharging. Fully charge the battery after each long-distance ride.
- Do not overcharge the battery (in excess of 10 hours), especially in hotter climates. Doing so may damage the battery or prevent it from fully charging.
- Recharge the battery once a month, even if your bike is in storage and not in use.
- Charge the battery indoors. Avoid charging the battery in extreme temperatures outside of 32°F - 104°F (0°C -40°C).
- Keep battery away from fire, liquid, corrosive substances and long-term sun exposure
- We recommend charging your e-bike through a surge protector. This will help avoid damage to electrical components during storage and charging.
NOTE: You can still ride your e-bike as a regular bike while the battery is dead.
Your e-bike battery pack is removable. It is recommended you remove your battery pack if you are not riding your e-bike for extended periods of time, storing it, or have your e-bike parked in an unsecured location.
TROUBLESHOOTING
| No. | Problems | Causes | Troubleshooting |
| 1 | Battery gauge lights up but bicycle does not operate |
|
|
| 2 | Bicycle operates but battery gauge does not light up |
|
|
| 3 | Bicycle has reduced speed and/or range |
|
|
| 4 | Bicycle has intermitted power | 1. Loose connectors 2. Loose fuse 3. Damaged wires |
|
| 5 | Charger light does not operate |
|
|
| 6 | Charger completes charging in an unusually short amount of time |
|
|
| 7 | Chain jumping off freewheel sprocket or chain ring |
|
|
| 8 | Gear shifts not working properly |
|
|
| No. | Display Error | Causes | Troubleshooting |
| 1 | ERR 000 | None. Normal function | None. Normal function |
| 2 | ERR 006 | Battery Low Voltage | Charge the battery |
| 3 | ERR 007 | Motor Failure | Check the motor cable is plugged in and connected properly |
| 4 | ERR 008 | Throttle Failure | Check the throttle cable is plugged in and connected properly |
| 5 | ERR 009 | Controller Failure | Check the controller cable is plugged in and connected properly |
| 6 | ERR 010 | Display Connection Failure | Check the display cable is plugged in and connected properly |
| 7 | ERR 011 | Display Connection Failure | Check the display cable is plugged in and connected properly |
PRODUCT INSPECTION CHECKLIST
It is important to regularly carry out the following safety checks before every ride:
BRAKES:
- Ensure front and rear brakes work properly
- Ensure brake shoe pads are not over worn and are correctly positioned in relation to the rims.
- Ensure brake control cables are lubricated correctly, adjusted and display no obvious wear.
- Ensure brake levers are lubricated and tightly secured to the handlebar.
WHEELS & TIRES:
- Ensure tires are inflated within the recommended limit as displayed on the tire sidewall.
It is important to replace your tires after significant wear. Riding tires with excessive rim wear poses a safety risk.
- Ensure tires have thread and have no bulges or excessive wear.
- Ensure rims run true and have no obvious wobbles or kinks.
- Ensure all wheel spokes tight and not broken.
- Check that axle nuts are tight. If your bicycle is fitted with quick release axles, make sure locking levers are sufficiently resistant and in the closed position.
STEERING COLUMN:
- Ensure handlebars and stem are correctly adjusted and tightened, and allow proper steering.
- Ensure that the handlebars are set correctly in relation to the forks and the direction of travel.
- Ensure that the handlebar grips are properly positioned and tightened.
FRAME & FORK:
- Check that the frame and fork are not bent or broken.
- If either are bent or broken, they should be replaced.
CHAIN:
- Ensure chain is oiled, clean and runs smoothly.
- Please go to the qualified technician for adjusting the correct chain tension.
- Extra care is required in wet or dusty conditions.
REAR SUSPENSION:
- Please check the rear suspension connection regularly.
BEARINGS:
- Ensure all bearings are lubricated, run freely and display no excess movement or grinding.
CRANKS & PEDALS:
- Ensure pedals are securely tightened to the cranks.
- Ensure cranks are securely tightened to the axle and are not bent.
DERAILLEURS:
- Check that front rear mechanisms are adjusted and function properly.
- Ensure control levers are securely attached.
- Ensure derailleurs, shift levers and control cables are properly lubricated.
ACCESSORIES:
- Ensure that all reflectors are properly fitted and not obscured.
- Ensure all other fittings on the bike are properly and securely fastened, and functioning.
- Always wear a helmet when riding.
If any safety-critical components need to be changed, please see an authorized retailer or professional bicycle repair shop.
This assembly and operation manual shall remain an integral part of the e-bike. When you transfer the e-bike to others, please include this manual as it contains the important safety guidance and operation instructions. Anyone riding the e-bike should carefully read the safety guidance and operation instructions prior to riding.
Changes in pictures, diagrams, data, descriptions and specifications in this manual may change as we continuously improve our products.
SAFETY INSTRUCTIONS
Motorized e-bikes are new to most riders so in the interest of safe cycling make sure you read, understand, and follow the instructions in this manual.
This manual contains important safety, signal words such as DANGER, WARNING, CAUTION, IMPORTANT, and NOTE or NOTICE. These are important signal words telling you to pay special attention to that text as rider safety is involved.
This symbol will appear in areas of critical rider safety.
Pay special attention to the words DANGER and WARNING as failure to do so can result in serious injury or death to the rider or others.
CAUTION notes will indicate instructions that need to be followed to prevent injury, mechanical failure, or damage to the e-bike. They also indicate a hazardous situation, which, if not avoided, can cause minor or moderate injury.
 NOTE or NOTICE or IMPORTANT specify special interest notes. Pay close attention to these as your safety and that of your e-bike is involved.

Read the BEFORE RIDING section and check that all parts are working as stated in the manual. If you understand how the e-bike operates, you will ensure the vehicle's best performance. When you read this manual, compare the illustrations to your e-bike. Learn the location of all controls and parts and their functions. KEEP THIS MANUAL FOR FUTURE REFERENCE.
Before you ride the e-bike, check the brakes and other parts of the bike. Make sure all parts are assembled correctly, securely tightened, and working properly. Take your first ride in a large, open, level area away from traffic.
DO NOT RIDE YOUR E-BIKE WITHOUT FIRST SECURING AND FASTENING ALL HARDWARE CORRECTLY.
Make sure you read this complete manual before riding your e-bike. Failure to do so, or failure to follow its guidelines could lead to serious injury or death.
To reduce the risk of injury, close supervision is necessary when the product is used near children.
Brake pads and rotors get very hot during use and could burn skin. The edges can also be very sharp and cut skin. Do not touch the brake pads or rotors directly after riding your e-bike.
Proper use of your brake is vital to ensure safe, efficient stopping. To avoid misuse and potential injury, do not apply sudden or excessive force to your brakes. Apply your brakes gradually and give yourself enough room to come to a complete stop safely.
Different localities and countries have different laws governing riding on public roads, and you should check with local officials to ensure you are complying with these laws
Brakes do not work as well under wet conditions as they do when dry, It is recommended that you do not ride your e-bike in wet weather, as there are electronic components of your e-bike that may be damaged if exposed to water.
Wet conditions will require a longer distance to stop. Brake earlier and avoid sudden stops when riding in wet conditions.
When you ride in low-visibility conditions such as fog, dusk, or at night, vision could be impaired, which could lead to a collision. Wear bright reflective clothing when riding in poor lighting conditions and use lights.
There may be additional risk to injury if you use your e-bike incorrectly.
This includes, but is not limited to:
- Riding e-bike over debris or obstacles
- Performing stunts
- Riding on off-road terrain
- Riding fast
- Racing other riders
- Riding in an unusual manner
The aforementioned examples add stress to each part of your e-bike and can lead to long term damage of the e-bike. Damage to your e-bike can lead to an accident or increase your risk of injury. To decrease your risk of injury, operate your e-bike correctly.
Do not ride the e-bike without the battery pack. The battery pack must be on the e-bike while riding or else the motor and safety lights will not function when needed.
Check to see that your wheels are securely fastened and that your helmet is securely fastened.
Protect the battery docking connector. When the battery pack is removed, apply a protective cover to prevent corrosion and damage to the connector.
Remove the battery pack from the e-bike and store it elsewhere in the vehicle during your transport.
Always respect local transportation laws when riding your e-bike.
Lithium battery packs of this size and power are considered "Dangerous Goods, Class 9." When transporting, regulations may restrict the transport of separate lithium batteries in some places.


Tampering or modifying the electric circuit system may case a shock, fire or explosion and permanently damage the system. Exposed wiring and circuitry in the charger may cause electric shock. Always keep the charger housing closed.
SEEK IMMEDIATE MEDICAL ATTENTION IF YOU ARE EXPOSED TO ANY SUBSTANCE THAT IS EMITTED FROM THE BATTERY PACK.
This equipment is not intended to be used at ambient temperatures less than -20°C (-4°F) or above ambient temperatures of 55°C (131°F)."
The battery is intended to be charged when the ambient temperature is between 0°C (32°F) and 40°C (104°F)
SAFETY PRECAUTIONS
- If the e-bike is not to be used for an extended period of time, you may need to recharge the battery every 1 month to maintain the battery life.
- Ensure that the screws on the front and back tires are locked firmly before each ride.
- Check to ensure the tires are not worn..
- Check to ensure all connections are maintained on your e-bike.
- Ensure the brake cables are well lubricated. It is suggested you lubricate brakes every 6 months
- Ensure all gears move smoothly.
- Make sure there are no frayed cables, loose connections, missing fasteners or axle/lug nuts.
- For your safety, always wear a helmet that meets CPSC or CE safety standards. In the event of an accident, a helmet can protect you from serious injury and in some cases, even death.
- Obey all local traffic laws. Obey red and green lights, one-way streets, stop signs, pedestrian crosswalks, etc..
- Ride with the traffic, not against it.
- A crash can put extraordinary stress on your e-bike's components, possibly causing them to fail prematurely. Components suffering from stress fatigue can fail suddenly, causing loss of control, or serious injury.
CARE & MAINTENANCE
- Do not expose the e-bike to liquid, moisture, or humidity to avoid damage to the electrical system.
- Do not use abrasive cleaning solvents to clean the e-bike.
- Do not expose the e-bike to extremely high or low temperatures as this will shorten the life of the electrical system, destroy the battery, and/or distort certain plastic parts.
- Do not dispose of the e-bike in a fire as it may explode or combust.
- Do not expose the e-bike to contact with sharp objects as this will cause scratches and damage.
- Do not let the e-bike fall from high places, as doing so may damage the internal circuitry.
- Do not attempt to disassemble the e-bike.
- Use only the specified charger provided.
- Ensure the e-bike chain is well lubricated for optimal performance.
- To minimize tire wear and for maximum riding safety, comfort and handling, maintain recommended tire air pressure which can be found on the side wall of all tires. Use a reliable tire air pressure gauge to check for proper inflation before every ride. At the same time, inspect tires for excessive wear and cracks. Replace tires if necessary.
OWNER RESPONSIBILITY
Reading and following the information and instructions in this manual are essential to the ability of the owner or any other persons allowed to use this bicycle in order to ride safely.
- It is the responsibility of the owner or in the case of a younger rider the parents of the rider to be certain all assembly instructions have been followed, even if the bike has been assembled by the seller, manufacturer, or a professional assembly company.
- Brakes are essential to safety. Be sure they are checked and working properly before each use. Remember that any mechanical system changes condition during use and must be maintained and checked before each use.
- Rules for bicycle use (bicycle laws) vary from location to location so be certain the rider knows and understands the rules that apply to bicycle usage in all areas where the bicycle will be used. Wearing a helmet, light or reflective clothing, using lights and reflectors are examples of rules which may exist and which make sense as rider safety precautions at all times.
- Know how to operate the bicycle and all equipment on it before first use and be certain anyone allowed to use the bike knows how to properly and safely use the bike as well.
- There are many different types of bicycles and often these types are designed for different uses. Make sure you know what type unit you have and do not exceed its service limitations. Be sure you check and understand the bicycle classifications set in this manual, including size of the unit that is proper for the rider to insure good control during use. Riders who are too small or large may have control problems. Do not overload a unit with a rider that is too heavy or too large, and do not attempt to carry extra passengers, packages or loads on the bicycle. Do not use street bikes for off road riding.
- Your electric bike is water-resistant, but must be properly maintained to preserve this condition. Please do not submerge the bicycle or any electric components in water. Water entering electric components can cause a short circuit and damage the electric components with possible injury to the rider and others.
- The battery's performance can be effected by its environment. Generally speaking, battery's discharge performance is better in a higher temperature. Electric power will drop by more than 1/3 when the temperature is below 32°F (0°C). Thus, this e-bike's riding distance per charge will become shorter in winter or cold areas. It returns to normal / optimal when the temperature is higher than 68°F (20°C).
![burn hazard]() Do not put any metal objects in charge hole or battery circuit, it may cause a short circuit, start a fire, or cause an explosion with personal injury or property damage.
Do not put any metal objects in charge hole or battery circuit, it may cause a short circuit, start a fire, or cause an explosion with personal injury or property damage.
For your safety you must carefully read this manual and follow its instructions. Your bicycle may come with additional instruction sheets that cover features unique to your bike. Please ensure that you read and become familiar with their contents and retain them with this manual for future reference. Remember bicycles, in most areas, are subject to the same laws, rules, and regulations as motor vehicles.
Always wear a CPSC approved helmet when riding your bike.
Learn and follow local and state traffic use laws.
Any major service or adjustments on your bike not covered in this manual should be carried out by a professional bicycle mechanic. If you wish to make adjustments yourself, this manual contains important tips on how to do it.
Any adjustments you make are entirely at your own risk. Do NOT use your bike for freestyle and stunt riding, jumping or competitive events. Even if you are riding a mountain bike, you should know that off-road use or any similar activities can be dangerous, and you assume the risk for personal injury, damages or losses incurred from such use. Do not ride your bike when any part is damaged or not working properly.
You must, for your safety and the safety of other users, consult a professional bicycle mechanic for any questions on repairs or maintenance.
As with all mechanical components, the bicycle is subjected to wear and high stresses. Different materials and components react to wear or stress fatigue in different ways. As your bicycle ages, you should inspect it more frequently to look for deformed, cracked, bent, or loose components. Such conditions may lead to sudden failure. This may possibly cause injuries to the rider. If something is cracked or broken, do not ride until repairs have been made.

ALWAYS WEAR A HELMET!
IT COULD SAVE YOUR LIFE
A properly fitting, CPSC-approved bicycle helmet should be worn at all times when riding your e-bike.
The correct helmet should:
- be lightweight and comfortable
- have good ventilation
- cover the forehead and fit correctly
- be securely fastened on the rider
RIDING PRECAUTIONS
![]()
ON AND OFF ROAD CONDITIONS: The condition of the riding surface is very important to your safety. If the surface is wet, or has sand, leaves, small rocks or other loose debris on the surface where you plan to ride, carefully decrease the speed of the bicycle and ride with extra caution. It will take a longer time and more distance to stop. Apply the brakes sooner and with less force. Always apply the rear brake first allowing time and distance for it to take effect. Then follow by cautiously applying the front brake, in order to maintain control of the bicycle. Rapid front brake application first may cause a front pitch over or fall. Learn to use your brakes properly under controlled conditions until you learn proper braking under all road conditions.- NOTICE: State and federal regulations require a full set of reflectors. Some state and local laws may require that your bike be equipped with a warning device, such as a horn or bell and most states require a light. The manufacturer and many legal authorities DO NOT approve or encourage riding at night. Vision is quite limited at dawn, dusk and at night for bike riders, motorists and by-standers. If you must ride at night, take extra precautions, use front and rear lights, wear flashers on your arms, wear light-colored clothing, and plan your route to ride in well lighted areas avoiding heavy traffic areas.
- NOTE: Always wear shoes when riding a bicycle and avoid loose fitting clothes. Wear a cuff band or trouser clip to keep pants or other loose clothing from getting caught in the chain wheel. Long sleeves, long pants, gloves, eye protection, a CPSC-approved helmet, elbow and knee pads are recommended.
Helmet use is required by law in many states and is always a good idea for your safety. ![]()
WET WEATHER WARNING: Check your brakes frequently. The ability to stop is critical to your safety. Roads are slippery in wet weather so avoid sharp turns and allow more distance for stopping. Brakes become less efficient when wet. Leaves, loose gravel and other debris on the road can also lengthen stopping distance. If at all possible, do not ride in wet weather. Vision and control are impaired, creating a greater risk of accidents and injury.![]()
A bicycle rider's best defense against accidents is to be alert to road conditions and traffic in the area. Do not wear anything that restricts your vision or your hearing.- When riding, ALWAYS WEAR A CPSC-APPROVED BIKE HELMET. It may save your life.
- Obey all traffic regulations. Most traffic regulations apply to bike riders as well as automobile operators. Observe all state and local traffic regulations, signs and signals. Check with your local police station on bicycle licensing and inspection, and where it is legal to ride your bike.
- Keep to the RIGHT SIDE of the road. Follow the traffic flow in a straight line close to the curb. Watch out for opening car doors and cars moving in and out of traffic. Use caution at intersections.
- Never carry passengers. This is dangerous and it makes the bicycle harder to control. Never carry anything that can inhibit your ability to control the bicycle or see the road.
- When riding in pairs or in larger groups, form a single line along the right side of the road. Set up a sensible distance between riders. Don't follow too closely.
- Always be alert. Animals or people may dart in front of you. Give pedestrians the right-of-way. Don't ride too close to pedestrians, and don't park your bicycle where it can get in the way of foot/vehicle traffic.
- Be careful at all intersections. Slow down and look both ways before crossing.
- Use hand signals. Always let other drivers and pedestrians know what you are going to do. Signal 100 ft. before turning unless your hand is needed to control the bike.
![]()
NIGHT TIME OPERATION: We do NOT recommend riding your bike at night. If you have an emergency that requires you to ride at night you must have proper lights and reflectors. NEVER ride at night without a helmet, taillight, a white front reflector, a red rear reflector, pedal reflectors and white wheel reflectors. You must be able to clearly see the surface where you are riding and be seen by others.- Never hitch rides. Never hold onto moving vehicles while riding. Never stunt ride or jump on your bike.
- ON AND OFF ROAD OPERATION: Avoid the following road hazards: drain grates, pot holes, ruts, soft road edges, gravel, leaves (especially when they are wet), uneven pavement, railroad crossings, manhole covers, curbs, speed bumps, puddles, and debris as all have an effect on your riding and may result in loss of control. Adjust your speed and the way you use your brakes if you must ride in such areas.
- If any components becomes loose while riding, (STOP!!) immediately and tighten, or bring to a mechanic for repair.
Scan the QR code below to register your product & activate your warranty!

ASSEMBLY TIPS & QUESTIONS? WE'VE GOT YOU.
Scan the QR code for assembly videos & quick start instructions.
For other FAQs and more cool stuff, visit us at: www.rideswft.com

Documents / Resources
References
![www.rideswft.com]() SWFT Electric Bikes & Scooters | Style. Speed. Technology.
SWFT Electric Bikes & Scooters | Style. Speed. Technology.![rideswft.com]() SWFT Electric Bikes & Scooters | Style. Speed. Technology.
SWFT Electric Bikes & Scooters | Style. Speed. Technology.
Download manual
Here you can download full pdf version of manual, it may contain additional safety instructions, warranty information, FCC rules, etc.
Advertisement


Need help?
Do you have a question about the EDGE and is the answer not in the manual?
Questions and answers