Advertisement
- 1 UNPACKING
- 2 ASSEMBLY INSTRUCTIONS
- 3 MONITOR BUTTONS
- 4 MONITOR FUNCTIONS
- 5 RESISTANCE ADJUSTMENT
- 6 THE HAND PULSE SENSOR SYSTEM
- 7 WARMING UP AND COOLING DOWN – IMPORTANT
- 8 EXERCISES FOR RESISTANCE BANDS
- 9 STORAGE & CLEANING
- 10 TROUBLESHOOTING
- 11 IMPORTANT SAFETY PRECAUTIONS
- 12 Documents / Resources
UNPACKING

Care must be taken when lifting the Bike as it may be awkward or heavy for you to lift. You may need a friend or family member to help you unpack, assemble and position the unit.
- To avoid danger of suffocation, please keep all plastic bags out of the reach of children.
- Check that there is no damage to the unit prior to use. In case of visible damage before or during use, stop using the Bike and contact your Vendor. Do not attempt to use the Bike.
- The Bike is designed for home use only and is not intended for commercial use. Please do not use outdoors.
- Please retain all packaging and paperwork for future use and store safely away from children and animals.
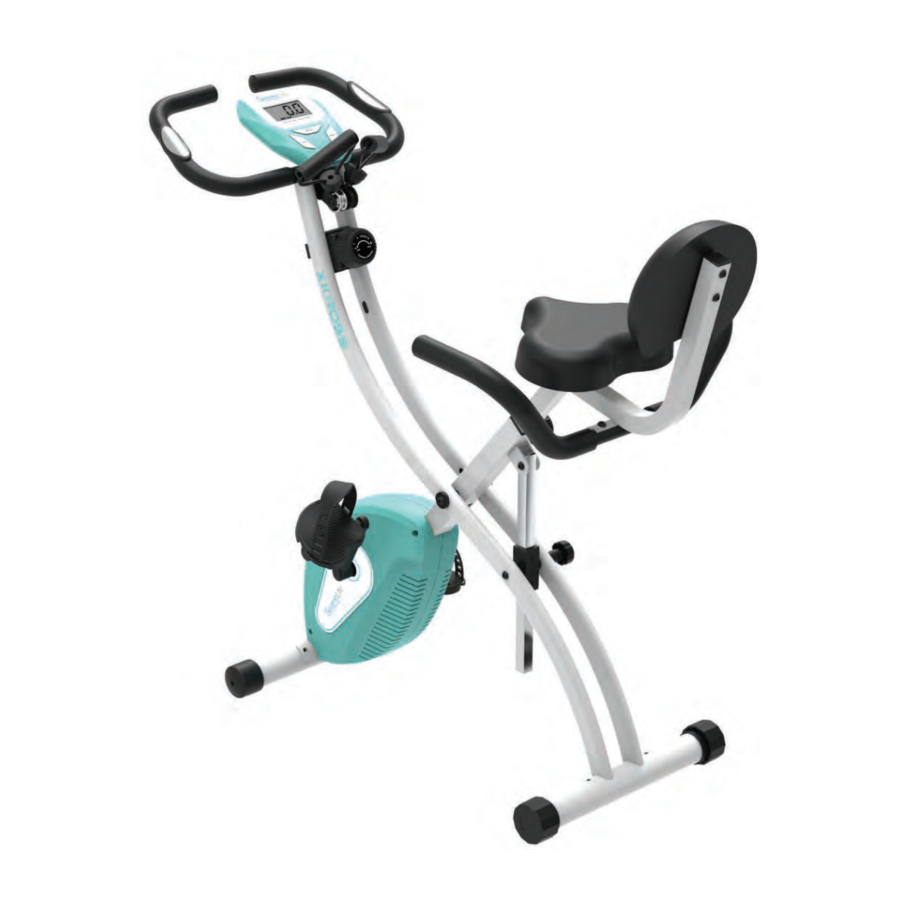
WHAT'S IN THE BOX?

- Bike Frame
- Monitor
- Saddle Frame
- Resistance Bands (attached)
- Saddle
- Back Rest
- 2 x Pedals
- Handlebars (with pulse sensors)
- Saddle Handlebars
- 2 x Stabiliser Feet (one with wheels)
- 1 x Hand Screw
- Screws and Tools (Hex Tool & Allen Key)
ASSEMBLY INSTRUCTIONS
- Unscrew bolts from the stabiliser bars.
Attach to the main body into the corresponding grooves, using bolts and curved washers. Use the supplied allen key to tighten.

- Attach the left and right pedal onto corresponding axle.
Use the hex tool provided to tighten. Each pedal is marked with an L & R to help you know which pedal goes on which side. Be careful not to attach them on the wrong way round (they are right and left handed threads) as it may damage the product and could lead to injury.- Attach the saddle handlebar to the underside of the saddle frame by screwing in 2 bolts with curved washers from the underside using the allen key to tighten.

- Remove nuts from underside of seat, attach to the seat post and secure in place using the hex tool provided. Attach back rest to the upright section of the seat post using two screws, at washers, and allen key provided.

- Slide saddle frame into the main frame and secure in place using the hand screw provided.

- Add handlebars to the main frame using two screws and curved washers provided, placing through the top of the handlebars into the frame and tighten using the allen key.

- Attach the saddle handlebar to the underside of the saddle frame by screwing in 2 bolts with curved washers from the underside using the allen key to tighten.


MONITOR ASSEMBLY INSTRUCTIONS
- Insert batteries into the back of the monitor as instructed in the battery well of the monitor. Make sure that the batteries are inserted the correct way round for it to work. Slide the monitor onto the metal bar of the frame in the middle of the handlebar.

- Connect the plugs from the handlebar into the back of the monitor (1 for sensor, 1 x for pulse).


MONITOR BUTTONS

MODE: This key lets you select the following functions; Scan, Time, Speed, Distance, Calorie & Pulse.
SET: Press Set to give your workout a goal, for example if you wish to work out for 5 minutes. Make sure display is on Timer function (by pressing Mode), press Set so display is flashing and the Timer will start to increase. Stop pressing once target is reached. Hold down button to cycle through quicker. You can give yourself a target in Time, Distance, Calories or Pulse rate.
RESET: This will clear the display to show zero. Press and hold for 3 seconds to restart the monitor.
MONITOR FUNCTIONS

Scan (SCAN): displays each function every 5 seconds.
Time (TMR): shows amount of time of workout in minutes and seconds. Maximum display shows 99 minutes
Speed (SPD): shows speed you are cycling and is measured in kilometres per hour.
Distance (DST): shows distance covered in kilometres.
Calories (CAL): shows calories burnt whilst exercising.
Pulse (PULSE): shows your heart rate when holding the pulse sensors on the handlebar. The readings from the display monitor may vary and are to be used only as a guide The display monitor requires 2xAA Batteries (Not supplied) Do not mix old and new batteries. Ensure correct installation of batteries noting the polarity as shown in the battery well. Dispose of old batteries safely.
RESISTANCE ADJUSTMENT
To increase the tension of the Bike turn the tension adjustment dial clockwise. The maximum tension level is level 8. To decrease the tension of the Bike turn the tension adjustment dial anti-clockwise. The minimum tension level is level 1.

THE HAND PULSE SENSOR SYSTEM
Hand pulse sensors are built-in to the handlebars on the exercise bike. During a workout, grasp both sensors that are set into the handlebars. For an accurate reading, use a comfortable grip. The monitor displays the heart rate after a few seconds. Both sensors must be grasped. The system will not function if only one sensor is grasped.
NOTE: Excessively squeezing the hand pulse sensors will not improve the heart rate reading.
WARMING UP AND COOLING DOWN – IMPORTANT
One of the most important parts of your workout is to prepare your body for exercise on the Bike. Warming up the muscles substantially decreases the chances of injury and only takes a few moments to do.
The Bike can also be used for warming up and cooling down exercise. Cooling down helps removes the lactic acid build-up in the muscles by oxygenating the muscles after your exercise routine. Lactic acid is what makes you ache after a workout, cooling down should be undertaken soon after the last set of exercises you intend to complete. Warming up and cooling down exercises are identical and easy to remember. Both warming up and cooling down should be done slowly and accurately, there is no hurry to complete these exercises, it is more important to complete them. In addition, it is good practise to move around after the cool down exercises to further dissipate the lactic acid.
QUADRICEPS STRETCH
Stand close to a wall, chair or other solid object. Use one hand to assist your balance. Bend the opposite knee and lift your heel towards your buttocks. Reach back and grasp the top of your foot with the same side hand. Keeping your inner thighs close together, slowly pull your foot towards your buttocks until you feel a gentle stretch in the front of your thigh. You do not have to touch your buttocks with your heel. Stop pulling when you feel the stretch. Keep your kneecap pointing straight down and keep your knees close together. (Do not let the lifted knee swing outward.) Hold the stretch for 20 to 30 seconds. Repeat the exercise for the other leg.
TOP TIP: Use a chair or a wall to help keep your balance only if you need to.

CALF AND ACHILLES STRETCH
Stand approximately one arm's length away from a wall or chair with your feet hip-width apart. Keeping your toes pointed forward, move one leg in close to the chair while extending the other leg behind you. Bending the leg closest to the chair and keeping the other leg straight, place your hands on the chair. Keep the heel of the back leg on the ground and move your hips forward. Slowly lean forward from the ankle, keeping your back leg straight until you feel a stretch in your calf muscles. Hold for 20 to 30 seconds. Repeat the exercise for the opposite leg.

INNER THIGH STRETCH
Sit on the floor and bend your legs so that the soles of your feet are together. Place your hands on your ankles. Lean forward from the waist and press down lightly on the inside of your knees. You should feel a stretch in the muscles of your inner thighs.

BUTTOCKS, HIPS AND ABDOMINAL STRETCH
Lay flat on your back with your hips relaxed against the floor. Bend one leg at the knee. Keeping both shoulders flat on the floor, gently grasp the bent knee with your hands and pull it over your body and towards the ground. You should feel a stretch in your hips, abdominal and lower back. Hold for 20 to 30 seconds and release. Repeat the exercise for the opposite side.

STANDING HAMSTRINGS STRETCH
Stand with your legs hip width apart. Extend one leg out in front of you and keep that foot flat against the ground. With your hands resting lightly on your thighs, bend your back leg and lean forward slightly from your hips until you feel a stretch in the back of your thigh. Be sure to lean forward from the hip joint rather than bending at your waist. Hold for 20 to 30 seconds. Repeat the exercise for the opposite leg.

OVERHEAD/TRICEPS STRETCH
Stand with your feet shoulder width apart and your knees slightly bent. Lift one arm overhead and bend your elbow, reaching down behind your head with your hand toward the opposite shoulder blade. Walk your fingertips down your back as far as you can. Hold this position.
Reach up with elbow. Gently assist the stretch by pulling on the elbow. Hold for 20 to 30 seconds.
Warming up and cooling down should take around ten minutes each. It is sensible to adjust this timing according to your own situation. You would benefit from a longer warm-up session if you exercise soon after waking up than you would after a walk to the shops and back for example. Take your time warming up and cooling down, enjoy the stretches as they will make you feel better.
Top Tip: As you progress, you can create your own warm up and cool down exercise routine, you do not need to keep strictly to the above routine so long as you utilise all the basic muscle types included above.

EXERCISES FOR RESISTANCE BANDS
BICEP CURL: With your arms tucked into your sides and palms facing up, slowly bring your hands up to your chest and lower them in a controlled manner.
LATERAL RAISE: With palms facing each other raise arms up to your shoulder level in an outward movement, so your arms are pointing outwards. Slowly bring back to original position.
HIGH PULL: With palms facing downwards, bring hands up to your chin, so your elbows point outwards. In a controlled manner bring back to original position.
DELTOID RAISE: Holding the bands with palms down raise both hands out in front of you until they are shoulder height. Then lower in a controlled manner.
TRICEP KICK BACK: Holding the resistance bands with palms facing in front of you tuck with your elbows tucked into your side. Straighten the arm in a backwards motion, so your arm is now pointing behind you. Slowly bring back to the original position.
CHEST PULL: Holding the resistance bands with palms facing out in front of you, in a pulling motion bring your hands to your chest. Slowly bring your hands back to the starting position.
STORAGE & CLEANING

- Clean the Bike with a damp cloth and mild detergent only.
- Regularly check the cord/cable for damage before storing. Should the cord/cable be damaged in any way it must be replaced by a cable with the same specifications.
- Should you need to store your Bike it is advisable to seek help with moving it. Store on its feet at all times.
- Regularly check all fixings are tight preferably before each workout.
![]()
- To fold the Bike, for easy storage, locate the hand screw at the rear of the bike. Turn anti-clockwise and pull the hand screw to release. Push the handles towards the saddle until the hand screw clicks into place. Then turn clockwise to secure in place.
- To clean the Bike use washing up liquid in warm water and a microfiber cloth, be sure to wring out the cloth so that it is just damp.

TROUBLESHOOTING
| PROBLEM | SOLUTION |
| Base is unstable | Make sure that the floor is flat and that there are no tiny objects under the stabilizers. Adjust the rear stabilizer end cap. |
| Handlebar is shaking | Ensure that the bolts are tightened securely |
| Monitor does not work | Check the batteries in the monitor are working by testing them in another device. Check that the sensor is plugged into the back of the monitor. |
| Resistance doesn't change | The resistance dial may be broken, contact SereneLife Customer Services. |
- Indoor Stationary Cycling Bike Trainer
- Running & Training Data Statistics Readout
- Built-in Hand Grip Sensors for BPM Pulse Monitoring
- LCD Digital Display Screen with Electronic Button Controls
- Displays Run Time, Distance, Speed, Calories Burned, Heart Rate
- Adjustable Flywheel Pedal Resistance Level Adjustment
- Integrated Arm Resistance Band Training
- Used for Bicep, Deltoid, Chest Pull & Lateral Arm Exercises
- Folding Exercise Bike Style for Storage and Transport
- Height Adjustable Bicycle Seat
- Perfect for Weight Loss, Cardiovascular Fitness, Endurance & Stamina Building
Technical Specs
- Flywheel Resistance Adjustment: 1 - 8 Strength Level Intensity
- Maximum Weight Support: Up to 265 lbs.
- *Some Assembly Required
- Battery Operated LCD Display, Requires (2) x 'AA' Batteries, Included
- Total Folded Dimensions (L x W x H): 53.1 x 20.9'' x 21.7'' -inches
- Total Open Dimensions (L x W x H): 42.1'' x 20.9'' x 42.3'' -inches
IMPORTANT SAFETY PRECAUTIONS
For your safety and the safety of others the following safeguards are very important. Failure to read and follow these instructions may lead to serious injury.
We always recommend that you talk to your Doctor before embarking on any new exercise regime if you have had any recent surgery, are pregnant, if you have an injury or if you have concerns about your health or levels of fitness that you think additional exercise may aggravate.
Always discontinue exercising if you experience dizziness or shortness of breath. Talk your Doctor before resuming exercising if you experienced nausea, pain or other acute abnormal symptoms, or are simply concerned about continuing.
GENERAL SAFETY INSTRUCTIONS
- Follow the warm-up exercises before you commence your workout.
- Increase speed, resistance and duration of exercises gradually.
- Make sure the Bike is securely assembled as described in this manual before use.
- The Bike is NOT suitable for use by children.
- Do not let the Bike get wet with any type of liquid.
- In addition, do not use the Bike while your hands are wet.
- Only use the Bike on a surface that will not be dented or damaged by the weight of the machine.
- Place the Bike on an old cloth or training mat before use, to avoid marking the floor or carpet.
- Keep children and pets away from equipment while in use.
- Leave yourself 1meter of space either side of the Bike for your safety.
- Always wear the appropriate workout clothes and footwear when exercising. Avoid wearing loose clothing or jewellery which might get caught in the Bike. NEVER operate the exercise bike with bare feet.
- Do not adjust the seat post over the STOP marker shown on the seat post.
- Use this exercise bike for its intended purpose as described in this manual. Do not use attachments that have not been recommended by the manufacturer.
- Never operate the exercise bike if it is not working properly, or if it has been damaged. Contact the authorized dealers for examination and repair.
- Keep hands and feet clear at all times from moving parts to avoid injury. Never turn the pedal cranks by hand.
- Do not dismount the exercise bike until the pedals are at a complete STOP.
- Do not attempt to ride the exercise bike in a standing position.
- Do not insert any object, hands or feet into any openings, or expose hands, arms or feet to the drive mechanism or other potentially moving part of the exercise bike.
- Inspect the resistance bands for damage and to make sure they are connected properly before using.
Documents / Resources
References
Download manual
Here you can download full pdf version of manual, it may contain additional safety instructions, warranty information, FCC rules, etc.
Advertisement

Need help?
Do you have a question about the SLXB18 and is the answer not in the manual?
Questions and answers