Advertisement
After-sale Support
We provided 12 months warranty for this smart video doorbell. If you have any questions, please feel free to send us direct messages on Amazon or emails at service@iegeek.com. We will reply to you in a 24-hour manner.
Tips:
- The smart video doorbell only supports 2.4GHz WIFI, it doesn't support 5GHz WIFI
- Please ensure that the Wi-Fi signal strength is to be over than 85%; if the smart video doorbell is far away from the signal source, it won't be connected successfully for the first time.
- If your router is connected with too many devices, the smart video doorbell will fail to connect Wi-Fi because of the IP address conflict.
- This smart video doorbell does not support PC Browser and Software.
- This smart video doorbell supports events recording when Wi-Fi disconnected.
- Video playback works in CloudEdge APP only. It does not support the 3rd party player.
- Manual y snapshot and recording files are saved in mobile. Events snapshot files are saved in Cloud. Events recording files are saved in Micro SD card.
- It will consume the batteries power if you watch live footage or the recorded videos from the SD card.
What's in the box

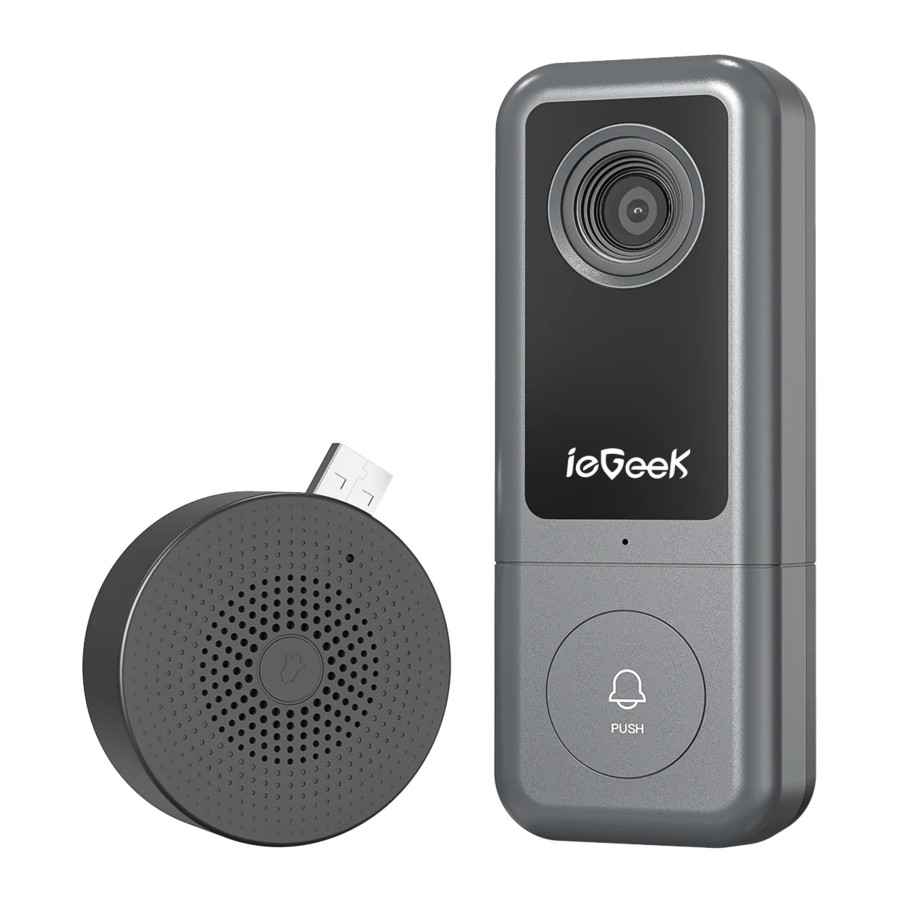
Meet the doorbell

- Camera(2K)
- Microphone
- Doorbell Button
- LED Indicator
- Speakers
- Hardwire Terminals
- Micro SD Slot
- Security Screw Hole
- Micro USB Port
- Reset Hole
- Wall Mount Bracket
- Mounting Screw Holes
- Security Screw
- 20º Angle Mount (Optional)
- Doorbell Mounting Holes
- Wall Mounting Screw Holes
Note: The doorbell works with both 12V-24V AC and 12V DC hardware power source. Either wire can be connected to either terminal. The cable order doesn't matter.
Tips: Please turn on 2 permissions below when use this APP at the first time.

- Allow 'CloudEdge' APP to access mobile cellular data and wireless LAN, or it will be failed to add doorbell.
- Allow 'CloudEdge' APP to receive pushed message, or the cellphone will not receive alarm push when motion detection or audible alarm is triggered.
Meet the chime

- Speakers
- Reset Button
- LED Indicator
- USB Port (Foldable)
Set up your doorbell

- Attach the wires from the provided power adapter to the terminals on the rear of your doorbell, and tighten the terminal screws with screwdriver. Each wire can be connected to each power terminal. The cable order doesn't matter.
- Plug the adapter to your AC outlet. Install the doorbell within 30 feet of your 2.4GHz WiFi router. It is suggested to test your doorbell prior to physical installation.
- Download and install the 'CloudEdge' App to your smartphone. Launch the App and register an account with your mobile phone number or email ID.
![]()
iOS
![]()
![itunes.apple.com]()
Android
![]()
![play.google.com]()
- Register Account: New users need to register by e-mail, click 'Register', and follow the steps to complete the registration of the account, then log in.
Note:


- When registering a new account, please choose the region which you are actual y in. (Different registered regions can't share the doorbell.)
- Please choose to register by e-mail.
- Start the Wi-Fi configuration following the in-App instructions or referring to below tutorial steps.


- LED indicator explanation:
![]()
Solid Red
Device is abnormal.![]()
Solid Blue
Successfully connected to WiFi network.![]()
Flashing Red Slowly
Ready for WiFi configuration.![]()
Flashing Blue Quickly
Firmware is upgrading.![]()
Flashing Red Quickly
Device is connecting to WiFi.![]()
Nothing
Power failure/ Status light is turned off in doorbell Settings.


- Live view
Tap![]() on the Home page devices to watch live view from your doorbell.
on the Home page devices to watch live view from your doorbell.
Note: Live viewing will not trigger device recording at Event recording mode.

- Quit live viewing
- Setting menu
- Date & time watermark
- Volume on/off
- FHD/HD/SD switch
- Full screen display
- Stream bit rate
- Wi-Fi signal status
- Screenshot button
- Speak to the scene
- Record on the phone
- Body detection on/off
- Notification history
- Cloud storage service
 on the Home page devices to watch live view from your doorbell.
Settings
APP Interface Introduction

- Back to live view
- Edit device name
- Receive/block motion alarms
- Share device with other users
- Device information
- Installation Guide
- Basic function:
- LED Indicator on/off
- Night vision on/off/auto
- Human detection frame on/off
- Wireless chime settings
- Alarm setting:
- Motion detection on/off
- Sensitivity Setting
- Alarm interval Setting
- Alert only when people appear(on/off)
- Alarm schedule
- Motion detection area setting
- SD Card Setting
- Cloud Storage Service
- Advanced Features: Onvif on/off
- Device Version
- Delete Device
Alert Settings
PIR 'Motion Detection' is on by default and the default sensitivity is 'Medium', but it is adjustable.
Alert settings steps: 'Setting (...) > 'Alarm Settings' >'Motion Detection'.
Tips: The detecting distance is 4 meters (13ft).

| Sensitivity | Detecting Distance(For moving objects) |
| Low | Up to 2 meters(7 ft) |
| Medium | Up to 4 meters(13 ft) |
| High | Up to 6 meters(20 ft) |
Note: Higher sensitivity offers longer detecting distance, but it would lead to more false alarms. You are advised to set up the sensitivity level to 'Medium' when you install the doorbell outdoor.
Device Sharing

When you have a sharing, please make sure the APP account is registered in the same regions. Otherwise, you won't share successfully. Other users can only live view & playback. All users can receive doorbell calls and alarm notifications (Need to open 'receive notifications' Sharing Steps: Settings (...) --> Device Share --> Tap on 'Add '--> Choose 'Scan QR Code' / 'Account' share

Method 1: Sharing by account searching Tap on "Account' --> Type in account ID -> Confirm Sharing ->Friends accept sharing.

Method 2: Sharing by QR code scanning Tap on 'Scan QR code ' --> Scan friends' QR code -> Confirm Sharing--> Friends accept sharing. find out their OR codes Note: The new users can in the App, and let the administrator scan the QR Code and share device.

How to find your QR code? ( Run 'CloudEdge App' --> Tap on Tap on Tap on My QR Code" --> Let the administrator scan your QR Code

Recording
Your doorbell comes with Event recording by default. It will record visitor calls and motion detection events. You can also enable Full day recording in the Settings -> SD Card.

History layback
Tap History to play the videos recorded in the Micro SD card.

- Time Line: Slide the timeline to the left or right to locate video recordings according to time period.
![]() The green bar stands for video length?
The green bar stands for video length?
![]() The yellow dot stands for the alarm point when someone has pressed the doorbell button:
The yellow dot stands for the alarm point when someone has pressed the doorbell button:
![]() The red dot stands for the alarm point when a motion has been detected.
The red dot stands for the alarm point when a motion has been detected. - Calendar:
Check video history by date. The numbers in green stand for the dates that have video recordings. - Screenshot: Tap to capture a photo and save to Me -> Pictures & Videos, Where you can share it to others.
- Record: Tap to start recording a video, tap again to end and save to Me -> Pictures & Videos, Where you share the video clips to others.
- Alarm: Tap the listed alarm records to quickly locate and display each alarm video.
![]() Stands for visitor call events;
Stands for visitor call events; ![]() stands for motion detection recordings.
stands for motion detection recordings. - Timeline Zoom:
Slide upward to zoom in the timeline and downward to zoom out.
 The green bar stands for video length?
 The yellow dot stands for the alarm point when someone has pressed the doorbell button:
 The red dot stands for the alarm point when a motion has been detected.
 Stands for visitor call events;
  stands for motion detection recordings.
Connect the chime
- Supply power to the chime
The chime can be powered by USB compatible power source (DC5V 1A), or by the USB port on your computer.

- Click reset button
Click on RESET on y once, and you will see the chime indicator flashing blue, indicating that the chime is in pairing mode.

- Press the doorbell button
Press the doorbell button, and the chime will sound. If pairing is successful, the indicator on the chime will be in solid blue.

- Chime settings
You can enter into the chime setting page following below setting steps, so as to mute the Chime Reminder, select ringtones, adjust chime volume or unbind the connection with doorbell.


NOTE:
- Your doorbell communicates with the chime via Radio Frequency, but not WiFi.
- You can assign different chimes as needed.
- Press and hold RESET button on the chime for 5 seconds till the indicator flashes blue 3 times, and you can also release the connection between the chime and its connected doorbell.
Installation
The video doorbell works with 12V DC power source (power adapter provided), as well as an existing 12V—24V AC hardware power source. It enables you to make use of your legacy doorbell wiring for retro-fit installation.
NOTE:
For retro-fit installation, you need to bypass your indoor mechanical chime so as to provide sufficient power for the new video doorbell.
Retro-fit installation (Optional)
To replace your existing doorbell and mechanical chime, please follow below installation steps:
- Shut off the master circuit breaker in your house.
- Bypass your indoor chime with provided jumper. In most cases, the existing doorbell circuit looks similar to the image below. Remove the cover of the indoor chime and loosen the "FRONT" and "TRANS" terminal screws. Use the provided jumper to connect the two terminals, and replace the chime cover.
 - Step 1")
- Select a location for your video doorbell. Determine the mounting position of the doorbell. Check if you can reuse the existing holes on the wall. If not drill new holes to mount your video doorbell. It is suggested to mount the doorbell at least 4 feet (120 cm) above the ground for optimal angle of view and best motion detection performance.
![]()
(Optional) Use the 20º angle mount as a supplementary mounting bracket, to adjust the viewing angle towards to fit your viewing preference.
 - Step 2")
- Replace your existing doorbell.
Remove the existing doorbell from the wall and disconnect the wires.
![]()
Lead the wire through the holes on the bracket before mounting.
![]()
Mark the screw holes location and mount the brackets on your wall with screws.
![]()
Attach the wires to the doorbell. Wire extension kits are optional.
![]()
Feed the wires back to the wall and Mount the doorbell to the brackets.
![]()
Insert the screw into the bottom and tighten with included tool.
![]()
- Restore power at the breaker, and your doorbell is ready for use.
 - Step 1")

 - Step 2")


Hardware installation
Hardware your doorbell with the provided DC12V power adapter.

Mark the screw holes location for doorbell installation.

Drill a hole on the wall and lead the adapter wires out from inside.

Lead the adapter wires through the brackets and install the brackets.

Attach the wires to the screws on the rear of the doorbell.

Attach your doorbell to the brackets and secure it with the security screw.

Plug the indoor adapter to your AC outlet to supply power. All set!
Trouble Shooting
| No. | Description | Solution and Operation |
| 1 | Unable to connect |
|
| 2 | Reset succeed or not |
|
| 3 | Change to a new network |
|
| 4 | Alarm picture without people |
|
| 5 | No alarm push | Enable CloudEdge APP notification in mobile setting |
| 6 | No alarm video record | Please insert SD card |
| 7 | Device offline | Check if the network transferring fluency processes well |
| 8 | Browse video delay | Check the Wi-Fi network; the distance between the doorbell and the router should not be too far |
Specification
VIDEO DOORBELL


INDOOR CHIME

FAQ
Is the video doorbell powered by battery?
No, this video doorbell requires constant hardware power supply. Compared to battery powered doorbells, this wired video doorbell has more advanced features, like supporting full day recording, no delay quick response to visitor calls, and smaller in dimension, fitting into narrow door frames.
How to connect the hardware to the doorbell? Does the cable order matter?
Your doorbell works with both DC 12V and AC 12V 24V hardware power source. There are 2 terminal screws on the rear of your doorbell, and you can connect each wire to each power terminal screw. The cable order doesn't matter.
I found a Micro USB port near the Micro SD Slot, what's it for?
You can power up the doorbell by the Micro USB port, using an USB compatible charger and cable. It is designed mainly for product testing in the factory.
What's the Wi-Fi range of the video doorbell?
The video doorbell works with any 2.4GHz wireless Wi-Fi router, mesh system or modems. In outfield test, it works well in most 3000sqft houses. The Wi-Fi range may vary because of different WiFi transmit power, transmission distance and wall blocks in between.
I installed my video doorbell, but the video or audio quality is poor.
In live view interface, WiFi status will be listed. It is suggested to ensure the Wi-Fi status be more than 70%, so as to get your doorbell work as expected. If you think your problem is caused by ow Wi-Fi signal strength, try moving your Wi-Fi router closer, or add one Wi-Fi Booster to extend your Wi-Fi range.
Does the video doorbell work with existing indoor mechanical chime?
No. The doorbell comes with an USB compatible wireless chime to notify people when your visitor presses the doorbell button. If you have an existing indoor chime, please use the provided jumper to bypass the existing chime, so as to provide sufficient power to the new video doorbell.
How many wireless chimes can be paired with one video doorbell?
You can add as many wireless chimes as your wish on one video doorbell.
Does it support customized Motion Detection Zones
Yes it does. Go to Settings - Alarm Setting - Motion detection - Alarm Area. Use your finger tips to draw one or more customized motion detection zones and save your settings, and the orange zones are motion detection zones.

How does the video doorbell detect the motions? Can motion detection be disabled?
The doorbell camera detects motion through the full-image pixel contrast, it will further undergo a human-shape detection to reduce false alarm rate. You can adjust the motion detection sensitivity, customize detection zone, schedule alarm intervals and disable motion detection accordingly due to various user scenarios.
Does the doorbell support Cloud storage?
Your doorbell support Micro SD card storage as well as Cloud storage. You can activate the Cloud storage service in App. There is a 7-day free Cloud recording trial service. Please note that cloud storage only support event recording but not full day recording.
We want to personally reach out and thank you for purchasing from our Amazon store. Selling on Amazon is what we do to support our family, and product reviews are the lifeblood of our business. It would mean a lot to us if you could take one minute to help share the love by leaving us an honest review via the link below:
www.amazon.com/ryp

Documents / Resources
References
Download manual
Here you can download full pdf version of manual, it may contain additional safety instructions, warranty information, FCC rules, etc.
Advertisement

Need help?
Do you have a question about the Bell J5 and is the answer not in the manual?
Questions and answers