Zojirushi EB-DLC10 Manual
- Operating instructins (12 pages) ,
- Operating instructions manual (12 pages)
Advertisement
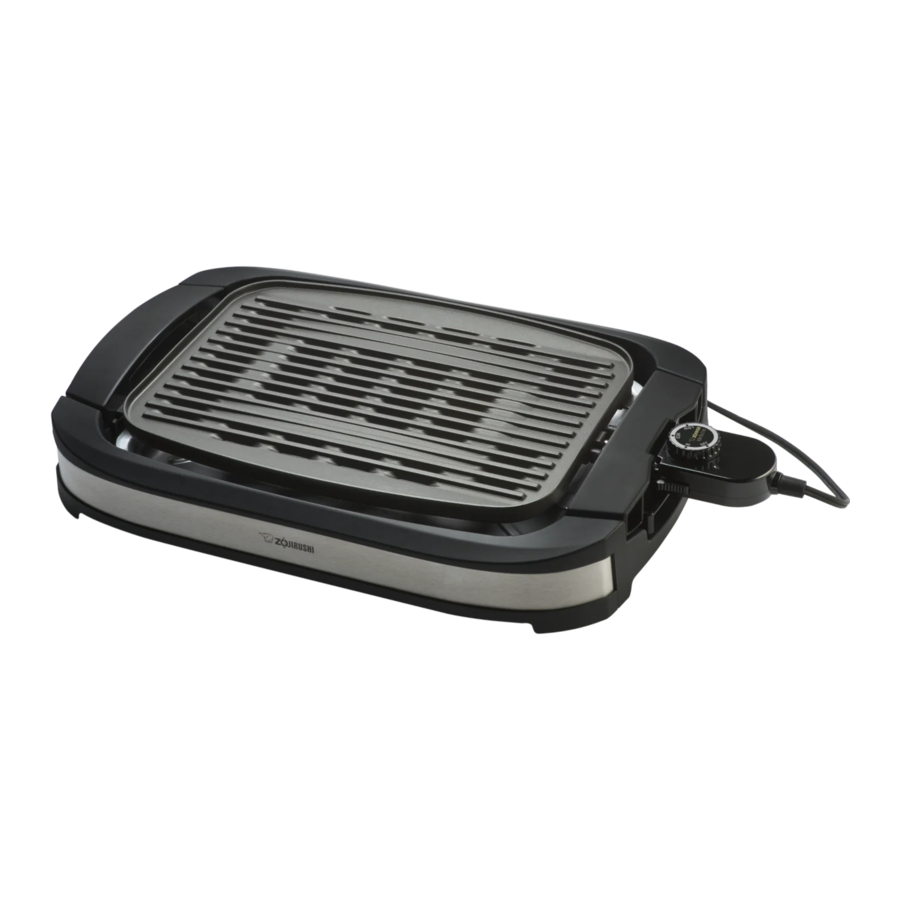
PARTS NAMES

Plate
- Do not bang or drop the Plate or handle roughly.
- Do not use metal utensils. Doing so may damage the Plate.

Temperature Control Plug
- Please remove the twist tie holding the Power Cord before use.
- Do not use the Power Cord bundled up. Doing so may cause the Power Cord to become excessively hot, resulting in malfunction.

Drip Tray

Base
REPLACEMENT PARTS
- Please replace damaged parts for optimum performance.
- When replacing parts, please record the model number and part name beforehand. Then contact either the store where you purchased the product or Zojirushi Customer Service.
| Parts Names | Parts Number |
| Plate | BX138801G-00 |
| Temperature Control Plug | BX138804A-00 |
Zojirushi Customer Service
1-800-733-6270
www.zojirushi.com
HOW TO USE
Preparation

- Place the Drip Tray in the Base.
- Set up the Plate on the Base.
![]()
Do not use the product without the Drip Tray. Doing so may scorch the table or surface, or cause burns.- Make sure that the Drip Tray and Plate are level, and not leaning.
- The Plate will fit onto the Base only one way. Make sure to set it up correctly.
- Do not insert the Temperature Control Plug in the Plate before placing the Plate on the Base. Doing so may cause malfunction.

Insert the Temperature Control Plug
- Firmly insert the Temperature Control Plug to the Plate.

- Then plug in the Power Plug to an electrical outlet.

- Do not use other Temperature Control Plugs than the one provided. Do not use the Temperature Control Plug for other appliances.
- Insert the Temperature Control Plug completely until the white crescent marks on both Release Buttons are completely visible. The Plate may not heat up properly if the Temperature Control Plug is not inserted completely. Incorrectly inserting the Temperature Control Plug may also cause accidents or malfunctions due to abnormal heat generation.
- Make sure OFF aligns with the Operation Light.
- To remove the Temperature Control Plug, pinch both Release Buttons and pull the Plug away.
- This product is for grilling foods only. Do not use for other than intended purposes.
- Wipe the Plate clean before use.
Preheat and Cook
- To begin preheating, turn the Temperature Control Dial so that HI aligns with the Operation Light. The Operation Light turns on and the Plate will begin to heat up.
![]()

| Approximate time for preheating | Approx. 6 min |
- The Operation Light will turn off when preheating completes. Turn the Temperature Control Dial so that the desired heat strength aligns with the Operation Light, and begin cooking.
| |
| HIGH | For preheating and cooking |
| MEDIUM | If foods burn, adjust the temperature between HI and MED. |
| LOW | Keep warm |
- To keep food warm, set the dial to LOW.
- The product may make a creaking sound, but this is normal and does not indicate a malfunction.
- The Operation Light will turn on and off during cooking. This indicates that the temperature is being controlled and not a malfunction.
- There may be some smoke or odor the first time the product is used, which is normal.
After Use
- Turn the Temperature Control Dial to OFF (align with the Operation Light), then unplug the Power Plug from the electrical outlet.
- Wipe off burnt on foods with a soft paper or cloth while the Plate is warm.
- Allow the Plate to cool (at least 30 minutes after use), then remove the Temperature Control Plug from the Plate and clean.
![]()
The Plate (and Receptacle), Drip Tray and the Probe on the Temperature Control Plug will be hot for a while after use. Please take caution to prevent burns.- Do not attempt to remove the Plate while the Temperature Control Plug is still inserted. Doing so may cause malfunction or damage.
SAFETY MECHANISM
This product is equipped with the following safety features:
- The Temperature Control Plug cannot be inserted if the Drip Tray and Plate are not properly placed.
- The Plate cannot be removed from the Base while the Temperature Control Plug is inserted.
Never force the Temperature Control Plug in or remove the Plate forcefully as doing so may cause malfunction.
RECIPES
Take extra care while cooking as oil may splatter.
NOTE
The measurements used in these Recipes:
1 cup = approx. 8 oz. (240 ml)
1 Tbsp. = 0.5 oz. (15 ml)
1 tsp. = 0.2 oz. (5 ml)
Steaks with Horseradish Sauce
| Heat setting | HIGH |
Ingredients (2 servings)
2 sirloin steaks
[about 1-inch (2.5 cm) thick, about 1 lb. (450g)]
Salt and pepper, to taste
(Horseradish Sauce)
2 Tbsp. brandy
4 Tbsp. beef stock
3 Tbsp. heavy cream
1 Tbsp. prepared horseradish
1/2 tsp. sugar
Salt, to taste
How to cook
- Sprinkle and press the salt and pepper onto both sides of the meat.
- Put the sirloin steaks on the preheated Plate and cook them to the desired doneness.
- To make the Horseradish Sauce, boil the brandy in a pan and then add all remaining ingredients. Mix the sauce until it is smooth.
- Serve steaks with the horseradish sauce.
Sweet and Sour Marinated Kabobs
| Heat setting | HIGH |
Ingredients (4 servings)
1/2 lb. (230 g) beef
1 large red bell pepper
1 large green bell pepper
1/4 small pineapple, peeled
8 skewers
1 tsp. cornstarch
(Marinade)
1 cup pineapple juice
1/2 cup orange juice
1 Tbsp. white vinegar
1 Tbsp. brown sugar
1 tsp. garlic, minced
How to cook
- Prepare the marinade by mixing the ingredients.
- Cut beef into 3/4-inch (2 cm) square cubes and put the pieces of beef in a shallow bowl made of glass or enamel. Pour half of the prepared marinade on the beef and marinate it in the refrigerator for one hour.
- Alternately skewer the marinated beef with green and red bell peppers and pineapple cut into 3/4-inch (2 cm) square cubes. Prepare 8 skewers.
- To make the sweet and sour sauce, add cornstarch to the remaining marinade and then boil and mix the sauce until it is smooth.
- Put the skewered food on the preheated Plate and cook them completely, turning several times.
- Serve with the sweet and sour sauce.
Grilled Spicy Prawns
| Heat setting | HIGH |
Ingredients (2 to 4 servings)
8 small prawns
(Marinade)
2 Tbsp. soy sauce
1 tsp. sesame oil
1 Tbsp. cajun seasoning mix
1 Tbsp. fresh lime juice
1 tsp. fresh minced ginger
1 tsp. mustard paste
How to cook
- Peel and devein the prawns.
- Marinate the prawns in the marinade for 5 to 10 minutes.
- Put the prawns on the preheated Plate and cook both sides thoroughly.
- Serve the prawns on plates.
Salmon Steaks with Fruit Salsa
| Heat setting | HIGH |
Ingredients (4 servings)
4 salmon steaks
[(about 1/2-inch (1.5 cm) thick, about 1/4 lb. (110 g)]
Salt and pepper, to taste
(Marinade)
2 Tbsp. lemon juice
2 Tbsp. lime juice
1 Tbsp. chopped fresh thyme
(Fruit Salsa)
1 /2 small papaya, peeled
1/4 small pineapple, peeled
Parsley, chopped, to taste
2 Tbsp. lime juice
1 Tbsp. Sugar
Salt, to taste
How to cook
- Sprinkle the salt and pepper onto the salmon.
- Pour the prepared marinade over the salmon and marinate it in the refrigerator for one hour.
- Put the salmon steaks on the preheated Plate and cook them completely, periodically basting the steaks with the marinade.
- To make the Fruit Salsa, cut the papaya and pineapple into cubes and mix them with the remaining ingredients.
- Serve salmon with the fruit salsa.
Bruschetta
| Heat setting | HIGH |
Ingredients (4 to a appetizer servings)
2 large red ripe tomatoes [(about 1 lb. (450 g)], diced
1/3 cup coarsely chopped fresh basil
1 Tbsp. peeled and diced onion (optional)
2 Tbsp. extra-virgin olive oil
Clove of garlic, peeled and minced
1 tsp. balsamic or red wine vinegar
Salt and pepper, to taste
8 slices diagonally cut crusty French bread
[about 3/4-inch ( 2 cm) thick]
Garlic salt, to taste
How to cook
- Mix all ingredients except for the bread and garlic salt in a glass or enamel bowl, and let stand for about 30 minutes at room temperature.
- Put the bread on the preheated Plate and brown both sides.
- Sprinkle the garlic salt onto one side of the browned bread.
- Dish the bread onto plates and serve with a generous amount of the sauce made in step 1.
CLEANING AND MAINTENANCE
Be sure to clean thoroughly after every use. Leaving burnt foods on the Plate may cause scorching, and will become difficult to remove.
Clean the product after it has cooled down completely except for the Plate.
| Base |
| 
|
| Drip Tray |
| |
| Temperature Control Plug | Wipe it clean with a soft dry cloth. | |
| Plate |
|


TROUBLESHOOTING GUIDE
Please check the following points before calling for service.
| Problems | Cause | Remedy |
Temperature Control Plug/Probe will not plug in |
| Please set them correctly. |
The Plate does not heat up |
| Insert the Power Plug securely. |
| Insert the Temperature Control Plug completely until the white marks on the Release Buttons are fully visible. (See "Insert the Temperature Control Plug") | |
The food does not cook well |
| Start cooking after preheating completes. (See "Preheat and Cook" - "Approximate time for preheating") |
Food is scorched |
| Perform Cleaning and Maintenance. (See "Cleaning and Maintenance") |
Plate cannot be removed from the Base |
| Remove the Temperature Control Plug. |
SPECIFICATIONS
| Model No. | EB-DLC10 | |
| Rating | AC120V 60 Hz | |
| Electric Consumption | 1500W | |
| Length of the Power Cord | 5'2" (1.6 m) | |
| External Dimensions | (approx. inches) | 20-3/4 X 14-1/8 X 3-5/8 |
| (approx. cm) | 52.5 X 35.5 X 9 | |
| Weight | 10 lbs. (4.5 kg) | |
| Temperature Control | 176~410°F (80~210°C) | |
IMPORTANT SAFEGUARDS
BASIC SAFETY PRECAUTIONS SHOULD ALWAYS BE FOLLOWED WHEN USING ELECTRICAL APPLIANCES, INCLUDING THE FOLLOWING:
- Read all instructions thoroughly.
- Avoid touching hot surfaces. The handles and knobs are provided for your safety and protection.
![shock hazard]() To prevent hazardous operation or electric shock, do not immerse power cord or parts of the power cord, power plug or appliance (except drip tray) in water or other liquids.
To prevent hazardous operation or electric shock, do not immerse power cord or parts of the power cord, power plug or appliance (except drip tray) in water or other liquids.- Close supervision is necessary when the appliance is used by or near children.
- Unplug from outlet when not in use and before cleaning. Allow the appliance to cool before adding or removing parts, and before cleaning the appliance. Make sure appliance is OFF when not in use, before putting on or taking off parts, and before cleaning.
- Do not leave the appliance unattended when in use.
- Do not use or operate the appliance with a damaged cord or plug. If the appliance malfunctions or has been damaged in any manner, unplug the appliance and return it to the nearest authorized service facility or dealer for examination, repair or adjustment.
- Do not use outdoors.
- The use of accessories or attachments not recommended by the appliance manufacturer may be hazardous or may cause malfunction.
- Keep the power cord away from hot surfaces and do not let the cord hang over the edge of tables or counters.
- Do not place the appliance on or near a heated surface such as a gas or electric stove, or in a heated oven.
- Always use the appliance on a dry, level surface.
- Always use extreme caution when moving appliances containing hot contents or liquids.
- Plug the cord into a household electrical outlet. The plug to the appliance should be attached first before plugging the cord into a wall outlet. To disconnect, turn the power control to OFF. Then remove the plug from wall outlet.
- Do not use the appliance for other than intended or specified purposes.
- Do not operate in the presence of explosive and/or flammable fumes.
![burn hazard]() To reduce the risk of fire and personal injury, always use with the metal drip pan properly placed.
To reduce the risk of fire and personal injury, always use with the metal drip pan properly placed.
SAVE THESE INSTRUCTIONS
THIS APPLIANCE IS FOR HOUSEHOLD USE ONLY
This appliance is supplied with a short power cord to reduce the risk of becoming entangled in or tripping over. Extension cords may be used if care is exercised in their use. If an extension cord is used, the marked electrical rating of the cord should be at least as great as the electrical rating of the appliance, and a longer cord should be arranged so that it will not drape over the countertop or tabletop where it can be pulled on by children or tripped over unintentionally.
 This appliance has a polarized plug (one bade is wider than the other). To reduce the risk of electric shock, this plug was designed to fit into a polarized outlet in only one direction. If the plug does not fit fully into the outlet, do not attempt to force it or modify it in any way. Simply reverse the plug and insert. If it still does not fit, contact a qualified electrician.
To avoid circuit overload, do not operate another high wattage appliance on the same circuit.
- These WARNINGS and CAUTIONS are intended to protect you and others from personal injury and household damage. To ensure safe operation, please follow carefully.
 | Indicates risk of serious injury.*1 |
| Indicates risk of injury or property damage if mishandled.*2 *3 |
 |  Indicates a warning or caution. A specific caution is indicated inside or near the triangle by sentences or illustrations. Indicates a warning or caution. A specific caution is indicated inside or near the triangle by sentences or illustrations. |
 |  Indicates a prohibited operation. A specific prohibited operation is indicated inside or near the circle by sentences or illustrations. Indicates a prohibited operation. A specific prohibited operation is indicated inside or near the circle by sentences or illustrations. |
 |  Indicates a requirement or instruction that must be followed. A specific instruction is indicated inside or near the circle by sentences or illustrations. Indicates a requirement or instruction that must be followed. A specific instruction is indicated inside or near the circle by sentences or illustrations. |

*1 Serious injury includes loss of eyesight, burns (high and low temperature), electric shock, bone fractures, toxic reactions as well as other injuries severe enough to require medical care or extended hospitalization.
*2 Injury indicates physical damage, burns or electric shock not severe enough to require medical care or extended hospitalization.
*3 Property damage indicates material damage towards a home, furniture, or pets and animals.

- The illustrations used in this Operating Instructions may vary from the actual product you have purchased.


- Plate and its Nonstick Coating
Please follow these instructions to ensure extended use of the Plate and for the protection of the nonstick coating:- Do not use metal spatulas. Doing so may damage the surface.
- Do not scratch the Plate with sharp objects such as knives or forks.
- Do not preheat the Plate for an extended period of time. Do not use the Plate directly on the stovetop.
- Do not use a thinner, benzene, abrasive cleaners and brushes (nylon/metal), chlorine bleach or anything that may damage the surface of the product. Doing so may cause deformation, discoloration or scarring of the product.
- Always clean the surface and the bottom of the Plate thoroughly after use. Acid (vinegar) or salt contents (sauce, soy sauce or salt) may cause corrosion or the product may not perform well.
- Do not use detergents other than mild kitchen detergent such as chlorine based alkaline detergents or those containing acidic ingredients. Doing so may cause corrosion.
REMARKS: The nonstick coating may wear out with use.
The nonstick coating may eventually discolor or peel off. This will not affect the cooking performance or sanitary properties, and is harmless to your health. If concerned with the peeling of the nonstick coating, please replace the Plate by purchasing a new one.
- Temperature Control Plug
- Only use the Temperature Control Plug provided.
- Always remove the Temperature Control Plug from the Plate after use.
- Never disassemble the Temperature Control Plug.
- Always clean the Probe and Receptacle of dust, soil or foods.
![]()
- Do not bang, drop or handle the Temperature Control Plug roughly. Do not move the Temperature Control Plug up and down when plugging in or unplugging.
- Clean any grease from the Release Buttons after use.
- Use and Care
- Do not use this product for other than grilling foods indoors.
- Handle the product gently; otherwise it may cause malfunction or breakdown.
- Do not use the Plate on a gas or electric stovetop burner. Doing so may cause the nonstick coating to peel off, corrode, or cause the Plate to deform or discolor.
- Do not use the Drip Tray soiled.
![]()
Do not use on top of items such as newspapers that may obstruct the air flow beneath the Base. Do not use on surfaces that are vulnerable to heat such as carpets, cushions, tatami mats or tablecloths. Doing so may cause fire, deform the Base, or burn the surface.
![]()
- Do not use on top of glass surfaces such as a glass table. Doing so may cause the glass to break from the heat.


Documents / Resources
References
Download manual
Here you can download full pdf version of manual, it may contain additional safety instructions, warranty information, FCC rules, etc.
Advertisement


Need help?
Do you have a question about the EB-DLC10 and is the answer not in the manual?
Questions and answers