Table of Contents
Advertisement
POWER
VOL
SEL
MENU
VOL
SCAN
SHIFT
• Electronic AM/FM tuner with US/Euro selection
• Single CD player; plays CD, CD-R, CD-R/W
• LED backlit controls, silicone rubber keypad
• Marine features; solid top cover, corrosion resistant
hardware, coated circuit boards, uV stable plastics
• Maintains settings with no power applied
• CD changer controls (optional MCD10 changer)
• Wired remote option (REMMS1550)
• Aux input and line level outputs
• 4x40W power
• Two wire power connection (Switched 12V and ground)
OWNER'S MANUAL
MS 1550
MODE
1
2 SCN
Marine Audio System
3 RPT
4 SHF
5 DISC-
MS1550
MS1550B
4 x 40W
EQ
MONO
6 DISC+
AMS
DISP
MUT
BAND
LOUD
Advertisement
Table of Contents

Related Manuals for Audiovox AquaTronics MS1550

Summary of Contents for Audiovox AquaTronics MS1550
- Page 1 MS1550 MS1550B OWNER’S MANUAL Marine Audio System POWER MS 1550 4 x 40W MENU BAND LOUD MONO SCAN MODE 2 SCN 3 RPT 4 SHF 5 DISC- 6 DISC+ DISP SHIFT • Electronic AM/FM tuner with US/Euro selection • Single CD player; plays CD, CD-R, CD-R/W •...
-
Page 2: Table Of Contents
CONTENTS Installation ...........3 Selecting disc ........9 Take out screw before installation..3 Disc notes ..........9 DIN Front-Mount ........3 Specification........10 Installing the unit ........3 Trouble shooting .......11 Removing the unit .........4 Wiring Connection ......5 Operation ..........6 Location of keys........6 Switching on/off the unit .......6 Sound adjustment.........6 Menu selection function......6 Loudness ..........7... -
Page 3: Installation
INSTALLATION Notes: TAKE OUT SCREW BEFORE INSTALLATION • Choose the mounting location where Before install the unit, please remove the the unit will not interfere with normal two screws. vehicle operation. Take out screw before installation • Before finally installing the unit, connect the wiring temporarily and make sure the unit and the system work properly. -
Page 4: Removing The Unit
INSTALLATION Sleeve Spring Washer Hex Nut L Key Metal Strap Outer Trim Ring Mounting Bolt Plain Washer Tapping Screw R Key 5. Mount the sleeve by inserting the sleeve into the opening of the dashboard and 9. Reconnect the cable to the vehicle bend open the tabs located around the battery's negative (-) terminal. -
Page 5: Wiring Connection
WIRING CONNECTION WHITE (BLACK) AV IN CABLE (YELLOW) WIRING REMOTE CONNECTOR SOCKET (BLACK) CD CHANGER CONNECTOR SOCKET FUSE ANTENNA CONNECTOR Output RCA CABLE (GREY) WHITE BLUE POWER ANTENNA YELLOW +12V POWER BLACK GROUND (B-) WHITE GREY FRONT Lch FRONT Rch SPEAKER SPEAKER WHITE/BLACK... -
Page 6: Operation
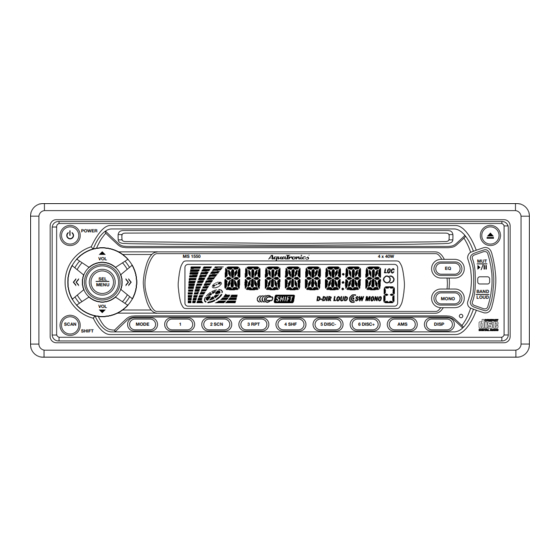
OPERATION LOCATION OF KEYS 10 17 POWER MS 1550 4 x 40W MENU BAND LOUD MONO SCAN MODE 2 SCN 3 RPT 4 SHF 5 DISC- 6 DISC+ DISP SHIFT 16 2 SWITCHING ON/OFF THE UNIT BEEP ON/OFF Switch on the unit by pressing any button •... -
Page 7: Set The Clock
OPERATION LIQUID CRYSTAL DISPLAY Press the AMS button (18) briefly to Exhibit current frequency and activated scan the station preset memories. The functions on the display (8). radio will play each preset location for several seconds, then move on to the RESET FUNCTION next memory location. -
Page 8: Cd Operation
OPERATION CD OPERATION CDC OPERATION You can connect a CD changer to the • SWITCHING TO CD MODE unit with CDC operation version only. If there is no CD inserted: Information on handling CDs, inserting CDs and operating the CD changer can Gently insert the CD with the printed be found in the operating instructions side uppermost into the disc slot (5) -
Page 9: Selecting Disc
OPERATION random and play the selected disc in DISC NOTES: A. Notes on discs: random order. Press it again to cancel the function. 1. Attempting to use nonstandard shape discs (e.g. square, start, heart) • SELECTING DISC may damage the unit. Be sure to Press CD- button (23) to select use round shape CD discs only for previous disc and CD+ button (24) to... -
Page 10: Specification
SPECIFICATION GENERAL Power Supply Requirements : DC 12 Volts, Negative Ground Chassis Dimensions : 178 (W) x 160 (D) x 50 (H) Tone Controls - Bass (at 100 Hz) 10 dB - Treble (at 10 KHz) 10 dB Maximum Output Power : 4 x 40 watts Current Drain : 15 Ampere (max.) -
Page 11: Trouble Shooting
TROUBLE SHOOTING Before going through the checklist, check wiring connection. If any of the problems persist after check list has been made, consult your nearest service dealer. Symptom Cause Solution No power. The car ignition switch is If the power supply is not on. - Page 12 www.asaelectronics.com 88-C3380-01...
Need help?
Do you have a question about the AquaTronics MS1550 and is the answer not in the manual?
Questions and answers
Hello. The screen light has gone out for some reason on my AquatronicsMS1550G (TMG) Is there a way to turn it back on ? Thanks for any help you can provide .