Advertisement
Introduction
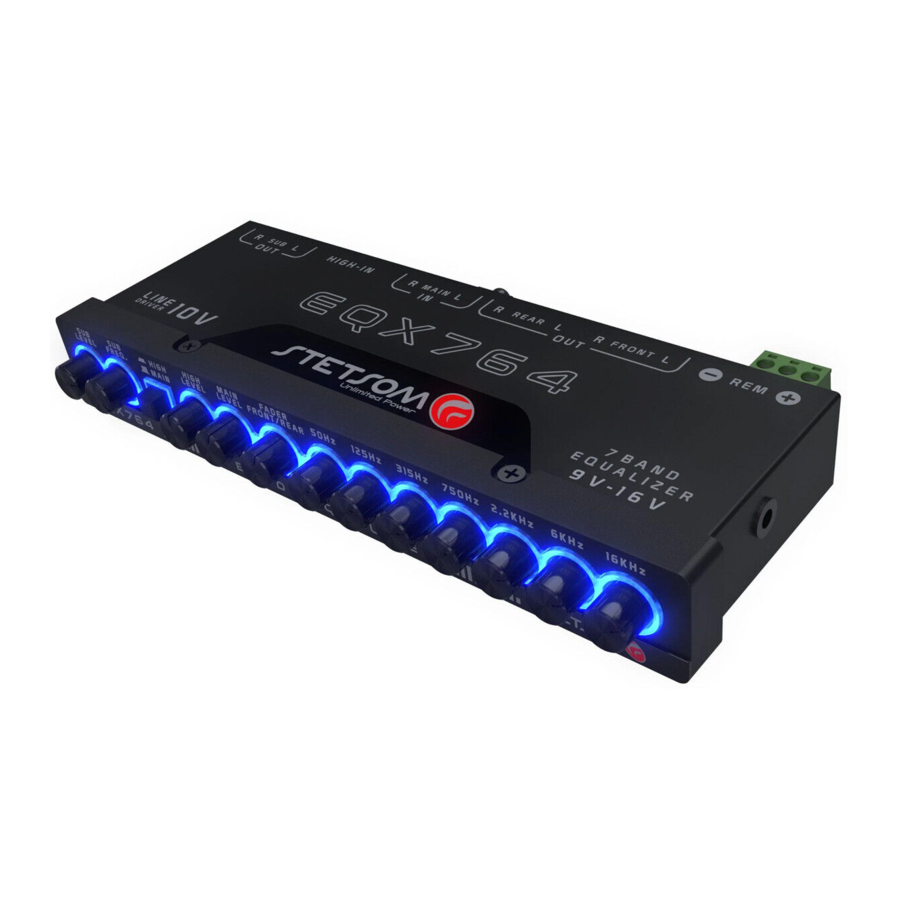
The equalizer was developed with the most advanced technology for adjustment and audio equalization with high-fidelity sound.
Resources
The equalizer has 2 input channels and 3 output channels, namely:
| INPUT | MAIN IN: RCA connection ( L + R ) |
| HIGH-IN: HIGH connection ( L + R ) | |
| OUTPUT | SUB OUT: RCA ( L + R ) |
| REAR OUT: RCA ( L + R ) | |
| FRONT OUT: RCA ( L + R ) |
INPUT CONNECTIONS
HIGH CONNECTION (WIRE)
Usual at various originals radio players of the vehicle.

RCA CONNECTION (LINE)
Usual on many radios and audio equipment on the market.

The equalizer counts with rotary controls for adjustment and equalization of signal in conforming audio wanted:
- SUB output control: Set the level and SUB output frequency.
- Input switch: Select the input signal channel (MAIN or HIGH).
- Input controls: Individual LEVEL adjustment in each input (HIGH or MAIN).
- FADER FRONT/REAR control: Set the balance between the FRONT and REAR outputs.
- LED lighting: For better control visualization, they lit on a LED frame, at color BLUE.
- Frequency controls: Equalizer with 7 bands (50Hz / 125Hz / 315Hz / 750Hz / 2.2KHz / 6KHz / 16KHz).
Before installing
Read this manual carefully before installing the equalizer.
The assembly instructions must be followed as well as the connections, to the best use of the product. If needed, consult our Customer Service. Before use, it's indispensable to pay attention to some info:
- Be sure the device is off before making or removing any connection. It prevents possible damage to the gadgets connected to the equalizer.
- Distribute all the cables as far as possible from the ignition cables, ECU modules, and starter key, as they can generate interferences at the sound.
- Use cables and connectors of good quality, as this ensures the quality and fidelity of sound
- To not damage your cables, pay attention to not passing them close to sharp metal edges.
 Use a 1A fuse at a distance of most 30cm/1ft of battery for protection.
Installation
For installation, choose a place with easy access to the product. The fixation (when necessary) can be made with a set of corner brackets that comes with the product. Set the corner bracket through the holes on the sides of the product using screws. Be sure the installation is done in a steady, ventilated and dry place.

Input Connections

- HIGH INPUT CONNECTION: : Use the connection when the radio/player does not have RCA output. The input has a stereo signal (L and R) identified at the product. Check the radio/player output signals before making the connections. For remote triggering of the amplifier, use the REM connection.

- MAIN INPUT CONNECTION: Double RCA connection with input stereo (L+R) identified at the product. Make the connection with radio/player output through quality RCA cables armored to avoid unwanted noises.
![warning]() The MAIN and HIGH INPUT connections can be switched using the front knob of channel selection between MAIN and HIGH.
The MAIN and HIGH INPUT connections can be switched using the front knob of channel selection between MAIN and HIGH.

EQX764 Controls

- SUBWOOFER OUTPUT CONTROLS
- SUB LEVEL: Allows the signal adjustment of the level provided at the output of the SUB channel.
- SUB FREQ: Rotary control to select the maximum frequency which will be reproduced by SUB channel. This control can be adjusted from 60Hz to 90Hz.
- INPUT CHANNEL SELECTOR
The equalizer has a key that allows a switch between the input channels MAIN (RCA) and HIGH (WIRE) without the need to disconnect the cables and connections.![]()
Key pressed, input channel HIGH (WIRE) selected. ![]()
Key released, input channel MAIN (RCA) selected. - LEVEL CONTROLS
Rotary controls to individual adjustment of the level signal of audio inputs HIGH and MAIN. - FADER CONTROL
Rotary control for balance adjustment between volume outputs in audio REAR and FRONT. - EQ CONTROLS
The equalizer has 7 bands in equalizations for frequency adjustment on an individual and precise form.


Example of impacts in each equalization control represented on the audio chart:

Output connections

- SUB OUTPUT:
RCA output (L+R) dedicated for use in SUBWOOFERS. It has controls dedicated to LEVEL and FREQUENCY for precise lower frequencies adjustment. - REAR & FRONT OUTPUT:
RCA outputs (L+R) dedicates to the channels REAR and FRONT. These outputs count with adjustments of GAIN, FADER, and EQUALIZATION.
Power and remote activation

- POSITIVE CONNECTOR
![]() : Connect the positive pole of the battery or a power source 12V, using a cable with a gauge of 20AWG. For use of the vehicle battery, use a 1A fuse at a distance of no more than 30cm/1ft from the battery, for protection.
: Connect the positive pole of the battery or a power source 12V, using a cable with a gauge of 20AWG. For use of the vehicle battery, use a 1A fuse at a distance of no more than 30cm/1ft from the battery, for protection. - NEGATIVE/GROUND CONNECTOR
![]() : Connect to the negative pole of the battery or power source, using a cable with a 20AWG gauge.
: Connect to the negative pole of the battery or power source, using a cable with a 20AWG gauge. - REMOTE ACTIVATION (REM):
Allows activation of the equalizer when this connection is energized. Plug the output remote of the radio/player, through a cable with a gauge of 20AWG or use a key on/off connected to +12V.
 : Connect to the negative pole of the battery or power source, using a cable with a 20AWG gauge.
Installation example

Problems solution
DOES NOT TURN ON OR LED'S DO NOT LIGHT UP:
- Power cables are not connected correctly or poorly contacted (terminals +12V, GND, and REM). Check connections and grounding.
- Remote activation (REM) connection with no voltage. Verify that the connection is receiving voltage near 12V.
NO AUDIO SIGNAL
- Controls on LEVEL channels at the minimum, increase the level.
- The audio cables might be disconnected or with bad contact. Check the connections.
DISTORTED AUDIO SIGNAL
- Signal in audio distorted/saturated. Adjust the volume level of the source signal, as well as the controls of gain channels.
UNDESIRABLE NOISES
- All cables (RCA and power) should be previously checked, to overcome any irregularity found.
- Use suppressive cables on the ignition candles.
- Pass the RCA cable's Input and Output away from any other cable, since they are more sensitive to interferences.
- Make the power connection installation (+12V) separate from the sound system.
- Make a good grounding of the product. For this, remove the ink from the chassis of the vehicle on the wanted point and screw the wire, using a ground terminal. To protect it from oxidation, insulate it with ink.
- Leave the grounding point the nearest possible to the others equipment grounding used on the set, avoiding loop. Prefer the star connection with every ground leaving it from a single point.
Protections
- Short circuit at Input (Fuse thermal resettable)
- Inversion of polarity
Technical specifications
| Inputs: | MAIN IN (RCA) and HIGH IN (WIRE) |
| Outputs: | SUB OUT, FRONT and REAR SUB LEVEL and FREQUENCY SELETOR DE ENTRADA (MAIN and HIGH) |
| Audio Controls: | LEVEL (MAIN and HIGH) FADER (FRONT and REAR) EQUALIZER (-12dB ~ +12dB) |
| SUB frequency control: | 60Hz ~ 90Hz |
| Vout @ 14.4V: | Sub Out: 10V RMS / Front & Rear: 8.5V RMS (LINE DRIVER) |
| Input sensitivity: | Main (RCA): 3.3V RMS @ 14.4V High (WIRE): 25V RMS @ 14.4V |
| Input impedance: | Main (RCA): 20K Ohms High (WIRE): 1K Ohms |
| Output impedance: | 47 Ohms |
| Frequency response: | 5Hz ~140KHz |
| THD: | < 0.1% |
| SNR: | > 100dB |
| Crosstalk: | > 85dB |
| Supply voltage: | 9V ~ 16V DC |
| Max consumption: | 290mA @ 12.6V |
| Dimensions (A x L x C): | 1" x 3.24" x 7.25" mm |
| Weight: | 0.68 lb |
 The measured data is based on equipment from the STETSOM laboratory. The electronic components and the manufacturing process may present variations, thus leading to a variation in the measurements taken.
 Any updates made to this manual will be available for consumer consultation free of charge on our website. It is recommended that the updated manual be consulted whenever necessary.
QUESTIONS AND ADVICE:
STETSOM offers Customer Services to answer questions and give advice about their products and services. Please contact us through the channels:
Phone: BR +55 18 2104-9412
E-mail: suporte@stetsom.com.br
Site: www.stetsom.com
Download manual
Here you can download full pdf version of manual, it may contain additional safety instructions, warranty information, FCC rules, etc.
Documents / Resources
References
Advertisement

Need help?
Do you have a question about the EQX764 and is the answer not in the manual?
Questions and answers