Advertisement
FEATURE HIGHLIGHTS

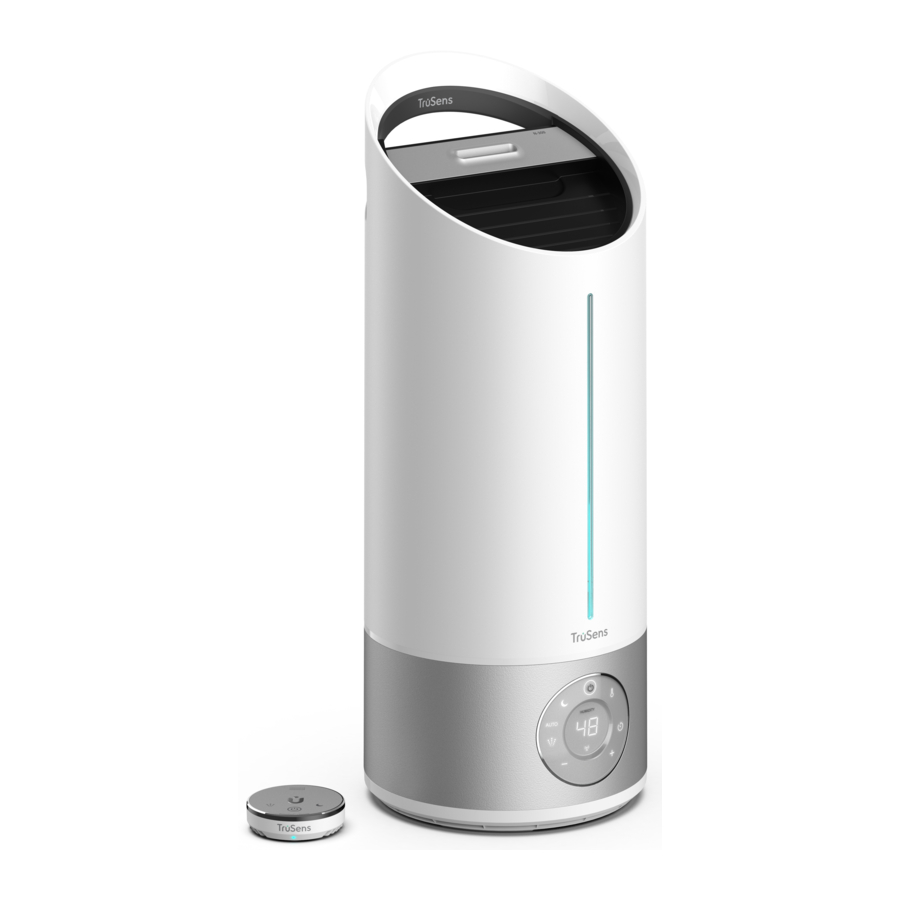
SensorPod™
Remote humidity monitor with integrated remote-control functionality.

Informs and Adapts
Humidifier displays relative humidity percentage in real-time and reacts to maintain your desired level of humidity in the room.

Water Softening Filter
Softens the water to help prevent the buildup of mineral scale.

UV-C Light

Warm & Cool Mist
Customize your comfort level with either warm or cool mist.

Top Fill Design
Lightweight water tank lid allows easy refilling and cleaning of the large capacity water tank.
PRODUCT OVERVIEW

GETTING STARTED

Always unplug the humidifier before removing the water tank. Empty all water before cleaning water tank, replacing filter or moving the humidifier. Only place the water tank on a hard, solid surface; do not place on carpeting.
Prepare the water filter
Remove plastic bag from filter. For optimal performance, submerge filter in bowl of water for 1 hour.

Install the water filter
- Unscrew gray cap.
![]()
- Secure the filter onto gray cap.
![]()
- Tightly secure gray cap with filter onto water tank until indicator meets lock symbol.
![]()


Failure to properly tighten gray filter cap may result in leaking. Return water tank on top of base.
Fill the water tank
Remove water tank lid and fill with room temperature water (preferably distilled) with pitcher.
The light in the tank is blue when it contains sufficient water (tank is red when it needs refilling).

Do not pour water into the mist outlet or directly into the base/reservoir. Do not fill over the "Max" indicator line.

Heavy object. To avoid injury always fill tank from the top and use care when lifting.
Set up
Place humidifier on a dry, firm, flat surface that is free from obstructions.
 Note: Failure to properly tighten gray filter cap may result in leaking.
Open lid of battery chamber found on SensorPod (bottom) and insert 2 AAA batteries (provided).*
SensorPod will automatically begin monitoring if humidifier is on.
For optimal results, place SensorPod on a tabletop or counter across the room, within line of sight of the humidifier.
Control the humidifier with the touch buttons on SensorPod.

NOTE: When the base reservoir is completely dry, like at the first use or at the start of each new season, there may be a delay of up to 30 seconds before mist is produced.
CONTROL PANEL


Power Button
![]()
Warm Mist
When on, mist is warmed.
Note: It will take a few minutes to achieve its full temperature.
![]()
Timer Mode
Humidifier will automatically turn off after 2, 4, 8, or 12 hours. To cancel this countdown, simply press button until no timer setting is displayed.

Target Humidity
Press the – or + button to set your own target humidity between 40 - 60%. The humidity level will be displayed as a percentage on panel (i.e. 45 = 45%).
![]()
Filter Change Indicator
Filter indicator glows red when it is time to be replaced. To reset, simply hold the Filter Reset button for 3 seconds.
If you replace the filter before the indicator turns red, simply hold the Filter Reset Button for 10 seconds to notify the humidifier that a new filter has been installed.
(See replacement instructions. Follow above Reset button instructions after replacing filter.)
![]()
Misting Speed Settings
Select misting speed (1/2/3) or AUTO mode. In AUTO mode, humidifier will only produce mist when SensorPod measures humidity lower than target humidity setting. Default AUTO mode setting is 50% relative humidity.
![]()
Dimmer Mode
Display illumination turns off – for use while sleeping – without sacrificing the effectiveness of the humidifier. Simply press the button again to bring back all display features.
SENSORPOD™
Remote Control
The SensorPod reads the humidity level where it is placed. The battery operated SensorPod should be positioned in line-of-sight of the humidifier; up to 33' away.
The SensorPod is also a remote control for your humidifier. Power on and off, adjust the misting speed, and dim the lights on the display.
The SensorPod communicates with the humidifier using radio frequency signals and will be pre-paired on the production line and ready for use when you open the box.

SPECIFICATIONS
| Model | N-300 |
| Tank Capacity | 8 Liters (2.1 gallons) |
| Max Mist Output | 300 ml/h (cool) |
| Operating Time | 26 - 80 hours |
| Room Size | Up to 485 sq. ft / 45 m sq. |
| Sensor | SensorPod™, works up to 33 ft (10m) from humidifier |
| Misting Speed Settings | 1, 2, 3, AUTO |
| Timer Settings | 2, 4, 8, 12 hr |
| Warm Mist | 104˚ F (40˚ C) at atomizer |
| Empty Tank Indicator | Water tank LED turns red |
| Filter Change Indicator | Yes |
| Noise Level | 41.0 dB Max |
| Dimensions | Ø 8.8" x 22.8" (Ø 224 x 578mm) |
| Weight (empty) | 7.3 lbs (3.3 kg) with filter |
| Power Requirements | 100 - 130V / 60 Hz |
| Power Consumption | 16 - 67.2W / 128 - 182.4W (warm) |
| Warranty | 3 years |
Replacement Filter & Pads
| Water Softening Filter | WSF300-01 | 1 pack | Replace after 4 months (with normal use) |
| Aromatherapy Pads | ATP300-01 | 10 pack | Replace as needed |
AROMATHERAPY
The humidifier includes an aromatherapy drawer, at the back of the unit, that allows you to add your favorite essential oils for an enhanced experience.
Do not use any synthetic fragrances - only use 100% natural essential oils. Do not add essential oils directly into the water tank.
Adding Essential Oils
Open the aroma drawer on the back of the humidifier & apply 2-3 drops of essential oil to the aroma pad (Fig. A).

When you are ready to replace the aroma pad, gently remove the pad from the aroma drawer, and replace with a new pad making sure to secure the pad using the tabs (Fig. B).

Refer to aromatherapy pad replacement part number.
REPLACING THE WATER FILTER
The filter indicator will glow red when it is time to change the ion exchange filter.
Note: The filter should also be replaced after the humidifier has been stored away for a season or more.
Always unplug the humidifier before removing the water tank. Always empty any water from the tank before replacing the filter.
Note: Remember to submerge the replacement water filter in a bowl of water for 1 hour before using (Fig. C).

Accessing the filter
- Remove the water tank from its base, pour out any water into a sink and gently place on its side so that the gray filter cap is exposed and accessible.
- Turn the gray cap counter-clockwise to remove the filter from the water tank (Fig. D).
![]()
- Remove current filter from gray cap in a counterclockwise motion (Fig. E).
![]()
Secure replacement filter onto gray cap threading in a clockwise motion (Fig. F).
![]()
- Tightly secure gray cap with filter onto the threading on the bottom of the water tank and turn clockwise until indicator meets lock symbol (Fig. G).
![]()
- Return water tank on top of base, plug-in and power on your humidifier. Hold the Filter Reset Button until the red indicator turns off.


Refer to water softening filter replacement part number.
CARE & MAINTENANCE
Cleaning the tank and base reservoir on a regular basis is critical to ensure the optimal performance of the humidifier. The water filter will help to prevent mineral scale buildup, but a regular cleaning routine is important for addressing mineral scale in areas with especially hard water, as well as to prevent any odors that may be caused by standing water if the humidifier is not used for days at a time.
If you have concerns about your local water quality or if you have especially hard water, we recommend using distilled water.
Always unplug the humidifier before removing the water tank. Always empty any water from the tank before cleaning. Always allow any remaining water in reservoir to cool before cleaning.
REGULAR MAINTENANCE
We recommend that the following is carried out when you refill the water tank:
- Rinse the water tank with water and wipe clean.
- Dry with clean cloth.
Note: Lower humidity control settings or turn off the humidifier if moisture forms on wall or windows
Do not use any detergents or cleaning chemicals.
Do not place any part of the humidifier in a dishwasher.
Do not submerge the base reservoir under water at any time.
WEEKLY MAINTENANCE
Base Reservoir

- Empty the water by pouring out the left side of the base, to avoid splashing onto control panel or power cord inlet.
- Remove the covers of the UV-C chamber and PTC heater.
- Pour 20 fl oz cup of distilled white vinegar into the reservoir, making sure that the atomizer, UV-C chamber and PTC heater are submerged in vinegar. Allow the vinegar to soak for 30 minutes, and then carefully empty the vinegar by pouring out of the left side of the base.
- Dampen a soft cloth with undiluted white vinegar and gently wipe the reservoir, including all components.
- Rinse thoroughly with clean water and dry with a clean cloth.
Water Tank
- Empty all water out of the tank.
- Remove filter from tank, and tightly secure the gray cap onto the tank.
- Add 2 cups of distilled white vinegar and 2 cups of water to the tank.
- Gently shake the water tank to coat the inner sides of the tank.
- Allow the vinegar and water to soak inside the tank for 30 minutes.
- Dampen a soft cloth with undiluted white vinegar and wipe thoroughly around the tank and the outside of the filter.
- Rinse with clean warm water to remove the mineral scale and vinegar.
- Dry with clean cloth.
MAINTENANCE BEFORE STORING
Follow weekly maintenance instructions above. Let the humidifier dry completely before storing. Do not store with water inside the tank or base reservoir. Store in a cool dry place. Clean the humidifier before the next season begins.
FAQ & TROUBLESHOOTING
| Where do I place the SensorPod™? | Anywhere you want to measure the humidity within the room. For optimal results, place the SensorPod™ up to 33ft (10 m) away from the humidifier on a counter or table, within line of sight of the humidifier. In Auto Mode, the humidifier will work to distribute humidity until the SensorPod reads an acceptable level. |
| How often do I need to change the filter? | That's easy! The humidifier's replacement indicator will notify you when it is time to replace the water softening filter. Plan on replacing the water filter every 3-4 months, with normal use of 8 hours per day and average hardness of water. |
| How often do I need to replace the aromatherapy pad? | The humidifier comes with one aroma pad. Replace as needed. |
| Humidifier won't turn on. | Check that the power cord is connected securely to both the wall outlet and the humidifier. Check if there is a power outage in the outlet by trying a nearby light or device, or by trying a working device in the same outlet. Check that there is water in the tank, and consider filling the tank to the "Max" indicator line. Please contact us if you're still having a problem. |
| Humidifier won't go into Auto Mode. OR Humidity indicators are off. OR Humidifier's sensor signal indicator is blinking. | First, check that the SensorPod is within range of the humidifier (up to 33ft/10m). Next, check the SensorPod batteries and consider replacing with new batteries. If the connection is still failing, see below instructions on repairing the SensorPod's connection. |
| I've lost my SensorPod™! | Don't worry! Please contact our customer support team and you can order a replacement SensorPod. Follow the easy pairing instructions below to pair your replacement SensorPod with your existing humidifier! |
Pairing SensorPod™ and Humidifier
The SensorPod communicates with the humidifier using radio frequency signals, and is already paired and ready for use when you open the box. In the rare event that the signal is interrupted, the humidifier's sensor indicator light ![]() will blink. You can repair the connection in just a few easy steps.
will blink. You can repair the connection in just a few easy steps.
- HOLD the Power Button on the humidifier for 3 seconds, until you should hear two chimes.
- HOLD the Power Button on the SensorPod remote control panel for 5-7 seconds.
- The connection is established when the humidifier's sensor indicator light is lit with no blinking, and the humidity display turns on.
SUPPORT
Our customers are at the heart of what we do, and we strive to design products that fit your lifestyle. If you have any questions or feedback, please reach out!
Visit our website at www.trusens.com
Email us at support@trusens.com
Call us at 1-833-TRUSENS (1-833-878-7367)
Subscribe to our YouTube channel TruSens & Follow us @TruSensWellness

SAFETY INFORMATION
READ AND SAVE THESE INSTRUCTIONS / READ THE LABEL AND ANY OPERATING MANUAL BEFORE USING
PRECAUTIONS
This appliance has a polarized plug (one blade is wider than the other). To reduce the risk of electric shock, this plug is intended to fit in a polarized outlet only one way. If the plug does not fit fully in the outlet, reverse the plug. If it still does not fit, contact a qualified electrician. Do not attempt to defeat this safety feature. Unplug or disconnect the appliance from the power supply before cleaning the base.
To reduce the risk of fire or electric shock, do not use this appliance with any solid-state speed control device.
Do not operate any humidifier with a damaged cord or plug, or if the wall socket is loose.
Do not run cord under carpeting, throw rugs, runners, or similar coverings. Do not run cord under furniture or appliances. Arrange cord away from traffic area and where it will not be tripped over.
- Never handle the plug with wet hands.
- Do not touch the mist when in warm mist mode.
- Remove all packaging, including the filter bag, before use.
- Unplug the humidifier and empty the water tank before moving. Always carry by the base.
- Always place the appliance on a dry, firm, flat surface that is free from obstructions.
- Appliances that are obviously damaged must not be operated.
- Do not pour water into the mist outlet or chimney.
- Always fill the water tank with clean, cold water. Do not overfill the water tank.
- If you have concerns with your local water quality or if you have especially hard water, use distilled water.
- Always place the water tank directly onto the base when there is water in the tank.
- Do not add essential oils directly to the water tank. Do not use synthetic fragrances.
- Always empty any water from the water tank before cleaning or before replacing the filter.
- Locate humidifier near the outlet wall socket and do not use extension cords.
- This appliance can be used by children aged from 8 years and above and persons with reduced physical, sensory or mental capabilities or lack of experience and knowledge if they have been given supervision or instruction concerning use of the appliance in a safe way and understand the hazards involved.
- KEEP OUT OF THE REACH OF CHILDREN. Children shall not play with the appliance.
- Do not attempt to service or repair this product yourself.
- Only use the humidifier with the power cable provided.
- Only clean this machine with a damp cloth, do not use solvents or bleach.
- Do not place any part of the humidifier in a dishwasher.
- Do not submerge the base reservoir under water at any time.
- Do not block or obstruct the mist outlet or chimney.
- Do not insert fingers or other items into the mist outlet or chimney.
- Do not place foreign objects in the water tank or base reservoir.
- When the humidifier is in standby mode the SensorPod is still transmitting a signal/data.
- Let the appliance cool down before cleaning. Water spilled from the appliance may be hot and a burn hazard.
- Replace any leaking batteries immediately. Remove the batteries if the appliance is being stored for long periods.
- Safely dispose of or recycle used batteries per local regulations.

The water and heater may cause burns. Unplug the humidifier and let cool before cleaning.
Skin or eye damage may result from directly viewing the light produced by the lamp in the apparatus.
This appliance contains a UV-C bulb. Avoid exposing the eyes and skin to UVC radiation as it may cause eye and skin injury.
- This appliance contains an UVC emitter.
- Unintended use of the appliance or damage to the housing may result in the exposure of UVC radiation.
- UVC radiation may cause eye and skin irritation.
- Avoid exposing eyes and skin to UVC radiation.
FIRST AID INSTRUCTIONS - Seek medical attention in event of injury.
The use of this device is a supplement to and not a substitute for standard infection control practices; users must continue to follow all current infection control practices, including those practices related to cleaning and disinfection of environmental surfaces.
Documents / Resources
References
Download manual
Here you can download full pdf version of manual, it may contain additional safety instructions, warranty information, FCC rules, etc.
Advertisement


Need help?
Do you have a question about the N-300 and is the answer not in the manual?
Questions and answers