
Summary of Contents for Lynovation CTR2-Dial
- Page 1 CTR2-Dial Operation Manual v1.00.05a Last Revision: January 29, 2025 Copyright 2025 – Lynovation.com All rights reserved Updated to firmware v1.00.05 Revised sections for this version are highlighted in yellow...
-
Page 2: Table Of Contents
Mapping for Thetis ............................23 Advanced Options ............................25 Operation with N1MM Logger+ ......................25 Troubleshooting ............................26 Appendix A: Connecting CTR2-Dial to Your App ..................28 Remote Ham Radio ..........................28 Marcus’ Apps for iOS or MacOS ......................28 Enable Permissions ..........................28 Select the CTR2 Controller Device ...................... - Page 3 Thetis..............................31 SparkSDR ..............................32 Flex Radio CW Zombie Mode ........................32 Appendix B: Installing or Updating CTR2-Dial Firmware ................33 Installing using Linux or Mac ........................34 Appendix C: Configuring Tera Term ......................35 Appendix D: Configuring Putty ........................36 Serial Session ............................
-
Page 4: Introduction
I cannot guarantee or warranty the hardware supplied in kits. I make no warranty that the firmware provided for CTR2-Dial will perform up to your expectations or be suitable for your application. Software bugs are a fact of life and I try to find and correct all bug reports to the best of my ability ASAP. -
Page 5: V1.00.05 - January 28, 2025
– January 20, 2025 – Shipped version Added WheelB-r (reverse) wheel option to switch direction of dial rotation for PI HPSDR Touching CTR2-Dial caption on the Home page returns to the previously open page Fixed bugs in Knob B property editing ... -
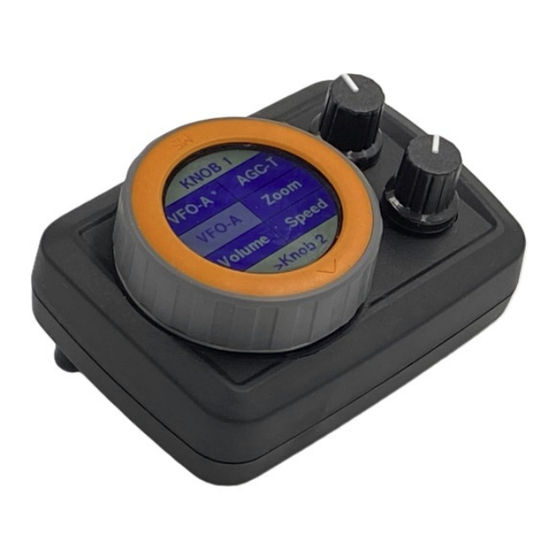
Page 6: System Overview
Knob controls available if your unit is equipped with external encoders. These can be user assigned to any MIDI command number and control type, including those already assigned to the Dial controls. The graphic below shows how three controls on the Dial are mapped to the SmartSDR app. CTR2-Dial Operation Manual v1.00 Page 6... -
Page 7: Power Options
USB battery pack, an external 6 to 36 VDC power source, or even an internal 3.7 volt lithium battery pack, making the Dial an idea companion for portable operation. CTR2-Dial Operation Manual v1.00 Page 7... -
Page 8: Ctr2-Dial Features
Support for USB MIDI and Bluetooth-LE MIDI connections 42 virtual button controls for modes/bands/filters selection 12 virtual dial (wheel/slider) controls for tuning, volume, RIT, XIT, etc Up to two optional physical encoders (referred to as Knobs) CTR2-Dial Operation Manual v1.00 Page 8... -
Page 9: Hardware
NOTE: On the M5Dial, Port A is used for the first encoder (Knob A) and Port B is used for either the second encoder (Knob B) or the 3.5mm (1/8”) stereo jack for CW paddles, key, and PTT. CTR2-Dial Operation Manual v1.00 Page 9... -
Page 10: Registering The Ctr2-Dial Firmware
3.5mm (1/8”) stereo Paddle Input jack connections are on the rear of the enclosure. Rubber boots are also provided to tilt the enclosure for better viewing and control if desired. Registering the CTR2-Dial Firmware You must enter a registration key for your Dial if you don’t purchase an assembled Dial (i.e. you purchase the M5Dial separately). -
Page 11: Home Page
From the Home page you can quickly access the Dial, Buttons, Knob, and virtual PTT pages or open the Settings menu. Pressing the CTR2-Dial caption at the top of the Home page will return you to the previously displayed menu or control. -
Page 12: Dial Control
<A> at the bottom of the label indicates that this is a WheelA control. In addition to wheel controls you can select from two slider controls. Slider controls are similar to potentiometers and have a minimum and maximum range. CTR2-Dial Operation Manual v1.00 Page 12... -
Page 13: Knob Menu
Dial selection. Turning the Knob will change VFO-A. Selecting one of the other five functions on this page assigns it to the Knob. On dual-encoder models each encoder has its own menu page with six functions. CTR2-Dial Operation Manual v1.00 Page 13... -
Page 14: Buttons Menu
The first touch selects the button and the second touch executes the selected function. On the caption button: Touch the left side to switch to the Knob Menu page. Touch the right side to switch to the Dial page. CTR2-Dial Operation Manual v1.00 Page 14... -
Page 15: Ptt Page
The footer button (<2/7>) is a dual-function button and requires a select and execute touch. Touch the left side to decrement the Settings menu page #. Touch the right side to increment the Settings menu page #. CTR2-Dial Operation Manual v1.00 Page 15... - Page 16 96, 97, 98, and 99. MIDI controls 20, 21, 30, and 31 are also available for compatibility with Remote Ham Radio CTR2-MIDI mapping. Rotates the screen 90 degrees for each selection. This allows the Rotate Screen screen to be aligned for various M5Dial mounting configurations. CTR2-Dial Operation Manual v1.00 Page 16...
- Page 17 NOTE: Your call sign and firmware registration key will also be reset Reset to requiring you to re-enter this data. Factory NOTE: If you reset the configuration by mistake, execute the Restore to Start Up option to restore your settings before powering the unit down. CTR2-Dial Operation Manual v1.00 Page 17...
-
Page 18: Editing The Map
Dial controls are assigned to MIDI control #s 100 through 111. You can edit the MIDI control # assigned to Knob controls. Press T to step through the MIDI control type assigned to the control and L to edit the label. CTR2-Dial Operation Manual v1.00 Page 18... -
Page 19: Backing Up And Restoring Your Settings
You can view this file with a text editor. I don’t recommend editing the values in this file because invalid values may cause problems with the Dial’s program. CTR2-Dial Operation Manual v1.00 Page 19... -
Page 20: Import Settings
This is also handy if you have more than one Dial and want to clone one unit to the other. You can also use the XModem transfer option in ExtraPutty as shown here. Use the Xmodem option, not the Xmodem 1K option. CTR2-Dial Operation Manual v1.00 Page 20... -
Page 21: Mapping For Remote Ham Radio
CW Mode MFB1 (long-press) Toggle NR MFB2 SSB Mode Button and MIDI Ctrl # Original MIDI Button Action Taken Dial Label MFB2 (long-press) Toggle NB MFB3 MFB3 (long-press MFB4 Toggle PTT MFB4 (long-press) Toggle VOX CTR2-Dial Operation Manual v1.00 Page 21... -
Page 22: Mapping For Ios And Macos Apps
Plug your paddles into the Paddle In jack on the Dial. Set the radio’s mode to CW In SmartSDR, press the View menu in the Panadapter display and select CWX Panel. You can adjust speed and other setting here. CTR2-Dial Operation Manual v1.00 Page 22... -
Page 23: Mapping For Thetis
Configure MIDI button. The program will find and initialize the Dial using USB. NOTE: If the program doesn’t initialize the Dial check to make sure you are using a USB-C data cable, not a USB-C charge cable. CTR2-Dial Operation Manual v1.00 Page 23... - Page 24 When you’re finished mapping controls make sure to click the Save button in the Midi Controller Setup page and Apply before you leave the Setup page so these functions will be restored the next time you run Thetis. CTR2-Dial Operation Manual v1.00 Page 24...
-
Page 25: Advanced Options
If you’re looking to have N1MM Logger control your radio remotely you might consider using CTR2- Micro to remotely control and key your radio with SmartSDR or SDR-Control providing the user interface. Instructions for this can be found in the CTR2-Micro Operation Manual under the Advanced Options section. CTR2-Dial Operation Manual v1.00 Page 25... -
Page 26: Troubleshooting
Solution I can’t connect the app 1) Make sure you are using a USB-C data cable. Many USB-C cables are to the CTR2-Dial using power only. These will not work with USB MIDI. USB MIDI 2) If using a mobile device (iPhone, iPad, Android, etc) you must use an OTG adapter for your device. - Page 27 Paddles. work. Turning Knob B causes See the explanation in the previous topic. Change the Port B: setting in the Transmit indication Settings from Paddles to Knob B. to show. CTR2-Dial Operation Manual v1.00 Page 27...
-
Page 28: Appendix A: Connecting Ctr2-Dial To Your App
Dial into a USB port on your computer then select the CTR2-MIDI option in the RHR console’s Tool menu (a CTR2-Dial option may be added in the future). The CTR2-MIDI option is pre-configured for the MIDI so you’ll need to change the configuration of the Dial to match RHR. -
Page 29: Select The Ctr2 Controller Device
“Camera Adapters” on Amazon. The adapter I use has two USB-A connectors on it. It also has a Lightning port so you can connect a wall charger or battery to power your phone and Dial. CTR2-Dial Operation Manual v1.00 Page 29... - Page 30 7. You may need to change the state of the Enabled checkbox to get the Dial to connect. 8. You can now unplug you Dial from the Mac and use it remotely with Bluetooth. CTR2-Dial Operation Manual v1.00 Page 30...
-
Page 31: Windows Applications
Dial on the USB port. The tab at the top should be labeled CTR2-Dial or possibly STAMP_S3. If the initialization fails, double-check that you are using a USB-C data cable, not a charge cable and try again. -
Page 32: Sparksdr
SparkSDR. Once you have the program running, click on the General Settings menu and select Midi. You should see CTR2-Dial 0 as a MIDI controller and turning the encoder should display MIDI messages from the controller. To map these messages to a control in the app... -
Page 33: Appendix B: Installing Or Updating Ctr2-Dial Firmware
1. Download and unzip the latest CTR2-Dial firmware from my web site. Unzip that file into a different folder than where you store other Lynovation firmware update files. 2. Download and open the EspressIF Flash Downloader Tool. When it starts, select the ESP32-S3 Chip Type. Leave WorkMode set to Develop and LoadMode set to UART. -
Page 34: Installing Using Linux Or Mac
3. Map the four .BIN files in the CTR2-Dial’s firmware distribution folder into the downloader tool. NOTE: The address for each file is embedded in its file name. Enter these addresses in the address fields to the right as shown in this screenshot. -
Page 35: Appendix C: Configuring Tera Term
Select Display to change the font and background colors to your liking. Select Font to change the font and font size. I like Courier New, Regular, and 14 point size. You’re preferences may differ. CTR2-Dial Operation Manual v1.00 Page 35... -
Page 36: Appendix D: Configuring Putty
LF in Every CR to on, and Local Echo, and Local Line Editing to Force Off. You can change the window size under the Window item. Set the Columns to 41 and the Rows to 20. CTR2-Dial Operation Manual v1.00 Page 36... -
Page 37: Appendix E - Power Requirements
105 mA Medium 1 82 mA 70 mA By comparison, because it has no display, CTR2-MIDI draws 93 mA with the Bluetooth radio on and 43 mA with it off. Appendix F: Change Log CTR2-Dial Operation Manual v1.00 Page 37...
Need help?
Do you have a question about the CTR2-Dial and is the answer not in the manual?
Questions and answers