
Related Manuals for Bosch PXX895D66E


Summary of Contents for Bosch PXX895D66E
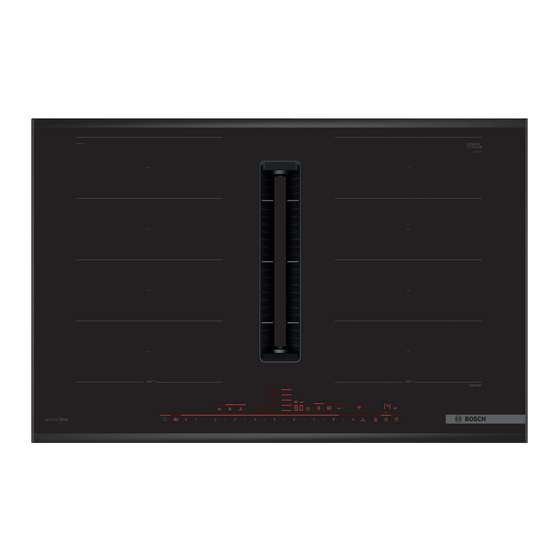
- Page 1 Induction hob with integrated ventilation system PXX...D6.. [en] Instruction manual...
- Page 2 Ø = cm...
-
Page 3: Table Of Contents
Table of contents [ e n ] I n s t r u c t i o n m a n u a l H o b Intended use ......5 Time-setting options . - Page 4 Test dishes ......61 Produktinfo Additional information on products, accessories, replacement parts and services can be found at www.bosch-home.com and in the online shop www.bosch-eshop.com...
-
Page 5: Intended Use
Intended use This appliance may be used by children over 8Intended use the age of 8 years old and by persons with reduced physical, sensory or mental R ead these instructions carefully. Please keep capabilities or by persons with a lack of I n t e n d e d u s e the instruction and installation manual, as well experience or knowledge if they are... -
Page 6: Important Safety Information
Important safety information The exhaust air must not be conveyed into a (Important safety functioning smoke or exhaust gas flue or into information a shaft that is used to ventilate rooms in which heating appliances are installed. If the exhaust air is to be conveyed into a non- Warning –... - Page 7 Important safety information Warning – Risk of burns! Warning – Risk of injury! The hotplates and surrounding area The wireless cooking sensor is equipped ■ ■ (particularly the hob surround, if fitted) with a battery, which may become become very hot. Never touch the hot damaged if it is exposed to high surfaces.
-
Page 8: Causes Of Damage
Causes of damage ]Causes of damage 7Environmental protection C aution! I n this section, you can find information about saving C a u s e s o f d a m a g e E n v i r o n m e n t a l p r o t e c t i o n Rough pan bases may scratch the hob. -
Page 9: Induction Cooking
Induction cooking fInduction cooking A dvantages of induction cooking I n d u c t i o n c o o k i n g Induction cooking is very different from traditional cooking methods, as heat builds up directly in the item of cookware. - Page 10 Induction cooking Pan detection Each hotplate has a lower limit for pan detection. This depends on the diameter of the ferromagnetic area of the cookware and the material from which its base is made. For this reason, you should always use the hotplate that best matches the diameter of the base of the pan.
-
Page 11: Getting To Know Your Appliance
Getting to know your appliance *Getting to know your appliance Y ou can find information on the dimensions and power G e t t i n g t o k n o w y o u r a p p l i a n c e of the hotplates in~ Page 2 Note: . -
Page 12: The Control Panel
Getting to know your appliance The control panel Display Selection sensors ‹ ‹ Operating status Main switch ‚ Š Power levels Selecting the cooking zone ã Residual heat • œ Settings area Ê Ê Ê Ê Time-setting options ‹‹ PowerBoost and ShortBoost functions á... -
Page 13: The Hotplates
Getting to know your appliance The hotplates Hotplate Simple hotplate Use cookware that is a suitable size Û Flexible cooking zone See section ~ "Flex Zone" á Only use cookware that is suitable for induction cooking; see section ~ "Induction cooking" Residual heat indicator The hob has a residual heat indicator for each hotplate. -
Page 14: Operating Modes
Operating modes ÇOperating modes KBefore using for the first time T his appliance can be used in air extraction mode or O p e r a t i n g m o d e s circulating-air mode. P lease read the following information before using the B e f o r e u s i n g f o r t h e f i r s t t i m e appliance for the first time: Exhaust air mode... -
Page 15: Operating The Appliance
Operating the appliance Selecting a hotplate and heat setting 1Operating the appliance The hob must be switched on. Touch the ã symbol for the required hotplate. T his chapter explains how to set a hotplate. The table O p e r a t i n g t h e a p p l i a n c e shows heat settings and cooking times for various ‹... -
Page 16: Chef's Recommendations
Operating the appliance Chef's recommendations Recommendations When heating up puree, cream soups and thick ■ sauces, stir occasionally. Set heat setting 8 to 9 for preheating. ■ When cooking with the lid on, turn the heat setting ■ down as soon as steam escapes between the lid and the cookware. - Page 17 Operating the appliance Heat setting Cooking time (mins) Boiling, steaming, braising Rice (with double the volume of water) 2.5 - 3.5 15 - 30 Rice pudding*** 2 - 3 30 - 40 Unpeeled boiled potatoes 4.5 - 5.5 25 - 35 Boiled potatoes 4.5 - 5.5 15 - 30...
-
Page 18: Manual Hood Control
Operating the appliance Manual hood control Automatic start via power levels The ventilation system switches on at a power level in You can control the ventilation setting manually. accordance with the respective power level for the cooking zone. Note: Using tall items of cookware may prevent the extraction system from working at optimum power. -
Page 19: Flex Zone
Flex Zone As a single hotplate |Flex Zone Using the entire cooking zone by connecting both hotplates. Y ou can use each flex zone as a single hotplate or as F l e x Z o n e two independent hotplates, as required. Connecting the two cooking zones It consists of four inductors that work independently of The cooking zones are automatically connected or... -
Page 20: Move Function
Move function Activation uMove function Select one of the two hotplates in the flexible cooking zone. T his function activates the entire flexible cooking zone, M o v e f u n c t i o n Touch the ç symbol. -
Page 21: Time-Setting Options
Time-setting options Frying sensor OTime-setting options If a cooking time has been programmed for a hotplate and the frying sensor has been activated, the cooking Y our hob has three timer functions: time will not begin to count down until the selected T i m e - s e t t i n g o p t i o n s temperature setting has been reached. -
Page 22: Stopwatch Function
PowerBoost function When the time has elapsed vPowerBoost function An audible signal sounds once the time has elapsed. ‹‹ and the symbol flash in the timer display. T he PowerBoost function enables you to heat up large P o w e r B o o s t f u n c t i o n The indicators go out after touching the symbol. -
Page 23: Shortboost Function
ShortBoost function xShortBoost function zKeep warm function T he ShortBoost function enables you to heat cookware T his function is suitable for melting chocolate or butter S h o r t B o o s t f u n c t i o n K e e p w a r m f u n c t i o n and for keeping food warm. -
Page 24: Transferring Settings
Transferring settings sTransferring settings T his function can be used to transfer the heat setting, T r a n s f e r r i n g s e t t i n g s the programmed cooking time and the selected cooking function from one hotplate to another. -
Page 25: Cooking Assist Functions
Cooking assist functions The hotplates that have a frying sensor are marked with ÜCooking assist functions the frying sensor symbol. The cooking functions are available to all hotplates if a T he cooking assistance functions make cooking easy wireless temperature sensor is connected. C o o k i n g a s s i s t f u n c t i o n s and always give you excellent results. -
Page 26: Suitable Cookware
Cooking assist functions Suitable cookware Sensors and special accessories Select the cooking zone with the diameter that most The sensors measure the temperature of the pot closely matches that of the base of the cookware and throughout the entire cooking process. This ensures place the cookware in the centre of this cooking zone. -
Page 27: Cooking Functions
Cooking assist functions Temperature settings Temperature level Suitable for very low Preparing and reducing sauces, stewing vegetables and frying food in extra virgin olive oil, butter or margarine. Frying food in extra virgin olive oil, butter or margarine, e.g. omelettes. medium - low Frying fish and thick food such as meatballs and sausages. - Page 28 Cooking assist functions Temperature ranges and settings Cooking functions Temperature setting Temperature range Suitable for Heating, keeping warm 1/70 ºC 60 - 70 ºC E.g. soups, punch Poaching 2/90 ºC 80 - 90 ºC E.g. rice, milk Cooking 3/100 ºC 90 - 100 ºC E.g.
- Page 29 Cooking assist functions Setting procedure You will need to connect the wireless cooking sensor to the control panel before using the cooking functions for the first time. Refer to the section entitled ~ "‚ Wireless temperature sensor" to find out how to do this Attach the temperature sensor to the saucepan;...
-
Page 30: Recommended Dishes
Cooking assist functions Recommended dishes The following table shows a selection of dishes and is arranged by food type. The temperature and the cooking time depend on the amount, the condition and the quality of the food. Cooking assistance functions: Frying sensor for pans é... - Page 31 Cooking assist functions Meat Cooking assis- Temperature level Total cooking time from sig- tance functions nal tone (mins) Cooking in a pressure cooker 4 - 120 ºC 15 - 25 å Chicken in pressure cooker 4 - 120 ºC 15 - 25 å...
- Page 32 Cooking assist functions Egg dishes Cooking assis- Temperature level Total cooking time from sig- tance functions nal tone (mins) Frying with a little amount of oil 2 - 6 é Fried eggs in butter 2 - 6 é Fried eggs 4 - 9 é...
- Page 33 Cooking assist functions Vegetables and pulses Cooking assis- Temperature Total cooking time from signal tance functions level tone (mins) Boiling 3 - 100 ºC 10 - 20 å Broccoli 3 - 100 ºC 10 - 20 å Cauliflower 3 - 100 ºC 30 - 40 å...
- Page 34 Cooking assist functions Potatoes Cooking assis- Temperature level Total cooking time from sig- tance functions nal tone (mins) Boiling 3 - 100 ºC 30 - 45 å Boiling potatoes Cooking in a pressure cooker 4 - 120 ºC 10 - 20 å...
- Page 35 Cooking assist functions Sauces Cooking assis- Temperature Total cooking time from signal tance functions level tone (mins) Frying with a little amount of oil 25 - 35 é Tomato sauce with vegetables 10 - 20 é Béchamel sauce 10 - 20 é...
- Page 36 Cooking assist functions Frozen products Cooking assis- Temperature Total cooking time from signal tance functions level tone (mins) Frying with a little amount of oil 15 - 20 é Escalope 10 - 30 é Cordon bleu 10 - 30 é Poultry breast 10 - 15 é...
- Page 37 Cooking assist functions Other Cooking assis- Temperature Total cooking time from signal tance functions level tone (mins) Keeping warm, heating 1 - 70 ºC 10 - 20 å Heating goulash soup 1 - 70 ºC 5 - 15 å Heating mulled wine Simmering 2 - 90 ºC 3 - 10...
-
Page 38: Teppan Yaki And Grill For The Flex Zone
Cooking assist functions Teppan Yaki and Grill for the Flex Zone « Teppan Yaki The Teppan Yaki enables you to cook meat, fish, The Teppan Yaki and Grill accessories are ideal for the seafood, vegetables, desserts and bread with very little FlexZone and are perfect for using the frying sensor. - Page 39 Cooking assist functions Cookware Temperature Total frying time after the signal level tone sounds (min) 4 - 15 « ¬ Frying green asparagus 10 - 15 « ¬ Mushrooms 2 - 10 « Garlic 2 - 10 « Sweating onions 6 - 10 «...
-
Page 40: Connecting The Wireless Temperature Sensor To The Control Panel
Wireless temperature sensor Fitting the wireless temperature sensor ‚Wireless temperature Attach the temperature sensor to the silicone patch and sensor align it correctly. Y ou will need to connect the wireless temperature W i r e l e s s t e m p e r a t u r e s e n s o r sensor to the control panel before using the cooking functions for the first time. -
Page 41: Cleaning
Wireless temperature sensor – The battery in the temperature sensor has run Notes out. Do not use abrasive cleaning agents such as ■ Reset the wireless temperature sensor and follow scouring pads, scrubbing brushes or cream the connection procedure once again. cleaners. -
Page 42: Declaration Of Conformity
Use only high-quality batteries of the type CR2032 in order to guarantee a long service life. Declaration of Conformity Robert Bosch Hausgeräte GmbH hereby declares that the appliance with wireless temperature sensor function meets the basic requirements and other relevant provisions of the Directive 2014/53/EU. -
Page 43: Wipe Protection
Wipe protection kWipe protection bAutomatic safety cut-out I f you wipe over the control panel while the hob is I f a hotplate operates for an extended period and no W i p e p r o t e c t i o n A u t o m a t i c s a f e t y c u t - o u t switched on, settings may be altered. -
Page 44: Basic Settings
Basic settings QBasic settings T he appliance has various basic settings. These basic B a s i c s e t t i n g s settings can be altered to suit your individual requirements. Indicator/ Function symbol Childproof lock ™‚... - Page 45 Basic settings Check the cookware and the cooking results ™‚ƒ ‹ Not suitable ‚ Not perfect ƒ Suitable Configuring activation of the flexible cooking zone ™‚„ ‹ As two independent cooking zones.* ‚ As a single cooking zone. Connecting the wireless cooking sensor to the hob ™‚…...
-
Page 46: To Access The Basic Settings
Energy consumption indicator To access the basic settings: [Energy consumption The hob must be off. indicator Switch on the hob. Within ten seconds, touch and hold the symbol for T his function indicates the total amount of energy approximately four seconds. E n e r g y c o n s u m p t i o n i n d i c a t o r consumed by this hob the last time it was used for The first four displays provide product information. -
Page 47: Cookware Check
Cookware check tCookware check hPower manager T his function can be used to check the speed and Y ou can use the power manager to set the total power C o o k w a r e c h e c k P o w e r m a n a g e r quality of the cooking process depending on the of the hob. -
Page 48: Home Connect
Home Connect Automatic registration in the home network oHome Connect You require a router that has WPS functionality. You require access to your router.If you do not have this, follow the steps for "Manually logging into your H o m e C o n n e c t This appliance is WLAN-enabled and settings can be home network". -
Page 49: Home Connect Settings
Home Connect Manual registration in the home network If the symbol no longer flashes in the control panel but, instead, lights up constantly, the hob is Switch on the hob. connected to the home network. Touch and hold the symbol for four seconds. If the appliance automatically tries to connect to the The product information is displayed. - Page 50 Home Connect Disconnecting from the network Symbol Function D i s c o n n e c t i n g f r o m t h e n e t w o r k You can disconnect your hob from the network at any WLAN signal strength •’ˆ...
-
Page 51: Confirming Settings
Home Connect Switch on the hob. Confirming settings Touch and hold the symbol for four seconds. As soon as cooking settings are transmitted to a The product information is displayed. cooking zone, the cooking zone display, timer display •’ ƒ Touch the symbol repeatedly until or modified function starts, depending on the setting. -
Page 52: About Data Protection
Warning – Risk of injury! Components inside the appliance may have sharp Declaration of Conformity edges. Wear protective gloves. Robert Bosch Hausgeräte GmbH hereby declares that Notes the appliance which features Home Connect is in Only use a minimal amount of water when cleaning ■... -
Page 53: Components To Clean
Cleaning Components to clean To ensure that the different surfaces are not damaged by using the wrong cleaning product, follow the instructions in the table. Area Cleaning products Glass ceramic Glass cleaner for stains due to limescale and water marks: Clean the cooktop as soon as it has cooled down. -
Page 54: Ventilation System
Cleaning You can obtain a suitable glass scraper (article no. Remove the metal grease filter. 17000334) from our after-sales service or through our online shop. Using a special sponge for cleaning glass-ceramic hobs achieves great cleaning results. Ventilation system The filter must be regularly cleaned or replaced in order to guarantee efficient filtration of odours and grease. -
Page 55: Cleaning The Overflow Container
Cleaning Resetting the saturation displays Remove the metal grease filter. ■ If you have replaced the activated charcoal filters, you ” should reset the saturation indicator so that the display goes out. After the appliance has been switched off, ” lights up. -
Page 56: Frequently Asked Questions (Faq)
Frequently Asked Questions (FAQ) {Frequently Asked Questions (FAQ) F r e q u e n t l y A s k e d Q u e s t i o n s ( F A Q ) Using the appliance Why can I not switch on the hob and why is the childproof lock symbol lit? The childproof lock is now active. - Page 57 Frequently Asked Questions (FAQ) Noises High-pitched whistling noises: Can occur when two hotplates are used at the highest heat setting at the same time. The whistling noises disappear or become quieter when the heat setting is reduced. Fan noise: The hob is equipped with a fan that switches on automatically at high temperatures. The fan may continue to run even after you have switched off the hob if the temperature detected is still too high.
-
Page 58: Trouble Shooting
Trouble shooting 3Trouble shooting U sually, faults are small matters that are easy to T r o u b l e s h o o t i n g eliminate. Please read the information in the table before calling the after-sales service. Display Possible cause Solution... - Page 59 Trouble shooting Display Possible cause Solution The cooking sensor indicator The cooking sensor is not responding and the Replace the 3 V CR2032 battery. For more information, see the does not light up. indicator does not light up. section entitled ~ "Changing the battery". If this does not solve the problem, press and hold the symbol on the cooking sensor for 8–10 seconds and then reconnect the cooking sensor to the hob.
-
Page 60: Customer Service
Customer service 4Customer service O ur after-sales service is there for you if your appliance C u s t o m e r s e r v i c e needs to be repaired. We will always find an appropriate solution, also in order to avoid after-sales personnel having to make unnecessary visits. -
Page 61: Test Dishes
Test dishes ETest dishes T his table has been produced for test institutes to T e s t d i s h e s facilitate the testing of our appliances. The data in the table refers to our Schulte-Ufer cookware accessories (4 piece cookware set for the HEZ 390042 induction hob) with the following measurements: Saucepan Ø... - Page 62 Test dishes Preheating Cooking Heat set- Cooking time Test dishes Cookware Heat setting Lid ting (min:sec) Cooking rice pudding Rice pudding, cooked with the lid on Temperature of the milk: 7 ºC Heat the milk until it starts to rise up. Set the recommended heat setting and add rice, sugar and salt to the milk.
- Page 64 Valid within Great Britain: Imported to Great Britain by BSH Home Appliances Ltd. Grand Union House Old Wolverton Road Wolverton, Milton Keynes MK12 5PT United Kingdom *9001469461* 9001469461 000916(02)
Need help?
Do you have a question about the PXX895D66E and is the answer not in the manual?
Questions and answers