
Subscribe to Our Youtube Channel
Related Manuals for EG4 FLEXBOSS


Summary of Contents for EG4 FLEXBOSS
- Page 1 ® S C R E E N K I T Q U I C K - S T A R T G U I D E ©2024 EG4 ® ELECTRONICS, LLC. ALL RIGHTS RESERVED. VERSION 1.0.2 | INFORMATION SUBJECT TO CHANGE WITHOUT NOTICE.
-
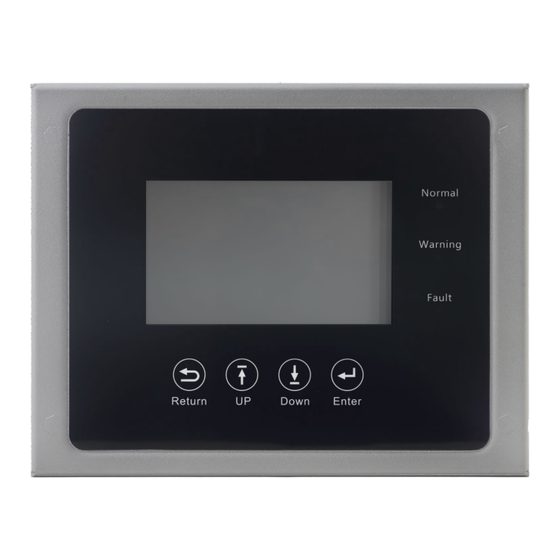
Page 2: Lcd Description
1. PRODUCT OVERVIEW 1.1 PACKING LIST Remote LCD Screen • • Ribbon Cable Extension Cable Adapter • 3M Dual Lock Re-Closable Fasteners • • Mounting Plate 1.2 LCD DESCRIPTION NO. DESCRIPTION LCD Screen LED Lights Return Down Enter 2. INSTALLATION 1. - Page 3 3. Connect the provided cable adapter to the end of the inverter’s ribbon cable and close both sides around the cable. 4. Connect the end of the LCD’s ribbon cable to the cable adapter and close both sides around the cable. NOTE: Check all cable connections.
- Page 4 8. Turn on the FlexBOSS21 by following the steps below and ensure the LCD screen turns on: a. Turn on the BAT breaker located in the cable box of the inverter and then power on the battery system one battery at a time. b.
- Page 5 3.1 HOME After waking up the screen, the home page will show on the screen by default. Users will see a system overview diagram along with the real-time information of each component, such as battery SOC, battery charging/discharging power, grid import/export power, load power, etc. On the right side of the screen, users can view: 1.
- Page 6 Grid Detailed information about energy imported and exported from the grid. Detailed information about energy used on loads (Line 1 to Neutral and Line 2 to N), including voltage (V), power (W), and energy (kWh). Other Detailed information about the inverter. 3.3 ALARM/FAULT Select the bell icon at the bottom of the screen to see historical and current fault and alarm information.
- Page 7 3.4 SETTINGS Select the gear icon at the bottom of the screen to alter inverter settings. Basic • “Standby”: This setting is to set the inverter to normal or standby status. In standby status, the inverter will stop any charging, discharging, or solar feed-in operations. Some settings and features will require the system to be in standby mode before enabling.
- Page 8 Charge • “Operating Mode”: Users can choose “Use SOC%” or “Use Bat V” to control the battery charge logic. “Bat. charge current limit (A)”: Set the maximum charge current. Limit can be set up to • 250A. Follow battery manufacturer’s recommendations for this setting. “AC Charge”: Grid charge configuration.
- Page 9 During the time period, the inverter will discharge the battery at the power set by “Discharge Power(kW)” until battery SOC or voltage reaches “Stop discharge” value. NOTE: When using EG4 ® batteries with the FlexBOSS21 inverter, it is recommended to set...
- Page 10 “Grid regulation”: Select the correct grid safety regulation. • “Reconnect time(S)”: Select the amount of time in seconds to reconnect to the grid after • connection is lost. EG4 recommends setting this at 300 seconds to avoid damage to the ® system.
- Page 11 “Battery type”: Select “No battery”, “Lead-acid”, or “Lithium”. If “Lead-acid” battery is • selected, input the correct “Lead capacity (Ah)”. If “Lithium” battery is selected, choose the “Lithium brand” in the drop-down list. “PV input”: The connection type for solar modules. •...
- Page 12 “Run without grid”: Enable for nominal off-grid operations while utilizing AC input as a • backup power source, allowing for absolute zero export. “PV Arc”: The inverter will detect when there is an arc fault on the PV inputs in order to •...
- Page 13 Debug Frequently asked questions for simple troubleshooting issues. Press the question on the screen to see the answers for each question. If an issue is not addressed on this page, contact the distributor. Device Info. • “Time”: The format for inputting the time is the four-digit year, two-digit month, two-digit day. Followed by the two-digit hour, two-digit minute, and two-digit second (in 24-hour format).
-
Page 14: Installing The Update
4. UPDATING THE LCD SCREEN To update the screen, follow the steps below: NOTE: The callout numbers below correlate to the steps taken. FORMATTING FLASH DRIVE: Ensure the USB flash drive is ≤16GB for file system compatibility. 1. Plug in a USB drive to a Windows computer. 2. -
Page 15: Change Log
5. CHANGELOG 12-10-24 • Published v1.0.2 • Modified step 9 in section 2 for additional clarity Added step 10 to section 2 for additional clarity • 12-6-24 • Published v1.0.1 Modified final screen mounting location in section 2 • 12-4-24 Published v1.0 •... - Page 16 NOTES...
- Page 17 CONTACT US support@eg4electronics.com (903) 609-1988 www.eg4electronics.com...
Need help?
Do you have a question about the FLEXBOSS and is the answer not in the manual?
Questions and answers