Table of Contents
Advertisement
Quick Links
Advertisement
Table of Contents

Summary of Contents for Joroto F5
- Page 1 User Manual TREADMILL...
-
Page 2: Table Of Contents
Read all instructions carefully before using this product. Retain this owner’s manual for future reference. If you have any inqui- ries or require further assistance, please contact JOROTO Cus- tomer Support. Scan the Instagram QR Code to reach us online!... -
Page 3: Exploded-View & Parts List
EXPLODED-VIEW & PARTS LIST... -
Page 5: Safety Instruction
SAFETY INSTRUCTION Warning:Consult your GP before starting to exercise on this device. Should you want to exercise regularly and intensively, the approval of your GP would be advisable. This is especially crucial for users with health problems. 1. To avoid possible injury, read all instructions and warning labels before using this machine. - Page 6 10. Take care not to put your arms and legs near moving parts. Do not place any material in openings in the device. 11. Use the device only for the purposes described in these operating instructions. If the supply cord is damaged, it must be replaced by the manufacturer, its service agent, or simi- larly persons in order to avoid a hazard.
-
Page 7: Assembly Introduction
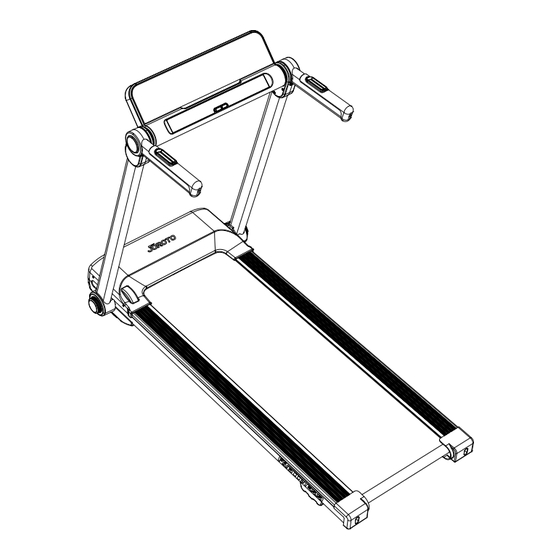
ASSEMBLY INTRODUCTION The following figure is a loose picture of the components installed on the whole machine. Open the packing box, and you can take out the following parts: Parts list: Hardware pack:... - Page 8 Step 1: Take out the Treadmill from the box.
- Page 9 Step 2: 1. Turn the knob on the left and right columns to loosen the inner and outer gears on both sides. 2.Rotate the column upward till the column baffle is fixed, tighten the knob to tight and fix the gear. 3.Rotate the armrest till the armrest is fixed.
- Page 10 Step 3: Plug the safety lock into the treadmill.
-
Page 11: Moving The Treadmill
MOVING THE TREADMILL... -
Page 12: Technical Specification
TECHNICAL SPECIFICATION Column Open Dimensions Nominal voltage 110V 57.8x28x44.2in Column Folded Dimensions Rated frequency 60Hz 57.8*28*8.2in Belt Size Continuous 1.0Hp 16.1*47.2in Net Weight Speed Range 0.6---8.5mph 83.7lbs Lifting Slope Max Load 265lbs None LED Display Speed Time Dis CAL Pulse Steps POWER GROUNDING INSTRUCTION Please refer the following picture. -
Page 13: Display Operation
DISPLAY OPERATION 1.OPERATION OF DISPLAY: “SPEED/PULSE” : Display speed data, the speed range is 0.6-8.5MPH (British system) / 1.0-14.0 KM/H(Metric system);When the trainer holds the heartbeat sensor handle with both hands for about 5 seconds, the product can automatically detect the pulse data of train- er and display it. -
Page 14: Key Function
2.KEY FUNCTION: 1. “START”:When the power is on and the safety lock is put on, press this to start the treadmill at 0.6MPH (British system) or 1.0KM/H (Metric system) after 3 seconds count down. 2. “STOP”: When treadmill is running, press this button to stop treadmill, all data remains still and display “PAU”. - Page 15 3. In the time countdown mode, press MODE to enter the distance countdown mode. The DIS displays “1.00” and blinks. Press “ SPEED+ ” “ SPEED- ” to set the distance. Range:0.50—99.9. 4. In the distance countdown mode,press “MODE” to enter calorie countdown mode. “CAL”...
- Page 16 PROGRAM TABLE (METRIC SYSTEM) 7. BODY DETECTION FUNCTION In the standby state, continuously press “PROGRAM” to enter the body detection function (FAT), and press “MODE” to enter the F-1, F-2, F-3, F-4, F-5 section (F-1-- gender, F-2 -- age, F-3 -- height, F-4 -- weight, F-5 -- body detection). Press “SPEED+” and “SPEED-” to set parameters from 01 to 04 (parameters in the following table).
- Page 17 9. RANGE OF EACH VALUE: 1.0 Power saving mode: This system has the power saving function. If there is no button pressed within 10 minutes in the standby state, the system will enter the power saving mode and automatically close the display.
-
Page 18: Starting Guidance
D. Check whether the power cable between the display and the motor is properly inserted. Remove the column to check each section of the connection cable between the display and the motor, and ensure that each wire core is fully inserted. If the communication power cable is bad (damaged or broken), reconnect or replace the cable. -
Page 19: Safety Training Instruction
SAFETY TRAINING INSTRUCTION Consult a medical provider or fitness specialist before starting any exercise. This is espe- cially important for individuals over the age of 35 or for those with health conditions.If you are a regular user of treadmill, when selecting a pace, you can choose a normal walking pace or a jogging pace.If you are inexperienced or unsure of the most appropriate test speed, follow these guidelines:... - Page 20 2. EXERCISES FOR THE SHOULDER AREA Lift the left and right shoulders alternately, or lift both shoulders simultaneously. 3. ARM STRETCHING EXERCISES Stretch the left and right arms alternately towards the ceiling. Feel the tension in your left and right side. Repeat this exercise several times.
-
Page 21: Maintenance
MAINTENANCE Warning: Unplug the power cord before cleaning or maintaining the treadmill Cleaning: Regular cleaning of the striding belt ensures a long product life. Wipe the console and other surfaces with a clean soft and damp cloth to remove sweat resi- dues. -
Page 22: Running Belt Adjustment
RUNNING BELT ADJUSTMENT You may need to adjust the running belt during the first few weeks of use. All running belts are properly set at the factory. It may stretch of off tne center after use. Stretching is normal during the break-in period. CENTERING THE BELT: Start the treadmill without anyone on the running belt, running the treadmill at about 3.8-4.9MPH. -
Page 23: App Operation
APP OPERATION 1) Search "KINOMAP" in the mobile app store to download the app. 2) After the download is complete, open the APP and register your personal information, turn on the Bluetooth of your mobile phone, and make sure that the monitor is powered on and awake. - Page 24 Select “JOROTO” Select “F5” Found Equipment 4) After the equipment is connected, choose the scene you like and start your workout!
- Page 25 FCC Warning Statement Changes or modifications not expressly approved by the party responsible for compliance could void the user’s authority to operate the equipment. This equipment has been tested and found to comply with the limits for a Class B digital device, pursu- ant to Part 15 of the FCC Rules.
- Page 26 Li’ang Health Science and Technology (Beijing) Co.,Ltd Email:support@jorotofitness.com...
Need help?
Do you have a question about the F5 and is the answer not in the manual?
Questions and answers