Table of Contents
Advertisement
Quick Links
DoorBell user manual
Updated January 15, 2025
DoorBell is a video doorbell with built-in AI, PIR sensor, and control via
apps. It features two-way voice communication, movement detection, and
object recognition. With the doorbell, users can view archived videos,
watch live streams, and talk with visitors near the device.
DoorBell is connected to the system via Wi-Fi and can be paired with a hub
as a backup communication channel. The recorded videos can be stored
on an Ajax NVR added to the same network or on the Ajax Cloud Storage
archive according to subscription (Ajax Cloud Storage will be available in
future releases).
Buy DoorBell
Functional elements
DoorBell
Advertisement
Table of Contents

Summary of Contents for AJAX Systems DoorBell
- Page 1 With the doorbell, users can view archived videos, watch live streams, and talk with visitors near the device. DoorBell is connected to the system via Wi-Fi and can be paired with a hub as a backup communication channel. The recorded videos can be stored...
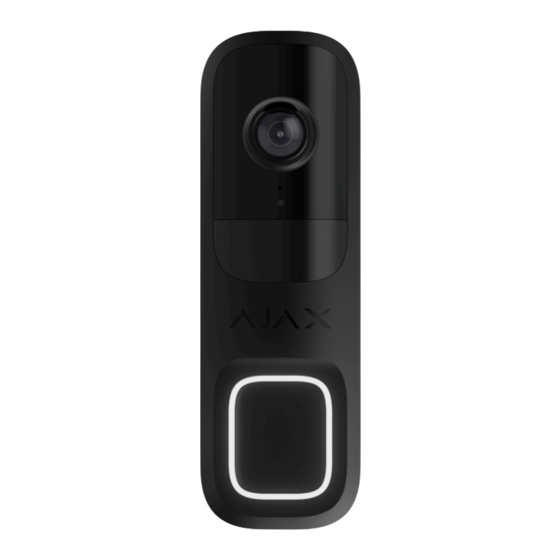
- Page 2 4. Ambient light sensor. 5. Motion sensor lens. 6. Circular LED indicator around the button. 7. Button to ring DoorBell. 8. SmartBracket mounting panel. To remove the panel, slide it down. 9. Holes to attach SmartBracket to the surface or the wedge bracket.
- Page 3 17. Holding screw. It is used to fix the device on the SmartBracket mounting panel. Wedge brackets 1. Wedge bracket to tilt DoorBell 10° down or up. 2. Wedge bracket to swivel DoorBell 25° right or left. 3. Holes to attach the wedge brackets to the surface.
-
Page 4: Operating Principle
To save the recorded videos, you need to add DoorBell to an Ajax NVR or activate the cloud archive. Ajax Cloud Storage will be available in future releases. -
Page 5: Video Wall
View the Video wall, which combines images from all connected cameras. Create video scenarios that send a short video from the selected camera to an Ajax app when the security detector is triggered. How to export video in PRO Desktop How to configure temporary camera video access Video scenarios An Ajax system allows the use of IP cameras for alarm verification. -
Page 6: Privacy Zones
In PRO Desktop, you can: 1. Switch between cameras. 2. Search for the desired camera by name. 3. Organize cameras by room, NVR, or group. 4. Manage a PTZ camera. 5. Save customized layouts for displaying video from cameras. 6. Change the order in which the camera video is displayed. Create templates for displaying videos in a slideshow How to use the video wall widget in PRO Desktop What keyboard shortcuts are available in PRO Desktop... -
Page 7: Firmware Update
The device can transmit alarms, events, and photo verifications using these protocols to keep you informed. However, live streams and archived recordings for the period when the Wi-Fi connection was lost will be unavailable. When DoorBell is added to the hub, it occupies one slot among hub devices. -
Page 8: Selecting The Installation Site
Learn more Selecting the installation site DoorBell is best placed outside the entrance to the premises or to the protected territory. This allows visitors to ring DoorBell and users to see and communicate with visitors, as well as to monitor the situation near the entrance. -
Page 9: Signal Strength
When choosing where to place DoorBell, consider the parameters that affect its operation: Wi-Fi signal strength. Jeweller and Wings signal strength. This is applicable if the device is paired with the hub. The presence of objects or structures that may obstruct the device’s view. -
Page 10: Installation
Consider installing the corresponding wedge bracket to adjust the device’s camera view. The complete set includes two wedge brackets: the first one tilts DoorBell 10° down or up, and the second one swivels DoorBell 25° right or left. To install the device: 1. - Page 11 6. Connect and firmly secure the wires to the terminals. For a reliable connection, use bundled wires with a U-type terminal. 7. Switch on the external power. Add DoorBell to the system 9. Place the device on the SmartBracket mounting panel. 10. Test the device operation and check the camera view angles.
- Page 12 14. Tighten the holding screw on the bottom of the device enclosure. The screw is needed for more reliable fastening and protection of the device from quick dismantling. Connecting to a wired chime To connect DoorBell to a wired chime, it is required to install BellKit according to the wiring scheme below.
-
Page 13: Adding To The System
To configure the wired chime connection, in an Ajax app: 1. Go to the Devices tab. 2. Select DoorBell from the device list. If it is connected to the network video recorder, select NVR and tap on Cameras. 3. Go to Settings by tapping on the gear icon two times. - Page 14 Before adding to the system, make sure you have checked the following: A Wi-Fi signal covers the DoorBell installation site. The DoorBell external power supply is switched on. You are near DoorBell with your smartphone with an Ajax app installed. You have the password to your Wi-Fi network at your fingertips.
- Page 15 Tap Add device to proceed. 6. Press the power button to switch on the device. Wait for DoorBell to enter setup mode. When the LED is flashing blue, tap Next to proceed: 1. If DoorBell has not been previously connected to your Wi-Fi network before, the device will activate the Access Point (AP) mode.
- Page 16 If DoorBell is already added to the space as a standalone device, you can easily pair it with an Ajax NVR. If not, refer to the Adding to the space section to know how to add DoorBell to the NVR or as a standalone device.
- Page 17 1. Go to the Devices tab. 2. Select DoorBell from the device list. If it is connected to the network video recorder, select NVR and tap on Cameras. 3. Go to Settings by tapping on the gear icon two times.
-
Page 18: Resetting To The Default Settings
DoorBell resetting is finished. The resetting can take up to 2 minutes. 3. Once the resetting is finished, DoorBell automatically enters setup mode Icons Icons in an Ajax app display some of DoorBell’s states. You can check icons in the Devices tab. - Page 19 Icon Meaning The extra services are activated according to the subscription. Wi-Fi signal strength. It displays the signal strength through the Wi-Fi communication channel. The recommended values are 2–3 bars. Backup channel signal strength. It displays the signal strength between the hub and the device.
- Page 20 The states include information about the device and its operating parameters. You can find DoorBell states in Ajax apps: 1. Go to the Devices tab. 2. Select DoorBell in the list. Parameter Meaning Tapping on opens the list of device malfunctions.
- Page 21 Failed to update firmware — the new firmware could not be installed. Tapping on opens more information about the device’s firmware update. Wi-Fi signal strength via Wi-Fi Wi-Fi signal strength communication channel. The recommended value is 2–3 bars. The device connection status to the internet via Wi-Fi: Online —...
- Page 22 The field is displayed when the device is added to the hub. Connection status on the Jeweller channel between the device and the hub (or the range extender): Online — the device is connected to the hub (or the range extender). Normal state.
- Page 23 Offline — the device is not connected to the range extender. The field is displayed if the device operates via the radio signal range extender. Displays the list of storage devices connected to DoorBell: Cloud (coming soon); Storage location NVR hard drive — data is recorded on the NVR hard disk.
- Page 24 Temperature out of range. The status of the device tamper that responds to detachment or opening of the device enclosure: Open — the device is removed from the SmartBracket mounting panel, or its integrity is compromised. Check the mounting of the device. Closed —...
- Page 25 Device ID. It is also available on the QR code Device ID on the device enclosure and its package box. Device number. This number is transmitted Device No. to the CMS in case of an alarm or event. Settings To change DoorBell settings, in an Ajax app:...
- Page 26 Name field. The name can contain up to 24 Latin characters or up to 12 Cyrillic characters. Selecting the virtual room to which DoorBell is assigned. Room The room name is displayed in the text of SMS and notifications in the events feed.
- Page 27 When armed Always The user can select the type of object, and when it’s recognized, a notification with video footage is received: Human Vehicle Any motion (pixel position change) Notifications from camera detectors Any motion (PIR sensor) You can also configure Interval in reporting similar events and select the armed mode that triggers the notifications: When camera armed...
- Page 28 Audio codec. Bit rate. Sample rate. Microphone gain — configure the microphone sensitivity level based on the installation location. Speaker volume — adjust the speaker volume for two-way voice communication. Switches the device to the firmware Firmware update updating mode if a new version is available. Opens a menu with Connection settings: Wi-Fi —...
- Page 29 Available if the device is paired with the hub. Allows the user to describe a problem and Report a problem send a report. Opens the DoorBell user manual in an Ajax User guide app. Unpairs the device from the NVR to which it was paired.
-
Page 30: Detection Settings
Erases all device settings and deletes the device from the space. Also, it unpairs the Delete device device from the NVR and the hub if such connections are set up. Detection settings Settings Meaning When the option is enabled, the device uses PIR sensor for motion detection the built-in PIR sensor for motion detection. - Page 31 Adjust activity zone — defines the specific area within the field of view where the camera should detect motion. Sensitivity threshold — defines the device’s sensitivity to the motion in the activity zone. Area occupied by detectable objects — specifies the size of the area in the camera’s field of view that a moving object should occupy for the device to be triggered.
-
Page 32: Video Stream Settings
Video stream settings Settings for mainstream and substream parameters. Settings Meaning Mainstream Selecting the video compression standard: Video codec H.264 Selecting the mainstream resolution: 1024 × 576 1920 × 1080 Resolution 2304 × 1296 2560 × 1440 2688 × 1520 Selecting the frame rate: from 3 to 25 with Frame rate an increment of 1 frame/s. -
Page 33: Image Settings
H.264 Selecting the substream resolution: 720 × 480 Resolution 720 × 576 1024 × 576 Selecting the frame rate: from 3 to 25 with Frame rate an increment of 1 frame/s. Selecting the bit rate type: Variable (VBR) Bit rate type Constant (CBR) Bit rate Setting the bit rate in kbit/s. - Page 34 Enabling or disabling the WDR. When WDR is enabled, it helps to enhance Wide dynamic range (WDR) the camera images, with too dark or bright areas. Selecting the camera vision mode depending on the light conditions: Day — IR backlight is always off. Day/Night mode (IR-cut filter) Night —...
-
Page 35: Service Settings
This setting is available if Infrared illumination (IR) is set to Custom. Service settings Settings Meaning Time zone selection. Time zone It is configured by a user and is displayed when a user views video from the camera. When the option is enabled, the device LED flashes if motion is detected by the PIR sensor. - Page 36 Indication Depending on the device status, the DoorBell LED indicator may light many colors with different patterns. Event Indication Note The LED lights up green for Turning on the device. about 2.5 s. The LED lights up orange The indication lasts until the The device is starting up.
- Page 37 Tamper alarm when the The LED flashes red The indication lasts until the system is armed. continuously. user disarms the system. Downloading a new The LED lights up green firmware version of the twice and goes out every 3 device. The device firmware is The LED lights up green The indication lasts until the...
-
Page 38: Maintenance
All technical specifications Compliance with standards Warranty The warranty for the products of the “Ajax Systems Manufacturing” Limited Liability Company is valid for 2 years after purchase. If the device does not operate properly, we recommend contacting support service first, as most technical issues can be resolved remotely. - Page 39 User Agreement Contact Technical Support: email Telegram Manufactured by “AS Manufacturing” LLC Subscribe to the newsletter about safe life. No spam Email Subscribe...
Need help?
Do you have a question about the DoorBell and is the answer not in the manual?
Questions and answers