Advertisement
Quick Links
-------------------------------------------------------------------------------------------------------------------------------------------------------------------
RADIOCOMANDI 4-6 CANALI HCS 433.92 MHz
4-6 CHANNEL KEYFOBS HCS 433.92 MHz
Descrizione
TX 6 AB LORA è un radiocomando meccanicamente robusto bidirezionale a
lungo raggio con codifica a codice variabile basato sulla tecnologia LoRa. In
combinazione con il decoder RX-2CH-LORA, può gestire due uscite relè in
modalità bistabile, monostabile o timer e ricevere lo stato di attivazione dei
relè. È ideale per controllare e rilevare l'uscita di carichi distanti dall'utente e/o
attivare allarmi.
Description
TX 6 AB LORA is a rugged bidirectional long-range radio remote control with
variable code encoding based on LoRa technology. In combination with the
decoder RX-2CH-LORA, it can manage two relay outputs in bistable,
monostable, or timer mode and receive the activation status of the relays. It's
ideal for controlling and monitoring output of loads distant from the user
and/or trigger alarms.
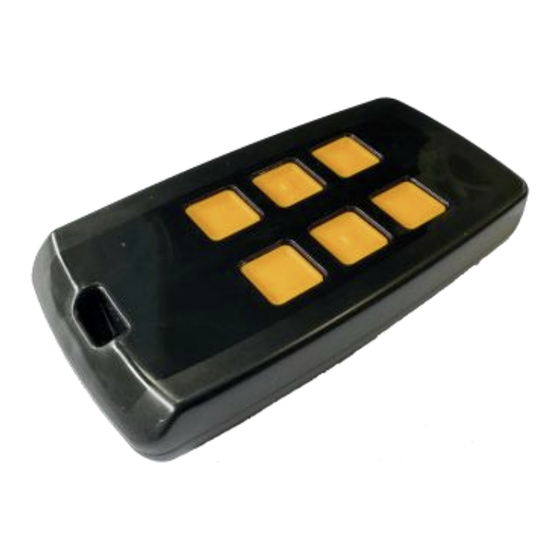
Funzione Pulsanti e Led
Ogni pulsante ha un peso binario diverso e può essere associato singolarmente
ad un canale della ricevente Aurel del "RX-2CH-LORA". Alla pressione del
pulsante il radiocomando invia il messaggio radio, riceve l'ack di conferma, il
led di stato segnala l'esito dell'operazione.
Clonazione radiocomando: Mantenedo premuti per più di 2 secondi i
pulsanti P1 e P2, il trasmettitore già associato ad un "RX-2CH-LORA" permette
alla stessa di entrare in modalità clonazione. A tal fine vericare il manuale
d'uso del "RX-2CH-LORA".
STATUS LED
Il comportamento del LED di stato dipende dall'impostazione della modalità
di uscita nel decoder:
1.
Uscita impulsiva: il LED lampeggia rapidamente in verde dopo
circa 200 ms se il comando è stato ricevuto e diventa rosso se non
è stato ricevuto.
2.
Uscita bistabile: il LED rimane verde fisso (per 2 secondi) se
l'uscita è attiva, rosso fisso (per 2 secondi) se l'uscita è inattiva e
lampeggia rapidamente se il comando non riceve un ACK dal
decoder.
LED batteria: lampeggia in rosso quando la batteria è scarica (<2,4 V).
La batteria deve essere sostituita il prima possibile.
Buttons and LED Functions
Each button has a different binary code and can be uniquely associated with a
channel of the Aurel receiver "RX-2CH-LORA." Multiple buttons pressed
together is not supported.
When a button is pressed, the remote control sends a radio message, receives
an acknowledgment (ACK) confirmation, and the status LED indicates the
result of the operation.
Remote Control Cloning: By holding down buttons P1 and P2 for more than
2 seconds, the transmitter already associated with an "RX-2CH-LORA" allows it
to enter cloning mode. For complete cloning procedure, refer to the user
manual of the "RX-2CH-LORA."
-----------------------------------------------------------------------------------------------------------------------------------------------------------------------------------------
Aurel S.p.A via Foro dei Tigli 4, 47015 Modigliana (FC) ITALY
Tel:(+39)0546941124, Fax:(+39)0546941660, http: www.aurelwireless.com
Manuale istruzioni – user manual
BATTERY LED
P1
P2
P3
P4
P5
P6
The behaviour of the Status LED depending of the output mode setting in the
decoder:
1.
Pulse output: The LED flashes green quickly after about 200 ms if
the command has been received, and turns red if it has not been
received.
2.
Bistable output: The LED stays solid green (for 2 seconds) if the
output is active, solid red (for 2 seconds) if the output is inactive,
and flashes quickly if the command does not receive an ACK from
the decoder.
Battery LED: it blink red color when the battery is low level (<2,4V).
The battery needs to be change as soon as possible.
Caratteristiche tecniche – Technical features
DESCRIZIONE - DESCRiPTION
Frequenza portante RF – RF carrier frequency
Banda Europea ISM – European ISM Band
Tensione di funzionamento – Supply voltage
Assorbimento in Trasmissione
Supply current (Tx mode)
Assorbimento in Ricezione
Supply current (RX mode)
Assorbimento in stand-by (pulsanti aperti)
Supply current (Stand by mode)
Potenza ERP
ERP power
Modulazione - Modulation
Potenza irradiata spurie 1GHz
Radiated power spurious <1GHz
Potenza irradiata spurie >1GHz
Radiated power spurious >1GHz
Codifica - Encription
Tipo Batteria Litio 3V – Lithium 3V battery model
Materiale contenitore e tasti – Enclosure material
Tool cambio batteria – Battery replacement tool
Temperatura di funzionamento – Operating temperature range
Tabella 1 – Table 1
Sostituzione della batteria
Sostituire la batteria quando il led batteria si accende rosso durante la
trasmissione.
In tal caso la batteria ha raggiunto il valore di 2,3V, si raccomanda la
sostituzione immediata in modo da evitare disservizi all'utente causati
dall'arresto del trasmettitore al valore di 2,1V.
Procedura sostituzione batteria:
1. Rimuovere la vite: Mediante cacciavite a stella rimuovere la vite
accesibile nella parte posteriore del radiocomando (fig.1 – Tab.2).
2. Far leva nei punti fig.2: Inserire 2 cacciaviti a taglio nei punti indicati in
figura 2, quindi fare leva contemporaneamente verso l'esterno del contenitore.
3. Aprire il contenitore: Sollevare il coperchio inferiore del radiocomando
quindi separare i due semigusci.
4. Rimuovere copri tasti: Con un cacciavite a taglio, eseguire leva come in
figura 3, tra il copri tasti e il guscio inferiore in modo da separare le 2 parti.
5. Rimuovere il circuito TX: Estrarre il circuito trasmettitore dal guscio
inferiore.
6. Rimuovere la batteria: Estrarre la batteria, facendo pressione nella
direzione indicata in fig.4 Tab.2.
7. Inserire batteria: Inserire la nuova batteria avendo cura di controllare
modello (tipo Litio CR2450) e polarità. Il polo positivo deve essere rivolto
verso l'alto come mostrano nelle fig.5-6 Tab.2.
8. Riassemblare il contenitore: Chiudere il trasmettitore ripetendo a ritroso
i punti 1-2-3-4.
Battery Replacement Instructions
Replace the battery when the battery red LED switch-on during transmission.
At this point, the battery has reached a voltage of 2.3V, the replacement is
recommended as soon as possible.
Battery Replacement Procedure:
1. Remove the screw: Using a Phillips screwdriver, remove the screw
located on the back of the remote control (refer to Fig.1 – Tab.2).
TX 6 AB LORA
650201638G
TYP. VALUE
869,525
MHz
869,4 – 869,65
MHz
2,1-3,3
Volts
45
mA
16
mA
0,5
uA
7
dBm
LORA
-40
dBm
-30
dBm
Keeloq
CR2450
ABS
Cacciavite a croce e taglio
Phillips and flat
screwdriver
-10+55
°C
12/12/2024 - Rev.1
Advertisement

Related Manuals for AUREL TX 6 AB LORA

Summary of Contents for AUREL TX 6 AB LORA
- Page 1 Supply current (RX mode) Description Assorbimento in stand-by (pulsanti aperti) TX 6 AB LORA is a rugged bidirectional long-range radio remote control with Supply current (Stand by mode) variable code encoding based on LoRa technology. In combination with the Potenza ERP...
- Page 2 Manufacturer's Declaration of Conformity EU indicated in Fig.2, and simultaneously pry outward to open the casing. Hereby, Aurel S.p.A. declares that the radio equipment type TX 6 AB LORA is 3. Open the enclosure: Lift the bottom cover of the remote control and in compliance with Directive 2014/53/EU.
Need help?
Do you have a question about the TX 6 AB LORA and is the answer not in the manual?
Questions and answers