Advertisement
PRODUCT SPECIFICATION
| Model | AMR516 |
| Rated voltage | 120V~ |
| Rated power | 400W |
| Rated frequency | 60Hz |
| Continual juicing time | ≤ 2 min. |
| Time interval | ≥ 2 min. |
| Net weight | 5.84LB |
| Unit size(D*W*H) | 14.6*7*16 in |
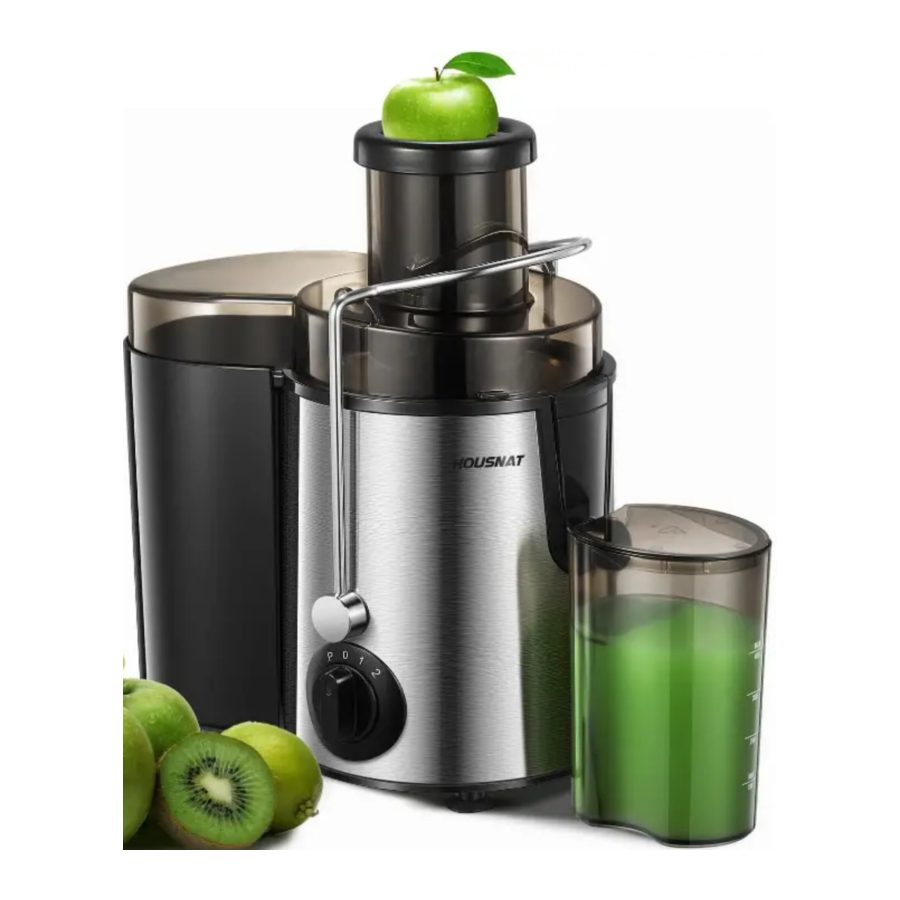
ACCESSORIES AND THEIR FUNCTIONS

| No. | Part | Function |
| 1 | Food pusher | For gently pushing the food materials in food material feeding to ensure full contact between the food materials and the juice strainer and prove the juicing efficiency |
| 2 | Juicer cover | For connecting with the main unit. As a key part for juicing, it realizes safety protection. |
| 3 | Juice strainer | For cutting food materials by the cutter holder at its bottom and filtering juice and separating fruit residues by the lateral strainer |
| 4 | Motor wheel | For connecting the juice strainer and making the juice strainer align automatically for convenient handling |
| 5 | Middle ring | For discharging the juice separated by the juice strainer by means of pressing |
| 6 | Juice cup cover | Put cover on the juice cup to keep foreign body out when accepting juice |
| 7 | Froth separator | To separate the fruit juice from foam |
| 8 | Juice container | A container for accepting juice, easy for cleaning |
| 9 | Knob switch | For controlling the operating status (including inching, low speed, and high speed) of the product |
| 10 | Motor base | As a main part of the product, it contains parts such as motor and serves as the power source of the product |
| 11 | Interlocking safety arm | A key component for starting the safety switch, locking the body and header to allow the machine under normal working condition |
| 12 | collector | For collecting the fruit residues separated by the juice strainer by means of pressing |
| 13 | Cleaning brush | Convenient for cleaning |
OPERATING INSTRUCTIONS
Clean its parts in contact with food materials thoroughly before using the product for the first time (see the content of "Maintenance").

| "P" | Controlled processing & burst of power - Press to pulse and release to control juicing |
| "0" | For stopping |
| "1" | A low-speed gear for processing soft fruits and vegetables such as watermelon, tomato, cucumber and strawberry |
| "2" | A high-speed gear for processing all fruits and vegetables (see "Recipe" for the selection of fruits, vegetables and gears) |
Use of product
The product is designed with a dual-action safety system and can run after all parts are correctly installed. Install and use the product following the steps below.
Juicing
 | 1 | Install middle ring on the body. Proper installation is required. |
 | 2 | Put the juice strainer into the middle ring and properly install it on the motor wheel (before use, check whether the juice strainer is damaged and if it is, do not use the product but contact our customer service at once). |
 | 3 | Install the pulp collector. |
 | 4 | Put the juicer cover right above on the body and properly install it as per the direction indicated on the header. |
 | 5 | Put the pulling rod inside the two grooves of header until completely in place, or the product will not work normally. |
 | 6 | Allow the froth separator slide in the juice container along the neck, put on the cup cover. |
 | 7 | Put juice container under the outlet. |
 | 8 | Align the groove of pushing rod with the flange inside the feeding port and put the pushing rod inside the feeding port. |
 | 9 | Connect the power supply and prepare for run. (Make sure the switch is off before connecting the power supply). |
 | 10 | Clean fruits and vegetables and cut them into blocks suitable for the food material inlet (Please remove hard seed or, shells or thick skins of the fruits and vegetables before juicing). |
 | 11 | Activate the switch, start working with working time mins. |
 | 12 | Put the prepared fruit and vegetable in the feeding port. |
 | 13 | Push the blocks of fruit and vegetable gently through the feeding port with pushing rod. Too excessive force will affect the juicing effect. (Never put your fingers or other objects inside the feeding port!) |
 | 14 | When there is no longer juice flowing via the juice outlet after good material processing, make the switch off, disconnect the power supply and take the juice cup from the juice nozzle after the motor and the juice strainer have both stopped running (drink the juice at once, otherwise its taste and nutrition will be both influenced after some time of exposure in air). |
 | 15 | Take the juice cup away from the outlet nozzle when the motor and juicing screen has completely stopped. The Froth separator attached to juice cup may help you with a cup of foamless juice. The baffle may be neglected if the juice with foam is required. |
MAINTENANCE
- Make the power switch off before cleaning the product.
- Clean the product promptly after use.
- Exterior of main unit of the product may be wiped by wet cloth. Do not place main unit of the product into water or other liquids, or flush it with water or other liquids.
- Put the product in a dry place without direct ultraviolet rays.
- Make sure the product is clean and dry before keeping it.
- Clean the detachable parts following the steps below.
 | 1 | Take down the pushing rod. |
 | 2 | Pull open the pull rod from right direction and take off the header. |
 | 3 | Remove the juice strainer and the middle ring in order etc. |
 | 4 | Clean with water the pulp collector, middle ring, juicing screen and juice container successively. |
FAULT ANALYSIS AND ELIMINATION
| Fault | Possible cause | Elimination |
| After the power supply is connected and the switch is made on, the product does not run |
|
|
| There is a bad smell from the motor in the first few times of use of the product | It is normal | If the bad smell still exists after the product has been used for several times, contact us customer service. |
The product stops automatically in use |
|
|
There are many residues in juice |
|
|
The product has abnormal vibration or big noise |
|
|
There is a little juice |
|
|
The cutter holder is seized | The cutter holder is wound or seized by food materials. | Disconnect the power supply, take out the food materials and cut them into smaller blocks. |
Notes:
The table above introduces the common faults and their cause analysis and elimination methods. For other faults, contact our customer service department. Do not dismantle or repair the product by yourself.
PRECAUTIONS FOR SAFE USE
- Make sure the product has an input voltage of 120V~ 60Hz before use.
- Disconnect the power supply before dismantling, assembling or adjusting any part.
- The product has Y type connection. If the power cable is damaged, contact our customer service department. It is dangerous to dismantle and repair the product by yourself.
- Before use, check whether any parts such as the power cable or the plug is damaged and, if it is, stop using the product and contact our customer service department promptly. It is dangerous to dismantle and repair the product by yourself.
- If product maintenance is necessary in use, contact our customer service department. It is dangerous to dismantle the product by yourself.
- Before connecting the power supply, make sure detachable parts such as the juice strainer and the top cover are all properly installed.
- When the product is running, never put hands or sharp articles into its feed opening, or replace the pushing rod with any object, or have eyes close to the feed opening or else accidents may happen.
- Keep the juice strainer or motor wheels from the operator's body and other hard foreign matters when the product is running to avoid personal injuries and product damage.
- After juicing, do not dismantle the detachable parts of the product until the motor and the juice strainer have both stopped and the power supply has been disconnected.
- Operate with the rated operating time strictly: Juice continually for 2 minutes at most each time. After end of any function above, stop for 2 minutes to end a cycle. Stop for 15 to 20 minutes after 3 successive cycles and start again after the motor has cooled down. This practice can prolong life of the product.
- If the product stops running in use, it is possibly caused by temperature protection of the motor. Disconnect the power supply for cooling and use the product 15 to 20 minutes later.
- To avoid heat caused deformation and damage, do not disinfect any accessories in hot water above 800 or microwave ovens. Materials of the parts in contact with food materials should be clean, hygienic, reliable and in compliance with relevant food hygiene certification.
- Do not place main unit of the product into water or other liquids, or flush it with water or other liquids (it can be wiped by soft cloth).
- Do not clean the product with steel wool, abrasive cleansers or corrosive liquids (such as gasoline or acetone).
- Put the product in a place out of reach of children. Use or play of the product by persons with disabled limbs or sensory or mental disorders or by persons without relevant experience or knowledge (including children) is forbidden.
- Do not process any fruits or vegetables with cores, hard seeds or shells or thick skins until their cores, hard seeds or shells or thick skins have been removed.
- The product is suitable for individuals or families only.
Should you have any questions or concerns regarding your new product, please reach out to us at service@housnat.cc
Documents / ResourcesDownload manual
Here you can download full pdf version of manual, it may contain additional safety instructions, warranty information, FCC rules, etc.
Advertisement


Need help?
Do you have a question about the AMR516 and is the answer not in the manual?
Questions and answers