Advertisement
Quick Links
Advertisement

Subscribe to Our Youtube Channel
Related Manuals for Bosch HAC-WAS


Summary of Contents for Bosch HAC-WAS
- Page 1 Washer Kit HAC-WAS Installation Manual...
- Page 3 Connecting the UPH Pan/Tilt 4.2.3 Installing the Pump (HAC-WAS20-05, HAC-WAS20-50) 4.2.4 Installing the Pump (HAC-WAS30-50) Installing the Washer to the UPH 4.3.1 Washer Installation Examples Fuse Replacement Technical Data Dimensional Drawings Bosch Security Systems, Inc. Installation Manual F.01U.206.249 | 2.0 | 2010.12...
- Page 4 Please dispose of these units at an environmentally compatible recycling facility, per European Directive 2002/96/EC. This user guide is the intellectual property of Bosch Security Systems; protected by copyright. Contact: www.boschsecurity.com F.01U.206.249 | 2.0 | 2010.12...
- Page 5 Bear in mind that if the material has to be returned due to a fault, using the original packaging for its transport is strongly recommended. Bosch Security Systems, Inc. Installation Manual F.01U.206.249 | 2.0 | 2010.12...
- Page 6 Attach the metal cage (item 1, below) firmly to a wall using the four (4) holes provided for this (item 2). HAC-WAS05-20 HAC-WAS05-50 HAC-WAS30-50 Remove the cap from the tank with the corresponding pump or level controller. Remove the tank from the metal cage. F.01U.206.249 | 2.0 | 2010.12 Installation Manual Bosch Security Systems, Inc.
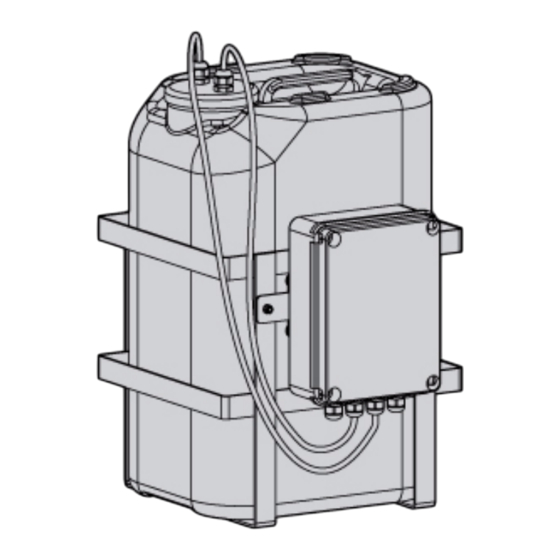
- Page 7 The power supply cable should also be covered by the silicone sheath supplied for this purpose, and fastened with the corresponding tie. Furthermore, all signal cables must be grouped together by means of a strap. Line Earth Neutral Bosch Security Systems, Inc. Installation Manual F.01U.206.249 | 2.0 | 2010.12...
- Page 8 Fill the tank with water and insert it in the metal cage. Insert the pump in the tank and tighten the cap. The system is ready to be powered. F.01U.206.249 | 2.0 | 2010.12 Installation Manual Bosch Security Systems, Inc.
- Page 9 Check the delivery hose coupling for the pump (item 3) to make sure a small quantity of water comes out. Connect the delivery hose. The system is ready to be powered. Bosch Security Systems, Inc. Installation Manual F.01U.206.249 | 2.0 | 2010.12...
- Page 10 (item 2) from the coupling, insert it into the pipe and insert the end of the pipe on the nosecap (item Lock the nut to the coupling. F.01U.206.249 | 2.0 | 2010.12 Installation Manual Bosch Security Systems, Inc.
- Page 11 Lock the coupling using the hose clip (item 4) supplied and connect the delivery hose (item 5). To calibrate the jet direct the nozzle towards the glass of the housing. To operate the washer, refer to UPH Series Installation Manual. Bosch Security Systems, Inc. Installation Manual F.01U.206.249 | 2.0 | 2010.12...
- Page 12 | Assembly and Installation Washer Kit 4.3.1 Washer Installation Examples Figure 4.1 Example of installation with wall bracket Figure 4.2 Pipe fixed directly to the wall through the plate F.01U.206.249 | 2.0 | 2010.12 Installation Manual Bosch Security Systems, Inc.
- Page 13 301 x 635 x 269 mm (11.8 x 25.0 x 10.6 in.) Reservoir Capacity 23 l (6 gal) Delivery Head Maximum 30 m (98 ft) Tube Length 30 m (98 ft) Power Consumption 600 W maximum Waterproofing IP45 Bosch Security Systems, Inc. Installation Manual F.01U.206.249 | 2.0 | 2010.12...
- Page 14 | Dimensional Drawings Washer Kit Dimensional Drawings HAC-WAS05-20, HAC-WAS05-50 (13.70) (11.85) (7.87) (10.59) (in.) HAC-WAS30-50 (11.85) (10.59) (7.87) (in.) F.01U.206.249 | 2.0 | 2010.12 Installation Manual Bosch Security Systems, Inc.
- Page 16 Bosch Security Systems, Inc. 850 Greenfield Road Lancaster, PA 17601 U.S.A. www.boschsecurity.com © Bosch Security Systems, Inc., 2010...
Need help?
Do you have a question about the HAC-WAS and is the answer not in the manual?
Questions and answers