Advertisement
Quick Links
Advertisement

Related Manuals for ROCKRIDER E-EXPL500S 2024

Summary of Contents for ROCKRIDER E-EXPL500S 2024
- Page 1 EN - INSTRUCTIONS E-EXPL500S Date of last update : V2 - 13/07/2024...
- Page 2 TABLE OF CONTENTS LES BONNES PRATIQUES POUR PROFITER PLEINEMENT DE VOTRE VAE ....... 3 PRODUCT DESCRIPTION ........................4 GENERAL OPERATION OF THE ELECTRICAL ASSISTANCE ............4 SCREEN AND CONTROL ELEMENTS ....................5 MOTOR ............................... 11 BATTERY AND CHARGER ........................ 11 SAFETY INFORMATION ........................
- Page 3 Electrically assisted bicycles are heavier than classic pushbikes. Without assistance, pedalling can be harder. Always make sure that you can complete the whole journey without using the electrical assistance, in the event of a breakdown. Here is what you need to do to get the most out of your ROCKRIDER e-bike. PLEASE NOTE, THESE INSTRUCTIONS ONLY REFER TO THE BIKE’S ELECTRIC FEATURES.
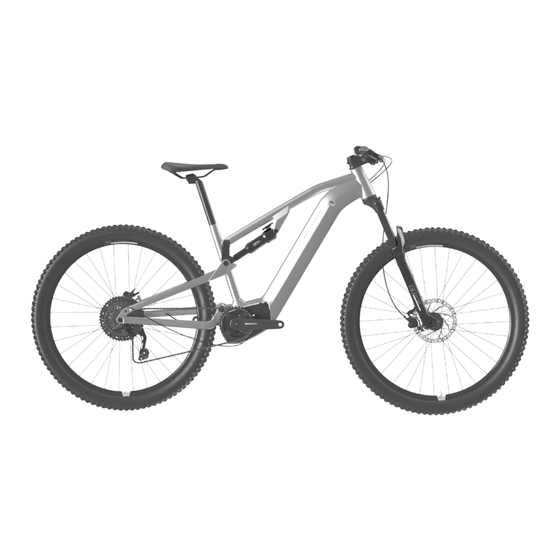
- Page 4 PRODUCT DESCRIPTION ELECTRICALLY-ASSISTED BIKE TECHNICAL FEATURES Battery Control screen Speed Sensor Assistance mode control Controller and motor Battery unlocking cylinder GENERAL OPERATION OF THE ELECTRICAL ASSISTANCE The electric bicycle can be used with or without assistance by pressing the ON/OFF button and playing around with modes 1 / 2 / 3 / 4 / AUTO. Assistance modes modes 1 / 2 / 3 / 4 / AUTO, which you can select via the «D»...
- Page 5 SCREEN AND CONTROL ELEMENTS DESCRIPTION OF SCREEN AND FUNCTION Assistance mode : «1» mode is the default assistance mode when the screen is switched on. The motor power adapts according to the selected mode The motor power according to the modes is defined below: Mode % of electrical assistance contribution + 40%...
- Page 6 AUTOMATIC MODE Getting started Flat Slope Ascent Descent The assistance mode of your bike will vary automatically according to your conditions of use (speed, torque, spin, slope, etc.). Speed Torque Spin Angle...
- Page 7 NAVIGATING THE ASSISTANCE MODES 1’’ 1’’ 17:30 17:30 km/h km/h speed speed trip trip 1234 1234 1’’ 1’’ +40% +80% 1’’ 17:30 17:30 km/h km/h speed speed trip trip 1234 1234 1’’ +120% +280% LIGHTING ACTIVATION/DEACTIVATION 17:30 17:30 00:00 17:30 LIGHTS LIGHTS km/h...
- Page 8 BATTERY LEVEL 00:00 km/h speed U03 FAILED trip 00000 BATTERY LIFE MODE 1 - 80km MODE 2 - 60km MODE 3 - 48km MODE 4 - 40km MODE 1 - 53km MODE 2 - 40km MODE 3 - 31km MODE 4 - 25km MODE 1 - 36km MODE 2 - 25km MODE 3 - 20km...
- Page 9 INFORMATION SELECTION 1’’ 1’’ 1’’ 1’’ 1’’ 1’’ 1’’ Trip Time User-generated power (in W) Cadence User/electrical power ratio Remaining battery in km Total distance Electrical power (in W) SMARTPHONE CHARGING USB A (1A max)
- Page 10 RESET ≥ 3’’ ≥ 3’’ ADJUSTMENTS AND DIAGNOSTICS 3’ ’ From all screens 1’ ’ 1’ ’ Choice of language 1’ ’ 1’ ’ 1’ ’ 1’ ’ Setting the time 1’ ’ 1’ ’ 1’ ’ 1’ ’ 1’ ’ Date settings 1’...
- Page 11 MOTOR The motor «C» of your power-assisted bike is a brushless-type motor with mechanical reduction, which means you can have high torque and less resistance (quieter motor). The A-weighted emission sound pressure level at the driver ears is less than 70 dB(A). Motor power is limited to 250 W maximum. BATTERY AND CHARGER BATTERY PROPERTIES AND WARRANTY All batteries in our electric bikes use Lithium-Ion cell technology and have no memory effect.
- Page 12 Do not dispose of the battery in non-suitable containers. Return the used battery to your Decathlon store for recycling. Risk of fire. Risk of electrocution. Handle with care. Impact sensitive. Never short-circuit the battery by connecting the positive and negative terminals. Never allow children to play with or handle the battery.
- Page 13 INSERTING AND REMOVING THE BATTERY Installation: CLIC Before inserting your battery in its housing, make sure that the lock is in the open position and does not interfere with the insertion of the battery. Removal: Remember to unlock your battery before removing it from its housing. RECHARGING THE BATTERY Start of charging red LED.
- Page 14 MAINTENANCE AND LIFETIME (WARRANTY CONDITIONS) Do not store the discharged battery (1 flashing blue LED) to avoid deep discharge, which may cause it to malfunction. In cases of extended storage, recharge the battery once every 3 months. 100% Your battery is guaranteed for 2 years or 500 charge and discharge cycles (1 cycle = 1 charge from 0% to 100% + 1 discharge from 100% to 0% or 1 cycle = 2 charges to 50%) subject to compliance with good conditions of use and storage.
- Page 15 Always carry out maintenance operations in sufficient light. Warning, in the event of wheel removal, you must ensure the direction of rotation of your wheel is correct. Before each use you must make sure that your brakes and electric system are working properly. 2020 Km/h The weight, power, manufacturing year and maximum speed are indicated on your bicycle’s frame.
- Page 16 MAINTENANCE Please note that the maintenance of electrical components is a specialised job which cannot be carried out in store, and it should be done in a regional Decathlon workshop and may take several days. All cleaning, and electrical or mechanical maintenance must be carried out with the power switched off and the battery removed from bike! Maintenance operations specific to the bike’s electric system must be performed by trained and qualified staff.
- Page 17 DISPLAYS ERROR CODE ON THE CONTROL SCREEN ERROR km/h ENGINE vitesse distance parcourue Error code Definition Solutions Undervoltage protection Charge the battery > Battery diagnosis > HS > Change the battery Battery completely discharged. Temperature sensor error (-20°C) Restart the bike > If the error occurs on a resting motor > Replace the motor Temperature sensor error (+125°C) Check the motor connectors.
- Page 18 Program manipulation Motorised unit program error Restart the bike > Complete bike diagnosis. Wrong motor parameter Undetected trigger Check the trigger connections. > Replace the trigger. Trigger voltage error Trigger reset failure Check if nothing is preventing the return to zero position > Restart the bike > Replace the trigger. Programming error Restart the bike >...
- Page 19 APPENDIX 1: COMPONENT TIGHTENING TORQUE Component Tightening torque Seat collar Bell immobile Headset Compression No Loose / No hard point Fork/Stem 6 N.m +/-1 N.m Display immobile Grip - handlebar immobile Handlebar - stem 7 N.m +/-1 N.m Seat post - saddle 19 N.m +2/-2 N.m Disc screw 5 N.m +/-1 N.m...
- Page 20 CONTENTS OF THE COMMERCIAL WARRANTY FOR YOUR ELECTRICALLY-ASSISTED BIKE Please keep your receipt safe as proof of purchase. The bike has a lifetime warranty that covers its structural components (frame, handlebar and stem, and saddle-pillar) and a 2 year warranty for wear parts. The warranty does not cover damage caused by improper use, non-compliance with safety precautions, accidents, or incorrect or commercial use of the bike.
- Page 21 https://www.decathlon.it/ https://www.decathlon.de/ https://www.decathlon.fr/ https://www.decathlon.be/ https://www.decathlon.bg/ https://www.decathlon.cz/ https://www.decathlon.es/es/ https://www.decathlon.hr/ https://www.decathlon.nl/ https://www.decathlon.pl/ https://www.decathlon.pt/ https://www.decathlon.ro/ https://www.decathlon.se/ https://www.decathlon.sk/ https://www.decathlon.si/ https://www.decathlon.com.gr/ https://www.decathlon.at/ https://www.decathlon.mt/ https://www.decathlon.ie/ https://www.decathlon.lv/lv/ https://www.decathlon.be/fr/luxembourg_lp-NZHTVF https://www.decathlon.ee/ https://www.decathlon.ch/ https://www.decathlon.co.il/en/ https://www.decathlon.com/ https://www.decathlon.com.hk/en/ https://www.decathlon.in/ https://www.decathlon.co.uk/ https://www.decathlon.rs/ https://www.decathlon.sg/ https://decathlon.com.au/ https://www.decathlon.ca/ https://www.decathlon.com.br/ https://www.decathlon.com.tr/...
Need help?
Do you have a question about the E-EXPL500S 2024 and is the answer not in the manual?
Questions and answers