
Summary of Contents for Perfect-10 P10 VK-1604
- Page 1 Step 1 Order #XXXXX - P10 Workstation VK-1604 - General Layout 866.652.2100 Plan View WHEN DISASSEMBLING ALUMINUM EXTRUSION, TIGHTEN ALL SETSCREWS AND LOCKS TO PREVENT LOSS DURING SHIPPING © 2014 w w w . c l a s s i c e x h i b i t s . c o m Page 1 of 3...
- Page 2 Step 1 Order #XXXXX - Workstation Assembly 866.652.2100 Part Number Description Left Leg Assembly Right Leg Assembly Horizontal Extrusion Horiontal Extrusion w/ Door Stopper D (w/ Door Stopper) Knobs face INSIDE of workstation Steps: 1) Connect lower horizontal extrusion [C] between bottom of leg assemblies [A and B] as shown. 2) Insert Laminated infill into grooves of leg assemblies [A and B].
- Page 3 Step 2 Order #XXXXX - Workstation Assembly (Cont’d) 866.652.2100 Part Number Description Horizontal Extrusion Horizontal Extrusion Place internal shelf into Steps: workstation then 1) Attach horizontal extrusion [E] between vertical leg assemblies [A and B] as shown below. place counter atop 2) Insert Laminated infill into grooves of vertical leg assemblies [A and B].
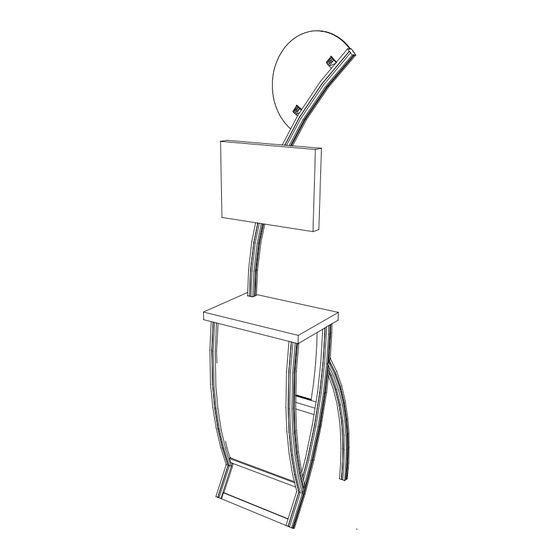
- Page 4 Step 3 Order #XXXXX - Workstation Assembly (Cont’d) 866.652.2100 Part Number Description Curved Montior Mount Extrusion Steps: 1) Slide connection bar into lower leg assembly. Slide upper vertical over bar and secure both. 2) Attach flag to A10’s located on curved vertical extrusion G. 3) Attach monitor mount to vertical as shown in detail below.
- Page 5 Step 4 Order #XXXXX - P10 Workstation - Case Packing Instructions 866.652.2100 Top View of Each Level Horiz. Extrusion E Horiz. Extrusion F Monitor Mount Internal Shelf Leg Assembly Leg Assembly Inserts Counter Door Level 4 Level 1 Level 2 Level 3 Level 5 WHEN DISASSEMBLING ALUMINUM EXTRUSION, TIGHTEN ALL...
Need help?
Do you have a question about the P10 VK-1604 and is the answer not in the manual?
Questions and answers